
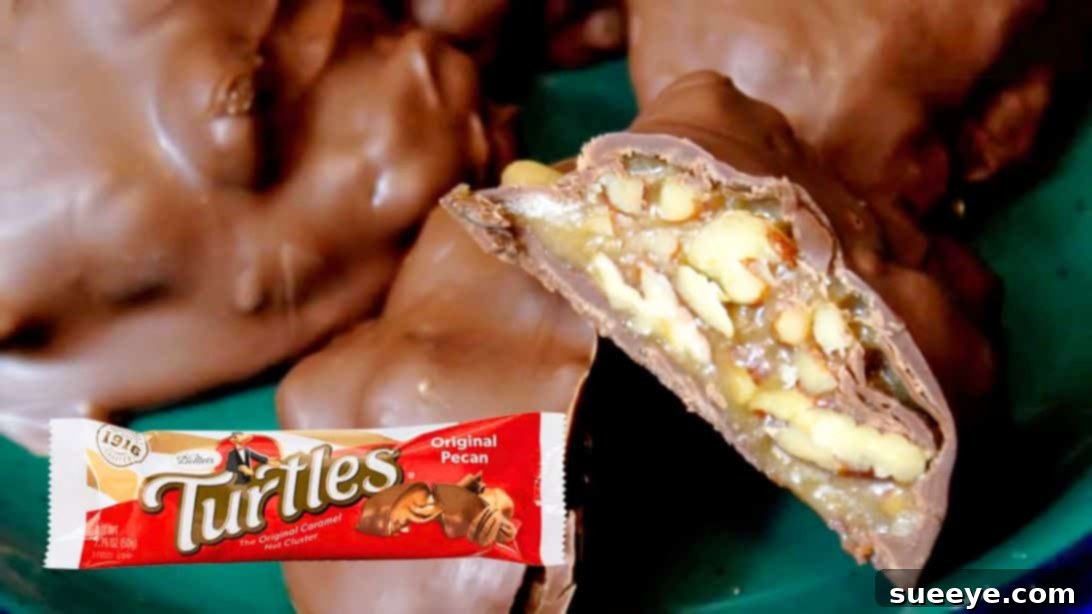
Classic Homemade Pecan Turtles Chocolate Candy: A Sweet Journey Back Home
Do you remember that iconic treat that brought smiles to your face and sticky delight to your fingers during childhood? The beloved Pecan Turtles, with their irresistible combination of crunchy pecans, chewy caramel, and rich chocolate, have been a classic American confection for generations. Relive those cherished memories and create new ones by making this delightful candy right in your own kitchen with this incredible homemade Turtles chocolate candy recipe, inspired by The Southern Mountain Kitchen. If you haven’t yet experienced the pure bliss of these nutty, caramel-filled, chocolate-coated delights, then prepare yourself for a truly special treat!
These aren’t just any candies; they’re miniature masterpieces named “Turtles” for their charming resemblance to the shelled animal. Each one features a cluster of perfectly toasted pecans, nestled in a luscious, buttery caramel, all enveloped in a smooth layer of melted chocolate. The contrast of textures—the snap of the pecan, the chew of the caramel, and the melt-in-your-mouth chocolate—creates an unparalleled snacking experience that’s truly addictive.
Having these homemade wonders again after many years is an instant portal back to my childhood! They are incredibly tasty and just as addictive as I remember them, perhaps even better because they’re made with love and fresh ingredients. While you can often find these exquisite candies in specialty shops, they can be quite expensive. Crafting them at home is not only a fantastic way to save money but also allows you to prepare large batches, perfect for sharing with family and friends, gifting during holidays, or simply keeping a secret stash for yourself!
Why Make Homemade Pecan Turtles?
Choosing to make your own Pecan Turtles offers several delightful advantages over store-bought versions:
- Unbeatable Freshness: Store-bought candies, no matter how good, can’t compete with the fresh, vibrant flavors of homemade ingredients. You control the quality of every component.
- Cost-Effective: Producing a large batch at home will be significantly cheaper than buying the equivalent amount from a candy store, especially if you’re planning for gifts or a party.
- Customization to Your Liking: You’re in charge! Adjust the amount and type of chocolate (milk, dark, or a blend), try different kinds of nuts, or add a sprinkle of sea salt to truly make them your own signature treat.
- Nostalgia and Connection: There’s a special joy in recreating classic treats from scratch. It’s a wonderful way to bring back fond memories and create new, sweet traditions with loved ones.
- Perfect for Gifting: Homemade Turtles make thoughtful and impressive gifts for any occasion, from birthdays to holiday celebrations, showcasing your effort and care.
RELATED: Chocolate Pecan Cobbler Recipe – A Delectable Dessert Idea
Essential Ingredients for Your Homemade Pecan Turtles Candy
Creating these delightful candies requires a few simple, readily available ingredients. The magic truly happens when these quality components come together to form the iconic Turtle shape and flavor profile. Let’s gather everything you need to embark on this sweet adventure:
- 2 cups of pecans: These are the undeniable stars of our show! Opt for fresh, high-quality pecan halves for the best crunch, rich flavor, and aesthetic appeal.
- 6 tablespoons of butter (melted): Unsalted butter is generally preferred, as it gives you precise control over the overall saltiness of your caramel. It forms the essential rich, velvety base of the caramel.
- 1/2 cup of light brown sugar: This adds a deeper, more complex sweetness with subtle molasses notes, contributing significantly to the chewy and rich texture of the caramel.
- 1/2 cup of white sugar: Provides a clean, straightforward sweetness that balances the brown sugar and helps achieve the perfect, smooth caramel consistency.
- 1/2 cup of corn syrup: This is a crucial ingredient for preventing sugar crystallization, which can make caramel grainy. It ensures your caramel remains wonderfully smooth, glossy, and delightfully chewy.
- 1/2 cup of condensed milk: Adds incredible creaminess and richness to the caramel, making it exceptionally luscious and indulgent.
- 1 1/2 teaspoons of vanilla extract: A good quality vanilla extract is essential. It subtly elevates the flavor profile of the caramel, adding a warm and aromatic depth that enhances all the other ingredients. Use pure vanilla for superior results.
- 2 cups of chopped chocolate: Your choice of chocolate can significantly impact the final taste. Semi-sweet or milk chocolate are classic choices for a balanced sweetness, but dark chocolate offers a more sophisticated, less sweet experience. Ensure you use good quality melting chocolate (like baking bars or chips designed for melting) for a smooth and even coating.
Step-by-Step Guide: How to Craft Your Own Delicious Turtles Chocolate Candy
Follow these detailed instructions carefully to ensure your homemade pecan turtles turn out perfectly. Precision, proper technique, and a little patience are key to achieving that ideal balance of crunch, chew, and chocolatey goodness that makes this candy so beloved.
Step 1: Toasting the Pecans for Enhanced Flavor
Begin by preheating your oven to 350°F (175°C). Line a large baking sheet with parchment paper; this crucial step prevents the pecans from sticking and makes cleanup a breeze. Spread the two cups of pecans in a single, even layer across the prepared baking sheet. Place them in the preheated oven and toast for approximately 8 to 10 minutes. It’s vital to keep a close eye on them during this process, as nuts can burn quickly due to their high oil content. You’ll know they’re perfectly toasted when they become wonderfully fragrant and turn a beautiful, light golden brown. Toasting significantly enhances their natural nutty flavor and adds an irresistible crunch to your finished candies.
Step 2: Preparing the Pecans for the Caramel Mix
Once the pecans are perfectly toasted and fragrant, carefully remove the baking sheet from the oven. Transfer the pecans to a clean cutting board and allow them to cool slightly. While they don’t need to be completely cold, handling them when they’re warm makes chopping easier. Once cooled enough to handle, chop them finely. The goal here is to achieve small pieces that will be evenly distributed throughout your caramel mixture, ensuring a consistent texture in every bite of your turtle. Set the chopped pecans aside; they will be lovingly incorporated into the caramel in a later step.
Step 3: Creating the Creamy Caramel Base
In a large, sturdy microwave-safe bowl, combine the six tablespoons of melted butter. Follow this with 1/2 cup of light brown sugar, 1/2 cup of white sugar, 1/2 cup of corn syrup, and 1/2 cup of condensed milk. These ingredients are the foundation of your rich, chewy caramel. Using a strong spatula or a heat-resistant whisk, mix everything together very thoroughly until all the ingredients are completely well combined and the mixture appears smooth and uniform. Proper mixing at this stage is essential to ensure a consistent caramel consistency and prevent any grainy texture.
Step 4: Cooking the Caramel to Perfection
Place the bowl containing your well-mixed caramel mixture into the microwave. Cook on high power for approximately six minutes. It’s important to note that microwave cooking times can vary depending on your appliance’s wattage, so vigilant observation is key. The caramel should be actively bubbling and gradually thickening. For optimal results and to promote even cooking, it’s often a good practice to pause the microwave halfway through (around the 3-minute mark), carefully remove the bowl, give the mixture a good stir, and then continue microwaving. The ultimate goal is a thick, deeply golden, and wonderfully glossy caramel that holds its shape.
Step 5: Infusing the Caramel with Vanilla Flavor
Carefully remove the hot caramel mixture from the microwave. Exercise extreme caution, as both the bowl and its contents will be very hot and can cause burns. Immediately add the 1 1/2 teaspoons of vanilla extract to the cooked caramel. Stir vigorously and thoroughly until the vanilla is completely incorporated into the mixture. Adding the vanilla at this stage, after the main cooking process, helps to preserve its delicate aroma and flavor, contributing a wonderful warmth and depth that perfectly complements the rich caramel.
Step 6: Combining Pecans with the Caramel Mixture
Now, it’s time to bring the two main textural components together. Add all the finely chopped, perfectly toasted pecans to the still-warm caramel mixture. Using your sturdy spatula, mix thoroughly until every single piece of pecan is generously and evenly coated with the rich, glossy caramel. This step is where the signature “turtle body” of the candy truly begins to form. Allow the mixture to cool for a little bit; it should still be warm enough to be pliable and workable, but not so hot that it’s difficult or unsafe to handle.
Step 7: Forming the Classic Turtle Shapes
To make the forming process easier and to prevent your caramel from spreading excessively, prepare your baking sheet. Place an empty baking sheet (or a new one lined with fresh parchment paper) into the freezer for a few minutes. A chilled surface will help the pecan-caramel clusters firm up quickly upon contact. Once chilled, take it out and line it with fresh parchment paper. Take small, rounded portions of the pecan-caramel mixture – approximately a tablespoon each is ideal for a classic-sized turtle – and drop them onto the prepared baking sheet. Gently shape them into rough, flattened clusters, mimicking the natural shape of a turtle’s body. Ensure you space them out adequately, as they will be coated in chocolate later. Once all the clusters are formed, place the baking sheet into the refrigerator for at least 30 minutes. This chilling period is absolutely crucial, as it allows the caramel to firm up completely, making them robust enough to dip into chocolate without losing their shape or falling apart.
Step 8: Melting the Chocolate Coating
While your pecan-caramel clusters are chilling and firming up in the refrigerator, prepare your chocolate coating. Add the 2 cups of chopped chocolate into a clean, microwave-safe bowl. To melt the chocolate perfectly without burning or seizing, microwave it in short, controlled 30-second increments. After each interval, remove the bowl and stir the chocolate well with a clean, dry spoon or spatula, even if it doesn’t look fully melted. The residual heat will continue the melting process. Continue this gradual melting and stirring process until the chocolate is completely smooth, shiny, and free of any lumps. As an alternative, and for a more controlled melting process, you can also use a double boiler over simmering water.
Step 9: Coating and Setting Your Homemade Turtles
Once the chocolate is perfectly melted and your pecan-caramel clusters are thoroughly chilled and firm, it’s time for the exciting final touch! Take one cooled pecan-caramel cluster and carefully place it over the tines of a fork. Submerge the cluster into the melted chocolate, ensuring it’s fully coated on all sides. Gently tap the fork against the side of the bowl to allow any excess chocolate to drip off, preventing puddles around your finished turtles. Carefully transfer the chocolate-covered turtle onto a fresh sheet of wax paper or parchment paper. Repeat this process with all the remaining pieces, taking care to give each turtle a generous, even coating of chocolate. Once all your turtles are coated, place the baking sheet back into the refrigerator for at least an hour, or until the chocolate is completely set and firm. This chilling will give them a beautiful, glossy finish and ensure they are ready to enjoy! Serve and savor the delightful taste of your homemade classic!
Tips for Making the Best Homemade Pecan Turtles
Achieving homemade candy perfection is easier with a few expert tips and tricks:
- Quality Ingredients Matter: Always opt for fresh, high-quality pecans and good quality butter and chocolate. The better your foundational ingredients, the more superior and delicious your final product will be.
- Don’t Skip Toasting the Pecans: Toasting pecans is an absolutely crucial step that deeply enhances their nutty flavor and adds an irreplaceable crunch. It truly makes a significant difference in the overall taste and texture of your turtles.
- Precision in Caramel Making: Follow the measurements exactly. Candy making is often described as a science, and even small deviations can affect the consistency and texture of your caramel. Watch the caramel closely during microwaving; it can go from perfectly cooked to burnt very quickly.
- Chill Thoroughly at Each Stage: Ensure your pecan-caramel clusters are very cold and firm before you attempt to dip them in chocolate. This crucial step prevents them from falling apart, helps them retain their shape, and prevents the melted chocolate from becoming too runny.
- Tempering Chocolate (Optional but Recommended): For a truly professional, glossy finish that resists blooming (those unsightly white streaks) and has a satisfying snap, consider tempering your chocolate. While it’s a more advanced technique, it yields superior aesthetic and textural results.
- Work Cleanly and Efficiently: Have all your tools and prepared ingredients ready and organized before you begin. Candy making can sometimes be a bit messy, so a clean and organized workspace will make the process much smoother and more enjoyable.
- Experiment with Chocolate Types: While semi-sweet chocolate is the classic choice, don’t hesitate to try milk chocolate for a sweeter profile or dark chocolate for a richer, less sweet, and more intense treat. You can even use different types for drizzling!
- Add a Pinch of Sea Salt: A tiny sprinkle of flaky sea salt on top of the wet chocolate coating can really elevate the flavors by providing a delightful contrast and cutting through the sweetness.
Creative Variations & Customizations for Your Turtles
Once you’ve mastered the classic Pecan Turtles recipe, feel free to get creative and customize them to your heart’s content!
- Nut Variations: Not a fan of pecans? Experiment with other nuts like walnuts, almonds, or even a delightful mix of your favorites for a different flavor and texture profile.
- Spiced Caramel: Add a pinch of warm spices like cinnamon, nutmeg, or even a tiny dash of cayenne pepper to your caramel mixture for an intriguing, spiced twist.
- Salted Caramel Turtles: Enhance the popular sweet and salty combination by sprinkling a touch of flaky sea salt over the wet chocolate coating immediately after dipping.
- White Chocolate Drizzle: After the main chocolate coating has fully set, melt some white chocolate and elegantly drizzle it over the turtles for a beautiful, contrasting decorative touch.
- Mini Turtles: For smaller, bite-sized treats perfect for a dessert platter or easy snacking, simply make smaller pecan-caramel clusters in Step 7. Adjust dipping time accordingly.
- Infused Chocolate: Consider adding a single drop of food-grade peppermint, orange, or even a hint of almond extract to your melted chocolate for a wonderfully flavored coating.
Storing Your Homemade Pecan Turtles
To keep your delicious homemade Turtles fresh, flavorful, and enjoyable for as long as possible, proper storage is essential. Here’s how to ensure they last:
- Airtight Container at Room Temperature: For immediate enjoyment or short-term storage, place your completely set Turtles in an airtight container. They will remain fresh and delightful at cool room temperature for up to 1-2 weeks, keeping their texture and flavor intact.
- Refrigeration for Extended Freshness: If your home tends to be warm, or if you wish to extend their shelf life significantly, store your Turtles in an airtight container in the refrigerator. They can last for up to 3-4 weeks this way. For the best texture and flavor experience, allow them to come to room temperature for about 10-15 minutes before serving.
- Freezing for Long-Term Storage: For the longest possible storage, you can freeze Pecan Turtles for up to 3 months. To freeze them properly, first place the individual turtles in a single layer on a baking sheet and freeze until solid. Once solid, transfer them to a freezer-safe, airtight container or a heavy-duty freezer bag, separating layers with parchment paper to prevent sticking. When you’re ready to enjoy them, thaw in the refrigerator overnight or at room temperature for a few hours before indulging.
Homemade Turtles Chocolate Candy: Your New Favorite Indulgence!
There’s something truly satisfying and uniquely rewarding about making your favorite candies from scratch. This homemade Turtles chocolate candy recipe is not just about creating a delicious treat; it’s about embracing nostalgia, sharing joy, and savoring the simple, yet profound, pleasures of life. With perfectly toasted pecans, a lusciously creamy and buttery caramel, and a generous coating of rich, melting chocolate, these classic candies are guaranteed to be an absolute hit with everyone who is lucky enough to try them.
Whether you’re preparing them for a special gathering, assembling them as heartfelt, homemade gifts, or simply indulging your own sweet tooth, these homemade Pecan Turtles are a delightful testament to the fact that the best things in life are often those made with love and care right in your own kitchen. So, roll up your sleeves, gather your ingredients, and get ready to create an unforgettable batch of these timeless treats that will undoubtedly become a new favorite tradition!
Don’t wait any longer to bring this timeless classic into your home and share its magic. Follow this comprehensive recipe, and prepare to delight your taste buds and those of your loved ones. Happy candy making, and enjoy every sweet bite!