
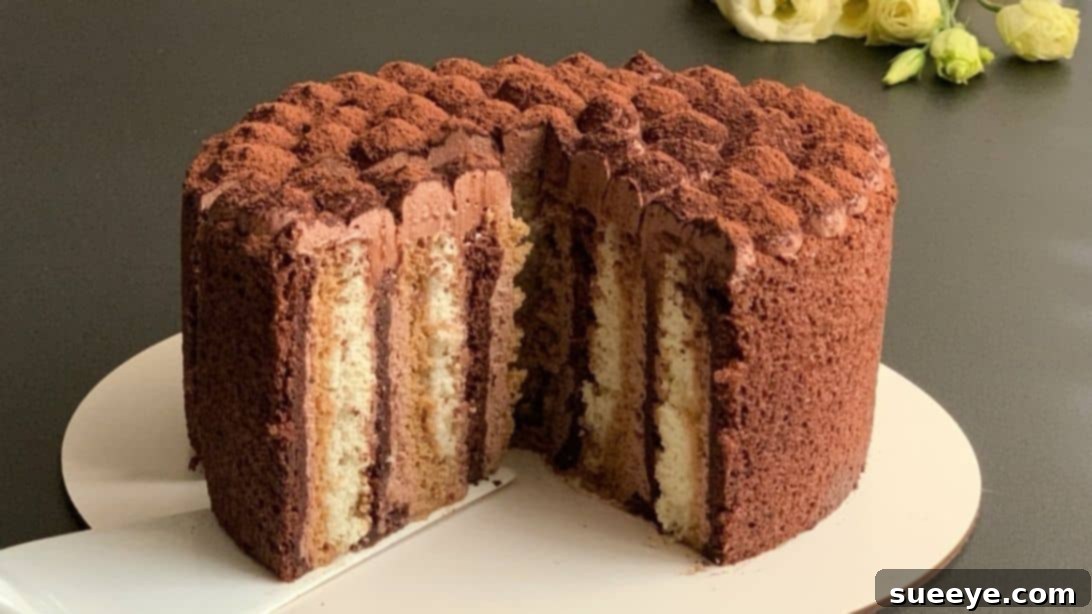
Indulge in Homemade Chocolate Tiramisu Cake: An Easy Recipe Guide
Few desserts capture the heart quite like tiramisu. Its elegant layers, rich coffee kick, and creamy texture create an unforgettable experience. While the classic tiramisu is a beloved staple, imagine elevating this masterpiece with the luxurious depth of chocolate. We’re talking about a Chocolate Tiramisu Cake that promises to tantalize your taste buds and impress your guests. This particular recipe, inspired by Baking Room, brings together the best of both worlds: the iconic Italian dessert reimagined with a delightful cocoa twist.
Whether you’re a long-time tiramisu enthusiast or a curious newcomer, this recipe offers a surprisingly straightforward path to a truly spectacular dessert. Forget complicated techniques; with clear instructions and a little passion, you’ll be creating a culinary marvel in your own kitchen.
Why This Chocolate Tiramisu Cake Is a Must-Try
Our chocolate tiramisu is more than just a dessert; it’s an experience. Each spoonful delivers a symphony of flavors and textures, meticulously crafted to complement one another. Imagine the tender, airy sponge cake, infused with rich cocoa, providing the perfect base. This is then beautifully contrasted by a velvety, tangy cream cheese filling, enhanced with a hint of vanilla and more cocoa. The star of the show, of course, is the subtle yet distinct bitterness of coffee, soaked into delicate ladyfingers, cutting through the sweetness and adding that signature tiramisu depth.
Unlike some complex baking projects, this recipe demystifies the process, making it accessible for home bakers of all skill levels. It’s an ideal choice for special occasions, family gatherings, or simply when you desire a sophisticated treat to brighten your day. The combination of rich chocolate, robust coffee, and creamy cheese creates a harmonious balance that is utterly irresistible. Prepare to fall in love with your new favorite dessert!
RELATED RECIPES TO EXPLORE:
- Easy 6-Ingredient Tiramisu Truffles Recipe – For a quick, bite-sized tiramisu fix.
- Best Classic Tiramisu Recipe from Scratch – If you’re craving the traditional version.
Essential Ingredients for Your Easy Chocolate Tiramisu Cake
Crafting a truly memorable chocolate tiramisu begins with selecting fresh, quality ingredients. This recipe is divided into two main components: the light and airy cocoa sponge cake, and the rich, creamy cheese filling. Pay close attention to ingredient temperatures, as this often plays a crucial role in achieving the desired texture and consistency.
For the Cocoa Sponge Cake:
- 4 Large Egg Yolks: Ensure these are at room temperature for optimal emulsification and a smoother batter.
- 4 Large Egg Whites: Also at room temperature, as this allows them to whip up into voluminous, stable peaks more easily.
- 1 Tablespoon + 1 Teaspoon Granulated Sugar: For the egg yolk mixture, providing sweetness and aiding in structure.
- 1/4 Cup Granulated Sugar: Specifically for stabilizing and sweetening the egg whites.
- 1/2 Teaspoon Vanilla Extract: Adds a warm, aromatic note that enhances both chocolate and coffee flavors.
- 2 Tablespoons + 2 Teaspoons Milk: Room temperature milk helps keep the batter smooth and ensures even mixing.
- 3 Tablespoons Vegetable Oil: Contributes to the cake’s tender crumb and moistness without adding specific flavor.
- 3 Tablespoons All-Purpose Flour: The primary structural component of our delicate cake base.
- 3 Tablespoons Unsweetened Cocoa Powder: Provides the rich chocolate flavor and dark color for the sponge.
- Pinch of Salt: A small but mighty ingredient that balances sweetness and enhances overall flavor.
- 1/8 Teaspoon Cream of Tartar: A common baking aid that stabilizes egg whites, helping them achieve higher volume and firmer peaks.
For the Creamy Coffee-Chocolate Filling & Assembly:
- 8.75 Ounces Cream Cheese: Full-fat cream cheese, softened to room temperature, is essential for a smooth, lump-free filling.
- 4 to 5 Tablespoons Powdered Sugar: Also known as confectioners’ sugar, it dissolves easily into the cream cheese for a silky texture and desired sweetness. Adjust to your preference.
- 1/2 Teaspoon Vanilla Extract: Reinforces the delightful vanilla notes throughout the creamy layers.
- 1 Tablespoon Unsweetened Cocoa Powder: Adds a beautiful chocolate undertone and slight bitterness to the cream cheese mixture.
- 1 Cup Heavy Cream (33% or higher fat content): Chilled, this whips into a stable, airy component that lightens the cream cheese mixture.
- 3/4 Cup Boiling Water: For dissolving the instant coffee, creating the essential coffee soak.
- 3 Tablespoons Instant Coffee Powder: Choose a good quality instant coffee or espresso powder for the best flavor in your soak.
- Ladyfingers (Savoiardi Biscuits): These light, dry, finger-shaped sponge cakes are perfect for soaking up the coffee mixture without becoming overly soggy.
- Extra Unsweetened Cocoa Powder: For dusting the finished cake, providing a beautiful presentation and a final touch of bitterness.
Step-by-Step Guide: How to Craft Your Decadent Chocolate Tiramisu Cake
Follow these detailed instructions to create a show-stopping chocolate tiramisu. Precision and patience are key to achieving the perfect balance of flavors and textures.
Step 1: Prepare the Egg Yolk Mixture for the Sponge Cake
In a spacious mixing bowl, combine the room-temperature egg yolks and vanilla extract. Using a whisk, beat them together until they are well combined and slightly pale. Next, gradually incorporate the 1 tablespoon and 1 teaspoon of granulated sugar, milk, and vegetable oil. Continue whisking until the mixture is homogenous, smooth, and has a light, emulsified consistency. Ensure no streaks of oil or milk remain.
Step 2: Incorporate Dry Ingredients into the Yolk Mixture
Carefully sift the flour and cocoa powder directly over the egg yolk mixture. Sifting is crucial here to prevent lumps and ensure a smooth, uniform batter. Gently whisk the dry ingredients into the wet mixture until just combined and smooth. Be careful not to overmix, as this can develop the gluten in the flour, resulting in a tougher cake. The goal is a velvety, lump-free chocolate batter.
Step 3: Whip the Egg Whites to Stiff Peaks
In a separate, very clean, large mixing bowl (free from any grease), add the room-temperature egg whites and a pinch of salt. Begin whisking on medium speed until the egg whites become foamy. Then, add the cream of tartar, which helps stabilize the whites. Gradually, stream in the 1/4 cup of granulated sugar while continuously whisking on medium-high speed. Continue whisking until stiff, glossy peaks form. When you lift the whisk, the peaks should stand upright without drooping. This step is vital for the lightness of your sponge cake.
Step 4: Gently Fold the Whipped Egg Whites into the Batter
This is a critical step for maintaining the airy texture of your cake. Take about one-third of the whipped egg whites and gently fold them into the chocolate batter using a spatula. This initial addition lightens the batter, making it easier to incorporate the remaining whites without deflating them. Once partially combined, add the rest of the whipped egg whites. Use a gentle, sweeping motion, folding from the bottom up, until no white streaks remain and the batter is evenly combined. Be very careful not to overmix and lose the precious air you’ve incorporated.
Step 5: Bake the Chocolate Sponge Cake
Line a large baking sheet (approximately 12×16 inches or suitable for a thin cake layer) with parchment paper, ensuring it extends slightly over the edges. Carefully transfer the chocolate batter onto the prepared baking sheet. Using an offset spatula or the back of a spoon, spread the batter evenly to form a thin, consistent layer. Gently tap the baking sheet a few times on the counter to release any trapped air bubbles. Place the baking sheet into a preheated oven at 340°F (170°C) and bake for approximately 30 minutes, or until the cake springs back when lightly touched and a toothpick inserted into the center comes out clean. Once baked, remove the cake from the oven and carefully transfer it, still on the parchment paper, to a cooling rack. To prevent the cake from drying out, gently place another piece of parchment paper or a clean kitchen towel over the top while it cools.
Step 6: Prepare the Coffee Soaking Liquid
In a heatproof cup or small bowl, combine the boiling water and instant coffee powder. Stir well until the coffee is completely dissolved. Allow this mixture to cool down slightly before using, as hot coffee can make the ladyfingers too soggy.
Step 7: Prepare the Cream Cheese Filling
In a clean mixing bowl, add the softened cream cheese and powdered sugar. Whisk thoroughly until the mixture is smooth, creamy, and free of lumps. Next, add the vanilla extract and 1 tablespoon of cocoa powder, whisking until fully incorporated. In a separate, chilled bowl, whip the cold heavy cream until soft peaks form. Gently fold the whipped cream into the cream cheese mixture until just combined. Be careful not to overmix. Transfer this luscious cream cheese filling into a piping bag for easier application later.
Step 8: Prepare the Cake Layers
Once the chocolate sponge cake has completely cooled, gently flatten it using a rolling pin. This step helps create a denser, more uniform cake layer. Carefully slice the flattened cake lengthwise into three equal strips. These will be the foundation of your layered tiramisu.
Step 9: Prepare the Ladyfingers
Take your ladyfingers and cut them to the same height as your prepared cake strips. This ensures an even and aesthetically pleasing structure for your dessert.
Step 10: Assemble the First Layer
Lay one of the chocolate cake strips on your serving plate or board. Pipe or spread an even layer of the cream cheese mixture over the entire surface of the cake strip. Take the cut ladyfingers and quickly dip each one into the cooled coffee mixture, ensuring they are soaked but not dripping wet. Arrange these coffee-soaked ladyfingers neatly on top of the cream cheese layer, covering the entire length of the cake strip. Once the ladyfingers are in place, add another generous layer of the cream cheese mixture over them.
Step 11: Create the Iconic Tiramisu Roll
With careful hands, slowly and firmly roll the first assembled cake strip, starting from one end. As you roll, the layers of cake, cream, and ladyfingers will form a beautiful spiral. Once rolled, gently place it upright onto a flat serving plate or cake stand. Now, take your second cake strip. Apply a layer of cream cheese mixture and coffee-soaked ladyfingers, similar to Step 10. Instead of rolling this one, carefully wrap it around the first rolled cake, seamlessly extending the spiral. Repeat this process with the remaining cake strip, ensuring a continuous, elegant roll. This technique creates a stunning presentation that reveals the intricate layers when sliced.
Step 12: Final Touches and Chilling
Once your impressive tiramisu roll is assembled, use the remaining cream cheese mixture to generously cover the entire top and sides, creating a smooth, elegant finish. For that iconic tiramisu look, lightly dust the surface with a generous layer of unsweetened cocoa powder using a fine-mesh sieve. This adds both visual appeal and a lovely bittersweet contrast. Now comes the hardest part: chilling! Cover the cake loosely with plastic wrap and refrigerate for at least 4-6 hours, or ideally overnight. Chilling allows the flavors to meld beautifully and the cake to set, making it much easier to slice and serve.
Tips for a Flawless Chocolate Tiramisu Cake
To ensure your chocolate tiramisu cake is nothing short of perfection, keep these expert tips in mind:
- Room Temperature Ingredients: Always ensure your eggs, milk, and cream cheese are at room temperature. This is crucial for proper emulsification and whipping, leading to smoother batters and creamier fillings.
- Don’t Overmix: When incorporating dry ingredients into the yolk mixture and especially when folding in egg whites, stop mixing as soon as everything is just combined. Overmixing can result in a dense, tough cake.
- Whip Egg Whites Correctly: For stiff, stable peaks, ensure your bowl and whisk are perfectly clean and free of any grease. Gradually add sugar once the whites are foamy.
- Gentle Folding: The success of the sponge cake relies on maintaining the air in the whipped egg whites. Use a light hand and a folding technique rather than stirring to preserve volume.
- Perfectly Soaked Ladyfingers: Dip ladyfingers quickly into the coffee – just a second or two per side. Over-soaking will make them mushy, while under-soaking leaves them dry.
- Quality Coffee: The flavor of your coffee soak greatly impacts the final taste. Use a good quality instant espresso or strong brewed coffee for the best results.
- Chilling is Non-Negotiable: The prolonged chilling period is vital. It allows the cake to set, the flavors to meld, and the cream to firm up, making it easier to slice and enhancing the overall taste.
- Dusting Cocoa: For a clean dusting, use a fine-mesh sieve. You can dust just before serving for the freshest look.
Variations to Customize Your Chocolate Tiramisu
Feel free to get creative with this recipe and make it your own:
- Liqueur Kick: For an adult version, add a tablespoon or two of a complementary liqueur to your coffee soak, such as rum, Kahlua, Marsala wine, or an orange liqueur.
- Espresso Powder in Cream: For a stronger coffee flavor in the cream, you can add a small amount of instant espresso powder along with the cocoa powder.
- Darker Chocolate: Use a higher quality, darker cocoa powder in both the cake and cream for a more intense chocolate experience.
- Nutty Twist: A sprinkle of finely chopped toasted hazelnuts or almonds between layers could add a delightful crunch and flavor dimension.
- Raspberry or Cherry Addition: For a fruity contrast, a thin layer of fresh raspberries or macerated cherries could be added within the layers.
Serving and Storage Suggestions
This Chocolate Tiramisu Cake is best served chilled, directly from the refrigerator. Slice it with a sharp knife, wiping the blade between cuts for clean, beautiful portions that showcase its stunning layers. Garnish with a fresh raspberry, a chocolate curl, or an extra dusting of cocoa for an elegant presentation.
Store any leftover tiramisu in an airtight container in the refrigerator for up to 3-4 days. While it’s best enjoyed within the first couple of days, the flavors often deepen beautifully overnight.
The Ultimate Chocolate Tiramisu Cake Experience Awaits!
There’s immense satisfaction in creating a beautiful dessert from scratch, and this easy chocolate tiramisu cake recipe truly delivers on that promise. With its rich, layered flavors and inviting presentation, it’s a dessert that speaks of celebration and comfort. The blend of bittersweet coffee, creamy cheese, and deep chocolate notes is simply irresistible, making it a perfect grand finale to any meal. So, gather your ingredients, follow these steps, and prepare to delight your senses with a homemade treat that tastes like it came straight from a gourmet patisserie. Enjoy every delectable bite!