
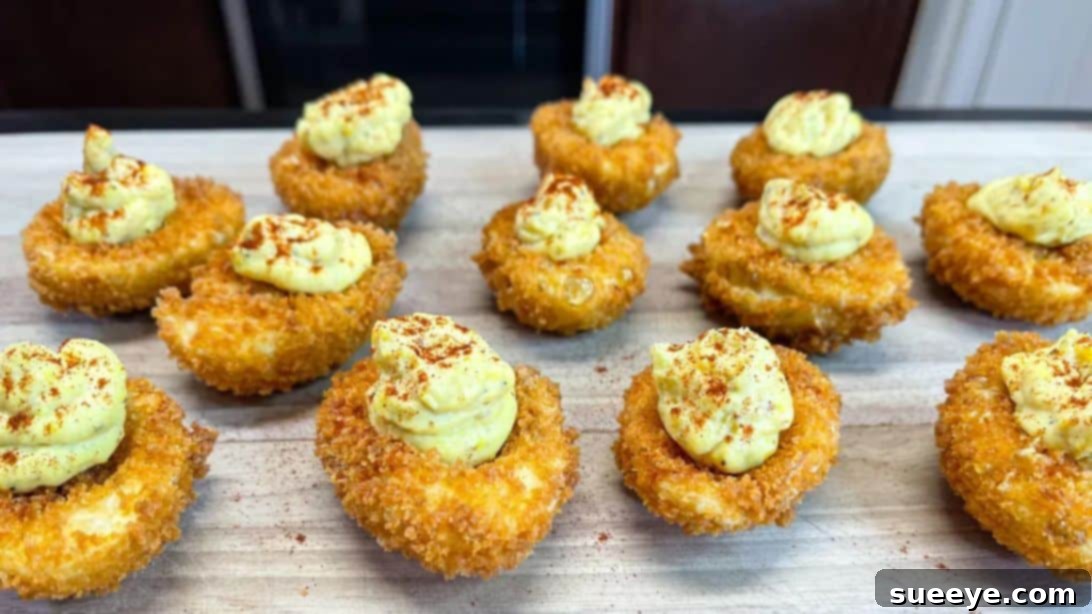
Are you ready to elevate your appetizer game and impress your guests with a dish that’s both classic and sensationally innovative? Forget the ordinary deviled eggs and dive into the extraordinary world of **Fried Deviled Eggs**! This recipe, inspired by the culinary genius of Catherine’s Plates on YouTube, transforms a beloved comfort food into a crispy, golden-brown delight that will become the star of any gathering. Imagine a perfectly seasoned deviled egg filling nestled inside a crunchy, deep-fried egg white shell – it’s a textural and flavor experience you won’t soon forget.
Fried deviled eggs are more than just a novelty; they’re a culinary revelation. The addition of a crispy exterior adds an exciting dimension, making them incredibly addictive and utterly irresistible. They’re surprisingly easy to make, making them the perfect choice for holiday celebrations, game day parties, or simply a special treat on an ordinary day. This comprehensive guide will walk you through every step, ensuring you create these delectable bites with confidence and flair. Get ready to ditch the bland and embrace the bold with these super delicious, perfectly crispy fried deviled eggs.
Crispy Fried Deviled Eggs: The Ultimate Party Appetizer Recipe
Making deviled eggs is a time-honored tradition, but frying them introduces a whole new level of gourmet appeal. This recipe leverages simple techniques and readily available ingredients to deliver an appetizer that looks as impressive as it tastes. We’ll ensure your hard-boiled eggs are perfectly peeled, your breading is impeccably crisp, and your filling is creamy and full of flavor. Follow along to master this unique spin on a classic, guaranteed to have everyone asking for the recipe.
Ingredients for Irresistible Fried Deviled Eggs:
- 6 large eggs: These will be hard-boiled and form the base of our deviled eggs. Choose fresh eggs for easier peeling.
- ½ tsp of baking soda: A secret weapon for effortlessly peeling hard-boiled eggs. Added to the boiling water, it helps loosen the shell.
- 40 ounces of vegetable or canola oil: Essential for deep frying. Ensure you have enough to submerge the egg whites for an even, crispy coat.
- ½ cup of all-purpose flour: Forms the first layer of our breading, helping the egg wash adhere evenly.
- ¼ tsp of salt, divided: Used for seasoning both the flour mixture and the creamy yolk filling.
- ¼ tsp of garlic powder, divided: Adds a savory depth to both the breading and the yolk mixture.
- ¼ tsp of paprika, divided: Provides a hint of sweet pepper flavor and vibrant color to the breading and as a garnish.
- 1/8 tsp of black pepper: A subtle spice that enhances the overall flavor profile of the yolk filling.
- 2 medium eggs: Whisked to create the egg wash, which acts as a binder for the panko crumbs.
- 1 cup of panko crumbs: The key to achieving that incredibly crispy, light, and airy fried exterior.
- ¼ cup of mayonnaise: Forms the creamy base of our deviled egg filling, adding richness and tang.
- 2 tsp of mustard or dijon mustard: Contributes a zesty, sharp flavor that perfectly balances the richness of the yolks and mayonnaise.
Step-by-Step Directions for Perfect Fried Deviled Eggs:
Step 1: Preparing the Hard-Boiled Eggs and Breading Station
The foundation of any great deviled egg recipe begins with perfectly cooked and easily peelable hard-boiled eggs. Start by carefully placing your 6 large eggs in a medium-sized saucepan. Add enough cold water to cover the eggs by at least an inch; this ensures even cooking. Now, sprinkle in the ½ teaspoon of baking soda. This small addition makes a significant difference in how easily the shells will come off, saving you time and frustration. Place the saucepan on your stove over high heat and bring the water to a rapid, rolling boil. Once boiling vigorously, immediately turn off the heat, cover the saucepan with a tight-fitting lid, and let the eggs sit undisturbed in the hot water for precisely 11 minutes. This method yields perfectly cooked yolks with no green ring.
As soon as the 11 minutes are up, remove the eggs from the hot water with a slotted spoon and transfer them directly into an ice water bath. This crucial step immediately stops the cooking process, preventing overcooked yolks, and helps the shells contract, making them even easier to peel. Let the eggs cool completely in the ice bath for at least 5-10 minutes. Once cooled, gently tap and roll each egg to crack the shell, then carefully peel them under cold running water. You’ll find the shells slide off with remarkable ease thanks to the baking soda and ice bath technique.
Next, take each peeled hard-boiled egg and carefully cut it in half lengthwise, using a sharp knife to achieve a clean cut. Gently scoop out the vibrant yellow yolks and transfer them into a small, separate mixing bowl. Arrange the perfectly clean, hollowed-out egg whites on a plate; these will form the crispy vessels for our deviled egg filling. Now, it’s time to set up your breading station, which typically consists of three shallow bowls for an efficient and mess-free process. In the first bowl, combine the ½ cup of all-purpose flour with ¼ teaspoon of salt, ¼ teaspoon of garlic powder, and ¼ teaspoon of paprika. Whisk these dry ingredients together until well combined. In the second bowl, whisk together the 2 medium eggs until the yolks and whites are fully incorporated, creating your egg wash. Finally, in the third bowl, pour the 1 cup of panko crumbs. Having these three bowls ready ensures a smooth breading process for your egg whites.
Step 2: Frying the Egg Whites and Preparing the Yolk Filling
With your breading station ready, it’s time to transform those humble egg whites into crispy, golden shells. Take one egg white half at a time and dredge it thoroughly in the flour mixture, ensuring it’s lightly but completely coated. Tap off any excess flour. Next, dip the floured egg white into the whisked egg mixture, allowing any extra egg wash to drip off. Finally, carefully place the egg white into the bowl of panko crumbs, pressing gently to ensure the crumbs adhere well and fully coat the entire surface. This triple-layer breading is essential for achieving that satisfying crunch. Place each coated egg white on a clean plate as you finish breading them, keeping them separate so the coating doesn’t get damaged.
Now, prepare for frying. Place a heavy-bottomed pot or Dutch oven over medium-high heat. Pour in your 40 ounces of vegetable or canola oil. It’s crucial to heat the oil to the correct temperature for even cooking and a truly crispy result. Use a kitchen thermometer to monitor the oil temperature, aiming for approximately 350 degrees Fahrenheit (175 degrees Celsius). Maintaining this temperature is key to preventing soggy egg whites or over-browning. Once the oil reaches the target temperature, carefully, and one at a time, lower the breaded egg whites into the hot oil. Be cautious not to overcrowd the pot, as this can lower the oil temperature and lead to less crispy results. Fry the egg whites for about 2 to 3 minutes, or until they achieve a beautiful light golden-brown color and a visibly crispy texture. Use a slotted spoon or spider to carefully remove the fried egg whites from the oil and transfer them to a plate lined with paper towels to drain off any excess oil. This step helps ensure they remain perfectly crisp.
While the fried egg whites are cooling slightly, turn your attention to the creamy yolk filling. In the mixing bowl containing your reserved egg yolks, use a fork or potato masher to thoroughly mash the yolks until they are completely smooth and free of lumps. Achieving a smooth consistency is important for a creamy filling that’s easy to pipe. To the mashed yolks, add the ¼ cup of mayonnaise, 2 teaspoons of mustard (dijon works wonderfully for a zesty kick), the remaining ¼ teaspoon of salt, ¼ teaspoon of garlic powder, and ¼ teaspoon of paprika. Mix all these ingredients together vigorously until they are well combined and the mixture is smooth and creamy. Taste the mixture and adjust seasonings if necessary; you might want a pinch more salt or a dash more mustard depending on your preference.
For a professional presentation, scoop the yolk mixture into a piping bag fitted with a star tip (or any decorative tip you prefer). If you don’t have a piping bag, a simple zip-top bag with one corner snipped off will work just as well, or you can simply use a small spoon for a more rustic look. Carefully pipe or spoon the delicious yolk mixture into the center of each fried egg white shell. Once all the shells are filled, garnish generously with an extra sprinkle of paprika for color and a final touch of flavor. These Fried Deviled Eggs are best served immediately while the fried egg whites are still at their crispiest. Serve them on a beautiful platter and watch them disappear! Enjoy this delightful and innovative appetizer that will surely become a new favorite.
Tips for Success with Your Fried Deviled Eggs:
- Perfect Hard-Boiled Eggs: Don’t skip the ice bath! It’s critical for easy peeling and preventing that unsightly green ring around the yolk.
- Oil Temperature is Key: Invest in a good kitchen thermometer. If the oil isn’t hot enough, your egg whites will absorb too much oil and become greasy; if it’s too hot, they’ll burn before crisping properly.
- Don’t Overcrowd the Pot: Fry the egg whites in batches to maintain consistent oil temperature and ensure even browning.
- Drain Well: Always place fried items on a paper towel-lined plate or a wire rack set over paper towels to remove excess oil. This helps keep them crispy.
- Smooth Yolk Filling: Mash your yolks thoroughly. Any lumps will make piping difficult and result in a less appealing texture.
- Season to Taste: The provided measurements are a guide. Feel free to adjust the salt, pepper, garlic powder, and mustard in the yolk filling to suit your personal preferences.
- Serving: These are best enjoyed warm or at room temperature, shortly after frying, to maximize the crispiness of the shell.
Creative Variations to Explore:
While the classic fried deviled egg is delicious on its own, don’t hesitate to experiment with the yolk filling to create your signature twist:
- Spicy Kick: Add a dash of hot sauce (like Sriracha), a pinch of cayenne pepper, or finely chopped jalapeños to the yolk mixture.
- Smoky Bacon: Incorporate crispy, crumbled bacon bits into the filling for a savory, smoky crunch.
- Herbaceous Freshness: Mix in finely chopped fresh chives, parsley, or dill for a burst of garden-fresh flavor.
- Tangy Relish: For a classic deviled egg flavor, stir in a teaspoon or two of sweet pickle relish.
- Cream Cheese Twist: A small amount of softened cream cheese can add an extra layer of richness and creaminess to the yolk filling.
- Horseradish Zing: For those who love a bit of heat, a touch of prepared horseradish can add an exciting kick.
Conclusion: Your New Favorite Appetizer Awaits!
There you have it – a phenomenal recipe for Fried Deviled Eggs that promises to revolutionize your appetizer spread. This unique approach, brilliantly showcased by Catherine’s Plates, takes a beloved classic and elevates it to new heights of deliciousness. With a crispy exterior and a creamy, flavorful interior, these deviled eggs are guaranteed to be a hit at any party, holiday gathering, or even as a special treat for yourself. Follow these steps, embrace the joy of frying, and prepare to delight your taste buds with this unforgettable dish. Don’t forget to visit Catherine’s Plates on YouTube for more inspiring culinary creations!
*All these images are credited to Catherine’s Plates via YouTube. Give her channel a visit and subscribe for more amazing recipes!