

Ultimate Cheese-Stuffed Corn Dogs: A Homemade Recipe for Crispy, Cheesy Perfection
Forget everything you thought you knew about classic corn dogs. We’re about to introduce you to their irresistible, upgraded cousin: the **cheese-stuffed corn dog**. This isn’t just a snack; it’s an experience. Imagine a perfectly crispy, golden-brown batter encasing a juicy hot dog, which in turn cradles a core of molten, stringy cheese. It’s the kind of delightful surprise that makes every bite an absolute joy, especially when you achieve that picture-perfect, stretchy cheese pull.
Inspired by popular culinary trends, this recipe takes a beloved carnival classic and injects it with an extra dose of gooey goodness. Whether you’re looking for an exciting new party appetizer, a fun and kid-friendly meal, or just a deliciously indulgent midday snack, these homemade cheese-stuffed corn dogs are guaranteed to be a crowd-pleaser. They’re surprisingly simple to make, highly customizable, and perfect for preparing ahead of time, ensuring you always have a delightful treat ready for any occasion. Plus, with a few simple tweaks, they can even transform into a unique breakfast meal using sausage!
Why Homemade Cheese-Stuffed Corn Dogs Are a Game Changer
While classic corn dogs hold a special place in our hearts, adding cheese takes them to an entirely new level. The melting cheese creates a luscious, savory layer between the hot dog and the crispy batter, adding an incredible depth of flavor and texture. The visual appeal alone, with cheese stretching as you pull it apart, is enough to get anyone excited. But beyond the immediate deliciousness, making these at home offers several distinct advantages:
- Unmatched Freshness: Enjoy the freshest ingredients and the satisfying crunch of a perfectly fried corn dog straight from your kitchen.
- Total Customization: Choose your favorite brand of hot dogs, experiment with different types of cheese (cheddar, mozzarella, Monterey Jack!), and even adjust the seasoning in your batter to suit your taste.
- Cost-Effective: Making a batch at home is often far more economical than buying them pre-made or from a food truck.
- Perfect for Any Occasion: From casual family dinners to festive gatherings, these corn dogs fit right in. Their individual portion size makes them easy to serve and enjoy on the go.
- Make-Ahead Convenience: Prepare them in advance and freeze them, then simply fry when you’re ready for a quick and delicious meal or snack.
Ingredients for Your Cheesy Corn Dog Adventure
Crafting these delectable treats requires a handful of common pantry staples and, of course, the stars of the show: hot dogs and cheese. Here’s what you’ll need to gather:
- 8 slices of cheese (e.g., American, cheddar, mozzarella, or Monterey Jack)
- 8 standard-sized hot dogs
- 8 wooden skewers
- 2 cups all-purpose flour
- 1 teaspoon salt
- 1 teaspoon black pepper
- 1 tablespoon baking powder
- 1 ½ cups milk (whole milk recommended for richness)
- 2 large eggs
- Oil, for deep frying (vegetable, canola, or peanut oil are suitable)
- Ketchup and mustard, for serving (or your favorite dipping sauces)
Step-by-Step Directions to Cheesy Corn Dog Heaven
Follow these detailed instructions to create the ultimate cheese-stuffed corn dogs. For a visual guide, you can also refer to the Tasty tutorial on YouTube that inspired this delicious twist.
Phase 1: Preparing Your Hot Dogs and Cheese
- Wrap the Hot Dogs: Take one hot dog and place it in the middle of a cheese slice. Carefully roll the cheese slice tightly around the hot dog, ensuring the cheese fully encases it. The goal is to have the cheese stick to itself as much as possible to prevent it from escaping during frying.
- Skewer Them Up: Gently insert a wooden skewer through the entire length of the cheese-wrapped hot dog. Make sure the skewer goes in straight and emerges neatly from the other end, leaving enough handle for holding.
- Freeze for Firmness: Arrange the cheese-wrapped, skewered hot dogs seam-side down on a baking sheet lined with parchment paper. This helps prevent the cheese from unraveling. Place the baking sheet in the freezer for at least 20 minutes. This crucial step helps the cheese and hot dog hold their shape when dipped in batter and prevents the cheese from melting out too quickly during frying.
Phase 2: Crafting the Perfect Batter
- Combine Dry Ingredients: In a large mixing bowl, whisk together the all-purpose flour, salt, black pepper, and baking powder. Ensure there are no lumps and the ingredients are well distributed.
- Add Wet Ingredients: In a separate bowl, lightly beat the two large eggs, then stir in the milk.
- Mix Batter: Gradually pour the wet ingredients into the dry ingredient bowl, whisking continuously until you achieve a smooth, thick batter. The consistency should be similar to pancake batter – thick enough to coat the hot dogs evenly without dripping off too quickly. If it’s too thick, add a teaspoon of milk at a time; if too thin, add a tablespoon of flour.
- Prepare for Dipping: Transfer the batter into a tall glass or a wide, deep container. This will make dipping the hot dogs much easier, ensuring a uniform coating.

Phase 3: Frying to Golden Perfection
- Heat the Oil: Pour enough oil into a large, heavy-bottomed pot or deep fryer to submerge the corn dogs completely (at least 3-4 inches deep). Heat the oil over medium-high heat until it reaches a temperature between 375-400 degrees F (190-200 degrees C). A candy thermometer or deep-fry thermometer is highly recommended for accurate temperature control.
- Test the Temperature: To check the oil temperature without a thermometer, dip a small amount of batter into the oil. If it sizzles immediately and floats to the top, the oil is ready. If it browns too quickly, the oil is too hot; if it sinks and doesn’t sizzle, it’s not hot enough.
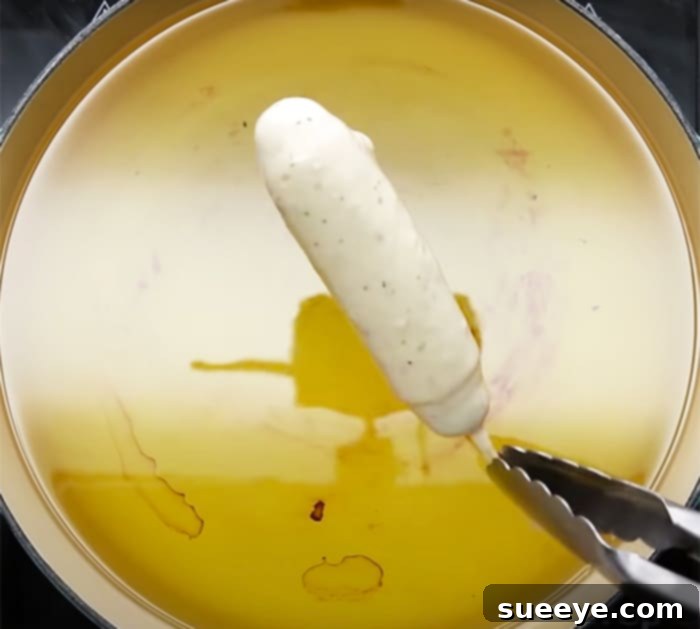
- Dip the Hot Dogs: Remove the frozen hot dogs from the freezer. One by one, dip each hot dog into the prepared batter, rotating it to ensure it is fully and evenly coated. Allow any excess batter to drip off back into the container.
- Fry the Corn Dogs: Carefully lower 2-3 battered hot dogs into the hot oil, ensuring not to overcrowd the pot. Overcrowding can lower the oil temperature and result in greasy, unevenly cooked corn dogs.
- Cook Until Golden: Fry for approximately 3-5 minutes, turning occasionally with tongs to ensure all sides are evenly cooked and achieve a beautiful golden-brown color. The batter should be crispy, and the cheese inside should be perfectly melted and gooey.
- Drain and Rest: Once golden brown, carefully remove the corn dogs from the oil and place them on a wire rack set over a baking sheet lined with paper towels. This allows excess oil to drain off, keeping them crispy.
Phase 4: Serve and Enjoy!
Serve your hot and crispy cheese-stuffed corn dogs immediately with classic ketchup and mustard, or explore other dipping options like honey mustard, sriracha mayo, or a sweet chili sauce. These are best enjoyed fresh, when the batter is at its crispiest and the cheese is at its meltiest!
Tips for Achieving Corn Dog Perfection
- Batter Consistency is Key: The batter should be thick enough to cling to the hot dog without being overly gloopy. A good test is to dip a spoon – if the batter coats the back of the spoon evenly, you’re good.
- Don’t Skip the Freeze: Freezing the hot dogs ensures the cheese stays intact during frying and gives the batter something cold to adhere to, resulting in a more even coat.
- Maintain Oil Temperature: Use a thermometer! Too-low oil temperature results in greasy corn dogs, while too-high oil temperature will burn the outside before the inside is cooked and cheese is melted.
- Tall Container for Dipping: A tall glass makes dipping effortless and ensures a uniform, full coating on each corn dog.
- Batch Fry: Fry in small batches to maintain consistent oil temperature and prevent crowding, which can lead to soggy corn dogs.
- Optional Spices: Feel free to add a pinch of garlic powder, onion powder, or paprika to your batter for extra flavor. A touch of sugar can also give it a slightly sweeter, classic corn dog taste.
Unleash Your Creativity: Customizing Your Corn Dogs
This recipe is incredibly versatile, allowing you to experiment with various ingredients and flavors:
- Cheese Varieties: While American cheese slices are classic for their melt, try sharp cheddar for a stronger flavor, mozzarella for ultimate stringiness, or pepper jack for a spicy kick.
- Hot Dog Alternatives: Experiment with different types of hot dogs – all-beef, pork, chicken, or even vegetarian options. For a delicious breakfast twist, use breakfast sausages!
- Spicy Kick: Add a dash of cayenne pepper to your batter, or wrap your hot dog with a thin slice of jalapeño along with the cheese for some heat.
- Gourmet Dipping Sauces: Beyond ketchup and mustard, consider pairing with sriracha mayo, a sweet and tangy BBQ sauce, a creamy ranch dip, or even a spicy Korean gochujang sauce for an adventurous palate.
Conclusion: Your New Favorite Snack Awaits!
Overall, this cheese-stuffed corn dog recipe is a simple yet incredibly rewarding culinary adventure. It transforms a familiar comfort food into something truly special and memorable. The ease of preparation, combined with the affordability of the ingredients, makes it an ideal choice for a quick family meal, a fun party snack, or a unique weekend project.
The beauty of this recipe lies not only in its delicious outcome but also in its adaptability. You have the freedom to customize it to your heart’s content, whether it’s through different types of hot dogs, a variety of cheeses, or even unique spices in the batter. So, gather your ingredients, fire up the fryer, and prepare to delight your taste buds with these ultimate homemade cheese-stuffed corn dogs. They’re guaranteed to be a hit and become a regular feature in your snack repertoire!