
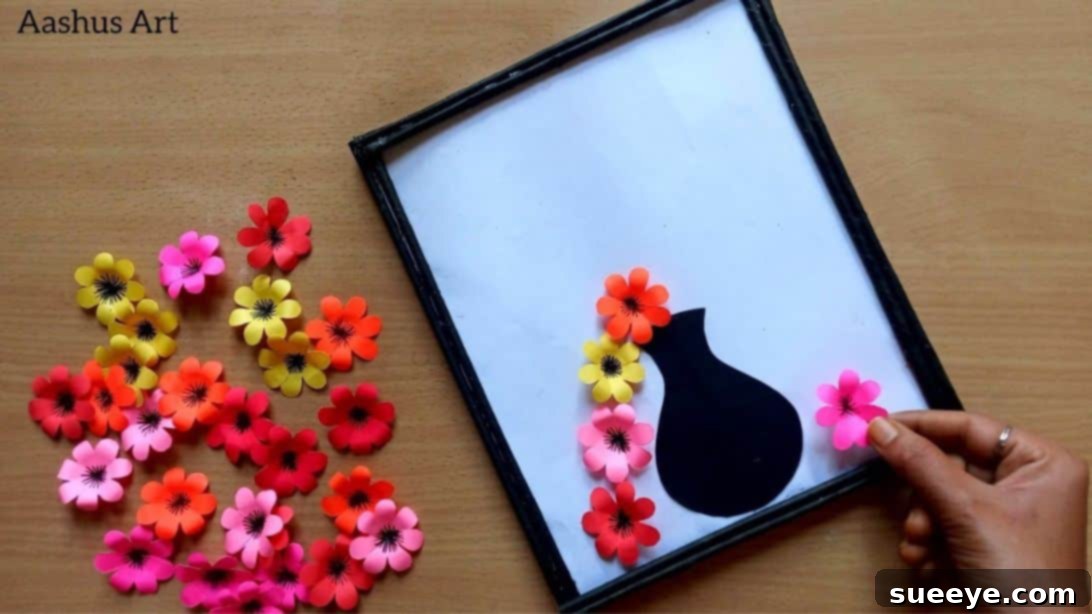
Stunning DIY Paper Flower Craft: Transform Your Home Decor with Ease
There’s a unique joy that comes with creating something beautiful with your own hands, especially when it involves paper crafts. Weekends often present the perfect opportunity to dive into such delightful activities. Whether it’s the intricate folds of origami, a fantastic way to destress and engage your mind, or a simple, charming project that brightens your home, crafting is a rewarding experience. I often find myself drawn to these creative outlets, and when I have the chance, I make sure the kids join in, encouraging them to explore their imagination and develop their fine motor skills. This week, while searching for engaging activities for us, I stumbled upon an inspiring paper flower craft home decor tutorial by Aashus Art on YouTube. What truly captivated me was its simplicity and elegance. This project is not just for children; its straightforward nature and beautiful outcome make it incredibly enjoyable for adults too, offering a serene escape into a world of color and creativity.
Creating handmade decorations for your living space adds a personal touch that store-bought items simply can’t replicate. This particular paper flower craft stands out because it combines readily available materials with a straightforward process, yielding a visually striking piece of art. It’s an excellent way to introduce a burst of color and a fresh, botanical feel to any room – be it your living room, bedroom, or even a cozy reading nook. Beyond the aesthetic appeal, engaging in DIY projects like this offers numerous benefits, from enhancing problem-solving skills and patience to fostering a sense of accomplishment. It’s an accessible craft for beginners, yet offers enough scope for experienced crafters to add their unique flair. Get ready to transform simple paper and cardboard into a charming display that will undoubtedly become a conversation starter.
Gather Your Crafting Essentials: Materials You’ll Need
Before embarking on this delightful paper flower journey, it’s essential to gather all your materials. The beauty of this project lies in its use of common, inexpensive items, many of which you might already have around your house. This makes it an incredibly budget-friendly way to add a touch of elegance to your home decor. Here’s a comprehensive list of what you’ll need to create your stunning paper flower art:
- Cardboard: One piece measuring approximately 7.9 inches by 9.8 inches (20 cm x 25 cm). This will serve as the sturdy base for your entire arrangement. You can repurpose a box lid or any firm cardboard piece.
- Plain Paper: Enough to cover your cardboard base. White paper is ideal as it provides a clean canvas, allowing your colorful flowers to truly pop. You can use standard printer paper or slightly thicker drawing paper.
- Craft Glue: A good quality white craft glue or a quick-drying adhesive is perfect for securing various elements. Make sure it bonds paper and cardboard effectively.
- Scissors: A sharp pair of scissors is crucial for precise cutting, especially when shaping your delicate paper flowers and newspaper rolls.
- Newspaper: Several sheets of old newspaper. This is a fantastic recycled material that will be transformed into the decorative frame for your artwork.
- Thin Stick: A thin skewer, knitting needle, or even a discarded pen or pencil can be used as a rolling aid for the newspaper sticks.
- Black Acrylic Paint: A small amount of black acrylic paint will be used to give your newspaper rolls a sleek, finished look, creating a striking contrast with the colorful flowers.
- Small Square Colored Papers: Numerous sheets of brightly colored paper, each measuring approximately 1.6 inches by 1.6 inches (4 cm x 4 cm). Variety in colors will make your floral arrangement vibrant and dynamic. Construction paper or origami paper works wonderfully.
- Marker: A fine-tip black marker is needed for adding delicate details to your paper flowers, enhancing their natural appearance.
- Ruler: Essential for precise measurements of the cardboard, newspaper rolls, and for helping to fold the flower petals neatly.
- Pencil: For light markings on paper, drawing the vase, and general measurements before cutting.
Having all these items ready before you start will ensure a smooth and enjoyable crafting experience. Let’s prepare to turn these simple materials into a beautiful piece of art!
Step-by-Step Guide: Crafting Your Elegant Paper Flower Decor
Now that you have all your materials assembled, let’s dive into the creative process. Each step is designed to be straightforward, allowing you to gradually build your masterpiece. Take your time, enjoy the process, and don’t hesitate to infuse your personal style into each element.
Step 1: Preparing Your Cardboard Canvas
The foundation of your paper flower display begins with the cardboard base. First, ensure your 7.9″ by 9.8″ cardboard piece is clean and free of any labels or marks. Next, take your plain paper and carefully cover one side of the cardboard. Apply a thin, even layer of glue across the entire surface of the cardboard, then gently lay the paper over it, smoothing out any air bubbles or wrinkles from the center outwards. This step creates a neat, uniform background for your floral arrangement, making the subsequent elements stand out beautifully. Allow it to dry completely before moving on, ensuring a firm and smooth surface.
Step 2: Crafting the Decorative Newspaper Frame
This step involves transforming ordinary newspaper into elegant decorative sticks for your frame. Begin by taking a thin stick (like a skewer) and a long, rectangular piece of newspaper. Tightly roll the newspaper around the stick, starting from one corner and rolling diagonally until you have a firm, cylindrical shape. Apply a small dab of glue to the end of the newspaper to secure the roll tightly. Create a total of four such rolls. Once dry, measure and cut three of these rolls to a length of 7.9 inches each. For the remaining four rolls, make them slightly longer, cutting them to 9.8 inches each. Paint all these newspaper sticks black using your acrylic paint, ensuring full coverage for a sleek finish. Allow them to dry thoroughly. Once completely dry, glue the 7.9-inch rolls into two pairs, and the 9.8-inch rolls into two pairs. This pairing adds thickness and a more substantial look to your frame.
Step 3: Assembling the Sturdy Frame onto the Cardboard Base
With your black newspaper roll pairs ready, it’s time to create the frame around your prepared cardboard base. Take the two paired 9.8-inch rolls and glue them along the longer edges of your cardboard, ensuring they are perfectly aligned and straight. Then, take the two paired 7.9-inch rolls and glue them along the shorter edges, fitting snugly between the longer pieces. This forms a neat, rectangular frame around your white paper-covered cardboard. Apply gentle pressure as the glue sets to ensure a strong bond. This black frame will provide a striking contrast and a polished border for your vibrant paper flowers, giving your artwork a refined and gallery-like appearance.
Step 4: Bringing Your Paper Flowers to Life
This is where the true beauty of the project unfolds! Pick one of your 1.6-inch square colored papers. Fold it in half diagonally to form a triangle. Then, fold it in half diagonally again, and one more time, making it a smaller, thicker triangle. With your scissors, carefully cut a half-heart shape along the open edges of the folded paper, ensuring the point of the heart is towards the folded corner. When you gently unfold the paper, it will reveal a perfectly symmetrical four-petal flower. Experiment with slightly different half-heart cuts to create various petal shapes – some rounder, some more pointed – to add diversity to your floral collection. Repeat this process numerous times with different colored papers to create an abundant garden of paper flowers. The more flowers you make, the fuller and more enchanting your final arrangement will be.
Step 5: Adding Depth and Realism to Your Flowers
To give your paper flowers a more realistic and three-dimensional appearance, we’ll add some simple yet effective details. Take your black marker and carefully draw a thin line down the middle of each petal of every flower. These lines will mimic the natural veins found in real flower petals, adding texture and visual interest. Next, using a ruler, gently press and fold each petal slightly inwards. This subtle fold gives the petals a gentle curve, lifting them from the flat surface and creating a beautiful, naturalistic form. This step is crucial for adding depth and dynamism to your flowers. Continue until all your paper flowers have these charming details. Don’t be afraid to experiment with how much you curve each petal; slight variations will enhance the organic feel of your bouquet.
Step 6: Designing and Positioning Your Vase
Now, let’s create the container for your beautiful flowers. Get a piece of black paper – its dark hue will provide a wonderful contrast against the white background and the colorful flowers. Using your pencil, lightly draw the outline of a vase. You can choose any shape you like, from a classic elegant silhouette to a more modern, abstract design. Keep it proportional to your cardboard base. Once you are happy with the shape, carefully cut out your black paper vase. Before gluing, position it on the white paper-covered cardboard to find the most aesthetically pleasing placement. Typically, it looks best centered and towards the bottom half of the cardboard. Once you’ve decided on its spot, apply glue to the back of the vase and firmly press it onto the cardboard. Ensure it is securely attached and straight.
Step 7: Arranging Your Blossoms and Finalizing Your Art
This is arguably the most exciting part – arranging your colorful paper flowers to create a captivating display! Take all the flowers you’ve made and begin to experiment with different arrangements around and above the black vase. You might choose to make it look like a lush, overflowing bouquet, with flowers cascading over the edges of the vase. Alternatively, you could opt for a more minimalist approach, placing a select few carefully positioned blossoms. Don’t be afraid to layer them, letting some slightly overlap others to create depth. Play with the color distribution, ensuring a balanced and pleasing visual. Let your creativity flow freely in this step; there’s no right or wrong way to arrange them. Once you are completely satisfied with your arrangement, meticulously glue each flower into its chosen spot. Apply a small amount of glue to the back of each flower and press firmly onto the cardboard. Allow everything to dry completely, and then step back to admire your beautiful, handmade paper flower craft!
Embrace Your Creativity with DIY Paper Flower Home Decor
Congratulations! You’ve successfully completed a charming and elegant paper flower craft that can now proudly adorn your home. This project is more than just a decorative piece; it’s a testament to your creativity, patience, and the joy of making something beautiful with your own hands. The vibrant colors and delicate textures of these paper flowers, framed by the sleek newspaper rolls, create a stunning visual impact that can brighten any room.
This DIY paper flower decor is incredibly versatile. It can be a captivating centerpiece on a console table, a refreshing accent on a shelf, or a personalized piece of wall art in your living space or entryway. Its handmade nature lends an authentic, personal touch that mass-produced decorations simply cannot replicate. Furthermore, the process of creating this craft offers a wonderful opportunity for relaxation and mindfulness, proving that hobbies can be both productive and therapeutic.
Feel free to experiment with different paper colors, vase shapes, or even add embellishments like glitter or tiny beads to make your next creation even more unique. The possibilities are endless when it comes to paper crafting. We encourage you to share your beautiful creations with friends and family, or even on social media, to inspire others to embark on their own crafting journeys. Your unique paper flower art is a celebration of simple materials transformed into extraordinary beauty. Happy crafting!