
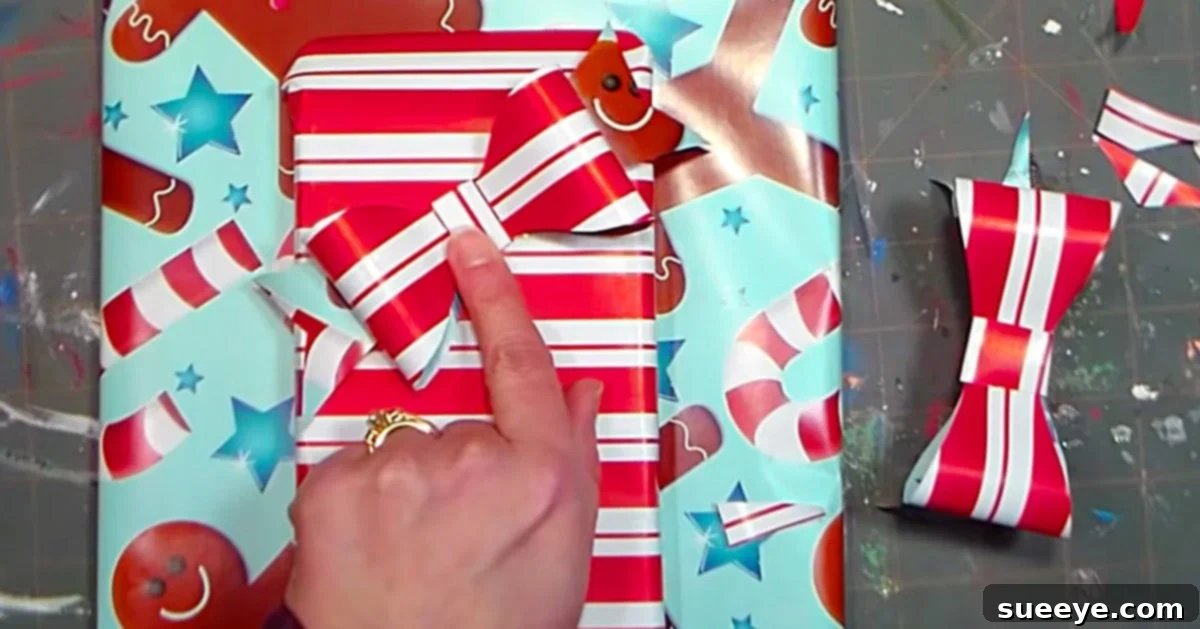
DIY Bow Out Of Wrapping Paper: Elevate Your Gift Wrapping Game
The festive season, birthdays, anniversaries – any occasion for gift-giving brings with it the joy of celebration. Yet, for many, it also presents a familiar challenge: the quest for the perfect gift bow. No matter how meticulously I plan or how many beautiful bows I stock up on for Christmas, there always seems to be a handful of last-minute gifts that are left unadorned, lacking that final touch. This exact scenario played out for me just yesterday, leaving me in a bind. Instead of rushing back to the store, I turned to the internet, specifically YouTube, searching for a creative solution to my bow dilemma. What I discovered was a truly brilliant tutorial: how to craft stunning gift bows from none other than wrapping paper.
This ingenious method was an absolute game-changer, perfectly suited to my problem. Why? Because wrapping paper is one item I always have in abundance. I make it a point to stock up after major holidays, buying rolls on deep discount for mere pennies on the dollar from stores like Dollar Tree, Hobby Lobby, or Michael’s Craft Store. It’s a simple, sustainable, and incredibly budget-friendly way to ensure I’m always prepared. This article will guide you through the process of creating beautiful, professional-looking bows using materials you likely already have on hand, transforming a potential last-minute scramble into a delightful DIY experience.
Why Choose DIY Wrapping Paper Bows? The Smart, Sustainable, and Stylish Choice
In a world increasingly focused on sustainability and mindful consumption, crafting your own gift bows from wrapping paper offers a multitude of benefits that extend far beyond simply having enough bows. It’s an opportunity to embrace creativity, save money, and contribute positively to environmental efforts. Let’s explore the compelling reasons why homemade bows should be your go-to choice for every occasion.
Cost-Effective Elegance: Say Goodbye to Expensive Store-Bought Bows
Walk into any gift wrapping aisle, and you’ll quickly notice how quickly the cost of pre-made bows can add up. Those glittery, perfectly formed embellishments, while undeniably attractive, often come with a price tag that can feel disproportionate to their temporary purpose. By utilizing leftover wrapping paper, or paper purchased on sale, you effectively eliminate this recurring expense. Imagine the savings over a year, across countless gifts for birthdays, holidays, and other celebrations! This DIY approach allows you to achieve an elegant, finished look without breaking the bank, turning potential waste into beautiful accessories.
Personalization and Uniqueness: A Touch That Matters
Store-bought bows, while convenient, often lack a unique touch. They’re mass-produced, limiting your ability to perfectly match them to your gift’s theme or the recipient’s personality. When you make your own bows, you unlock a world of creative possibilities. You can choose wrapping paper that perfectly complements the gift’s design, select specific patterns, or even mix and match colors to create truly bespoke embellishments. This personal touch demonstrates extra thought and effort, making the gift feel even more special and thoughtfully presented.
Eco-Friendly Gift Wrapping: A Step Towards Sustainability
One of the most significant advantages of making your own bows is its positive environmental impact. Pre-made bows are often made from plastic or non-recyclable materials, contributing to landfill waste. By repurposing wrapping paper – especially paper that might otherwise be discarded – you’re actively engaging in a sustainable practice. It’s a small but meaningful step towards reducing your ecological footprint, transforming what could be waste into a beautiful, functional item. This mindful approach to gift wrapping aligns perfectly with a greener lifestyle.
Accessible and Fun for Everyone: A Creative Family Activity
The beauty of this DIY project lies in its simplicity and accessibility. You don’t need specialized tools or extensive crafting experience. Most households have wrapping paper and a pair of scissors, making it an ideal spur-of-the-moment craft. Furthermore, it’s an engaging activity for the whole family. As I experienced firsthand, children are often captivated by the transformation of a simple piece of paper into a dimensional bow. It encourages creativity, develops fine motor skills, and provides a wonderful opportunity for shared family time, turning gift preparation into a joyful event rather than a chore.
Materials You’ll Need for Your DIY Wrapping Paper Bows
Gathering your supplies for this project is straightforward. You likely have most of these items already, making it an incredibly convenient and spontaneous craft.
- Wrapping Paper: This is your primary material. Choose paper that isn’t too flimsy or too thick, as extremely thick paper can be harder to fold and interlock. Both matte and glossy finishes work well, offering different aesthetic appeals. Experiment with patterns, colors, and textures!
- Scissors: A good pair of sharp scissors will ensure clean cuts and precise shapes.
- Optional: Ruler and Pencil: While not strictly necessary, these tools can help ensure accurate measurements for consistent bow sizes, especially if you’re aiming for uniformity across multiple bows.
- Optional: Double-Sided Tape or Glue Dots: For an extra secure hold in the center or to attach the finished bow to your gift.
Step-by-Step Guide: Crafting Your Perfect Wrapping Paper Bow
Let’s dive into the simple yet satisfying process of transforming a flat sheet of wrapping paper into a festive, dimensional bow. Follow these steps carefully, and you’ll be amazed at the beautiful results you can achieve.
Step 1: Prepare Your Paper – The Foundation of Your Bow
Begin by selecting your chosen wrapping paper. For a standard-sized bow, a piece measuring approximately 12 inches (30 cm) long and 4 inches (10 cm) wide works perfectly. However, don’t hesitate to experiment with different dimensions to create bows of various sizes – wider strips will yield fuller bows, while shorter strips will result in smaller, daintier embellishments. Once you have your strip, fold it lengthwise exactly in half. This crucial fold will ensure symmetry in your bow’s design and make the subsequent cutting steps much easier and more precise.
Step 2: Cut the “Fish” or Petal Shape – Defining Your Bow’s Loops
With your paper still folded in half, it’s time to cut the distinctive shape that will form the loops of your bow. Starting from the folded edge, begin cutting a curved line outwards towards the open edge, and then curve back in towards the folded edge, creating a shape that resembles a stylized fish or a long, slender petal. Ensure that the very center of the folded edge remains intact and uncut – this will be the central spine of your bow. The curves you create here will directly influence the final aesthetic of your bow’s loops, so aim for smooth, graceful arcs. The goal is to remove material from the top and bottom edges while keeping the center connected.
Step 3: Unfold and Create Notches – The Key to Interlocking
Gently unfold your cut paper. At this point, you’ll see a symmetrical shape that often resembles a pair of glasses, with two large ‘lenses’ connected by a central strip. Now comes the clever part: creating the interlocking notches. Along the central strip, cut small, distinct notches. It’s vital to cut these on alternating sides – one notch on the left side of the central strip, then the next notch on the right side, and so on. These notches should be deep enough to securely interlock with each other, but not so deep that they compromise the integrity of the paper and risk tearing. The precision of these cuts is crucial for the bow’s final assembly and its ability to hold its shape.
Step 4: Interlock and Form the Bow – The Magical Transformation
This is where the magic happens! Carefully bring the notched sections together. Gently interlock the notches you’ve just cut, fitting one into the other. As you do this, the flat paper will begin to gather and pucker in the middle, and the outer “petals” will naturally spring outwards, forming the characteristic loops of a bow. Once interlocked, pinch the center firmly to give your bow definition and volume. You’ll instantly see a gorgeous, three-dimensional bow take shape right before your eyes! For extra security, especially if the paper is a bit slick, you can apply a tiny dot of double-sided tape or a glue dot to the interlocked center at the back. This will ensure your beautiful creation stays perfectly intact on your gift.
Expert Tips for Perfecting Your Paper Bows
While the basic steps are straightforward, a few expert tips can elevate your homemade bows from good to absolutely fabulous, ensuring durability and a polished finish every time.
- Choosing the Right Paper Thickness: Not all wrapping paper is created equal. Thinner paper might be prone to tearing when cutting notches or interlocking, while extremely thick paper can be stiff and harder to manipulate into a graceful bow shape. Aim for a medium-weight paper that offers a good balance of flexibility and sturdiness. If you only have thin paper, consider doubling it up or using a slightly wider strip for added resilience.
- Experiment with Sizes: The 12″x4″ dimension is a fantastic starting point for a medium-sized bow, but don’t limit yourself! For small gifts or accents, try a 6″x2″ strip. For large gifts or a dramatic statement, you could go as big as 18″x6″. Adjusting the initial paper strip dimensions will proportionally change the size of your final bow, allowing you to customize it for any present.
- Precision in Cutting Notches: The success of your bow hinges on these small cuts. Ensure your notches are consistent in size and depth. If they are too shallow, they won’t interlock securely. If they are too deep, the paper might tear easily. A sharp pair of scissors will make this task much easier and cleaner.
- Secure the Center: While the interlocking mechanism is quite effective, a small piece of double-sided tape or a glue dot applied to the back of the interlocked center provides extra security, especially for bows that will be handled or shipped. It also helps to keep the bow’s shape perfectly intact.
- Adding Fluff and Volume: After interlocking, gently ‘fluff’ out the loops of your bow. You can carefully curl the edges slightly with your fingers or the blunt side of a scissor blade to give them more dimension and a softer, more voluminous appearance, mimicking the look of fabric bows.
- Creative Variations: Don’t be afraid to experiment with the initial “fish” cut. Try making more pointed tips for a star-like bow, or more rounded, wider petals for a softer look. You can also layer two different-sized bows made from contrasting papers for an even more elaborate embellishment.
Beyond the Holidays: Year-Round Applications for Your DIY Bows
While my initial need for these DIY bows stemmed from a Christmas wrapping emergency, I quickly realized their versatility extends far beyond the holiday season. These homemade creations are perfect for virtually any occasion that calls for a beautifully wrapped gift or a touch of decorative flair.
- Birthday Celebrations: Bright, colorful bows made from birthday-themed wrapping paper can add an extra pop to any birthday present, making it even more exciting to unwrap.
- Anniversaries and Weddings: Use elegant, subtly patterned, or metallic wrapping paper to create sophisticated bows that complement the refined nature of anniversary or wedding gifts.
- Baby Showers: Delicate pastels or playful patterns can be transformed into adorable bows for baby gifts, enhancing the sweetness of the occasion.
- Hostess Gifts and Thank You Presents: A simple bottle of wine or a thoughtful thank-you gift can be elevated with a handmade bow, showing an extra layer of appreciation.
- Craft Projects and Decorations: These bows aren’t just for gifts! Use them to adorn homemade cards, scrapbooks, party favors, or even as charming decorations for special events. You can string them together to create garlands or attach them to wreaths for a unique touch.
The ability to customize the size, color, and pattern means your DIY wrapping paper bows can seamlessly integrate into any theme or aesthetic, proving to be a truly invaluable crafting skill.
My Personal Experience: From Dilemma to Delightful Family Craft
That fateful day, faced with a stack of beautifully wrapped gifts awaiting their final embellishments, I truly felt the familiar pang of “not enough bows.” The store-bought options felt uninspired, and frankly, I was tired of the recurring expense. Discovering that simple YouTube tutorial was like finding a hidden treasure. I started with one strip of wrapping paper, following the instructions, a little skeptical but hopeful. The first cut of the “fish” shape, the careful unfolding, and then the almost magical moment of interlocking the notches – it was genuinely captivating.
The resulting bow was far more beautiful and substantial than I had ever anticipated. It had a wonderful dimension and a handmade charm that store-bought bows simply couldn’t replicate. In fact, it wasn’t long before my kids, drawn by the sound of crinkling paper and my focused concentration, came downstairs. They stood there, utterly intrigued, watching as the flat paper transformed into a graceful bow. Their eyes widened as they saw how the simple notches clicked together, creating an instant, elegant shape. Soon, one by one, they all pulled up chairs around our family table, eager to participate. It quickly turned into an impromptu family craft session, a delightful assembly line of creativity.
Within an hour, we had amassed a mountain of bows – easily twenty or more from each person! My daughter, completely charmed by our creations, even commented, “Mom, I wish we could just give bows for Christmas this year!” Her playful remark perfectly encapsulated the joy and satisfaction we all felt. Not only did we solve my immediate gift-wrapping crisis, but we also created lasting memories and a sense of shared accomplishment. One thing is for certain: we will have an abundance of beautiful, handmade bows not just for this year, but well into the future, all thanks to a simple piece of wrapping paper and a little bit of creative ingenuity.
Conclusion: Embrace the Art of DIY Gift Bows
As you can see, the art of making your own bows from wrapping paper is a skill well worth acquiring. It’s an incredibly simple, yet profoundly rewarding DIY project that transforms a common household item into a personalized, elegant, and environmentally friendly gift embellishment. From saving money and reducing waste to adding a unique touch to every present and fostering family fun, the benefits are undeniable.
So, the next time you find yourself with a stack of gifts and a scarcity of bows, or simply wish to add a special handmade touch, remember this tutorial. Grab a roll of wrapping paper, a pair of scissors, and unleash your inner crafter. You’ll not only solve your wrapping dilemmas but also discover a delightful new way to celebrate every occasion with style and sustainability. Happy crafting, and happy gifting!