
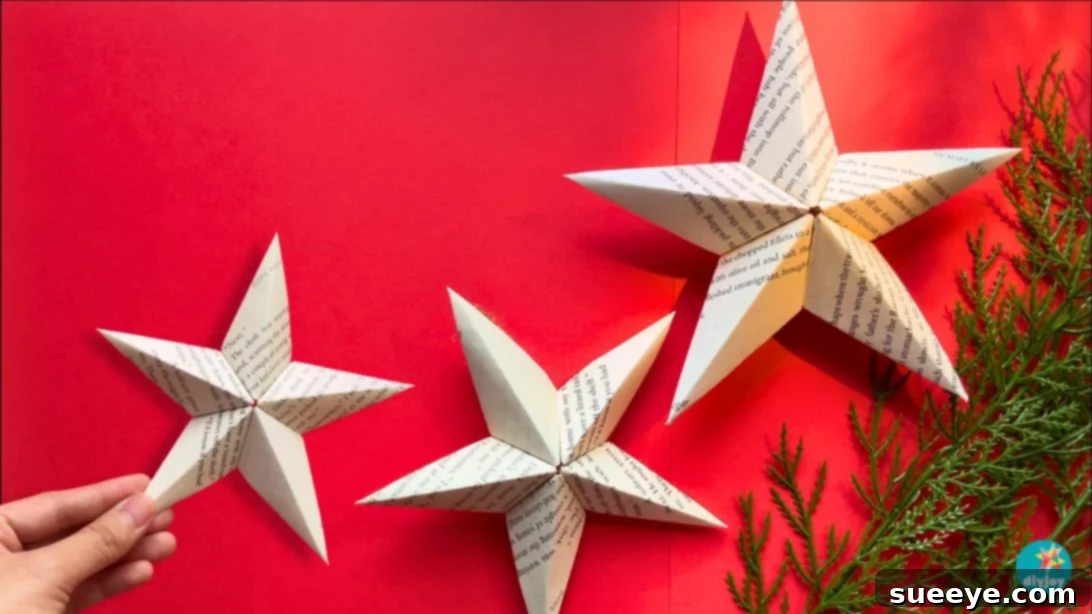
Do you have a collection of old books gathering dust on your shelves, books that nobody reads anymore, perhaps even some with stained pages or loose bindings? Instead of letting them take up space or heading to the landfill, why not give them a new lease on life? You can always pass them on to friends, donate them to local charities, or, even better, transform them into stunning, eco-friendly decorations for your home!
Craft Stunning 3D Paper Stars: An Easy DIY Guide to Upcycled Book Ornaments
This beginner-friendly tutorial will guide you through creating a beautiful 3D paper star ornament using recycled book pages. These versatile stars aren’t just for the festive season; they make charming additions to your walls, garlands, or even a child’s mobile all year round. Imagine the rustic charm and unique aesthetic they’ll bring to your living space. Best of all, this is an incredibly easy project, perfect for crafters of all skill levels, even if you’re just starting your DIY journey.
Why Upcycle Your Old Books? More Than Just Decoration
The motivation behind giving old books a new purpose goes beyond simple aesthetics. For many, it’s about sustainable crafting and reducing waste. I personally found myself with numerous forgotten books at home, their pages yellowing and their stories unread. As a creative individual, I saw not clutter, but potential. I began experimenting, eager to turn these literary relics into beautiful home accents. One of my first successes was a DIY Book Flower Vase, which proved to be a charming display for dried or paper flowers. With plenty of book pages still remaining, the idea for these elegant 3D paper stars was born. This particular craft quickly became a favorite due to its simplicity and stunning visual impact.
Choosing to upcycle your books offers a wealth of benefits. Firstly, it’s an incredibly eco-friendly practice, preventing perfectly good material from ending up in landfills. Secondly, it allows you to infuse your home decor with a truly unique, personal touch that mass-produced items simply cannot replicate. Each star, with its faint text and aged paper, tells a silent story, adding a layer of depth and character to your surroundings. Moreover, these projects are incredibly budget-friendly, requiring minimal materials you likely already have or can easily acquire.
The Allure of Paper Stars: Versatile Decor for Any Season
Stars have a timeless appeal, often symbolizing hope, guidance, and celebration. Crafting them from old book pages lends a rustic, vintage charm that fits seamlessly into various decor styles, from farmhouse chic to minimalist modern. These homemade Christmas decorations are incredibly versatile. While perfect for adorning your Christmas tree, they also excel as elements in a festive garland, unique wall art, elegant gift toppers, or even as parts of a whimsical mobile for a nursery. Their 3D structure adds visual interest and a sophisticated touch that belies their simple construction.
If you’re looking for enjoyable and easy Christmas crafts to tackle with family or friends this year, this paper star project is an ideal choice. It requires very few specialized materials – primarily just book pages, a pair of scissors, and some glue. This accessibility makes it a fantastic group activity, fostering creativity and shared enjoyment. I’m confident that everyone involved will have a delightful time creating these charming paper stars. Continue reading for the full, detailed instructions, or watch our video tutorial for a visual guide. Happy crafting!
How to Make a Paper Star: A Step-by-Step Guide
Learn how to turn ordinary book pages into extraordinary 3D paper stars with this easy-to-follow, step-by-step tutorial. Precision in folding is key to achieving a beautifully symmetrical star.
-
Preparation: Creating a Perfect Square Base
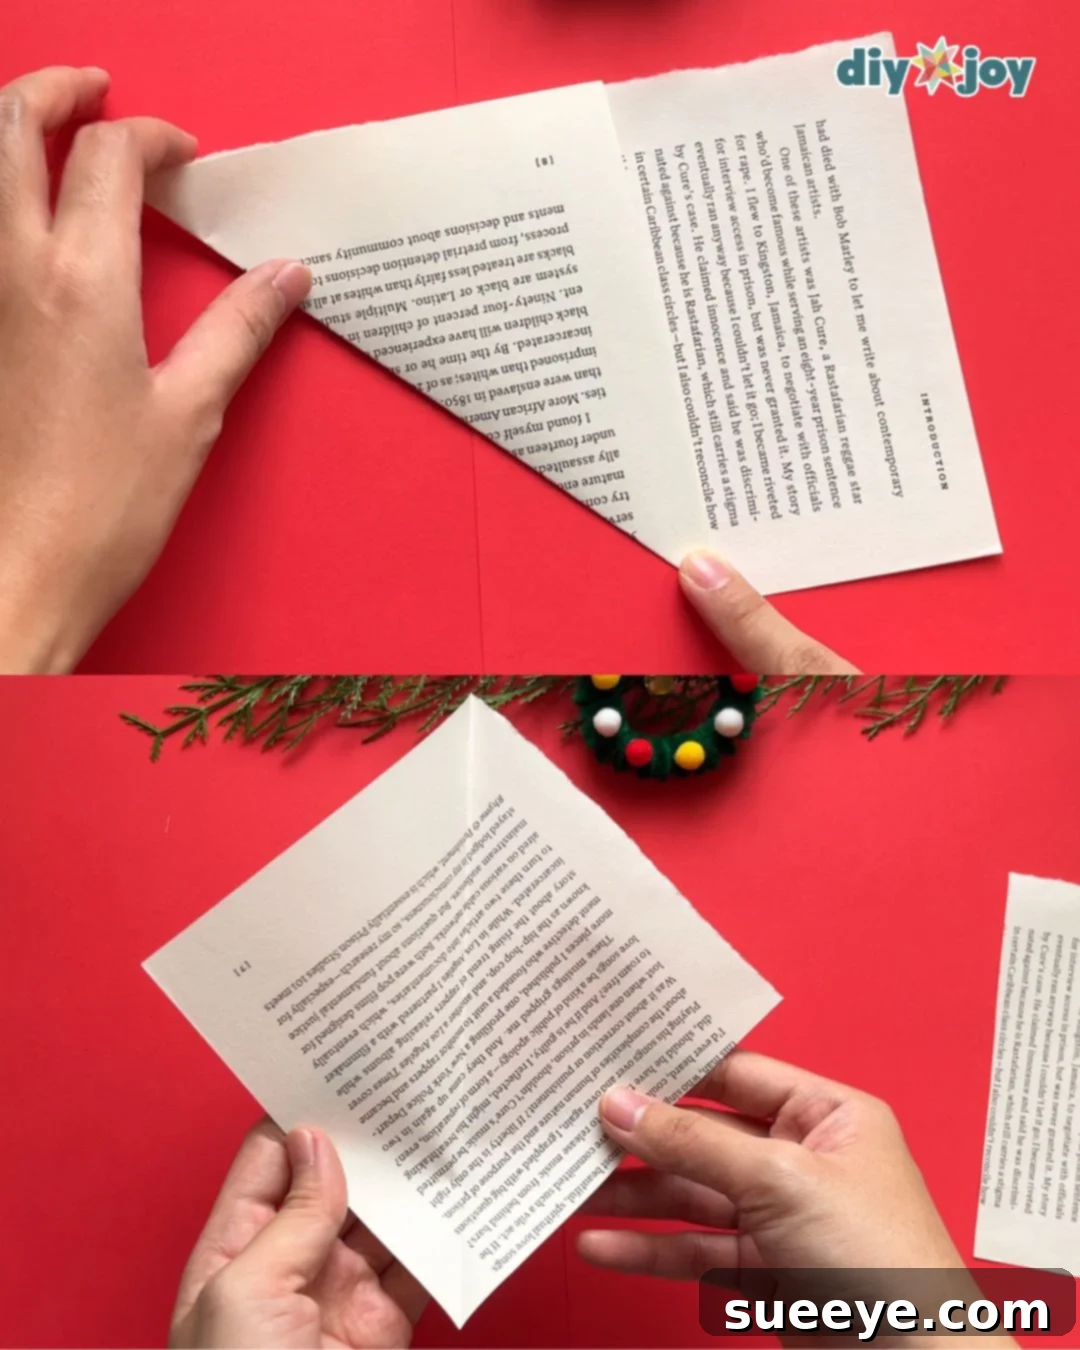
Begin by selecting a book page. Take one corner of the page and fold it diagonally to meet the opposite side, creating a perfect triangle. Ensure the edges align neatly to achieve a crisp fold. Any excess paper at the bottom should be carefully cut off, leaving you with a perfect square. This precise square forms the essential foundation for your star segment, so take your time to make it accurate.

-
Forming the Initial Folds: Guiding Your Paper
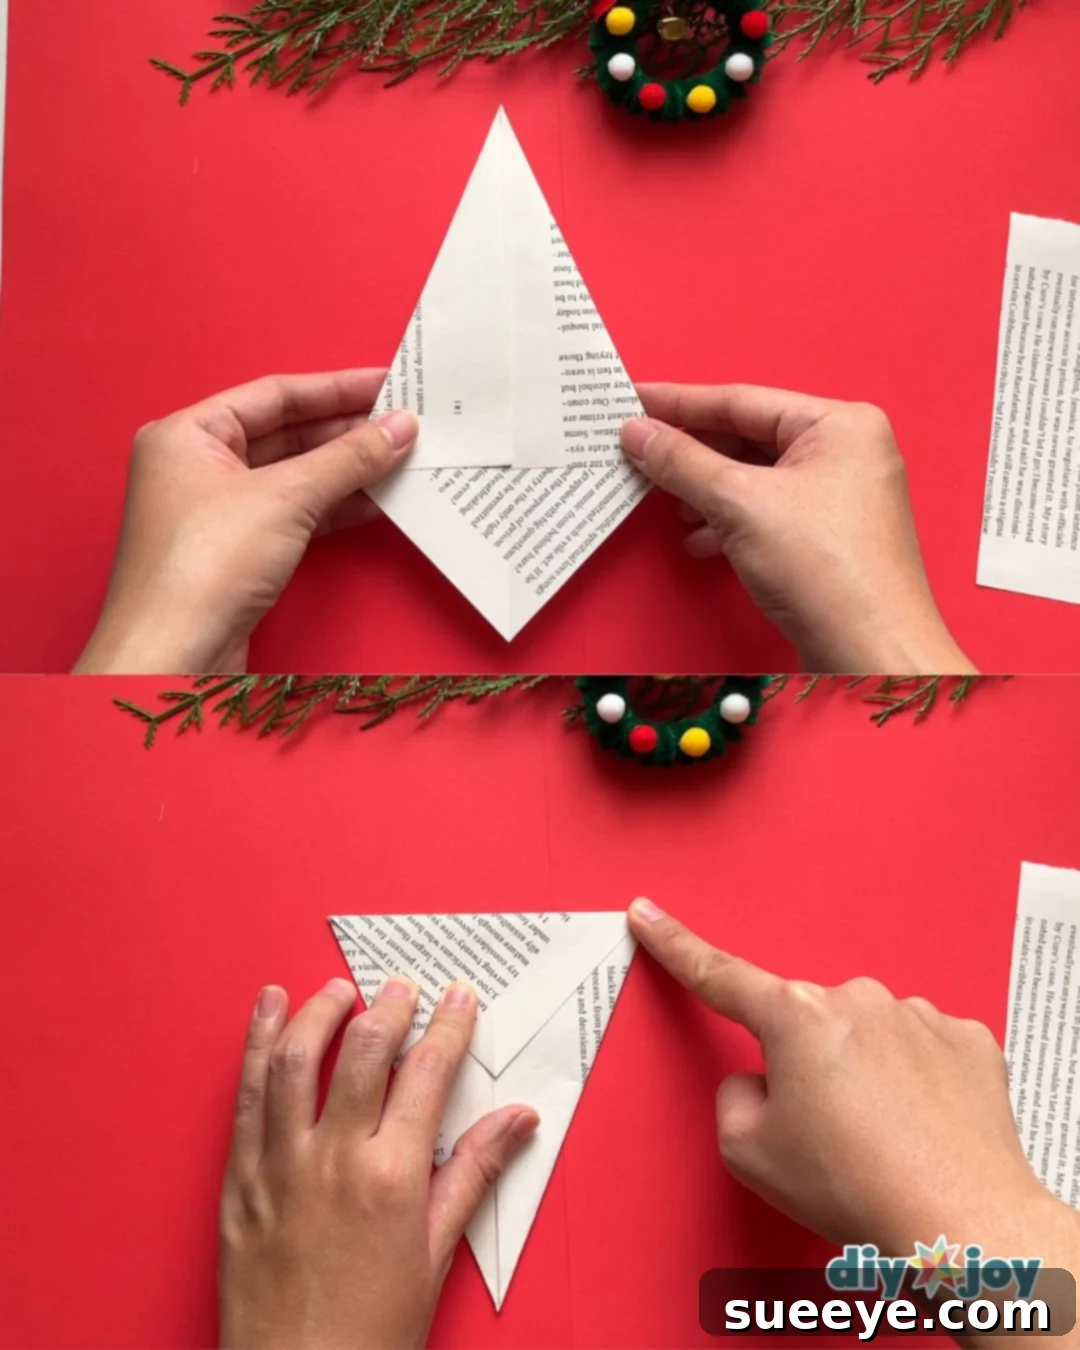
With your square prepared, fold the sides of the paper towards the center crease you just made. Aim for symmetry, ensuring both sides meet precisely at the middle. Once these folds are complete, rotate your paper 180 degrees. Now, fold the top part of the paper downwards, creating another distinct crease. These initial folds begin to define the structure of your star segment and are crucial for its final 3D shape.
-
Refining the Shape: The Star’s Points Emerge
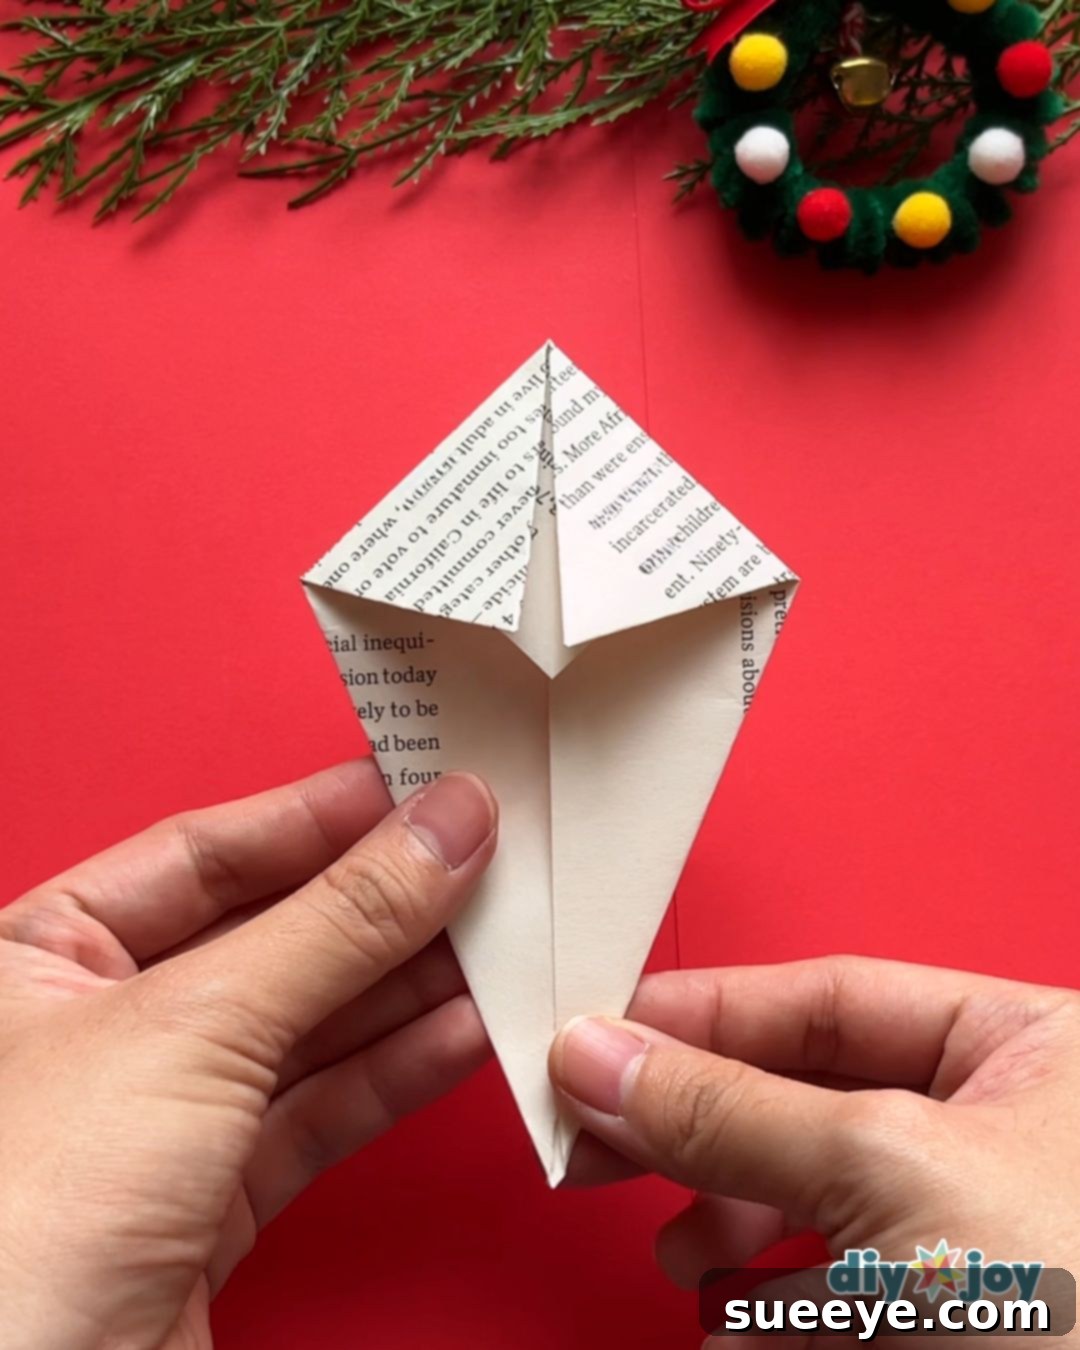
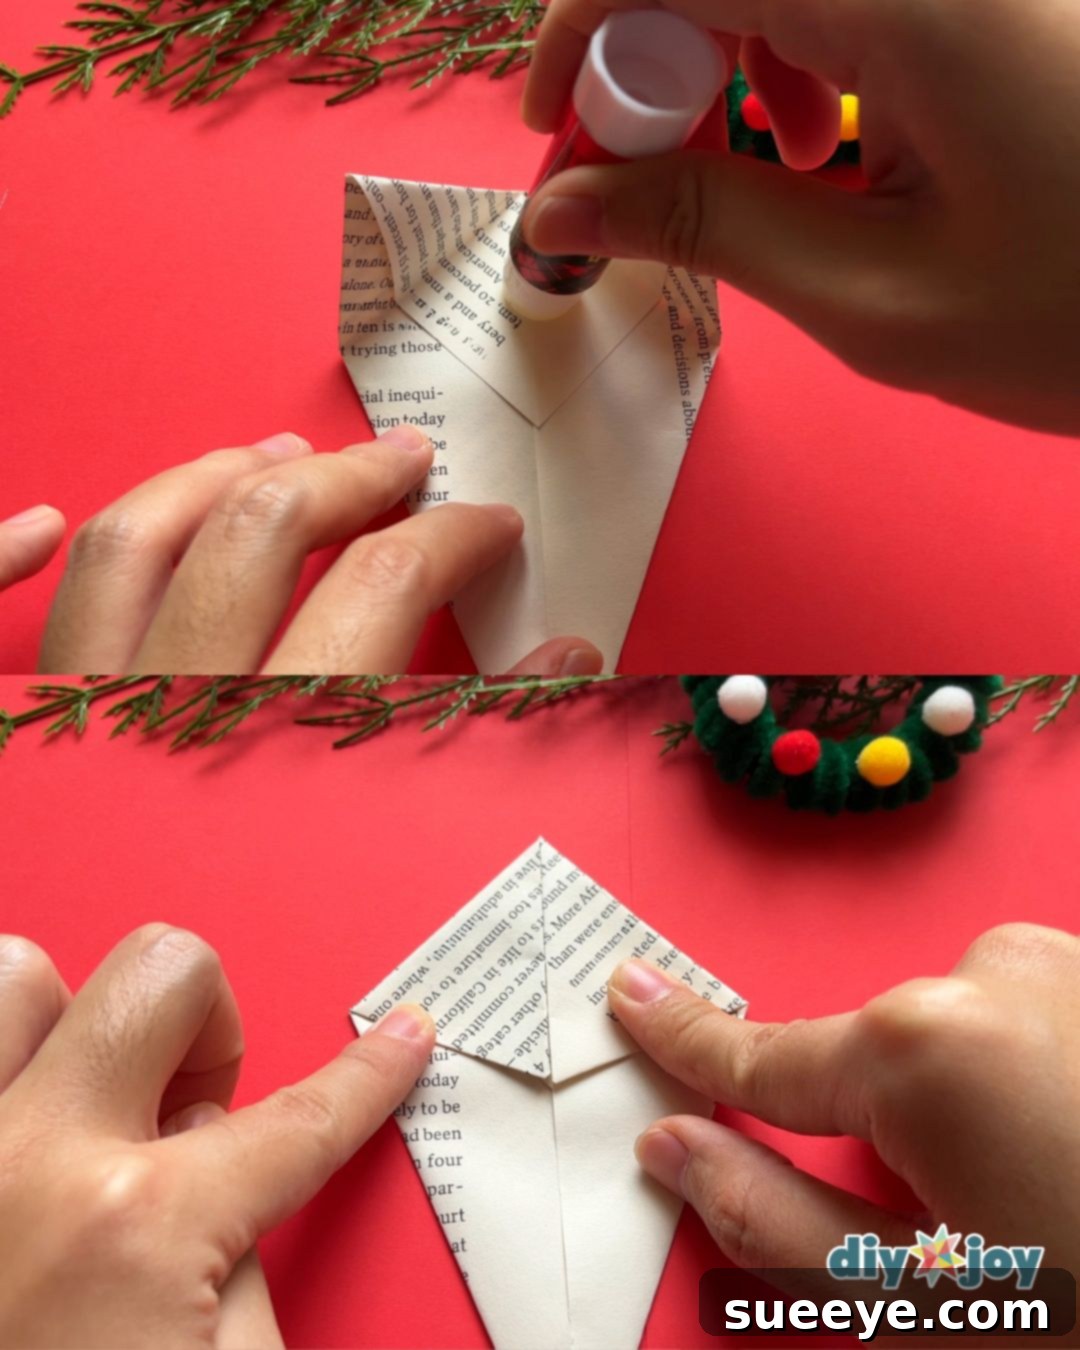
Now, take the top corners of your folded paper and fold them inwards towards the center. This step is where the distinct points of your star segment start to take shape. Make sure these folds are sharp and even on both sides to ensure a symmetrical and aesthetically pleasing star. Press down firmly on the creases to help them hold their form.
-
Securing the Structure: Applying Glue for Durability
Gently unfold the top part of your paper segment. Apply a small amount of glue to the folded sections you just made to keep them securely in place. A glue stick or a thin line of craft glue works best here, allowing for precise application without making the paper soggy. Press the folds together firmly and allow the glue to set for a moment before proceeding. This ensures the structural integrity of each star point.
-
Replication: Crafting Five Identical Segments
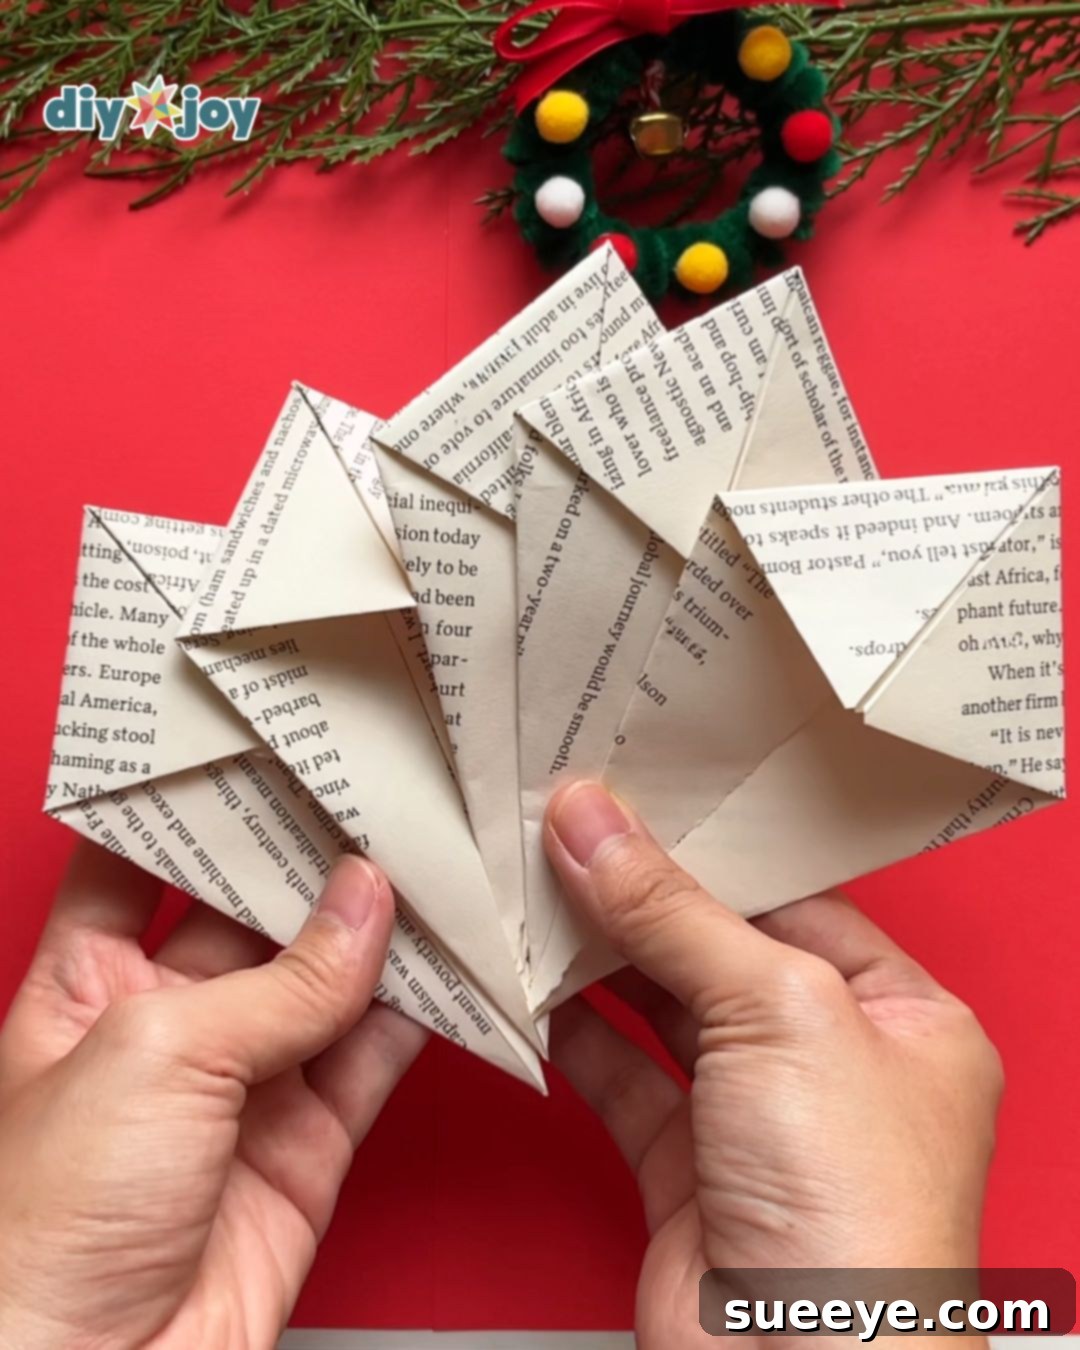
To create a complete 3D paper star, you will need five identical segments. Repeat steps 1 through 4 four more times, ensuring each piece is as consistent in size and folding as possible. This uniformity is crucial for a perfectly formed and balanced star. Working in batches can help maintain consistency and make the process more efficient.
-
Preparing for Assembly: Flattening the Foundations
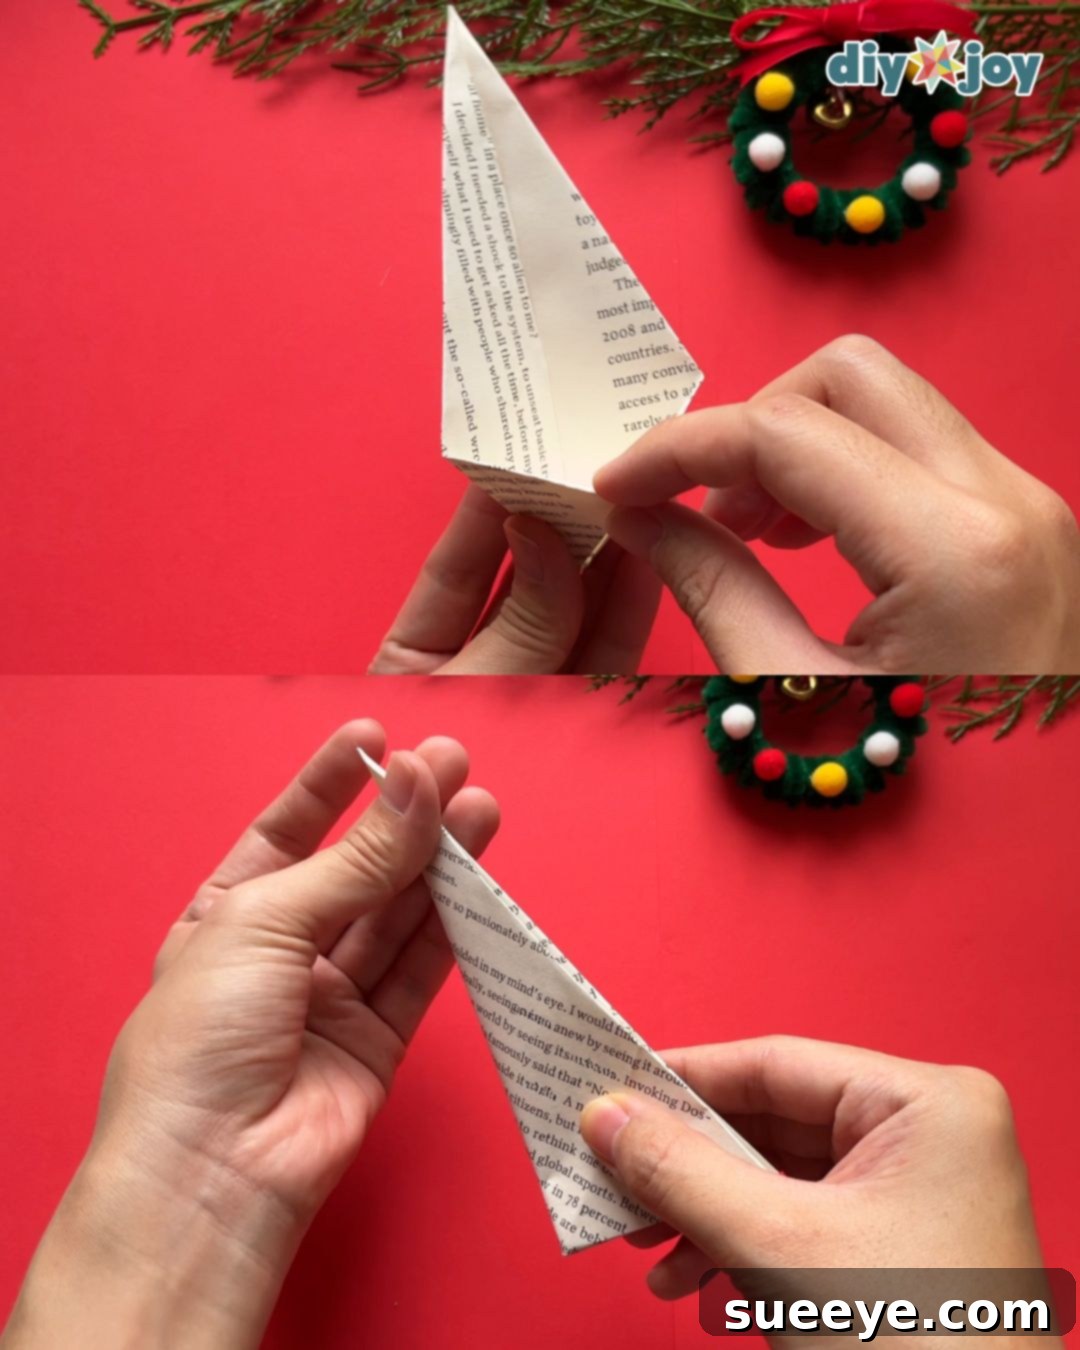
Take one of your completed star segments. Gently unfold the bottom part of the piece, then carefully flatten it out. Repeat this process for all five segments. This flattening step prepares the base of each segment for seamless assembly, allowing them to connect neatly and form the full star shape. Ensure the paper is flattened without tearing or wrinkling.
-
Assembling the Star: Connecting the Segments
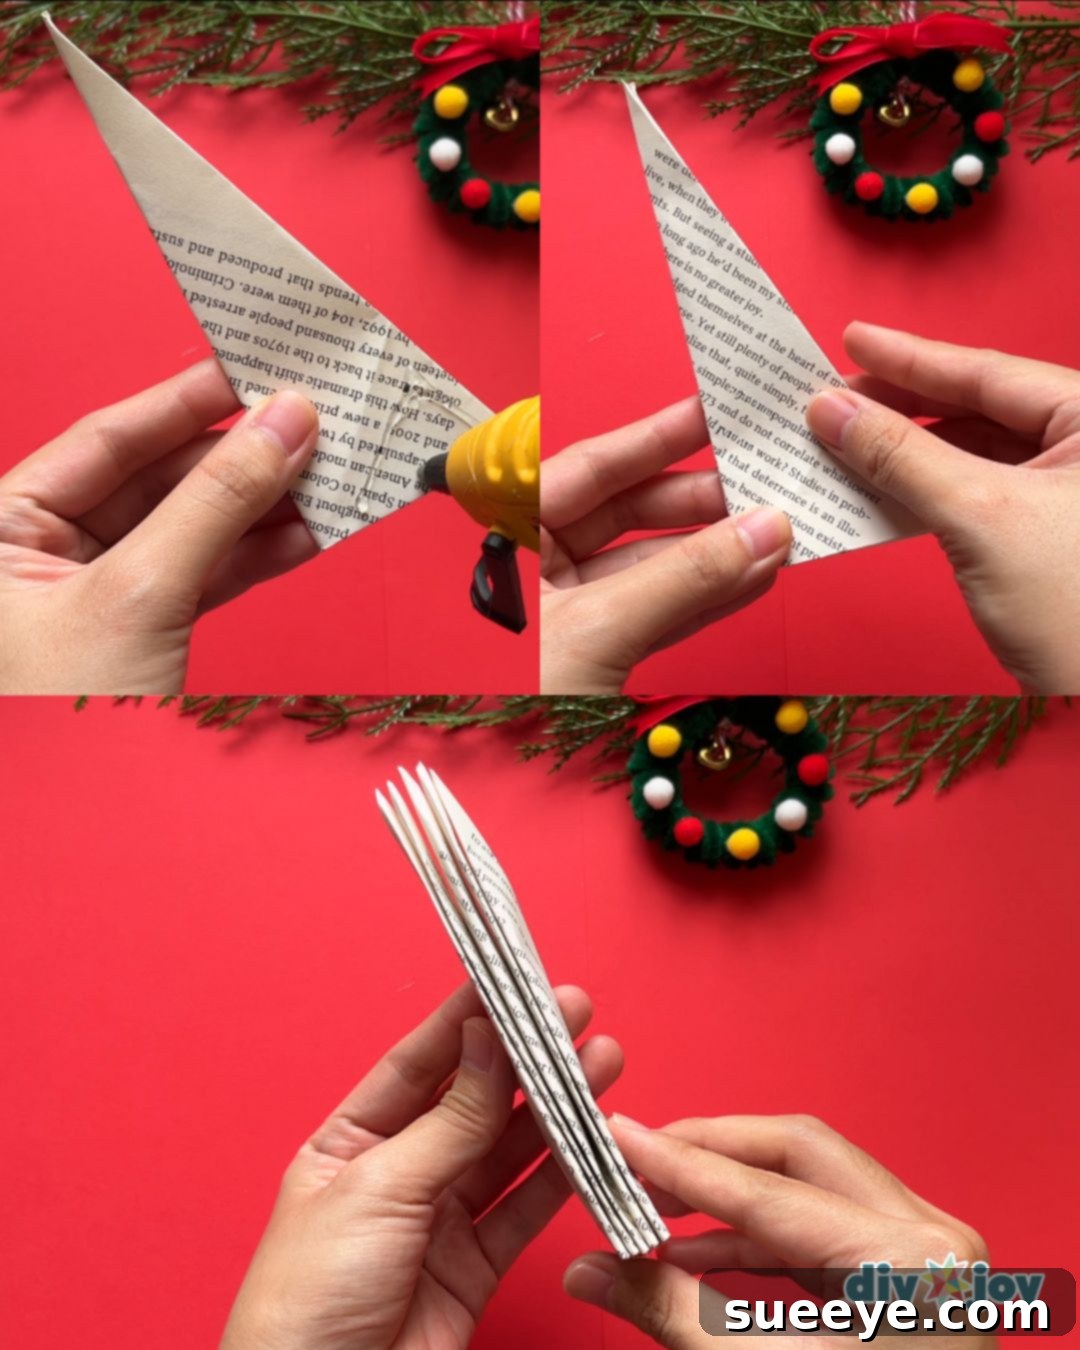
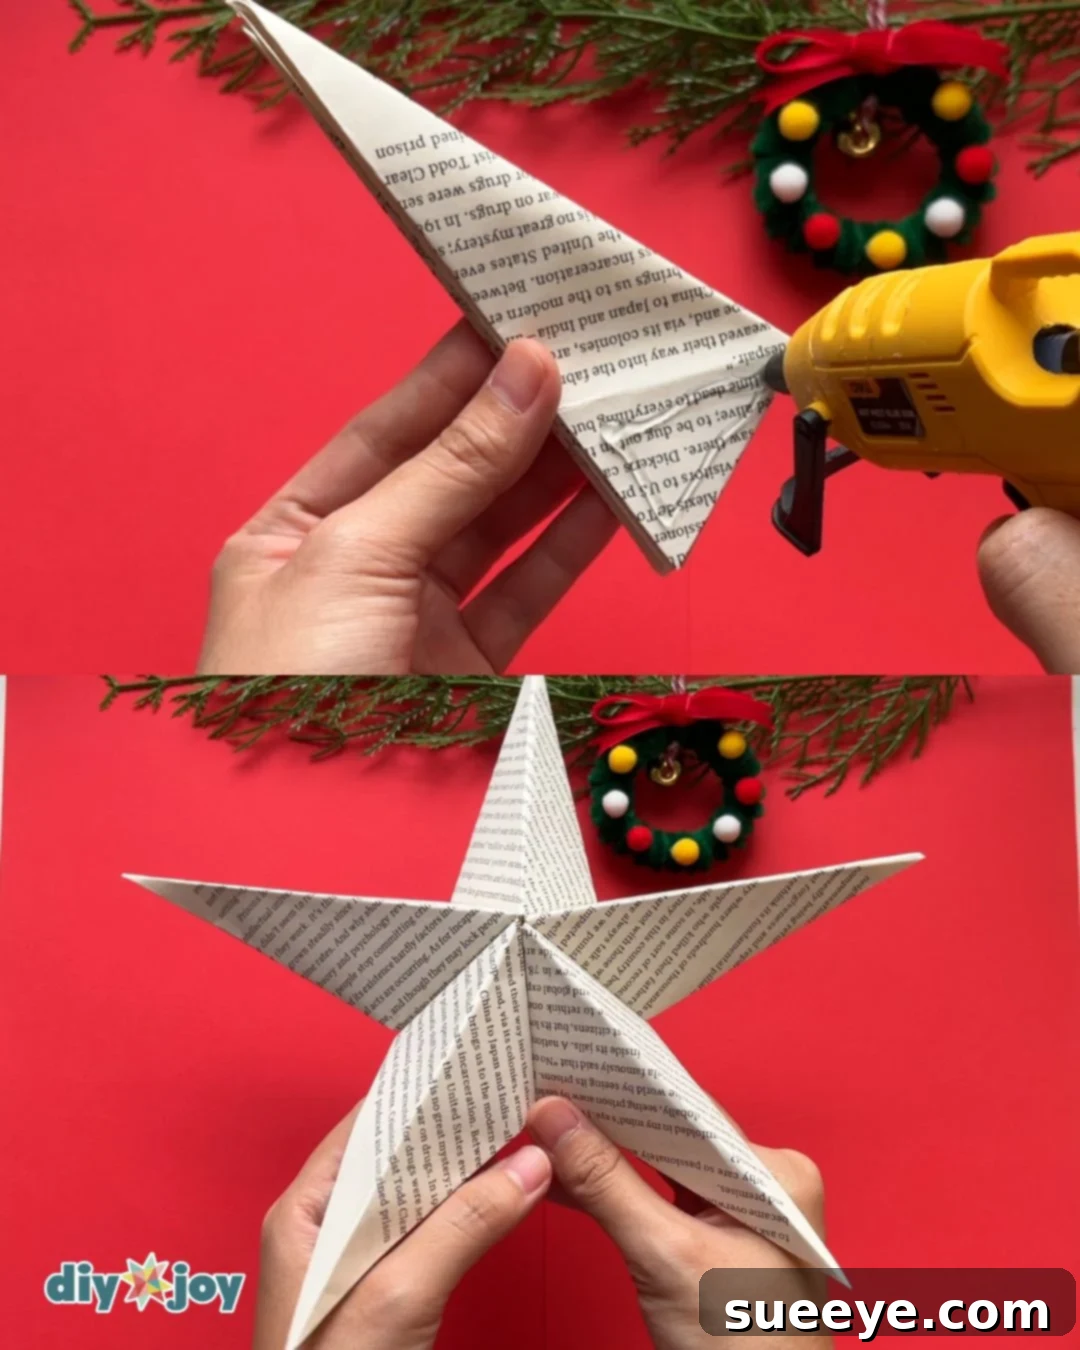
Now it’s time to bring your star to life! Apply glue along one of the flattened edges of a segment. Carefully attach it to the flattened edge of another segment, pressing them together firmly. Continue this process, gluing all five pieces together in a circular fashion. Take your time to align them perfectly, ensuring each connection is strong and even. A quick-drying craft glue or a hot glue gun (used carefully) can speed up this process.
-
Bringing it to Life: Completing Your Star Shape
Once you have four segments connected, carefully apply glue to the remaining open edge of the first segment and the open edge of the last segment. Bring these two ends together, pressing them firmly to complete the full star shape. Hold the star gently but steadily until the glue sets, ensuring the entire structure is stable and forms a cohesive 3D star. This is the moment your beautiful origami star truly emerges!
-
The Finishing Touch: Adding a Loop for Hanging
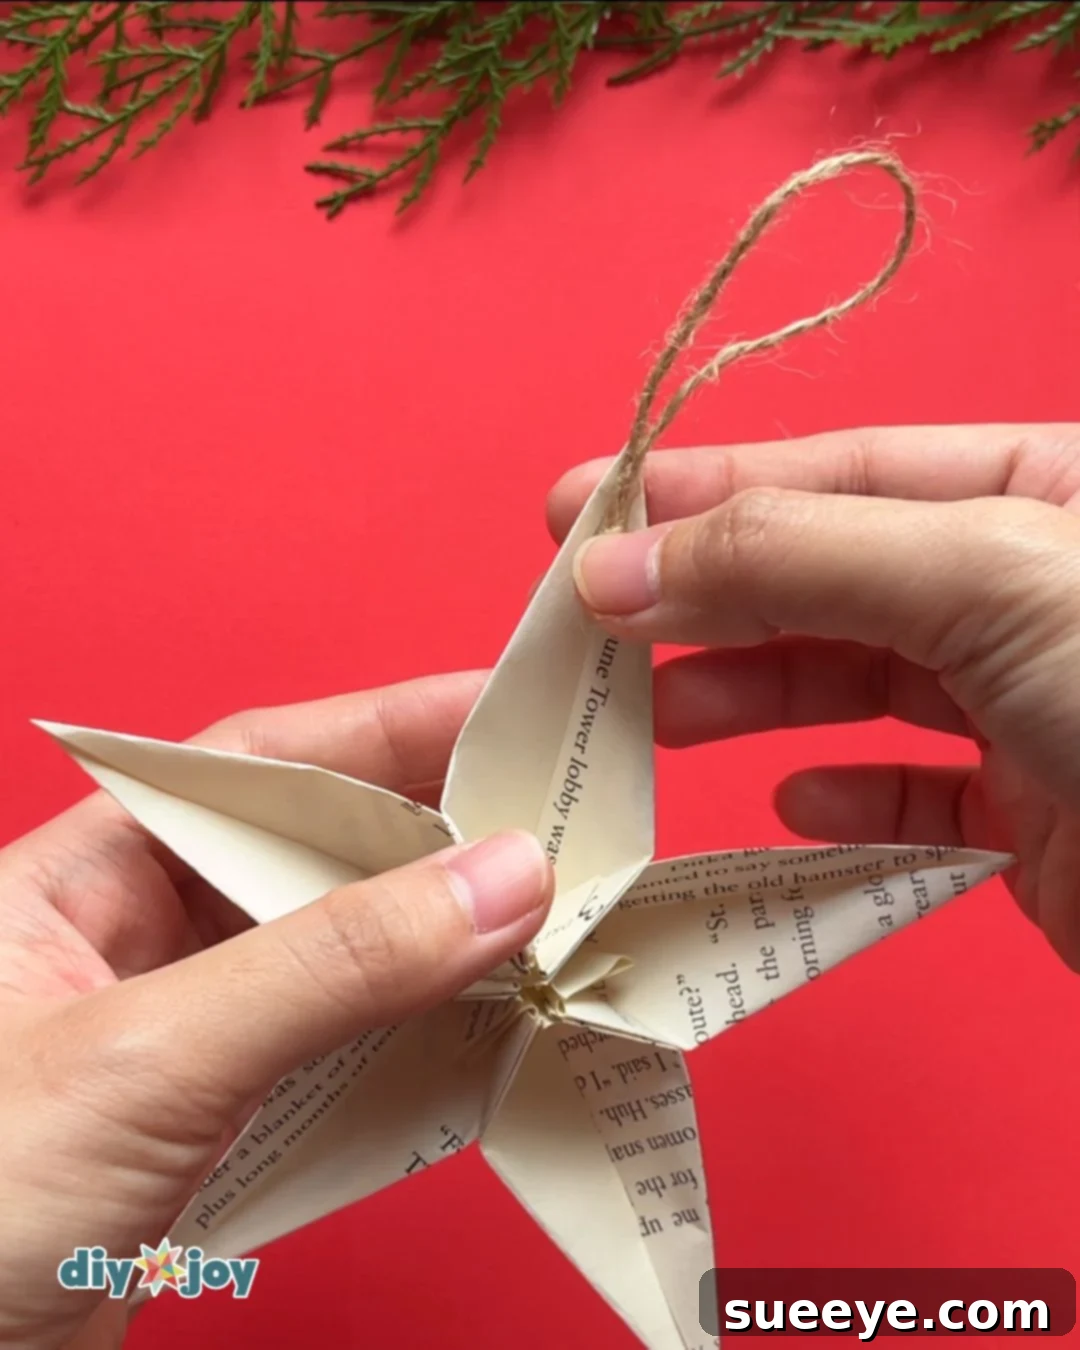
Finally, to make your 3D paper star ready for display, thread a piece of string or jute twine through one of the star’s points. Tie the ends of the string together to form a loop. This loop will allow you to hang your star on a Christmas tree, from a mantelpiece, or anywhere you wish to add a touch of handcrafted charm. Adjust the length of the string according to your display needs.
Tools You’ll Need
- A reliable glue gun for quick, strong bonds (optional, but recommended for speed)
- Sharp scissors for precise cuts
- A bone folder (optional, but highly recommended for crisp creases)
Materials to Gather
- Plenty of old book pages (the more, the merrier for practice!)
- String or jute twine for hanging (or fishing line for an invisible look)
- A strong glue stick or craft glue for securing folds
Creative Ideas and Variations: Personalize Your Paper Stars
While the classic book page star is undeniably charming, there are countless ways to customize your DIY paper star ornaments and make them truly your own:
- Paint for a Pop of Color. Don’t limit yourself to the natural aged look of book pages. After assembly, spray paint your stars in festive metallic colors like gold, silver, or bronze for a glamorous touch. Or, use acrylic paints to create solid vibrant colors, pastels, or even an ombre effect. You could also distress the edges with a contrasting color for an antique feel.
- Decorate with Embellishments. Enhance your stars with various decorative elements. Apply fine or chunky glitters while the glue is wet for a sparkling finish. Adhere small beads, sequins, or tiny buttons to the points or faces of the stars. Tie delicate ribbons or jute twine bows to the hanging loop. You can also use stamps to add patterns, or cut out small shapes from contrasting paper to layer onto your stars.
- Variety in Size and Texture. Create stars in different sizes by starting with larger or smaller square book pages. A collection of varying sizes grouped together makes for a dynamic display. Experiment with pages from different types of books – thicker paper for sturdier stars, or more delicate pages for a finer look. You could even mix in pages from old sheet music or maps for a truly unique aesthetic.
- Beyond Ornaments: Versatile Display Options. These paper stars aren’t just for your tree. String multiple stars together to create a stunning garland for your mantel or staircase. Hang them at varying heights from your ceiling to form a beautiful mobile. Use them as unique gift toppers for holiday presents, or incorporate them into a festive centerpiece for your dining table.

Expert Crafting Tip for Flawless Results
For the crispest and most professional-looking paper stars, ensure you fold the paper as flat and precisely as possible at each step. Using a bone folder (a simple tool available at most craft stores) will help you achieve incredibly sharp creases, making your star segments more defined and easier to assemble cleanly. Patience is also key; allow glue to dry completely between steps for a sturdy final product.
The Joy of Upcycling: A Sustainable Crafting Journey
Embracing crafts like these upcycled book decorations offers more than just a creative outlet; it’s a step towards a more sustainable lifestyle. By giving new purpose to items that would otherwise be discarded, you’re contributing to a reduction in waste and fostering an appreciation for handmade goods. There’s immense satisfaction in knowing that your beautiful home decor pieces were once forgotten stories, now transformed into symbols of creativity and environmental consciousness.
More Easy Christmas Crafts to Spark Your Creativity
Seasonal
DIY Christmas Tree With Pipe Cleaners
Seasonal
Make Beautiful DIY Snowflake Ornaments With Toilet Paper Rolls
Seasonal
Easy Paper Christmas Ornament
Easy 3D Paper Star Ornament | Video Tutorial
For a visual walkthrough of each step, be sure to watch our comprehensive video tutorial. It provides clear demonstrations that complement these written instructions, making the crafting process even easier. Don’t forget to share your amazing recycled book page stars with us!