
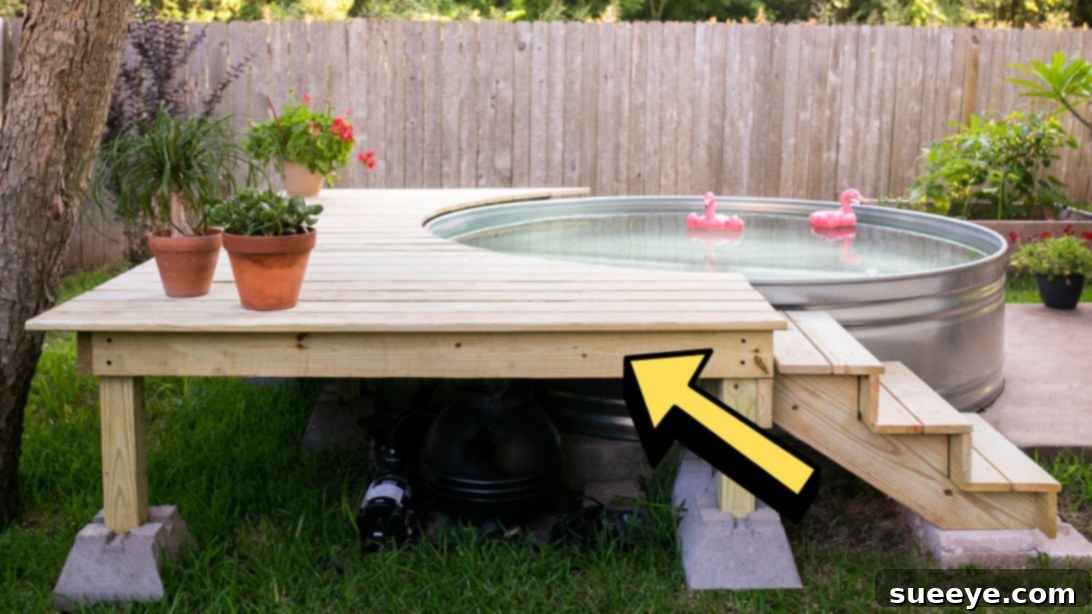
Transform Your Backyard: The Ultimate Guide to Building a DIY Stock Tank Pool Deck
Imagine escaping the summer heat in your very own backyard oasis, complete with a refreshing dip and a stylish, comfortable deck. Stock tank pools have become incredibly popular for their affordability and unique charm. But why stop there? Elevate your swimming experience and enhance your outdoor living space by building a beautiful, functional deck around your stock tank pool. Whether you’re looking for a spot to lounge, a safe entry point, or simply a more integrated look, a DIY pool deck is the perfect solution. This comprehensive guide, inspired by the creative insights of Maker Gray on YouTube, will walk you through every step to construct a stunning deck that will be the envy of your neighborhood.
Why Build a Deck Around Your Stock Tank Pool?
Adding a deck to your stock tank pool offers a multitude of benefits, transforming a simple galvanized tub into a sophisticated backyard feature. Beyond the aesthetic appeal, a deck provides practical advantages that greatly enhance your pool experience:
- Enhanced Aesthetics: A well-designed deck instantly upgrades the look of your stock tank, giving it a more permanent and integrated feel. It helps blend the pool seamlessly into your landscape design, creating a more cohesive and inviting outdoor space.
- Improved Accessibility and Safety: A deck makes it significantly easier and safer to get in and out of your pool, especially for children and those with mobility concerns. It eliminates the need for ladders or awkward steps directly into the tank, providing a stable platform.
- Comfort and Convenience: Imagine lounging by the pool on a warm day. A deck offers a clean, comfortable surface for sunbathing, placing towels, drinks, or even a small table and chairs. It extends your usable living space, creating an ideal spot for relaxation and entertaining.
- Protection for Your Pool: While sturdy, the exterior of a stock tank can be vulnerable to dings and scratches. A deck provides a protective barrier, especially around the rim, prolonging the life and appearance of your pool.
- Increased Property Value: Thoughtful outdoor improvements, like a custom pool deck, can add significant appeal and value to your home, making it more attractive to potential buyers should you decide to sell.
Planning Your Stock Tank Pool Deck Project
Before you pick up any tools, careful planning is key to a successful and enjoyable DIY project. Consider these essential aspects:
Design and Layout
- Size and Shape: How large do you want your deck to be? Will it wrap entirely around the pool, or will it be a partial deck with an integrated entry? Sketch out different ideas to visualize the best fit for your yard and needs.
- Location: Choose a spot that receives ample sunlight, is relatively level, and has good drainage. Consider proximity to water sources and electricity if you plan on adding pool pumps or lighting.
- Local Regulations: Always check with your local municipality for any building codes, permits, or specific requirements related to deck construction and pool enclosures. This step is crucial to avoid future complications.
Material Selection
The choice of materials will impact the deck’s durability, appearance, and maintenance. For outdoor structures exposed to the elements, using pressure-treated lumber is paramount:
- Deck Blocks: These pre-cast concrete blocks provide a stable and adjustable foundation for your deck.
- Treated 4×4 Posts: Essential for vertical support, ensuring the deck’s stability and elevation. Pressure-treated wood resists rot and insect infestation.
- Treated 2×6 Boards: These form the framework of your deck (rim joists and interior joists), providing structural integrity.
- Deck Boards: The visible surface of your deck. Options include pressure-treated wood, cedar, redwood, or composite decking. Each has different costs, maintenance requirements, and aesthetic qualities. Composite decking offers excellent durability and low maintenance, while natural wood provides a classic look.
- Hardware: Use galvanized or stainless steel screws, bolts, and joist hangers to prevent rust and ensure the long-term strength of your deck. Timber lock screws are excellent for heavy-duty connections.
Essential Tools and Materials
Having the right tools makes any DIY project smoother and safer. Here’s a detailed list of what you’ll need:
- Deck Blocks: For the foundation.
- Treated 4 by 4 Posts: For vertical support.
- Treated 2 by 6 Boards: For framing (rim joists and interior joists).
- Clamps: Indispensable for holding boards in place while securing them.
- Galvanized Joist Hangers: Crucial for securely connecting joists to the rim boards.
- Timber Lock Screws (or heavy-duty deck screws): For robust connections, especially for securing posts and main frame elements.
- Drill/Impact Driver: For pre-drilling holes and driving screws quickly and efficiently.
- Level Bar (or spirit level): Absolutely vital for ensuring your deck is perfectly level and plumb.
- Pencil: For marking cuts and measurements.
- Tape Measure: For accurate measurements.
- Circular Saw or Miter Saw: For precise and efficient cutting of lumber.
- Jigsaw (optional but recommended): For cutting the curved shape of the deck boards around the pool.
- Safety Glasses and Gloves: Always prioritize personal safety.
- Deck Boards: Your chosen material for the deck surface.
- Detailed Plans: Consider downloading specific plans, like those from Maker Gray, for precise measurements and guidance.
Step-by-Step Directions: Building Your Stock Tank Pool Deck
Step 1: Laying the Foundation and Setting Posts
The foundation is the most critical part of your deck, ensuring stability and longevity. Begin by preparing your work area. If your stock tank pool is already in place, consider covering it to protect it from debris and to make cleanup easier later. This also ensures your pool stays clean during construction.
Strategically place the deck blocks around the perimeter where your deck will sit. These blocks will serve as the primary base and support for your entire deck structure. The key to a stable deck is a perfectly level foundation. Use your level bar meticulously to ensure that each deck block is installed evenly. Adjust the ground underneath as necessary, compacting it to provide a solid base for each block. This initial precision will save you considerable time and effort in later steps.
Next, take your treated 4×4 posts. Cut them to a length that allows them to extend well above your desired final deck height initially; you’ll trim them precisely later. Set one post vertically into each deck block. While they don’t need to be at their final height yet, ensure they are standing straight and are roughly aligned. To secure these posts and create a robust frame, attach a treated 2×6 board horizontally between each pair of posts, just below where your deck frame will begin. Use strong timber lock screws to securely fasten the posts to this connecting board. This creates a stable base frame before you even begin the main deck framing.
Step 2: Framing the Deck and Laying Deck Boards
With your posts and initial cross-supports in place, it’s time to build the main frame of your deck using treated 2×6 boards. First, determine the exact height you want your finished deck surface to be. Mark this height on your posts. Then, using clamps, temporarily position the first rim joist board at this marked height, wrapping it around the exterior of your posts. This board will define the outer edge of your deck. Once satisfied with its position and level, securely fasten it to the posts using timber lock screws. Repeat this process, creating the entire perimeter rim joist around your deck, ensuring all connections are strong and square.
Next, you’ll add the interior joists that run perpendicular to your rim joists, providing support for the deck boards. Measure the appropriate spacing for your joists (typically 12 or 16 inches on center, depending on your deck board thickness and local codes). Mark these measurements on your rim joists. Install galvanized joist hangers at each mark. These hangers provide a strong, metal-to-wood connection. Cut your 2×6 joist boards to fit precisely between the rim joists, then slide them into the hangers and secure them with appropriate nails or screws specified for joist hangers. Ensure all joists are level and parallel.
Finally, it’s time for the decking itself. Begin by preparing the first deck board that will lie closest to your stock tank pool. Since stock tanks are round, this board will require a curved cut. Carefully measure and trace the curve of your pool’s rim onto the deck board. A flexible measuring tape or a large compass can help with this. Use a jigsaw to precisely cut along this line, creating a custom fit. Pre-drill pilot holes for your screws to prevent splitting the wood, especially near the edges. Lay this first custom-cut piece around the pool, securing it to the joists below with deck screws. Continue laying the rest of your deck boards, working outwards from the pool. Ensure consistent spacing between boards for drainage and aesthetic appeal, using spacers if needed. Secure each board firmly to the joists with two screws at every joist intersection. To complete your functional deck, design and build a simple stair tread at a convenient side of your pool, making access even easier and safer. Ensure the stair treads are sturdy and level.
Finishing Touches and Safety Considerations
Once the main construction is complete, consider these final steps to enhance the safety and longevity of your new deck.
Sanding and Sealing
For a smoother finish, lightly sand any rough spots or splintered edges on your deck boards. This is especially important for areas where people will walk barefoot. After sanding, apply a high-quality deck stain or sealer. This not only protects the wood from UV damage, moisture, and rot but also enhances its natural beauty and makes it easier to clean. Choose a product specifically designed for outdoor decks.
Safety Railings
If your deck is elevated significantly above the ground, local building codes may require safety railings. Even if not mandated, consider adding a railing for peace of mind, especially if you have children or pets. Railings can also be a beautiful design element, adding character to your deck.
Lighting
Consider adding subtle lighting to your deck for evening use. Solar-powered deck lights, LED strip lights under the rim, or post cap lights can create a magical ambiance and improve safety after dark.
Landscaping Around the Deck
Integrate your new deck into your backyard landscape. Plant some decorative shrubs or flowers around the base to soften its edges and blend it into the garden. Ensure proper drainage around the deck to prevent water from pooling.
Maintaining Your DIY Pool Deck
To ensure your stock tank pool deck remains a beautiful and functional part of your backyard for years to come, regular maintenance is essential:
- Regular Cleaning: Sweep leaves and debris off the deck regularly. Periodically wash the deck with a mild cleaner and a soft brush to remove dirt, mildew, and algae buildup.
- Inspect for Damage: Annually check for loose screws, warped boards, or signs of rot or insect damage. Address any issues promptly.
- Reapply Sealer: Depending on your climate and the type of sealer used, you may need to reapply a protective stain or sealer every 1-3 years to maintain the wood’s integrity and appearance.
- Winterization: If you live in a climate with harsh winters, follow appropriate winterization procedures for both your pool and deck to prevent damage from freezing water and snow.
Conclusion: Enjoy Your Backyard Oasis
Building a DIY stock tank pool deck is a rewarding project that significantly elevates your outdoor living experience. It transforms a simple stock tank into a sophisticated and inviting feature, offering enhanced comfort, safety, and aesthetic appeal. With careful planning, the right tools, and a step-by-step approach, you can create a stunning backyard oasis that you and your family will enjoy for many seasons to come. For more detailed instructions and visual guidance, we highly recommend visiting Maker Gray’s YouTube channel and their website for plans. Dive in and make your dream backyard a reality!
*All images in this guide are credited to Maker Gray via YouTube. Give their channel a visit and subscribe for more inspiring DIY projects!