
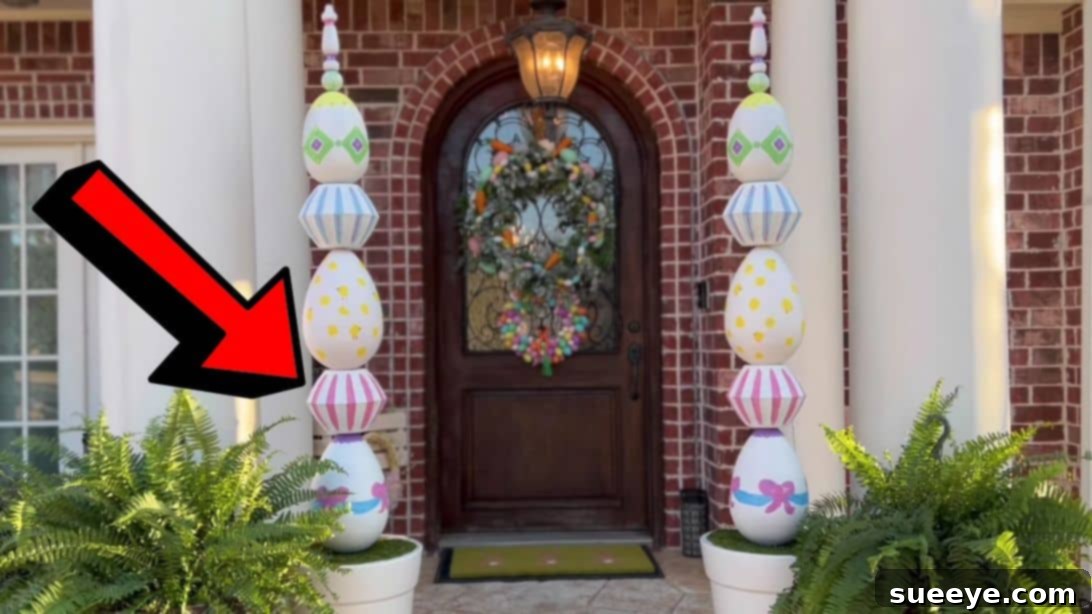
As spring awakens, bringing with it the joyful spirit of Easter, many of us seek creative ways to infuse our homes and gardens with festive charm. If you’re looking to make a grand statement without breaking the bank, look no further than this magnificent DIY Easter egg topiary. This project transforms simple, affordable items from your local dollar store into a stunning outdoor decoration that promises to capture attention and spread holiday cheer. Forget subtle accents; this year, embrace bold, vibrant decor that truly celebrates the season.
Creating impressive, large-scale decorations doesn’t have to be complicated or expensive. This comprehensive tutorial, inspired by the brilliant craftsmanship of Rose Lumare DIY on YouTube, guides you through each step of constructing a beautiful Easter topiary. With common craft supplies and a touch of creativity, you’ll be amazed at the professional-looking result you can achieve. Whether you follow the instructions precisely or use them as a springboard for your own unique design, this project offers a rewarding way to personalize your Easter celebrations.
Crafting Giant Easter Egg Topiaries: Your Ultimate DIY Guide
Why Choose DIY Easter Topiary Decor?
Embracing DIY projects for holiday decor offers a multitude of benefits, especially when it comes to a large-scale piece like an Easter topiary. Firstly, it’s incredibly cost-effective. By utilizing dollar store finds, you can create a high-impact decoration for a fraction of the price of store-bought alternatives. Secondly, DIY allows for unparalleled personalization. You have complete control over the color scheme, patterns, and embellishments, ensuring your topiary perfectly complements your existing outdoor aesthetic. It’s also a wonderfully engaging activity, perfect for individuals looking for a creative outlet or families wanting a fun project to tackle together. Beyond the practical advantages, there’s immense satisfaction in showcasing a handmade piece that garners admiration from neighbors and guests, enhancing your home’s curb appeal with a unique, festive touch.
This large outdoor Easter egg topiary is designed to withstand the elements, making it ideal for your front porch, garden, or entryway. Its imposing size makes it a focal point, inviting smiles and setting a cheerful tone for Easter gatherings. Plus, the durable construction ensures you can enjoy this splendid decoration for many springs to come, making it a valuable addition to your seasonal decor collection.
Essential Materials for Your Easter Egg Topiary
Gathering your materials is the first exciting step in bringing your vision to life. The beauty of this project lies in its reliance on affordable, easily accessible items, many of which can be found at your local dollar store. Here’s a detailed list of what you’ll need:
- Two large plastic pots: These will form the sturdy base of your topiaries. Look for pots with a decent depth to provide stability for the cement and wooden rods.
- Cement: Essential for anchoring the wooden rods securely. You’ll need enough to fill the bottom of both pots to a significant depth.
- Two long wooden rods: These are the central pillars of your topiaries. Choose rods that are strong, straight, and tall enough to achieve your desired topiary height.
- Two small wooden rods: These will be used for the very top sections, connecting the final ornament.
- Painter’s tape: Useful for temporarily securing the wooden rods in place while the cement dries.
- Styrofoam: Provides a lightweight filler and a surface for the grass sheet. Look for blocks that can be cut to fit your pot.
- Cutter or X-Acto knife: For precise cutting of styrofoam and other materials.
- Hot glue gun and glue sticks: Your primary adhesive for assembling the various elements and ensuring a secure build.
- Soldering gun (optional): Can be used to create clean, precise holes in plastic items like bowls and eggs. If you don’t have one, a heated skewer or drill can also work with caution.
- Large plastic eggs (Dollar Tree): The star of your topiary! Stock up on plenty in various colors, or choose a uniform color for painting.
- Plastic bowls (Dollar Tree): These will act as separators between the egg layers, adding structure and visual interest.
- Two old Christmas ornaments: A clever way to reuse and recycle. These will crown your topiaries, adding a decorative flourish.
- Grass sheet: A roll of artificial grass will give your topiary a natural, garden-like base.
- Primer paint: Essential for preparing plastic surfaces, ensuring your chosen paint adheres well and provides a lasting finish.
- Different colors of paint: Acrylic craft paints are a good choice for decorating the eggs and bowls. Be creative with your palette!
- Paintbrushes: Various sizes for applying primer and decorative paints.
Step-by-Step Guide to Crafting Your Easter Egg Topiaries
Step 1: Laying the Foundation and Initial Assembly
The stability of your topiary relies on a strong foundation. Begin by mixing equal parts of cement and water in a suitable container. Aim for a consistency that is thick enough to hold its shape but still pourable. Carefully pour this mixture evenly into the bottom of each large plastic pot, filling them to a depth of about 3-4 inches. Immediately after pouring, insert one long wooden rod into the center of the cement in each pot. It’s crucial for the rod to be perfectly upright and centered to ensure a balanced topiary. Use painter’s tape to secure the rod to the rim of the pot, holding it firmly in position while the cement begins to set. Allow the cement to dry completely, which may take 24-48 hours depending on humidity and cement type. Patience here is key to a stable structure.
Once the cement is dry, you can begin adding the first layers. Take a piece of styrofoam and cut it to fit snugly inside the pot, slightly overlapping the edges. This styrofoam will eventually be covered by the grass sheet, providing a neat finish. Next, prepare your plastic bowls. Using a soldering gun (or a carefully heated skewer), melt a hole in the bottom center of each blue bowl. The hole should be slightly larger than the width of your wooden rod, allowing the bowl to slide down easily. Slide the first bowl, right side up, all the way down the rod until it rests on the styrofoam. Then, take a second bowl, melt a similar hole in its bottom, and place it upside down directly on top of the first bowl, ensuring their edges align perfectly. This creates a solid base for your egg layers and adds visual bulk.
Step 2: Building the Egg and Grass Layers
With the initial bowl layers in place, it’s time to introduce the iconic Easter eggs. Take your large plastic eggs and, using a soldering gun or a sharp, heated tool, carefully make a hole at both the bottom and top center of each egg. These holes should be just wide enough for the wooden rod to pass through smoothly but snugly. The precision of these holes is important for the eggs to stack evenly. Slide the first plastic egg down the rod, placing it directly on top of the stacked bowls. This establishes the lowest egg tier.
Now, let’s refine the base. Trim the edges of the styrofoam you placed earlier so that it fits perfectly inside the pot’s rim. Gently push the styrofoam down until it sits flat and neatly on top of the dried cement, creating a level surface. This step is crucial for a polished look. Next, prepare your grass sheet. Fold the sheet into quarters, then snip off the folded corner. When you unfold the grass sheet, you’ll have a central hole. This technique allows you to create a perfect circle of grass with a pre-cut opening for the rod.
Step 3: Assembling, Finishing, and Personalizing
To integrate the grass sheet seamlessly, temporarily remove the bowls and eggs from the rod. Slide the prepared grass sheet down the rod, positioning it nicely over the styrofoam, ensuring the green side faces up. Trim the outer edges of the grass sheet into a round shape, making it fit snugly within the pot’s rim. Once the grass is perfectly placed, slide the bowls and eggs back onto the rod in their original positions. You can now continue layering the bowls and eggs alternately, building the height and fullness of your topiary. Experiment with the arrangement to create an appealing visual flow. Remember to vary colors if you’re using different shades of eggs.
Once you’re satisfied with the layering, piece together the small wooden rod and attach one of your old Christmas ornaments to its end. This assembly will serve as the decorative finial for your topiary. Place this small rod and ornament combination at the very top of your structure, ensuring it aligns with the main wooden rod. Throughout this assembly process, use your hot glue gun liberally to secure every element – each bowl to the egg below it, each egg to the bowl below it, and the finial to the top egg. This hot glue ensures that your topiary is robust and can withstand outdoor conditions.
With the structure complete, it’s time for the artistic transformation. Take your assembled topiary outdoors or to a well-ventilated area and spray it thoroughly with primer paint. The primer is essential for creating an even base, allowing your chosen colors to pop and preventing the plastic from absorbing the paint unevenly. Allow the primer to dry completely, following the manufacturer’s instructions. Once dry, let your creativity flow! Use different colors of paint and various brushes to decorate the eggs and bowls. You can opt for traditional Easter pastels, vibrant spring hues, or even intricate patterns like polka dots, stripes, or floral designs. Consider adding glitter or sealant for extra sparkle and protection. This final painting stage is where your unique personality shines through, making each topiary truly one-of-a-kind.
Tips for Topiary Success
- Safety First: When using a soldering gun or heating a skewer, always exercise caution and work in a well-ventilated area. Protect your hands and eyes.
- Drying Times: Allow ample time for the cement and primer paint to dry thoroughly. Rushing these steps can compromise the stability and finish of your topiary.
- Material Alternatives: Don’t hesitate to substitute materials if necessary. For instance, small plastic balls could replace eggs, or decorative rocks could be used instead of styrofoam and grass sheets at the base.
- Personalize Your Palette: While pastels are classic for Easter, feel free to use bright, bold colors or even metallics to match your personal style or home decor.
- Weatherproofing: If your topiary will be exposed to the elements, consider applying a clear outdoor-grade sealant over your finished paint job for added protection against sun and rain.
- Embrace Imperfection: Remember, handmade items have character! Don’t stress over minor imperfections; they add to the unique charm of your DIY creation.
Displaying Your Stunning Easter Topiary
Once your large DIY Easter egg topiary is complete and fully dry, it’s time to choose its proud display spot. These impressive decorations are perfect for enhancing your home’s exterior. Place them on either side of your front door to create a grand, welcoming entrance. Position them in your garden beds among your spring blooms for an unexpected pop of festive color. They can also make a wonderful statement on a patio or deck, bringing the joy of Easter to your outdoor living spaces. Their considerable size ensures they won’t go unnoticed, transforming any area into a vibrant celebration of spring and the Easter holiday.
This large DIY outdoor Easter egg topiary is more than just a decoration; it’s a testament to your creativity and resourcefulness. With affordable materials and a willingness to craft, you can elevate your holiday decor to new heights. Enjoy the process of bringing this magnificent piece to life and delight in the compliments it’s sure to attract!
*All image credit for this inspiring project belongs to Rose Lumare DIY via YouTube. Be sure to follow and subscribe to her channel for more brilliant DIY tutorials and creative ideas!