
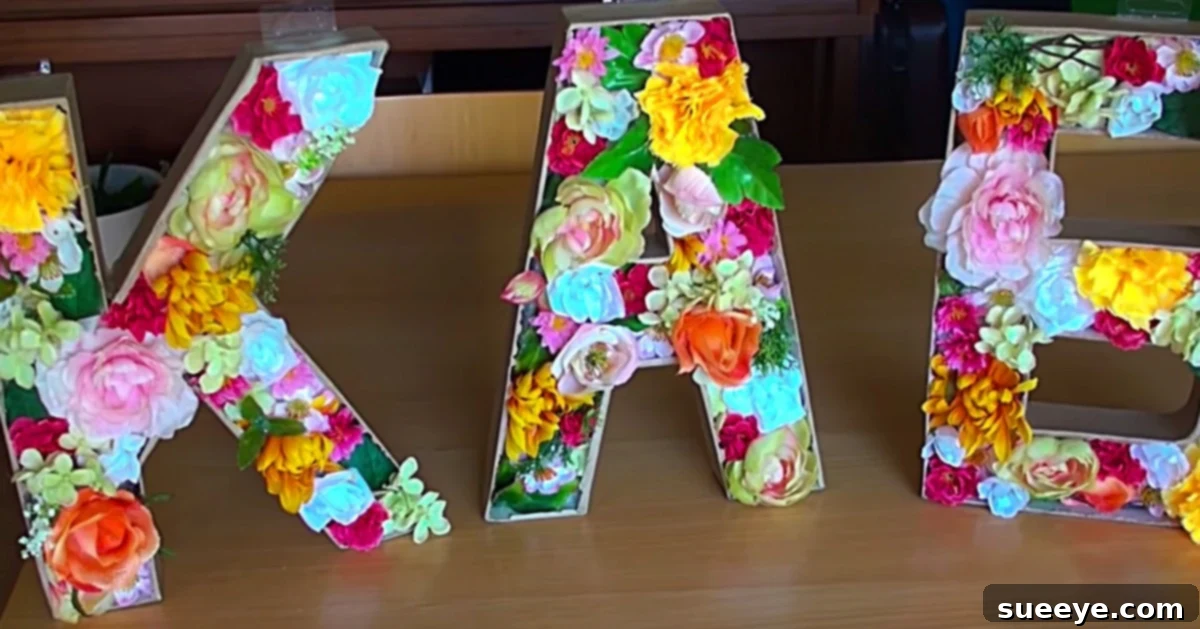
DIY Floral Monogram Letters: Add a Touch of Personalized Elegance to Your Space
There’s something uniquely charming about personalization, isn’t there? From embroidered jackets to custom stationery, adding my initials has always been a favorite way to make items truly my own. Yet, the idea of incorporating personalized initials into room decor had never crossed my mind until I stumbled upon a truly inspiring YouTube video tutorial. The moment I saw those beautiful floral letters, I was captivated! It sparked an immediate excitement, transforming a simple craft idea into an urgent, must-do project. I knew I had to try it right away, and I couldn’t wait to share the delightful journey of creating these enchanting DIY floral letters with you.
This project isn’t just about crafting; it’s about infusing personality and a touch of nature into your living space. Whether you’re looking to spruce up a dorm room, add a sweet accent to a nursery, or simply want a unique piece of home decor that reflects your style, these floral monogram letters are an absolute winner. They combine the timeless appeal of initials with the vibrant beauty of faux flowers, resulting in a show-stopping piece that’s surprisingly simple to make.
Why Choose DIY Floral Monogram Letters for Your Decor?
In a world of mass-produced items, handmade decor offers a special warmth and character. Personalized decor like these floral letters allows you to express your individuality and make your space truly yours. Here’s why this DIY project is an absolute gem:
- Uniquely Personal: Showcase your initials, spell out a meaningful word, or commemorate a special date. The possibilities for personalization are endless.
- Aesthetic Appeal: Faux flowers bring a vibrant, natural beauty that brightens any room without the need for watering or maintenance.
- Budget-Friendly: Compared to custom-made decorative items, crafting your own floral letters is incredibly cost-effective, allowing you to achieve a high-end look on a modest budget.
- Versatile Design: These letters can complement various decor styles, from rustic farmhouse to modern minimalist, and are perfect for any room – be it a cozy bedroom, a lively dorm, or a serene nursery.
- Rewarding Craft Experience: Engaging in a DIY project is not only fun but also a wonderful way to unwind and express your creativity. The satisfaction of creating something beautiful with your own hands is truly priceless.
Gather Your Essential Materials for This Easy Craft Project
Before diving into the creative process, gathering your materials is the first exciting step. You’ll find most of these items readily available at your local craft store like Michael’s, Hobby Lobby, or even online. What’s even better is that these are generally inexpensive supplies, making this a truly accessible easy craft project.
Here’s what you’ll need to create your stunning floral monogram letters:
- Paper Mache Letters: These are the foundation of your project. They come in various sizes and fonts, so choose ones that fit your desired aesthetic and display area. Paper mache is ideal because it’s lightweight, easy to cut, and provides a sturdy base for your floral arrangement. Look for hollow letters, as they are easier to modify.
- Faux Flowers: This is where your creativity truly shines! Select a variety of colors, sizes, and types of faux flowers to create a lush, vibrant look. Consider different textures and greenery to add depth. Michael’s is a fantastic resource for a wide selection of beautiful artificial blooms. The beauty of faux flowers is their longevity – your creation will remain fresh and vibrant indefinitely.
- Styrofoam: You’ll need a piece of styrofoam that is approximately half the depth of your chosen letters. This will serve as the secure base for your flower stems. Ensure it’s dense enough to hold the flowers firmly. Craft foam or floral foam could also work as alternatives.
- Exacto Knife or Box Cutter: A sharp cutting tool is crucial for precisely cutting the back off the paper mache letters and shaping the styrofoam. Always exercise caution when using these tools.
- Scissors: Essential for snipping flower stems and any other minor cuts.
- Hot Glue Gun and Glue Sticks: My trusty hot glue gun is an absolute must-have for countless DIY projects, and this one is no exception! It’s perfect for securing the styrofoam inside the letters and for adding extra hold to any flowers that might feel loose. Always use hot glue carefully and keep it away from skin.
Step-by-Step Guide to Crafting Your Beautiful Floral Initials
With your materials ready, let’s dive into the fun part: bringing your floral initials to life! This process is straightforward and incredibly satisfying.
Step 1: Preparing Your Paper Mache Letters
The first step involves transforming your hollow paper mache letters into a planter-like vessel for your flowers. This requires carefully removing the back panel of the letter.
Using your Exacto knife or box cutter, gently and precisely cut along the inside edge of one of the flat sides of your paper mache letter. The goal is to remove the entire back panel, creating an open box shape. Take your time with this step to ensure clean edges. If you’re working with multiple letters, repeat this process for each one. This opening will be where you insert your styrofoam and, subsequently, your beautiful faux flowers.
Step 2: Fitting the Styrofoam Insert
Once your letters are open, it’s time to create the secure base for your floral arrangement. The styrofoam insert is crucial for holding your flowers firmly in place, giving them structure and preventing them from shifting.
Place your opened paper mache letter onto the styrofoam and trace its outline. Using your Exacto knife or box cutter, carefully cut out the traced shape from the styrofoam. Aim for a snug fit within the letter. You might need to trim the edges slightly to get it just right. The styrofoam should sit snugly inside the letter, resting about halfway down its depth. Once you’re happy with the fit, use your hot glue gun to apply a generous amount of glue to the bottom edges of the styrofoam piece and firmly press it into place inside the letter. Hold it for a few seconds to ensure it adheres properly. This creates a stable, sturdy foundation for your faux flower craft.
Step 3: Crafting Your Floral Arrangement
This is arguably the most enjoyable part of the entire project – arranging your flowers! Here, your artistic vision comes into play to create a vibrant and beautiful display.
First, prepare your faux flowers by cutting their stems. You’ll want the stems to be long enough to securely poke into the styrofoam, but not so long that they bottom out. Trim them according to the depth of your styrofoam insert. Begin by inserting your larger, focal flowers first, distributing them evenly across the letter. Then, fill in the gaps with smaller flowers, buds, and any greenery you’ve chosen. Experiment with different arrangements – you can opt for a random, organic look, a structured pattern, or even an ombre effect. The goal is to create a full, lush appearance, ensuring the styrofoam is completely covered. If any flowers feel loose, a dab of hot glue at the base of the stem where it meets the styrofoam can provide extra security. Step back often to assess your arrangement and make adjustments until you’re delighted with the final look of your faux flower craft.
Bringing Your Floral Monogram to Life: Finishing Touches and Display Ideas
Once your floral letters are complete, the joy doesn’t end there! The final touches and deciding where to display your beautiful creation are just as exciting. This project turned out so super cute, exceeding all my expectations for dorm room ideas and general home decor.
Hanging these DIY Floral Letters was incredibly simple. I found that double-sided Command Hook Adhesive strips were perfect – they provide a strong hold without damaging your walls, making them ideal for dorms or rented spaces. They looked absolutely fantastic on the wall, adding a vibrant pop of color and a personal touch that instantly elevated the room’s aesthetic. The lightweight nature of the paper mache letters also makes them very easy to hang securely.
Just when I thought I had admired my handiwork enough, my best friend came over. Her reaction was priceless! She went absolutely crazy over my DIY Floral Wall Letters, showering them with compliments. Her enthusiasm quickly led to a brilliant idea: instead of just initials, why not create a whole word or even a sentence? This sparked a flurry of creative suggestions – we brainstormed favorite quotes, significant dates, and even song lyrics that could be transformed into these stunning floral displays. The possibilities suddenly felt endless!
I had to tell her, laughing, that I needed to go and buy a coffee pot first, because I think we were going to be there a while, lost in a whirlwind of creative ideas for our next craft project! This moment truly highlighted the power of creative inspiration and shared joy in DIY. These letters aren’t just decor; they’re conversation starters, mood lifters, and a testament to personalized style.
Display Your Floral Masterpiece Anywhere!
- Dorm Room Decor: Instantly personalize a generic dorm room, making it feel more like home.
- Nursery Accent: Spell out baby’s name or initials for a sweet, charming addition to the nursery.
- Wedding or Event Decor: Use them as part of a centerpiece, a photo booth backdrop, or to spell out “LOVE” or the couple’s initials.
- Living Room or Bedroom: A sophisticated touch on a gallery wall, above a headboard, or on a mantel.
- Office Space: Add a splash of personality and color to your workspace.
- Handmade Gifts: A thoughtful and unique gift for birthdays, housewarmings, or holidays.
The beauty of this project lies not only in its aesthetic appeal but also in its versatility. You can customize the flower types, colors, and letter styles to perfectly match any decor scheme or personal preference. Whether you’re a seasoned crafter or just starting your DIY journey, these DIY floral letters are a rewarding and relatively simple project that yields stunning results. So, grab your materials, unleash your creativity, and prepare to be amazed by the beautiful personalized decor you can create!