
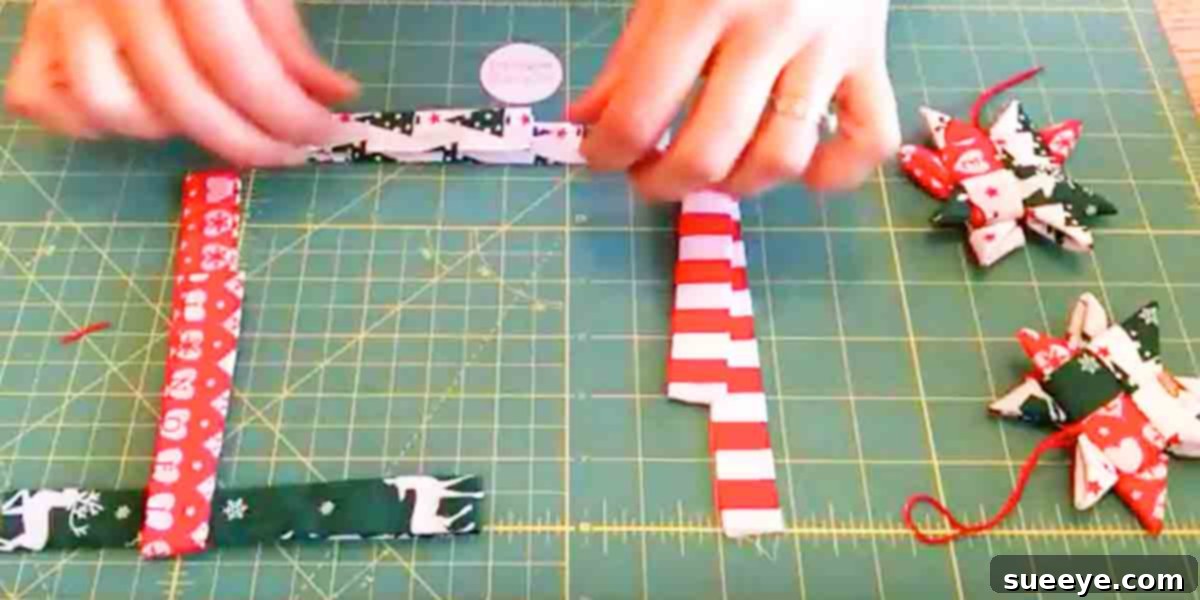
How to Make Scandinavian Fabric Stars: A Comprehensive Guide to Crafting Timeless Ornaments
Every year at Christmas time, a cherished tradition would unfold in our home, brought to life by my husband’s Scandinavian mother. Her collection of exquisitely folded paper stars, in vibrant reds, shimmering golds, and deep greens, would grace our Christmas tree and illuminate every corner of the house. These delicate adornments weren’t just decorations; they were beacons of holiday sparkle, imbuing each space with a touch of whimsical charm and a deep sense of family heritage. They embodied the spirit of the season, creating memories that linger long after the decorations are packed away.
Today, we have the wonderful opportunity to reimagine these beloved stars, transforming them from their traditional paper form into something truly special: fabric stars. This shift opens up a whole new realm of creative expression, allowing for an even richer aesthetic and enhanced durability. The diverse array of colors and patterns available in fabric strips lends these stars a fresh, captivating look, making them arguably even more charming and personal. Fabric not only provides a softer, more inviting texture but also ensures these handmade treasures can be enjoyed for many seasons to come, becoming enduring symbols of warmth and craftsmanship.
These DIY Scandinavian fabric stars are remarkably versatile, making them ideal for a multitude of decorative purposes. While they undeniably shine as exquisite ornaments on your Christmas tree, their appeal extends far beyond the festive season. Imagine them beautifully displayed around your home all year long – perhaps in a cozy living room, a bright sunroom, or even a whimsical child’s bedroom. Their robust nature, unlike delicate paper versions, means they can withstand gentle handling and repeated use, transitioning seamlessly between seasonal and everyday decor.
Beyond adorning your living spaces, fabric stars make for thoughtful and unique gift embellishments. Picture one gracefully tied to a beautifully wrapped present, complementing the gift tag and adding an extra layer of personal touch. It transforms a simple gift into a cherished token, demonstrating care and creativity. Furthermore, this project is a fantastic opportunity to engage the entire family. Its ease and repetitive nature make it an enjoyable activity for all ages, fostering shared moments of creativity and connection. Folding and pressing the 3-inch fabric strips, much like creating bias tape, then intricately interlacing four of them to form a dazzling star, is a process that is both satisfying and meditative.
Once your star has taken shape, simply attach a hanging loop. A piece of embroidery floss or a thin, decorative cord, secured with a few discreet hand stitches, transforms your star into an instant ornament. Then, step back and truly admire your new creation – a testament to your patience and skill. These stars also look absolutely darling when hung from small suction cup hangers in your windows, where they can catch the light and add a cheerful glow to your home’s exterior and interior. For those who love to customize, you can easily vary the size of your stars by simply changing the width of your fabric strips. Wider strips will naturally produce a larger, more impactful star, perfect for making a statement, while narrower strips yield smaller, more delicate stars suitable for garlands or petite decorations. This adaptability makes Scandinavian fabric stars a truly adaptable and beloved craft for any occasion.
Essential Materials for Crafting Your Fabric Stars
Before diving into the delightful process of creating your Scandinavian fabric stars, gathering the right tools and materials will ensure a smooth and enjoyable crafting experience. Most of these items are likely already part of your sewing or crafting stash, making this an accessible project for many.
Fabric Selection: The Heart of Your Star
The most crucial component is your fabric. Quilting cotton is highly recommended due to its stability, ease of folding, and wide array of available patterns and colors. However, lightweight linen or other finely woven cotton fabrics can also work beautifully. Avoid anything too thick or slippery, as this will make folding and pressing challenging. For a standard-sized star, you’ll typically need fabric strips measuring 3 inches wide. The length will depend on how many stars you plan to make and how efficient you are with your cuts. Fabric scraps are absolutely perfect for this project, making it an excellent way to use up remnants from previous sewing endeavors.
Cutting Tools for Precision
Accuracy in cutting your strips is paramount for well-formed stars. You will need:
- Rotary Cutter: Highly recommended for clean, straight cuts, especially when paired with a cutting mat and a clear quilting ruler.
- Self-Healing Cutting Mat: Protects your work surface and provides a stable base for cutting.
- Clear Quilting Ruler: Essential for precise measurements and guiding your rotary cutter.
- Fabric Scissors: A sharp pair of scissors can be used if a rotary cutter isn’t available, but ensure your cuts are as straight as possible.
Ironing Equipment: The Key to Crisp Folds
Pressing is an integral part of this craft, ensuring crisp, defined folds that give your stars their beautiful structure.
- Iron: A good quality steam iron is ideal for achieving sharp creases.
- Ironing Board: A stable surface for pressing.
- Spray Starch (Optional but Recommended): Helps to stiffen the fabric slightly, making it easier to achieve sharp creases and hold its shape throughout the folding process.
Finishing Touches
To complete your stars and prepare them for display, you’ll need a few small items:
- Embroidery Floss or Thin Cord: For creating hanging loops. Choose a color that complements your fabric.
- Hand Sewing Needle: A sharp needle to easily attach the hanging loop.
- Small Scissors or Thread Snips: For trimming threads neatly.
- Fabric Glue (Optional): A tiny dot of fabric glue can be used to secure the very end folds, especially if you’re concerned about fraying or movement, although careful pressing usually negates the need for this.
With these materials assembled, you’re well on your way to crafting a stunning collection of Scandinavian fabric stars that will add charm and warmth to your home!
Step-by-Step Guide: Crafting Your Scandinavian Fabric Stars
Creating these beautiful Scandinavian fabric stars is a rewarding process that combines simple techniques with a touch of intricate folding. Follow these detailed steps to bring your fabric stars to life.
Step 1: Prepare Your Fabric Strips
Start by preparing your fabric. If using new fabric, it’s a good idea to wash, dry, and press it beforehand to prevent future shrinkage and ensure a smooth working surface. Lay your fabric flat on your cutting mat. Using your clear quilting ruler and rotary cutter, cut four strips of fabric, each measuring 3 inches wide and approximately 22 inches long. While 22 inches is a good starting length for a standard star, a little extra won’t hurt, as you can always trim later. For larger stars, increase the width (e.g., 4 or 5 inches) and adjust the length proportionally to maintain the star’s balance.
Step 2: Create “Bias Tape” Style Folds
This is where precision and pressing are crucial. Take one of your fabric strips and lay it face down on your ironing board. The goal is to enclose all raw edges for a clean finish.
- Fold the long edges towards the center: Fold one long edge of the strip inwards so that it meets the center line. Press firmly with your iron. Repeat with the other long edge, ensuring both raw edges meet neatly in the middle of the strip.
- Fold in half again: Now, fold the entire strip in half lengthwise, encasing the raw edges completely within the fold. Press very firmly, creating a crisp, clean strip that is about 3/4 inch wide. This technique beautifully mimics the look of bias tape, resulting in a professional, no-fray finish.
- Repeat for all strips: Repeat this precise folding and pressing process for all four of your fabric strips. Consistency in your folds is paramount and will lead to a more symmetrical and professional-looking star. If using spray starch, lightly mist each strip before pressing to achieve extra crispness and ensure the folds hold their shape beautifully.
Step 3: Interlace the Strips to Form the Star Base
This is the magical part where your star begins to take shape. Lay two of your prepared strips horizontally on your work surface, parallel to each other, with the open folded edges (the side where the original raw edges were tucked in) facing upwards. Space them about 1/2 inch apart.
- First Vertical Strip: Take a third strip and weave it vertically through the two horizontal strips. Start by passing it over the first horizontal strip, then under the second. Ensure the open folded edge of this vertical strip also faces upwards.
- Second Vertical Strip: Take the fourth strip. This one will interlace in the opposite pattern to create a secure weave. Pass it under the first horizontal strip, then over the second. Again, ensure the open folded edge faces upwards for consistency.
- Adjust and Tighten: Carefully adjust all four strips so they form a tight, even square weave in the center. The goal is to create a secure, interlocking base from which the star points will gracefully emerge. This central weave should be snug but not so tight that it distorts the fabric.
Step 4: Form the Star Points
Now it’s time to bring out the distinctive star points. Each of the eight free ends of your fabric strips will become a point of the star, giving it its classic Scandinavian appearance.
- Fold Backwards: Take one of the top ends of a strip. Fold it backwards (away from the central weave) at a precise 45-degree angle, creating a small, neat triangular fold.
- Fold Downwards: Now, fold this triangular segment downwards, aligning its raw edge with the side of the main strip. This action effectively forms one of the sharp star points.
- Tuck and Secure: Gently tuck the end of this newly formed point under the adjacent horizontal or vertical strip within the central weave. Pull it through until it’s secure and taut, forming a defined and crisp star point. This step may require a little finesse to get the tension and alignment just right.
- Repeat for all eight ends: Continue this precise process for all eight free ends of your fabric strips. Work your way around the star, forming each point carefully and consistently. Take your time to ensure each point is evenly sized and tightly secured. As you complete each point, the star will become more robust, dimensional, and instantly recognizable.
Step 5: Finishing Touches and Hanging Loop
Once all eight points are formed and securely tucked, give your star a final gentle press with your iron to reinforce all the folds and ensure a flat, well-defined shape. Trim any excess fabric from the ends of the tucked points if necessary, ensuring they are neatly concealed within the star’s structure.
- Attach Hanging Loop: Cut a piece of embroidery floss or thin cord about 6-8 inches long. Thread it through a hand sewing needle.
- Secure Loop: Pass the needle through one of the star points from the back to the front, then back through, creating a small, secure stitch. Tie the ends of the floss/cord together in a firm knot, forming a loop. You can add a second stitch for extra security and durability, especially if the star will be frequently handled.
- Admire Your Creation: Step back and admire your beautiful, handmade Scandinavian fabric star! It’s now perfectly ready to adorn your home, brighten a gift, or be cherished as a thoughtful, handcrafted present.
Tips for Crafting Flawless Scandinavian Fabric Stars
To ensure your fabric stars turn out beautifully every time and to make the crafting process as enjoyable as possible, keep these helpful tips in mind:
- Fabric Choice Matters: Stick to quilting cotton or other stable, finely woven cottons. Fabrics that are too thick (like heavy canvas), too stretchy (like jersey), or too slippery (like silk or satin) will make folding and pressing much more difficult, potentially leading to a less defined and less crisp star shape.
- Precision is Key: While this is a fun and forgiving craft, accuracy in cutting your strips and executing your folds will significantly impact the final appearance and symmetry of your star. Use a rotary cutter and clear quilting ruler for the straightest, most consistent strips, and take your time with each press to ensure sharp creases.
- Embrace Your Iron: Your iron is arguably your best friend in this project. Each fold, especially the initial bias-tape-style folds, should be pressed firmly and crisply. Don’t rush this step, as well-pressed strips make the subsequent weaving and point-forming much easier and ultimately result in a sharper, more professional-looking star.
- Consider Spray Starch: A light mist of spray starch or fabric stiffener before pressing your strips can work wonders. It adds body to the fabric, making it stiffer and easier to handle, and helps the folds hold their shape beautifully and permanently, giving your stars a more robust feel.
- Vary Your Sizes: Don’t limit yourself to one size! Experiment with different strip widths to create a charming collection of stars in various sizes. Wider strips (e.g., 4 or 5 inches) will produce larger, more dramatic stars perfect for making a statement, while narrower strips (e.g., 1.5 or 2 inches) create delicate, miniature versions ideal for garlands, tiny gifts, or earrings.
- Color and Pattern Play: Get creative with your fabric choices. Use festive Christmas prints, classic Scandinavian-inspired patterns (like dots, stripes, or geometrics), solid colors that perfectly match your home decor, or even contrasting fabrics for a bold and visually striking look. Consider mixing two different fabrics for the strips (e.g., two plain, two patterned) to add an interesting visual dynamic.
- Utilize Fabric Scraps: This project is an absolutely fantastic way to use up those smaller fabric remnants and odd-sized scraps you’ve been saving. It’s a sustainable and creative method to give new life to leftover pieces, making each star truly unique and eco-friendly.
- Involve the Family: This is a wonderful family-friendly activity. Younger children can help select fabrics or tie knots for the hanging loops, while older children and adults can take on the more intricate tasks of folding and weaving. It’s a great way to bond, share skills, and create beautiful decorations together.
- Practice Makes Perfect: Don’t be discouraged if your first star isn’t absolutely flawless. The weaving and tucking of the points can take a little practice to master. You’ll quickly get the hang of it, and each subsequent Scandinavian fabric star you create will be even better and more refined!
- Secure with a Tiny Stitch (Optional): While careful folding and tucking usually suffice to hold the star together, a tiny, discreet hand stitch at the center of the star or at the tips of the points can provide extra security. This is particularly useful if the stars will be handled frequently, used as children’s toys, or hung in high-traffic areas.
By following these comprehensive tips, you’re well-equipped to create a charming array of Scandinavian fabric stars that will be admired by all and bring a touch of handmade elegance to any space!
Creative Ways to Display Your Scandinavian Fabric Stars
Once you’ve crafted your beautiful collection of Scandinavian fabric stars, the next joyful step is to find the perfect places and creative ways to display them. Their remarkable versatility allows them to enhance almost any space, bringing a touch of handmade charm and Nordic elegance to your home or gifts.
Holiday Decorating with a Nordic Flair
- Christmas Tree Ornaments: This is perhaps their most classic and beloved application. Hang them individually, or in clusters, on your Christmas tree, interspersing them with lights and other ornaments for a truly unique and deeply personal festive display. The soft fabric texture adds a wonderful depth and warmth to your tree.
- Window Decorations: As previously mentioned, these stars look absolutely charming when suspended from small suction cup hangers in your windows. They beautifully catch the natural light, creating a welcoming glow and a festive atmosphere both inside and out. Arrange them in varying heights for a dynamic and visually interesting effect.
- Garlands and Banners: String multiple stars together using a rustic twine, elegant ribbon, or fishing line to create stunning garlands. Drape them across mantels, weave them through doorways, adorn stair railings, or even line the edge of a shelf or bookshelf for an instant festive uplift that’s both cozy and stylish.
- Wreath Embellishments: Elevate a plain evergreen, birch branch, or twig wreath by attaching your handmade fabric stars. Mix different sizes, patterns, and colors for an eclectic, personalized look that truly stands out on your front door or above a fireplace.
- Table Centerpieces: Arrange a collection of stars of various sizes and fabrics in a decorative bowl, basket, or wooden tray on your coffee table or dining table. Combine them with natural elements like pinecones, fragrant cinnamon sticks, subtle fairy lights, or seasonal greenery for an inviting and unique centerpiece.
Year-Round Home Accents
- Nursery or Child’s Room Decor: These soft, colorful fabric stars are perfect for adding a whimsical touch to a child’s space. Hang them individually, create a gentle mobile above a crib, or string them along a wall for a charming and playful border.
- Wall Art: Unleash your inner artist by creating a unique piece of wall art. Arrange a group of stars of different sizes and fabrics on a canvas, framed background, or directly onto a wall in a compelling pattern for a textured, three-dimensional display.
- Door Knob Hangers: A single, well-placed fabric star hanging gracefully from a doorknob adds a subtle yet delightful charming detail to any room, inviting a soft touch of decor.
- Shelf or Mantel Decor: Prop them up artfully against books, alongside candles, or with other decorative items on shelves, bookcases, or a mantelpiece for a cozy, handcrafted feel that speaks of warmth and thoughtfulness.
- Spring Branches or Bouquets: In the spring or early summer, gather bare branches from your garden and arrange them in a vase. Then, hang smaller fabric stars from the branches, creating a beautiful and delicate indoor “tree” that celebrates nature and craft.
Thoughtful Gifting and Packaging
- Gift Toppers: Elevate your gift wrapping to an art form by tying a handmade fabric star onto a present instead of a traditional bow. It’s a beautiful “gift within a gift” that adds immense personal value and a memorable touch.
- Party Favors: For special occasions like weddings, baby showers, birthday parties, or even as hostess gifts, these charming fabric stars can serve as unique, thoughtful, and memorable party favors for your guests, a keepsake they can truly treasure.
- Attach to Handmade Items: If you knit, crochet, sew, or craft other items, attach a fabric star to your finished product as a signature tag, a delightful embellishment, or a token of your craftsmanship.
The possibilities are truly endless for these lovely Scandinavian fabric stars. Let your creativity soar and guide you in discovering new and wonderful ways to integrate them into your home decor, celebrations, and thoughtful gifts. They are sure to bring joy, a touch of handcrafted elegance, and a whisper of Nordic tradition wherever they appear.