
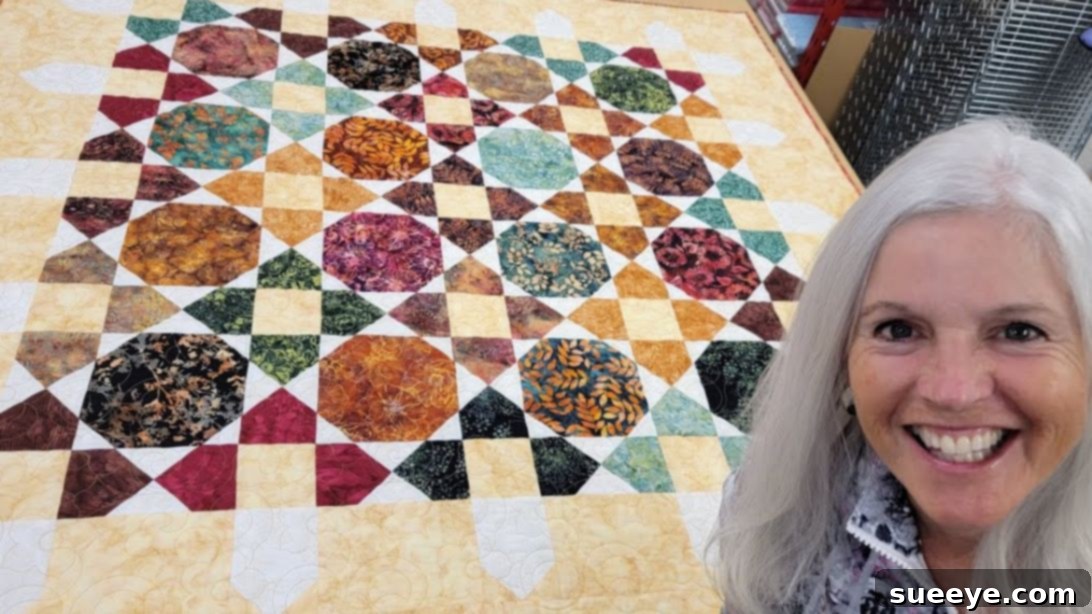
Master Donna’s Fancy Picket Quilt: A Comprehensive Step-by-Step Tutorial by Jordan Fabrics
Embark on a delightful quilting journey with this inspiring project, the Donna’s Fancy Picket Quilt, brought to life by the renowned experts at Jordan Fabrics on YouTube. This captivating quilt pattern, while offering a rewarding challenge, promises an incredibly beautiful and eye-catching finished product. Its intricate design, resembling a charming picket fence, is a true treat for anyone who appreciates the art of quilting. Whether you’re looking for your next passion project, a heartfelt gift for a loved one, or a unique item to sell, this quilt is an exceptional choice. Dive into the world of fabric, thread, and creativity, and prepare to create something truly magnificent that will be cherished for years to come.
Unveiling the Charm of the Fancy Picket Quilt
The Donna’s Fancy Picket Quilt stands out with its elegant geometric design and versatile appeal. It masterfully combines various fabric prints to create a dynamic visual experience that is both sophisticated and inviting. This project is not just about sewing; it’s about art, precision, and the joy of creating something tangible and beautiful with your own hands. Jordan Fabrics is celebrated for their clear, concise, and incredibly helpful tutorials, making even complex patterns accessible. This particular design offers a perfect blend of technique and artistry, making it an ideal endeavor for both intermediate quilters looking to refine their skills and ambitious beginners eager to tackle a rewarding challenge.
Essential Materials for Your Quilt Masterpiece
Gathering the right materials is the first crucial step towards a successful quilting project. For the Donna’s Fancy Picket Quilt, you’ll need a carefully selected array of fabrics and standard quilting tools. Opting for high-quality fabrics will not only make the quilting process more enjoyable but also ensure your finished quilt has a luxurious feel and lasts for generations.
- Layer Cake: A pre-cut collection of 10-inch fabric squares, typically from a single fabric line, ensuring a coordinated look. This saves considerable time on cutting and allows you to jump straight into the creative process.
- Light Print Fabric: Choose a fabric with a subtle pattern or a solid light color that provides contrast and acts as a visual anchor. This will help the “picket” elements stand out beautifully.
- Dark Print Fabric: A fabric with a more dominant pattern or darker solid hue to create depth and definition within the quilt blocks. It should complement your layer cake and light print selections.
- White or Background Fabric: This fabric is essential for creating crisp lines and allowing other colors to pop. A solid white, cream, or a very light-colored blender fabric works best as the canvas for your picket design.
- Border Fabric: A fabric chosen to frame your quilt top, providing a polished finish and an opportunity to introduce another coordinating color or pattern that enhances the overall aesthetic.
- Binding Fabric: This fabric encases the raw edges of your quilt, providing durability and a professional finish. It can be a contrasting color for a bold statement or a complementary one for a seamless look.
- Backing Fabric: The fabric for the underside of your quilt. It should be comfortable, durable, and wide enough to cover the entire quilt top with a few inches to spare on all sides for quilting.
- Needle and Thread: High-quality cotton thread that matches your fabrics or a neutral color like white or light gray is recommended for piecing. Ensure your needles are sharp and appropriate for quilting.
- Scissors or Rotary Cutter and a Cutting Mat: A rotary cutter with a self-healing cutting mat and a good ruler is highly recommended for precision and efficiency in cutting fabric pieces accurately. Sharp fabric scissors are also useful for trimming.
- Ruler: A clear acrylic quilting ruler with precise markings is indispensable for accurate cutting and measuring. A square-up ruler can also be beneficial for squaring up blocks.
- Marking Pen, Pencil, or Chalk: Essential for drawing diagonal lines on fabric squares. Choose a fabric-safe marker that is easily erasable or disappears over time.
- Iron, for pressing: A good iron and ironing board are non-negotiable for quilting. Pressing seams correctly as you go will result in flatter blocks and a much more professional-looking finished quilt.
- Sewing Machine: A reliable sewing machine with a quarter-inch foot (or a steady hand for maintaining a consistent ¼-inch seam allowance) is vital for piecing your quilt together efficiently.
- Official Pattern Download: Don’t forget to download the official pattern! You can often find it for free directly from the Jordan Fabrics website, providing detailed instructions and cutting guides. Click here to download the pattern for free (if available, or purchase a kit with the pattern).
Step-by-Step Guide: Crafting Your Donna’s Fancy Picket Quilt
Creating the Donna’s Fancy Picket Quilt is a rewarding process that combines precise cutting with careful sewing. Follow these detailed steps to bring your beautiful quilt to life.
1. Preparation and Precision Cutting for Initial Blocks
Begin by pre-washing and pressing all your fabrics to prevent shrinkage and ensure colorfastness. This also removes any factory chemicals and makes the fabric easier to work with. Once your fabrics are prepared, carefully consult the pattern for the exact cutting dimensions. Accuracy at this stage is paramount for a perfectly pieced quilt. Using your rotary cutter, cutting mat, and ruler, meticulously cut all your fabric pieces to the specified sizes according to the pattern’s instructions.
For the initial “picket” units, take your small white squares and draw a diagonal line from one corner to the opposite corner. These lines will serve as your sewing guides. Now, place one of these marked white squares onto each corner of your larger print squares, aligning the raw edges. Ensure the drawn diagonal line runs from the outer edge towards the center of the larger square. Sew directly along these drawn lines. After stitching, trim the excess fabric ¼ inch away from your stitching line. This creates a clean seam allowance. Carefully press these units open, ensuring the seams lay flat. Repeat this process for all your designated fabric pieces, creating numerous identical units that will form the foundation of your quilt blocks.
2. Assembling Your Quilt Blocks with Precision
With your individual units prepared, the next step involves assembling them into complete quilt blocks. Refer to the Jordan Fabrics tutorial video and the accompanying pattern to understand the precise layout for each block. Typically, this will involve arranging small print squares, accent squares, and your newly created corner units in a specific grid formation. The video provides an excellent visual demonstration of this crucial arrangement.
Once you have a block laid out to your satisfaction, begin sewing the individual units together. It’s often easiest to sew them in rows first, pressing seams carefully after each stitch. For example, sew the three units in the top row together, then the three in the middle row, and finally the three in the bottom row. Pay close attention to your ¼-inch seam allowance to ensure all blocks are consistent in size. After sewing each row, press the seams. For adjacent rows, it’s often beneficial to press seams in opposite directions (e.g., press seams in row one to the left, row two to the right) to allow them to “nest” neatly when you sew the rows together. This technique helps reduce bulk and creates perfectly matched points and corners.
3. Bringing Your Quilt Top Together
Once all your individual quilt blocks are completed, the exciting process of assembling the entire quilt top begins. Lay out all your finished blocks on a design wall or a clean floor space according to the pattern. This visual step is incredibly important as it allows you to see the overall design, ensure correct placement, and make any adjustments to color balance or block orientation before sewing. This “auditioning” phase is where the magic of the Donna’s Fancy Picket Quilt truly reveals itself.
After you are satisfied with your layout, start sewing the blocks together into rows. Just like with the individual blocks, sew one row at a time, pressing your seams after each row is assembled. Once all your rows are complete, you will then sew these rows to each other. Carefully align the seams between rows, pinning where necessary to ensure precise matching. Stitch the rows together, always maintaining that consistent ¼-inch seam allowance. As each row is added, press the longitudinal seams flat. Continue this process until your entire quilt top is complete, showcasing the beautiful picket design. The final step for the quilt top involves adding the border fabric, which frames the central design and can help square up your quilt.
4. Finishing Your Quilt: Batting, Quilting, and Binding
Once your quilt top is beautifully pieced, the final stages involve creating the quilt sandwich and adding the finishing touches. This involves three layers: the quilt top, the batting (the soft inner layer that provides warmth and dimension), and the backing fabric. Carefully layer these three components, ensuring they are smooth, flat, and securely basted together using pins, spray adhesive, or hand-stitching. This prevents shifting during the quilting process.
Next comes the actual quilting – stitching through all three layers to hold them together and add texture. You can choose to machine quilt on your home sewing machine, send it to a professional long-arm quilter, or even hand quilt for a more traditional feel. Select a quilting design that complements the “picket” pattern, perhaps echoing the lines or opting for an all-over stipple or meander. Finally, attach the binding fabric around the entire perimeter of the quilt. This not only seals the raw edges but also adds a decorative frame. There are various binding methods, from machine-stitched to hand-finished; choose the one that suits your preference and skill level. With these steps completed, your magnificent Donna’s Fancy Picket Quilt is ready to be admired!
Tips for a Flawless Picket Quilt Project
Achieving a professional-looking quilt involves more than just following steps; it requires attention to detail and a few helpful habits. Here are some key tips to ensure your Donna’s Fancy Picket Quilt is a resounding success:
- Accuracy is Key: From cutting to sewing, precision makes all the difference. Use a sharp rotary cutter, accurate rulers, and a consistent ¼-inch seam allowance. Even a slight variation can throw off your block sizes.
- Pressing Matters: Don’t just iron; press! Pressing involves lifting and placing the iron, rather than sliding it, to prevent distorting your fabric. Press seams open or to one side as indicated by the pattern, ensuring flat and neat blocks.
- Chain Piecing: To save time and thread, especially when making many identical units, try chain piecing. Sew one unit after another without cutting the thread in between, creating a “chain” of pieces.
- Squaring Up Blocks: After each block is assembled, use a square-up ruler to trim it to the exact finished dimension. This ensures all your blocks are uniform, making final assembly much easier.
- Stay Organized: Keep your cut pieces and assembled units organized, perhaps in labeled trays or on a design wall. This prevents confusion and keeps your workspace tidy.
- Take Your Time: Quilting is a journey, not a race. Enjoy the process, don’t rush, and if something goes wrong, don’t hesitate to use a seam ripper. It’s a quilter’s best friend!
Customizing Your Donna’s Fancy Picket Quilt
One of the most exciting aspects of quilting is the ability to personalize your project. The Donna’s Fancy Picket Quilt offers ample opportunities for customization, allowing you to create a truly unique piece that reflects your style:
- Fabric Selection: Experiment with different color palettes. A monochromatic scheme can create a subtle, sophisticated look, while a vibrant mix of prints will result in a playful, modern quilt. Consider seasonal fabrics or fabrics that match a specific room’s decor.
- Size Variations: While the pattern typically offers a specific size, you can easily adjust the number of blocks to create anything from a small wall hanging or baby quilt to a large king-size bedspread. Just remember to adjust your material quantities accordingly.
- Quilting Designs: The quilting itself can add another layer of design. Choose from simple straight lines that echo the picket pattern, intricate free-motion designs, or classic stippling to enhance the texture and feel of your quilt.
- Border Creativity: The border offers a chance for a final flourish. Use a solid fabric for a clean look, a coordinating print for added visual interest, or even piece together a scrappy border for a whimsical touch.
The Enduring Appeal of Quilting: More Than Just a Craft
Beyond the beautiful outcome, the act of quilting offers a myriad of benefits. It’s a meditative practice that reduces stress, fosters creativity, and provides a profound sense of accomplishment. Each stitch contributes to a tangible piece of art, often imbued with personal meaning and memories. Quilts become heirlooms, passed down through generations, telling stories and providing comfort. Joining the quilting community also connects you with fellow enthusiasts, offering camaraderie, inspiration, and shared passion. When you create Donna’s Fancy Picket Quilt, you’re not just making a blanket; you’re weaving together art, history, and a piece of your own heart.
Conclusion: Your Picket Quilt Masterpiece Awaits
The Donna’s Fancy Picket Quilt project is a truly rewarding endeavor that combines beautiful aesthetics with satisfying craftsmanship. By following the detailed guidance provided by Jordan Fabrics, you’ll not only create a stunning quilt but also enhance your quilting skills and gain immense satisfaction from your handmade creation. We encourage you to embrace each step, enjoy the process, and take pride in the exquisite quilt you’re about to complete.
*Special thanks to Jordan Fabrics on YouTube for sharing this inspiring tutorial and for all images used here. For more incredible quilting projects, expert tips, and a wealth of fabric inspiration, be sure to visit their fantastic YouTube channel and subscribe! Their dedication to teaching and sharing the joy of quilting is truly invaluable.