
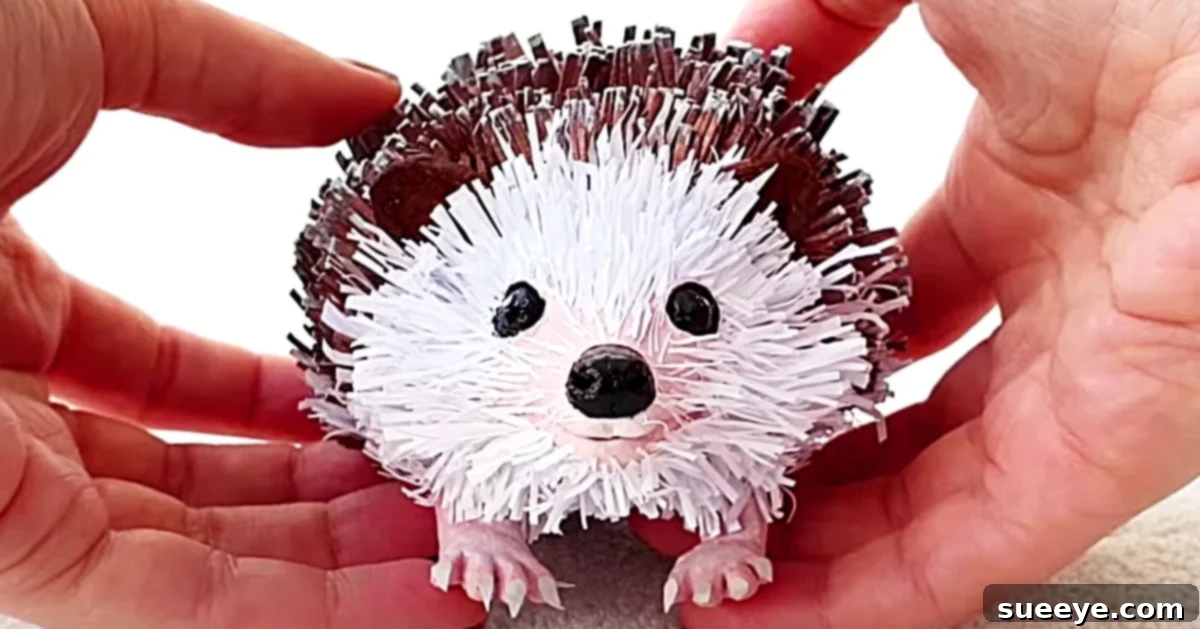
Crafting Adorable Paper Hedgehogs: A Fun DIY Guide for All Ages
Hedgehogs, with their endearing snouts and gentle demeanor, have long captured hearts in stories and folklore. Their unique charm makes them a beloved subject for artists and crafters alike. If you’re looking for a delightful and rewarding DIY project, creating your own paper hedgehog is an excellent choice. It’s an activity that combines creativity with sustainability, transforming simple household items into an adorable decorative piece or a heartfelt gift. We were particularly inspired by the fantastic paper hedgehog video tutorial by RS. Art Crafts Design on YouTube, which offers an accessible and enjoyable way to bring these cute creatures to life.
Why Make a Paper Hedgehog? Beyond the Cuteness
Beyond their undeniable cuteness, crafting paper hedgehogs offers a multitude of benefits:
- Creative Expression: It’s a wonderful outlet for your artistic side, allowing you to experiment with colors, textures, and details.
- Eco-Friendly Fun: This project ingeniously repurposes empty toilet paper rolls, promoting recycling and reducing waste.
- Affordable Crafting: Most materials required are inexpensive and often already found in your home or easily purchased at any craft store.
- Perfect for All Ages: While detailed enough for adults to enjoy, many steps can be simplified for children, making it a fantastic family activity.
- Charming Decor: Once completed, your hedgehog makes a lovely addition to shelves, desks, or children’s rooms, adding a touch of whimsical charm.
- Thoughtful Gifts: Handmade items carry a special sentiment. These paper hedgehogs make unique and personal gifts for friends, family, nieces, or nephews.
- Mindful Activity: Engaging in craft projects can be a calming and meditative experience, offering a break from daily stresses.
Embarking on this project promises not just a beautiful end product, but a fulfilling journey of creation.
Gathering Your Crafting Essentials: Materials for Your Paper Hedgehog
Before diving into the creative process, ensure you have all the necessary materials at hand. Most items are common household staples or readily available at craft stores, making this an accessible project for everyone.
- Empty Toilet Paper Rolls: These form the core structure of your hedgehog’s body. An eco-friendly choice!
- Air Hardening Modeling Clay: Essential for sculpting the hedgehog’s distinct face and tiny feet, offering a natural, textured look.
- A Pair of Scissors: For precise cutting of paper and other materials.
- A Paintbrush: For applying glue and various paints. Having a few sizes can be helpful for details.
- White Paper Sheet: The base for creating the hedgehog’s signature quills. Construction paper or cardstock can also work.
- White Universal Glue (e.g., Elmer’s): A strong, reliable adhesive for securing paper components and clay parts.
- Tissue Paper: Optional, but useful for adding texture or layering under quills for extra dimension.
- A Pair of Tweezers: Invaluable for manipulating small pieces and accurately placing quills.
- Modeling Clay Tools: A basic set of sculpting tools can help you refine the clay features, but household items like toothpicks or blunt knives can also work.
- Spray Paint: Ideal for providing an even base coat on the hedgehog’s body, giving it a professional finish. Choose a color that complements your desired aesthetic.
- Acrylic Craft Paint: Perfect for adding intricate details to the face, eyes, and any other decorative elements. A range of earthy tones like browns, blacks, and whites will be useful.
Having these materials organized before you begin will ensure a smooth and enjoyable crafting experience.
Step-by-Step Guide: Crafting Your Charming Paper Hedgehog
Follow these detailed instructions to transform simple materials into an enchanting paper hedgehog. Each step is designed to be clear and manageable, ensuring a successful outcome.
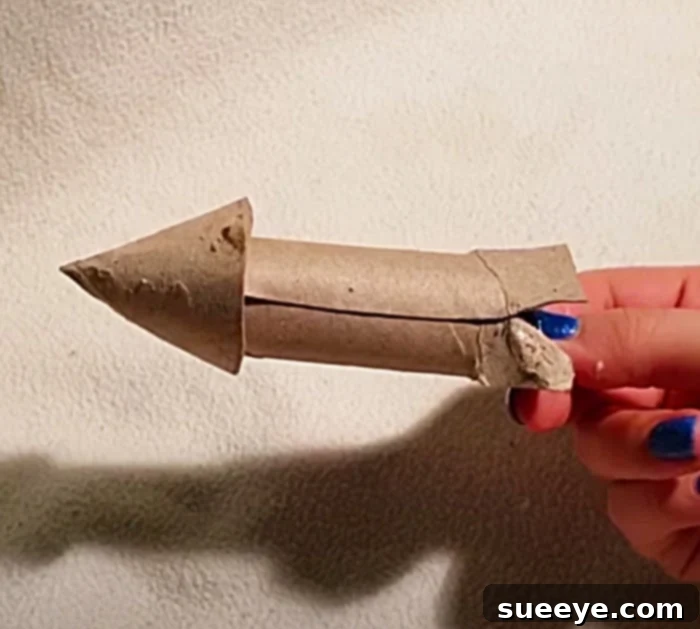
Step 1: Constructing the Hedgehog’s Body from a Toilet Paper Roll
The foundation of your hedgehog begins with an empty toilet paper roll. This clever use of a discarded item not only makes the craft sustainable but also provides a sturdy base.
- Prepare the Roll: Take one empty toilet paper roll. Gently flatten one end of the roll slightly.
- Shape the Head: Pinch and fold one end of the flattened roll into a pointed, conical shape. This will form the hedgehog’s snout. Use a small amount of white universal glue to secure this pointed end, holding it in place until it dries.
- Form the Body: The other end of the toilet paper roll will remain open and rounded, creating the wider body section. The resulting shape should resemble a blunt rocket or a cone, with a distinct head/snout at one end. This initial structure is crucial for the overall form of your hedgehog. Allow the glue to dry completely before proceeding, ensuring the body maintains its shape.
Step 2: Designing and Attaching the Iconic Quills
The quills are what give a hedgehog its unique character. This step requires a bit of patience and precision, but the result is incredibly rewarding.
- Prepare the Paper: Take your white paper sheet. You will need to cut numerous thin strips or small, elongated leaf-like shapes. These will become the individual quills. Varying the length and width slightly can add a more natural texture.
- Create Texture (Optional): For added realism, gently curl the paper strips using a pencil or the edge of a ruler before attaching them. This gives the quills a lovely, rounded dimension.
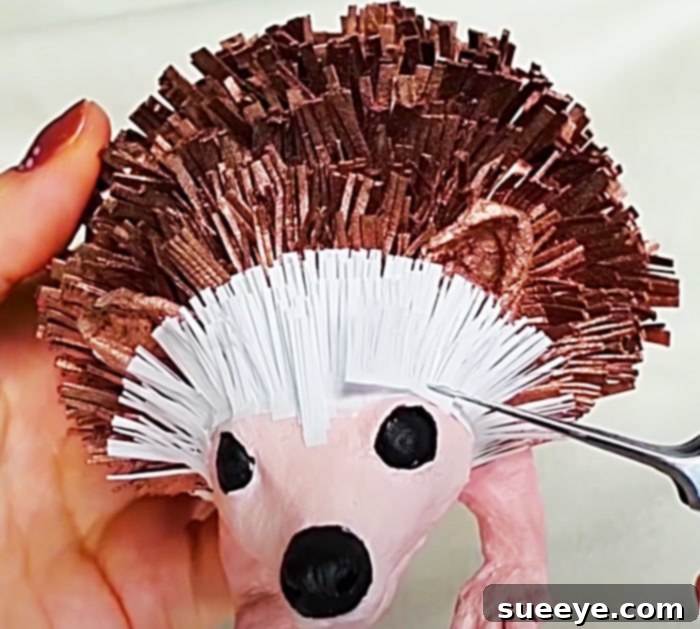
- Begin Attaching: Starting from the back (the wider, open end) of your toilet paper roll body, begin gluing the paper quills. Apply a small dot of glue to the base of each quill and press it firmly onto the cardboard body.
- Layering for Volume: Work your way forward towards the head, overlapping the quills in rows. Think of it like tiling a roof; each new row should slightly cover the previous one. This layering technique creates depth and the spiky volume characteristic of a hedgehog.
- Use Tweezers for Precision: For smaller quills or tighter spaces, especially near the head, utilize tweezers. They allow for accurate placement and prevent glue from getting on your fingers. Continue until the entire body, from the back to just behind where the face will be, is covered in quills.
- Drying Time: Allow all the glued quills to dry completely. This prevents them from shifting or falling off during subsequent steps.
Step 3: Bringing the Face to Life with Modeling Clay
The face is where your hedgehog truly gets its personality. Modeling clay allows for delightful sculptural details.
- Sculpt the Snout and Nose: Take a small amount of air hardening modeling clay. Roll it into a small ball, then gently shape it into a distinct snout. Pinch one end to create the tip of the nose.
- Add Eyes: You can either sculpt tiny clay balls for eyes and attach them, or you can paint the eyes on later after the clay has dried. For more character, slightly indent the areas where the eyes will go.
- Attach the Face: Carefully press the sculpted clay face onto the pointed end of the toilet paper roll body. Ensure it adheres well. You can use a tiny bit of white glue if needed, but air hardening clay often sticks to paper surfaces as it dries.
- Refine Details: Use your modeling tools (or a toothpick) to add any subtle details like small creases or the curve of a mouth, if desired.
- Allow to Dry: Air hardening clay needs time to set. Place your hedgehog aside and let the clay face dry and harden completely according to the clay manufacturer’s instructions. This usually takes several hours or overnight.
Step 4: Crafting Sturdy Little Feet
Small feet add stability and complete the hedgehog’s charming appearance.
- Sculpt the Feet: Take four small, equal-sized pieces of modeling clay. Roll each into a short cylinder or a small teardrop shape. You can flatten one side slightly so they have a stable base.
- Attach the Feet: Once the main clay face has hardened, carefully attach the four feet to the underside of the hedgehog’s body. Space them out evenly to ensure good balance. Press them firmly to the cardboard and clay.
- Ensure Stability: Stand your hedgehog up to check its balance. Adjust the feet as needed before they dry.
- Allow to Dry: Let the clay feet dry and harden completely, following the same drying guidelines as the face.
Step 5: Adding Color and Personality with Paint
Painting brings your hedgehog to life, allowing you to add depth and realistic features.
- Base Coat (Optional, but Recommended): If you want a uniform base color for the quills and body, gently apply a coat of spray paint (e.g., a light brown or grey) to the entire quill-covered body. Do this in a well-ventilated area and follow safety instructions. This helps unify the paper quills and gives a professional finish. Allow it to dry completely.
- Detailing the Face: Use acrylic craft paints and a fine paintbrush to add details to the hedgehog’s face. Paint the nose black, and if you haven’t sculpted eyes, paint small, expressive eyes. You can add a tiny white dot in each eye for a reflective sparkle.
- Adding Depth to Quills: With a slightly darker or complementary shade of acrylic paint, you can lightly dry-brush the tips of the quills to create a subtle shading effect, making them appear more dimensional.
- Coloring the Feet: Paint the clay feet a suitable color, typically a dark brown or black, to match the natural look of a hedgehog.
- Final Drying: Allow all paint layers to dry thoroughly before handling extensively.
Step 6: Final Touches and Embellishments
This is where you can truly personalize your hedgehog and add those charming finishing details.
- Blush: A touch of pink blush on the cheeks can add an extra layer of cuteness.
- Clear Coat: For added durability and a slight sheen, you can apply a clear craft sealer or varnish over the entire hedgehog once all paint is dry.
- Mini Accessories: Consider adding tiny accessories like a miniature fabric scarf for seasonal flair, a tiny paper mushroom beside it, or a few faux leaves around its base to create a small habitat.
- Personalization: If giving as a gift, you might add a small, handwritten tag tied to its body.
Tips for a Perfect Paper Hedgehog
To ensure your paper hedgehog project is a resounding success, keep these helpful tips in mind:
- Patience is Key: Allow each stage—especially glue and clay—to dry completely before moving to the next. Rushing can lead to a less durable or messy outcome.
- Experiment with Quills: Don’t be afraid to try different paper types or cutting techniques for the quills. Crumpling paper slightly before cutting can also add texture.
- Work in Layers: When attaching quills, layer them gradually and evenly for a full, natural look. Start from the back and work forward.
- Safety First: If crafting with children, supervise them closely when using scissors, spray paint, or any sharp tools. Ensure adequate ventilation when using spray paint.
- Reference Images: Keep pictures of real hedgehogs handy for inspiration on colors, facial expressions, and quill patterns.
- Clean as You Go: Have wipes or a damp cloth nearby to clean excess glue or paint, ensuring a neat finish.
- Personalize: Think about the “personality” of your hedgehog. Will it be sleepy, curious, or cheerful? Let that guide your choices for facial expression and accessories.
Creative Variations and Personalization
Once you’ve mastered the basic paper hedgehog, feel free to unleash your creativity with these variations:
- Size Matters: Experiment with different sizes of cardboard rolls (e.g., paper towel rolls cut down) to create a family of hedgehogs.
- Color Palettes: Instead of traditional browns, try whimsical colors for the quills – pastels for a spring hedgehog, or metallic paper for a fantastical creature.
- Textured Quills: Use fabric scraps, felt, or even natural elements like small dried leaves (carefully treated) for unique quill textures.
- Adding a Scene: Create a small woodland base for your hedgehog using moss, artificial grass, small pebbles, and miniature toadstools made from clay or felt.
- Functional Hedgehog: Adapt the design to be a small pen holder by leaving the back opening of the toilet paper roll slightly larger and reinforced.
- Themed Hedgehogs: Dress your hedgehog for different seasons or holidays – a Santa hat for Christmas, tiny flowers for spring, or a witch’s hat for Halloween.
- Different Facial Expressions: Use the clay to sculpt various expressions – sleepy, surprised, or cheeky – to give each hedgehog a unique character.
The possibilities for personalization are endless, allowing each creation to be a unique reflection of your imagination.
Conclusion: Your Charming Paper Hedgehog Awaits!
Making a paper hedgehog is more than just a craft; it’s an enjoyable journey that culminates in a truly delightful creation. From repurposing simple toilet paper rolls to meticulously crafting each quill and facial feature, the process is both engaging and therapeutic. The satisfaction of seeing your adorable hedgehog come to life is immense, and the finished product often looks surprisingly professional. Whether you’re looking for a fun solo activity, a project to share with children, or a unique handmade gift, this DIY paper hedgehog is an absolute winner. So, gather your materials, follow the steps, and prepare to be charmed by your very own handcrafted prickly friend!