
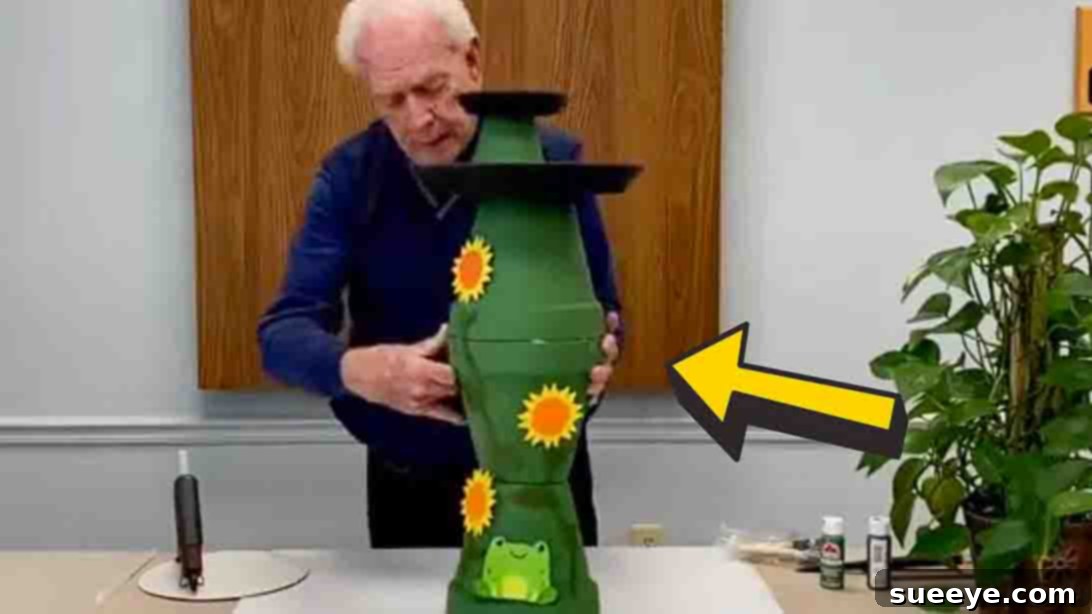
Create a Charming Oasis: Your Easy DIY Terracotta Birdbath Guide
Transform your garden into a vibrant sanctuary for feathered friends with this incredibly simple yet stunning DIY terracotta birdbath. Derived from an ingenious project by White County Library, Sparta TN, this guide will show you how to construct a beautiful and functional birdbath using only readily available terracotta pots and saucers. It’s a remarkably budget-friendly and satisfying weekend project that promises to add a touch of handcrafted elegance and lively activity to your outdoor space. Imagine the delightful sight of local birds splashing and drinking in a bath you created yourself!
If you’ve been dreaming of attracting more wildlife to your yard, or simply wish to enhance your garden’s aesthetic with a unique, handmade feature, this project is perfect for you. No complex tools or advanced crafting skills are required – just a few basic materials and a desire to create. Get ready to embark on a fun and rewarding journey to build your very own terracotta birdbath.
RELATED: How to Build a Birdbath Using Vintage Dishes
Why a Birdbath? The Joys of Attracting Feathered Friends
A birdbath is more than just a decorative element; it’s a vital resource for local bird populations, especially during dry spells or harsh winters. Providing fresh water for drinking and bathing can significantly increase the variety and number of birds that visit your garden. Birds need water for hydration, just like any other living creature, but they also use it for preening – a crucial process that keeps their feathers clean, flexible, and insulated, essential for flight and temperature regulation. A well-placed birdbath offers these essential services, making your garden a haven for various species, from sparrows and finches to robins and even hummingbirds.
Observing birds in your garden offers immense joy and a connection to nature. Their songs, vibrant colors, and playful antics can provide endless entertainment and a sense of tranquility. By building a DIY terracotta birdbath, you’re not only creating a beautiful garden feature but also contributing to the local ecosystem and fostering biodiversity in your own backyard.
Unveiling the Simplicity: Why Terracotta is Your Go-To Material
Terracotta, a type of porous clay, is an ideal material for DIY birdbaths for several compelling reasons. Firstly, its natural earthy tone blends seamlessly with any garden landscape, offering a classic and rustic charm. Secondly, terracotta pots are incredibly affordable and widely available at garden centers and hardware stores, making this project accessible to everyone. The inherent porosity of terracotta also means it has good drainage if not sealed, but for a birdbath, we’ll ensure it holds water effectively with proper sealing and gluing techniques.
Beyond aesthetics and cost, terracotta is surprisingly durable and stable, especially when stacked and secured correctly. Its weight helps to prevent tipping, ensuring a safe water source for birds. The ease with which terracotta can be painted and decorated also offers boundless opportunities for personalization, allowing you to match your birdbath perfectly to your garden’s unique style.
Gather Your Essentials: Materials for Your Terracotta Birdbath
Before you begin assembling your charming birdbath, it’s essential to gather all your materials. Opting for good quality terracotta pots will ensure the longevity and stability of your finished project. Consider the sizes mentioned as a guide, but feel free to adjust slightly based on what’s available and your desired final height and basin size. Larger pots will create a more substantial birdbath, while smaller ones will result in a more delicate feature. Always inspect pots for cracks or imperfections before purchasing.
- 3 Large Terracotta Pots: These will form the sturdy base and column of your birdbath. Choose pots of the same diameter for a cohesive and stable stack.
- 1 Small Terracotta Pot: This acts as an elevating stand for the upper water basin, adding a tiered effect.
- 1 Large Terracotta Saucer: This will serve as the primary water basin for your birdbath. Ensure it’s wide enough to allow birds to land and splash comfortably.
- 1 Small Terracotta Saucer: This forms the very top landing or a smaller, secondary water basin.
- Hot Glue Gun: A heavy-duty hot glue gun is crucial for securing the pots and saucers together. Ensure you have plenty of glue sticks on hand. For extra durability, consider using outdoor-grade construction adhesive or epoxy in addition to hot glue for a more permanent bond, especially if the birdbath will be exposed to extreme weather.
- Exterior Paint: Choose outdoor-safe, weather-resistant paint in colors that complement your garden. Acrylic latex outdoor paints are a good choice.
- Paintbrush: A few brushes of varying sizes will be helpful for painting both large surfaces and smaller details.
Step-by-Step Guide: Crafting Your Terracotta Birdbath
This project is designed to be straightforward and enjoyable. Take your time with each step, especially the drying and curing periods, to ensure a strong and lasting birdbath. Precision in gluing is key for stability.
Step 1: Prep and Prime Your Pots
The first and most enjoyable step is personalizing your terracotta pots with color. Before you even think about gluing, ensure all your terracotta pots and saucers are clean and dry. Wipe away any dust or debris with a damp cloth and let them air dry completely. This ensures the paint adheres properly.
Once clean, apply your chosen exterior paint to all terracotta pieces. This is your chance to get creative! You can opt for a single, uniform color for a classic look, or use multiple colors to create a more vibrant and whimsical design. Consider painting patterns, stripes, or even stenciling designs onto the pots. For longer-lasting color and protection against the elements, you might want to apply a primer specifically designed for terracotta before painting. Apply at least two coats of paint for full coverage, allowing each coat to dry thoroughly according to the paint manufacturer’s instructions. Once painted, set all pieces aside in a well-ventilated area to dry completely. This might take several hours or even overnight, depending on the paint and humidity. Patience here will pay off with a beautiful, durable finish. Once fully dry, consider applying a clear, outdoor-safe sealant to protect the paint and make cleaning easier, especially for the saucers that will hold water.
Step 2: Building the Foundation: Stacking Your Terracotta Tower
Now that your painted terracotta pieces are completely dry and sealed, it’s time to assemble the base of your birdbath. Begin by taking one of your large terracotta pots and turning it upside down. This will be the sturdy foundation. Next, apply a generous amount of hot glue or your chosen adhesive around the bottom rim of this inverted pot. Work quickly but carefully. Immediately take your second large terracotta pot and center it directly on top of the first, ensuring the holes align on the inside for better stability, even though they won’t be used for drainage in this configuration. Press firmly and hold it in place for a few minutes until the glue sets and a strong bond is formed. This initial bond is critical for the overall stability of your birdbath. Double-check for wobbles before proceeding.
Once the first two pots are securely attached, repeat the process. Apply another generous bead of glue around the rim of the second pot. Then, carefully place the third large terracotta pot, also upside down, directly on top. Again, ensure it’s perfectly centered and press down firmly until the glue completely dries and holds the structure firmly. You now have a solid, three-tiered terracotta column ready for its water basins.
Step 3: Securing the Saucers: Creating the Water Basin
With your terracotta column standing tall and stable, it’s time to add the crucial components: the water basins. Begin by applying a substantial amount of hot glue around the top rim of the third (uppermost) large pot. Carefully center your large terracotta saucer on top of this glued rim, pressing down firmly to ensure a secure attachment. This large saucer will form the primary basin for birds to drink and bathe in. Allow ample time for the glue to set completely before moving on.
Next, for an elevated and multi-tiered look, take your small terracotta pot and turn it upside down. Apply a generous amount of glue to the bottom rim of this small, inverted pot. Carefully place and secure this small pot right in the center of the large saucer you just attached. This small pot acts as a pedestal for the final, smaller basin. Hold it firmly until the glue creates a strong bond. Lastly, apply glue to the rim of this small, inverted pot. Gently place your small terracotta saucer on top, ensuring it’s centered. This smaller saucer can serve as a supplementary landing spot or a shallower drinking pool for smaller birds. Once all pieces are glued and dried, your terracotta birdbath is structurally complete. Now, unleash your creativity and decorate the birdbath further with any embellishments you desire – perhaps some mosaic tiles, painted accents, or even natural stones around the base. Fill the saucers with fresh water, and your garden will be ready to welcome its new feathered visitors!
Personalize Your Creation: Creative Decoration Ideas
While a painted terracotta birdbath is charming on its own, there are countless ways to further personalize your creation. Consider these ideas to make your birdbath truly unique and reflective of your garden’s personality:
- Mosaic Magic: Break old ceramic tiles, dishes, or even colorful glass pieces into small shards. Glue them onto the pots and saucers in intricate patterns or abstract designs. Once dry, grout the gaps for a professional, durable finish.
- Stenciled Designs: Use stencils to add elegant motifs, natural patterns like leaves or flowers, or even whimsical bird silhouettes.
- Distressed or Antiqued Look: Achieve a vintage feel by lightly sanding painted areas, applying a thin wash of darker paint, or using antiquing glaze.
- Natural Embellishments: Glue small river stones, sea glass, or even dried moss around the rims or bases of the pots for an organic, earthy touch.
- Vibrant Accents: Paint the inside of the saucers a bright, contrasting color to make the water sparkle and attract more birds.
- Glow-in-the-Dark Details: For a magical evening effect, use glow-in-the-dark paint for subtle details or stenciled patterns on the birdbath’s exterior.
Remember to use outdoor-grade adhesives and sealants for any additional decorations to ensure they withstand the elements.
Placement Perfection: Where to Install Your Birdbath for Maximum Charm
The location of your terracotta birdbath is just as important as its design. Strategic placement can significantly impact how many birds visit and how safe they feel. Here are some tips for finding the perfect spot:
- Visibility: Place the birdbath where you can easily see it from a window or patio. This allows you to enjoy watching the birds without disturbing them.
- Safety from Predators: Ensure the birdbath is at least 10-15 feet away from dense shrubs or thickets where cats or other predators might hide. Birds need clear sightlines to detect potential dangers.
- Shade and Sun Balance: A spot that receives partial shade during the hottest parts of the day will help keep the water cooler and reduce evaporation. However, a little morning sun can be beneficial to deter algae growth.
- Near a Water Source (Optional): If possible, locate it near an outdoor faucet or hose for easy refilling and cleaning.
- Away from Feeders: While it might seem intuitive to place a birdbath next to a feeder, it’s often better to keep them separate. Food debris can contaminate the water, and a busy feeder can sometimes attract larger, more aggressive birds that might deter smaller species from using the birdbath.
- Stable Ground: Ensure the ground beneath your birdbath is level and firm to prevent it from tipping over. You might even consider burying the base pot slightly for added stability.
Nurturing Your Birdbath: Maintenance and Care Tips
To ensure your terracotta birdbath remains a healthy and attractive spot for birds, regular maintenance is essential. Neglecting cleaning can lead to algae growth, mosquito breeding, and the spread of avian diseases. Here’s how to keep your birdbath pristine:
- Daily Water Changes: The simplest and most important step is to empty, rinse, and refill the birdbath with fresh water daily, especially during hot weather.
- Regular Scrubbing: At least once a week, give the saucers a thorough scrubbing with a stiff brush to remove algae and grime. A solution of one part white vinegar to nine parts water can be used for tough stains, followed by a thorough rinsing. Avoid harsh chemical cleaners, as residues can be harmful to birds.
- Winterizing: In freezing climates, terracotta can crack when water freezes and expands within its pores. Bring your birdbath indoors during winter months, or at the very least, ensure it’s completely dry and covered to prevent water accumulation. Alternatively, you can use a birdbath heater designed for outdoor use.
- Inspect for Cracks: Periodically check the terracotta pots and saucers for any hairline cracks. Address them promptly with appropriate outdoor sealant or adhesive to prevent them from worsening.
- Preventing Mosquitoes: Regular water changes are the best defense against mosquito larvae. If you notice any, simply dump the water and scrub the basin clean.
Beyond the Build: The Environmental Impact of Your DIY Birdbath
Creating a DIY terracotta birdbath is more than just a craft project; it’s an act of environmental stewardship. In an increasingly urbanized world, natural water sources can be scarce for birds and other small wildlife. Your birdbath provides a critical resource, supporting local ecosystems and helping bird populations thrive. By making it yourself, you’re also engaging in a sustainable practice, often reusing materials or choosing readily available, eco-friendly options like terracotta. This simple addition to your garden can transform it into a vibrant, living space, fostering a deeper connection to nature for you and your family.
Troubleshooting Common Questions About DIY Birdbaths
Even with the best instructions, questions can arise. Here are some common queries about DIY terracotta birdbaths:
- “My birdbath isn’t attracting birds.” Patience is key! It can take time for birds to discover and feel safe using a new water source. Ensure it’s placed in a safe, visible spot away from dense cover, and keep the water fresh. Adding a few small rocks to the basin can give smaller birds a place to perch.
- “The glue isn’t holding up.” If you used only hot glue, it might not be strong enough for outdoor conditions over time. For maximum durability, especially if you live in an area with temperature fluctuations, consider supplementing hot glue with an outdoor-grade construction adhesive or epoxy during assembly.
- “How do I prevent algae?” Regular cleaning and fresh water changes are the best defense. Placing the birdbath in a spot with partial shade can also help slow algae growth.
- “Can I make it taller?” Absolutely! You can add more large terracotta pots to the base column for a taller birdbath, ensuring each connection is securely glued. Just be mindful of stability.
Embarking on this DIY terracotta birdbath project is an incredibly rewarding experience. Not only will you create a stunning and functional piece of garden decor, but you’ll also provide a vital resource for local wildlife, turning your yard into a lively and enchanting space. This simple, affordable, and fun project demonstrates that you don’t need extensive crafting skills to make a significant impact on your outdoor environment. So gather your materials, unleash your creativity, and get ready to enjoy the delightful sight and sounds of feathered visitors enjoying their new oasis. Happy crafting!