
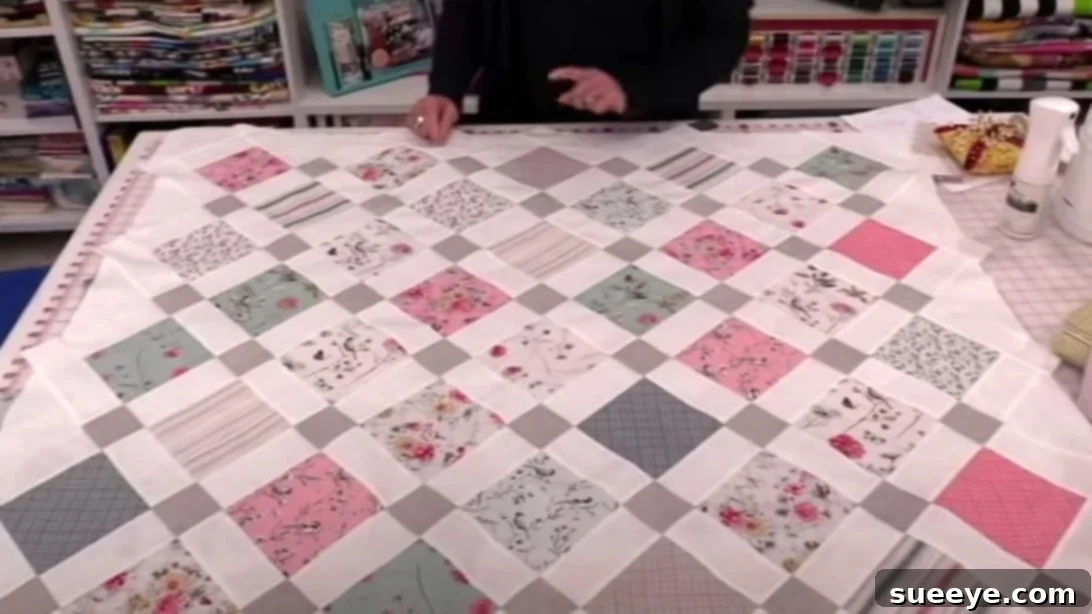
The timeless art of quilting is a cherished craft, passed down through generations and interwoven into the fabric of human history. For centuries, these intricate patterns have been shared, comforting individuals during sad times and celebrating moments of joy. Quilting offers a unique blend of creativity, tradition, and practicality, promising to remain a beloved art form for years to come. Whether you’re embarking on this therapeutic hobby for the first time or envisioning it as a foundation for a small business, mastering the basics is the first step. This comprehensive, easy-to-follow tutorial, inspired by the expertise of SewVeryEasy on YouTube, will guide you through creating a charming quilt using pre-cut 5-inch squares. This method is incredibly beginner-friendly, making it ideal for those eager to dive into the world of fabric artistry without feeling overwhelmed.
Unlock Your Creativity: Why Choose a Charm Square Quilt?
Charm square quilts are a fantastic starting point for new quilters. “Charm squares” are typically pre-cut 5-inch fabric squares, often sold in coordinated packs from a specific fabric line. This eliminates the need for extensive fabric selection and initial cutting, allowing you to jump straight into the fun part: sewing! This tutorial leverages these convenient pre-cuts, along with smaller 2.5-inch squares and background fabric, to construct a beautiful and surprisingly simple quilt top. The repetitive nature of quilting can be incredibly meditative, providing a wonderful escape and a tangible sense of accomplishment with each stitch. Imagine the satisfaction of transforming a pile of fabric into a cozy blanket, a decorative wall hanging, or even a cherished gift. This project is perfect for building confidence and developing fundamental quilting skills.
How to Make a Quilt with 5-inch Squares: A Step-by-Step Tutorial
Before you begin, ensure you have a dedicated workspace where you can comfortably cut and sew. Good lighting is essential, and having an iron and ironing board close by will streamline your process. Accuracy in cutting and sewing is paramount in quilting, as it ensures your blocks fit together perfectly, resulting in a flat and beautiful finished quilt.
Gathering Your Materials: What You’ll Need
Having all your materials prepared before you start will make the quilting process smoother and more enjoyable. Here’s a detailed list of what you’ll need for this project:
- 1 Pack of Pre-cut 5-inch Squares (Charm Pack): These are the stars of your quilt! A standard charm pack usually contains 42 squares, often featuring a variety of prints from a single fabric collection. This ensures a cohesive look without the hassle of matching fabrics yourself. Choose a pack with colors and patterns that appeal to you.
- 1 Pack of Pre-cut 2 ½-inch Squares (Mini Charm Pack or Cut from Jelly Roll Strips): These smaller squares will serve as accent pieces, adding visual interest and framing to your main blocks. If you can’t find pre-cut 2.5-inch squares, you can easily cut them from coordinating fabric scraps or even from a jelly roll (2.5-inch wide strips).
- 1 ½ Yards of Background Fabric: This fabric will provide contrast and help highlight your patterned squares. A solid, neutral color like white, cream, light gray, or a subtle tone-on-tone print works wonderfully as a background. Opt for high-quality quilting cotton, which is easy to work with and durable. This fabric will be used for sashing and borders.
- Quilter’s Ruler: A clear acrylic ruler, at least 6.5 x 24 inches, is indispensable for accurate cutting. Look for rulers with clear markings, especially for quarter-inch increments.
- Rotary Cutter: This tool makes cutting fabric quick and precise. A 45mm rotary cutter is a versatile size for most quilting projects. Always use it with a self-healing cutting mat.
- Self-Healing Cutting Mat: Protect your work surface and your rotary cutter blade with a good quality cutting mat. Ensure it’s large enough for your project pieces.
- Fabric Marking Pencil or Pen: Essential for marking lines or points on your fabric. Choose one that is easily removable with water or heat.
- Good Quality Thread: A neutral-colored 100% cotton thread (like white, cream, or light gray) is usually best for piecing quilt tops as it blends seamlessly. Ensure it’s strong enough for sewing machine use.
- Sewing Machine: Any sewing machine capable of a straight stitch will work. Make sure it’s in good working order and has a fresh needle.
- Iron and Ironing Board: Pressing your seams correctly is crucial for flat, accurate blocks and a smooth quilt top.
- Fabric Scissors: For trimming threads and other small cuts.
- Quilting Pins or Fabric Clips: To hold fabric pieces together securely before sewing.
- Seam Ripper: Every quilter needs one! It’s an essential tool for correcting mistakes.
Essential Preparation: Setting Up for Success
Before any cutting or sewing begins, a few preparatory steps will ensure your quilting project is set up for success.
- Pre-wash Your Fabrics (Optional but Recommended): Some quilters prefer to pre-wash their fabrics to prevent any potential shrinkage or color bleeding after the quilt is finished. If you choose to pre-wash, do so for all fabrics, including your charm squares and background fabric. Wash on a gentle cycle with cold water and tumble dry on low or air dry.
- Iron All Fabrics: Press all your fabrics thoroughly before cutting to remove any wrinkles or creases. This ensures accurate cutting and piecing. Use a steam iron for best results.
- Understand Seam Allowance: In quilting, a consistent ¼-inch seam allowance is critical. This small detail ensures all your blocks fit together precisely. If your machine doesn’t have a ¼-inch foot, you can mark the ¼-inch line on your sewing machine bed with tape as a guide.
Precision Cutting: Preparing Your Fabric Components
Even with pre-cut squares, you’ll need to cut your background fabric to create the unique design of this quilt. Accuracy here is key to a beautiful outcome.
- Cut Background Sashing Strips: From your 1 ½ yards of background fabric, use your rotary cutter and ruler to meticulously cut twenty (20) pieces, each measuring 5 inches x 2 ½ inches. These pieces will form the “sashing” that frames your charm squares and creates structure within the quilt design. Double-check your measurements for each strip to ensure consistency.
- Organize Your Pre-cut Squares: Lay out your 5-inch and 2 ½-inch pre-cut squares. Take a moment to appreciate the different patterns and colors. This initial visual assessment can help you plan your layout later.
Crafting Your Quilt Blocks and Sashing Units
This quilt design relies on combining the different sized squares and background strips into specific units that will then be assembled into rows. We’ll focus on creating two main types of units.
- Construct “Accent Bar Units”:
- Take one of your 5-inch x 2 ½-inch background sashing strips.
- Place one 2 ½-inch square right sides together with one of the 2 ½-inch ends of the background strip. Align the edges carefully. Pin if necessary.
- Sew with a ¼-inch seam allowance.
- Press the seam open or towards the darker fabric (typically the 2 ½-inch square, depending on your fabric choices). Pressing helps your blocks lie flat.
- Repeat this process on the *opposite* 2 ½-inch end of the same background strip, attaching a second 2 ½-inch square.
- You will now have an “Accent Bar Unit” that looks like: [2 ½-inch square] – [5-inch x 2 ½-inch background strip] – [2 ½-inch square]. This unit measures approximately 2 ½ inches high by 9 ½ inches wide (finished size, accounting for seam allowances).
- Create a total of ten (10) such “Accent Bar Units.” This will use all twenty of your 2 ½-inch squares and ten of your 5-inch x 2 ½-inch background strips.
- Prepare “Framed Charm Squares”:
- Take one of your pre-cut 5-inch squares.
- Place one of your remaining 5-inch x 2 ½-inch background sashing strips right sides together along one 5-inch side of the 5-inch square. Align carefully.
- Sew with a ¼-inch seam allowance.
- Press the seam towards the background strip.
- You now have a “Framed Charm Square” unit, measuring approximately 5 inches high by 7 inches wide (finished size).
- The number of these units you make will depend on the overall size of your desired quilt and the number of 5-inch squares you have. You’ll likely create several of these to alternate with other units.
Assembling the Quilt Top: Bringing Your Design to Life
Now that you have your individual units, it’s time to arrange them into rows and sew those rows together to form your quilt top. This is where your design vision comes to life!
- Design Your Layout:
- On a large flat surface (a design wall, floor, or large table), lay out your “Accent Bar Units” and “Framed Charm Squares” (along with any remaining plain 5-inch squares) into a grid.
- The original tutorial suggests alternating rows: one row primarily featuring the “Framed Charm Squares” and another row primarily featuring the “Accent Bar Units.” Experiment with your arrangement, mixing and matching fabrics and rotating blocks until you achieve a visually pleasing pattern. Consider color balance, contrast, and the overall flow of the design.
- For example, you might create rows of 5-inch squares separated by sashing (which could be plain 5×2.5″ background strips), and then alternate these “Square Rows” with “Bar Rows” made entirely of the “Accent Bar Units.” The key is to create a repeating pattern that you love.
- Sew Individual Rows:
- Once your layout is finalized, pick up the units for your first row, keeping them in order.
- Sew the units of this first row together, one by one, using a consistent ¼-inch seam allowance.
- Press the seams for each row. For alternating rows, it’s often helpful to press seams in opposite directions (e.g., press seams to the left for Row 1, to the right for Row 2). This technique, called “nesting seams,” helps reduce bulk and makes it easier to match your seams when joining rows.
- Repeat this process for all your rows, creating individual long strips of sewn units.
- Join the Rows to Form the Quilt Top:
- Lay out your completed rows, ensuring they are in the correct order.
- Take the first two rows (e.g., Row 1 and Row 2). Place them right sides together, aligning all the seams and raw edges. Use pins liberally, especially at seam intersections, to ensure everything lines up perfectly. “Nesting” your seams (where seams from one row meet seams from the adjacent row going in the opposite direction) will help them lock into place.
- Sew the two rows together using a ¼-inch seam allowance.
- Press this newly joined section. Again, pressing is crucial for a flat quilt.
- Continue adding the remaining rows, one by one, until your entire quilt top is pieced together. Take your time, align carefully, and press after each seam.
The Quilt Sandwich: Batting and Backing
Once your quilt top is complete, the next step is to create the “quilt sandwich,” which consists of the quilt backing, batting, and the quilt top.
- Prepare Backing Fabric: Choose a fabric for the back of your quilt. It should be at least 4-6 inches larger on all sides than your finished quilt top. You might need to piece two widths of fabric together to achieve the required size for larger quilts. Press it smooth.
- Prepare Batting: Batting is the soft, fluffy layer in the middle that provides warmth and dimension. It also needs to be 4-6 inches larger on all sides than your quilt top. There are various types of batting (cotton, polyester, wool, bamboo blends), each with different properties regarding warmth, drape, and stitch density. Choose one suitable for your project and desired outcome. The original text mentions cutting a “triangle” of batting to match the quilt, which is unconventional; typically, batting is a rectangular piece larger than the quilt top, and any excess is trimmed *after* quilting. For this project, assume a standard rectangular batting.
- Basting the Quilt Sandwich: This step secures the three layers together so they don’t shift during quilting.
- Lay your backing fabric face down on a clean, flat surface, smoothing out any wrinkles. Use painter’s tape to secure the edges to the floor or table, ensuring it’s taut but not stretched.
- Center your batting over the backing fabric, smoothing it out from the center outwards.
- Center your quilt top, face up, over the batting, again smoothing it from the center outwards.
- Secure the layers using your preferred basting method:
- Pin Basting: Use curved safety pins placed every 4-6 inches across the entire quilt.
- Spray Basting: Use a temporary fabric adhesive spray to glue the layers together. Follow the product instructions carefully.
- Thread Basting: Use large, loose stitches to temporarily hold the layers together.
Quilting Your Layers: Adding Texture and Durability
Quilting is the process of stitching through all three layers (quilt top, batting, backing) to hold them together and add texture. This can be done by hand or machine.
- Machine Quilting: For beginners, “stitch-in-the-ditch” (quilting along the seam lines of your pieced blocks) or simple straight-line quilting patterns are excellent starting points. You can use your walking foot (if you have one) to help feed all layers evenly through the machine.
- Hand Quilting: If you prefer a more traditional approach, hand quilting adds beautiful texture and a unique charm. This involves using a needle and thread to make small, even stitches through all layers.
Choose a quilting pattern that complements your piecing and provides adequate support for the batting, preventing it from shifting or bunching.
Finishing Touches: Adding Borders and Binding
The final steps involve adding optional borders and, most importantly, binding your quilt edges for a neat and durable finish.
- Adding Borders (Optional): If you want to enlarge your quilt or add another design element, you can add borders using additional background fabric or coordinating prints. Cut long strips of fabric (e.g., 2.5 inches, 4 inches, or 6 inches wide) and sew them to the sides, then the top and bottom of your quilt top. Press seams outwards.
- Trimming the Quilt: After quilting is complete, trim all four edges of your quilt sandwich, making sure they are straight and square. Use your quilter’s ruler and rotary cutter to create clean, even edges, removing any excess batting and backing.
- Creating the Binding: The binding is a strip of fabric sewn around the outer edge of the quilt to finish and protect it.
- Cut Binding Strips: From your background fabric (or a coordinating fabric), cut several 2 ½-inch wide strips, usually along the width of fabric (WOF). The total length of these strips should be enough to go around the entire perimeter of your quilt, plus about 10-12 inches for joining and overlap.
- Join Strips: Sew the binding strips together end-to-end at a 45-degree angle to create one continuous long strip. Press seams open.
- Prepare Binding: Fold the long binding strip in half lengthwise and press, creating a neat finished edge.
- Attach the Binding:
- Starting at the middle of one side of your quilt, align the raw edge of your folded binding with the raw edge of your quilt top. Leave a tail of about 6-8 inches unsewn.
- Sew the binding to the quilt edge using a ¼-inch seam allowance, stopping ¼-inch from each corner. Miter the corners by folding the binding up, then back down to create a crisp 45-degree angle.
- Once you’ve sewn around all four sides, stop about 10-12 inches before meeting your starting point. Join the two binding tails to create a continuous loop.
- Finish sewing the remaining binding to the quilt.
- Finish the Binding:
- Turn the folded edge of the binding over to the back of the quilt.
- Secure the binding in place, either by hand stitching for a traditional, invisible finish or by machine stitching for a quicker, more visible stitch. Ensure your stitches catch the binding on both the front and back of the quilt.
Congratulations! You’ve successfully completed your charm square quilt. This project, while designed for beginners, offers endless possibilities for personalization. Experiment with different fabric combinations, try out new quilting patterns, or explore various border styles to make each quilt truly your own. Quilting is a journey of continuous learning and creative expression. Enjoy your beautiful, handmade creation!