
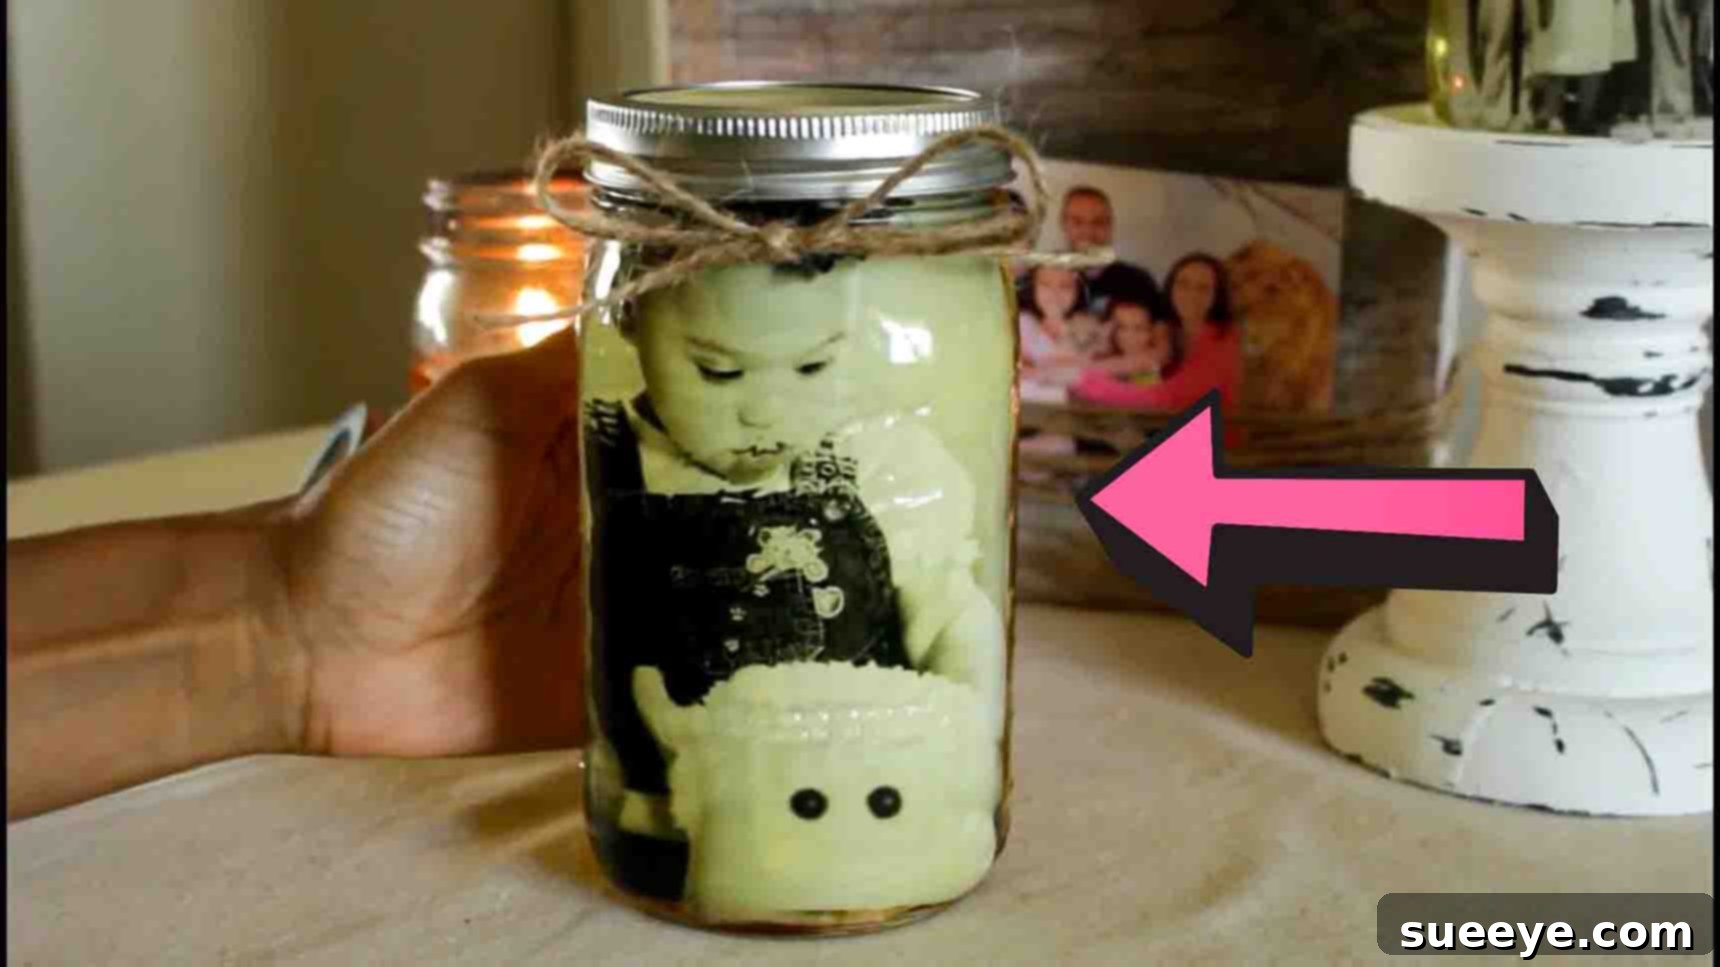
Craft Your Own Mason Memory Photo Jar: A Timeless & Personalized Gift
In a world increasingly dominated by digital interactions, there’s a unique charm in a tangible, heartfelt gift. Are you searching for a truly special and personalized gift idea that speaks volumes without breaking the bank? Look no further than the enchanting DIY Mason Memory Photo Jar. This delightful project, inspired by creations like those from Pretty Little Things on YouTube, offers a wonderful way to encapsulate cherished memories in a beautiful, rustic keepsake.
Imagine presenting a loved one with a jar that holds not just a photograph, but a moment frozen in time, suspended in a liquid medium that gives it an almost ethereal quality. This isn’t just a craft; it’s a vessel for nostalgia, a tangible reminder of shared joy, love, or significant milestones. The best part? It’s incredibly simple to make, requiring minimal materials and time, making it an ideal choice for a last-minute yet profoundly meaningful present.
Why Choose a Mason Memory Photo Jar as Your Next Gift?
Beyond its aesthetic appeal, the Mason Memory Photo Jar offers a multitude of reasons why it stands out as an exceptional gift. In an era of mass-produced goods, a handmade item carries an unparalleled weight of thoughtfulness and effort. Here’s why this DIY project is a cut above the rest:
- Profoundly Personal: Unlike generic gifts, this jar allows you to select a specific photograph that holds deep meaning for the recipient. It could be a snapshot of a shared adventure, a beloved family portrait, or a moment that evokes a special memory.
- Budget-Friendly: You likely already have most of the necessary materials at home or they can be acquired very affordably. This makes it a fantastic option for creating high-impact gifts without a high cost.
- Incredibly Easy to Make: With just a few simple steps, even beginner crafters can achieve stunning results. The process is straightforward, requiring no complex tools or advanced skills.
- Quick to Assemble: Perfect for those times when you need a thoughtful gift in a pinch. The entire project can be completed in under an hour, excluding any drying time for prints if applicable.
- A Lasting Keepsake: Unlike flowers that wilt or chocolates that disappear, a Mason Memory Photo Jar is designed to be a permanent fixture, a constant source of fond remembrance that can be displayed proudly in any home or office.
- Unique Home Decor: Beyond being a gift, these jars make charming decorative pieces, adding a touch of rustic elegance and personal warmth to shelves, mantels, or desks.
- Conversation Starter: Its unique appearance and the memory it holds are bound to spark conversations and bring smiles to faces.
This project isn’t just about crafting; it’s about connecting, sharing, and celebrating the precious moments that define our lives. Ready to embark on this heartwarming DIY journey? Let’s gather our simple ingredients and bring a cherished memory to life!
Materials You’ll Need for Your Memory Jar Project
One of the beauties of this DIY Mason Memory Photo Jar is the simplicity of its material list. You don’t need to be an expert crafter with a workshop full of tools. Most items are readily available, making this a truly accessible project for everyone.
- Mason Jar with a Lid: This is the cornerstone of your project. Standard pint or quart-sized jars work wonderfully, but feel free to experiment with different shapes and sizes to achieve a unique look. Ensure the jar is clean and dry.
- Vegetable Oil (or Corn Oil): This common household item is the magical medium that will preserve your photo and give it that captivating, suspended appearance. It’s safe for most photos and creates a beautiful magnifying effect.
- A Photo of Your Choice: This is where the personalization truly shines! Select a photograph that holds special significance for the recipient – a cherished memory, a beloved pet, a family portrait, or a meaningful landscape.
- Some Scrap Fabric, Ribbon, or Lace: These decorative elements are optional but highly recommended to add a touch of flair and customization to the jar’s exterior, especially around the lid.
Optional Materials for Enhanced Customization:
- Laminating Pouches & Laminator: While oil is generally safe, laminating your photo offers an extra layer of protection against potential oil penetration or ink bleeding, especially for inkjet prints.
- Twine or Jute String: For a rustic, natural look around the jar neck.
- Small Charms or Pendants: To hang from the ribbon or twine.
- Acrylic Paint or Glass Markers: To decorate the outside of the jar or lid.
- Labels or Tags: To add a custom message, date, or name.
- Glitter (non-oil soluble): For a touch of sparkle inside the jar, if desired, though be mindful it might obscure the photo slightly.
Before you begin, ensure all your materials are clean and ready. A little preparation goes a long way in ensuring a smooth and enjoyable crafting experience.
Step-by-Step Directions to Create Your Mason Memory Photo Jar
Now that you have all your materials assembled, let’s dive into the fun and easy process of creating your personalized Mason Memory Photo Jar. Follow these simple steps carefully, and you’ll have a beautiful keepsake in no time.
Step 1: Preparing Your Photo and Filling the Jar
The first and most crucial step involves preparing your chosen photograph and introducing it to its new, oil-filled home. This is where the magic begins, transforming a simple picture into an encapsulated memory.
- Choose and Prepare Your Photo: Select a photo that fits well within the dimensions of your mason jar. If your photo is a standard print, consider its material. Laser prints tend to be more resistant to oil and moisture than inkjet prints. For inkjet prints or older, more delicate photos, a quick tip is to laminate them before proceeding. This provides an excellent protective barrier, ensuring the photo’s longevity and preventing any potential ink bleed. Trim your photo to the desired size, ensuring it can easily slide into and unroll within the jar without crumpling.
- Placement is Key: Carefully roll or fold your photo so it can be inserted through the mouth of the mason jar. Once inside, gently unroll or adjust it against the interior glass. You might find a pair of long tweezers or even chopsticks useful for precise positioning. The goal is to have the photo standing upright, or artfully placed against the side, allowing the image to be clearly visible from the outside. Take your time to get the positioning just right, as this will be its permanent display spot.
- Pouring the Oil: With your photo perfectly placed, it’s time to introduce the vegetable or corn oil. Slowly and steadily pour the oil into the jar, allowing it to gently surround the photograph. Fill the jar completely to the brim, ensuring the entire photo is submerged and there are no large air pockets trapped inside. The oil not only preserves the photo but also creates a fascinating magnifying effect, making the image pop and giving it a unique, almost watery appearance. Once filled, securely screw the lid back onto the jar, sealing your precious memory within.
Witnessing the oil envelop the photograph is truly captivating. The oil enhances the colors and depth, giving your memory jar its characteristic “floating” or “preserved” look. Double-check that the lid is tightly sealed to prevent any leaks and to maintain the pristine condition of your keepsake.
Step 2: Decorating Your Mason Memory Photo Jar
Once your memory is safely encased, the final step is to adorn your jar, transforming it from a simple container into a beautifully finished gift or decorative item. This is your chance to infuse more of your personal style or tailor it to the recipient’s taste.
- Embrace Your Creativity: Grab your chosen decorative materials – be it lace, scrap fabric, elegant ribbons, rustic twine, or a combination. The top of the jar, particularly the lid and the neck, offers a perfect canvas.
- Lid Embellishment: You can wrap a strip of lace or fabric around the lid, securing it with a dab of hot glue or a knot. A pretty ribbon tied in a bow around the neck of the jar adds a touch of sophistication or charm. For a more rustic feel, jute twine wrapped several times around the neck and tied in a simple knot or bow works wonders.
- Theme and Occasion: Consider the occasion and the recipient’s preferences. For a vintage look, opt for delicate lace and muted tones. For a festive holiday gift, use red and green ribbons or add small sprigs of faux berries. If the jar is for a child, bright, playful fabrics or charms might be more appropriate.
- Beyond Fabric: Don’t limit yourself! You could paint the lid with acrylic paint, add a personalized sticker or label to the jar itself, or even hang a small, meaningful charm from the ribbon. For a minimalist aesthetic, you might choose to leave the jar as is, appreciating its clean lines and the vividness of the submerged photo. The beauty lies in its simplicity and the sentiment it holds.
This final step is where your creative vision comes to life. Whether you prefer a clean and simple look or a richly embellished design, the decorations truly complete the gift, adding that extra layer of love and personal touch.
Tips for Crafting the Perfect Mason Memory Photo Jar
To ensure your Mason Memory Photo Jar turns out beautifully and lasts for years to come, here are some expert tips and considerations:
- Photo Quality Matters: Start with a high-resolution photo. A crisp, clear image will look even more stunning when magnified by the oil.
- Print Type Preference: Laser-printed photos are generally recommended as their toner-based ink is more resistant to oil and bleeding. If you’re using an inkjet print, consider sealing it with a spray sealant or, even better, laminating it before placing it in the oil. This prevents the ink from running or fading over time.
- Removing Air Bubbles: After pouring the oil, you might notice small air bubbles clinging to the photo or the inside of the jar. Gently tap the jar on a soft surface or use a thin skewer or chopstick to dislodge them.
- Secure the Lid: Ensure the lid is tightly sealed to prevent any oil from leaking and to protect the contents from dust and humidity. For extra security, you could add a thin bead of waterproof adhesive around the rim of the lid before screwing it on.
- Consider the Photo Orientation: Think about how the photo will be viewed. Most people display these jars upright, so ensure your photo is oriented correctly for easy viewing.
- Experiment with Oils: While vegetable or corn oil is standard, some crafters use mineral oil or even baby oil for a slightly different clarity or preservation property. Always do a small test if you’re unsure about alternative oils and their interaction with your photo paper/ink.
- Long-Term Care: Store your finished memory jar away from direct sunlight, which can cause photos to fade over extended periods, even when protected by oil.
- Safety First: If you have pets or small children, ensure the jar is placed out of their reach, especially if using oils that might be harmful if ingested in large quantities.
Creative Variations & Gift-Giving Ideas for Your Memory Jars
The Mason Memory Photo Jar is incredibly versatile, allowing for endless creative variations to suit any occasion or recipient. Here are some ideas to inspire your next project:
- Themed Collections: Create a series of jars for different themes – a “Travel Memories” jar with photos from a vacation, a “Family Milestones” jar with pictures from birthdays and anniversaries, or a “Pet Love” jar dedicated to furry friends.
- Seasonal & Holiday Jars: Decorate jars with festive elements for holidays like Christmas, Halloween, or Valentine’s Day. Imagine a winter scene photo with faux snow (non-soluble glitter) in the oil, or a spooky Halloween photo with tiny plastic spiders outside the jar.
- Add Small Embellishments Inside: For a truly unique touch, consider adding small, non-soluble items to the oil, such as tiny plastic beads, glitter flakes (test for oil solubility first), or even dried flowers (if carefully preserved and tested not to degrade in oil). Just ensure they don’t obscure the main photo.
- Anniversary & Wedding Gifts: A jar containing a couple’s wedding photo or a picture from a significant anniversary date makes for a deeply romantic and thoughtful gift.
- Graduation & Achievement Gifts: Commemorate a graduation, a new job, or another significant achievement with a relevant photo and perhaps a small scroll of encouragement tied to the lid.
- Memorial Gifts: For a touching tribute, a memory jar with a photo of a loved one who has passed can serve as a beautiful and comforting keepsake, offering a tangible way to remember them.
- “Open When…” Jars: Fill several small jars with different photos and label them “Open when you miss me,” “Open when you need a laugh,” etc., creating a series of emotional prompts.
- Gift Presentation: Elevate your gift by placing the jar in a rustic gift box, tying a handwritten tag with a personal message, or pairing it with a small bundle of complementing items, such as a favorite tea or a scented candle.
No matter how you choose to customize it, the Mason Memory Photo Jar is more than just a craft; it’s a testament to the power of shared memories and the joy of giving a piece of your heart.
DIY Mason Memory Photo Jar Tutorial: Your Next Creative Endeavor
Creating a Mason Memory Photo Jar is an incredibly rewarding experience, offering both the joy of crafting and the satisfaction of giving a truly personal and meaningful gift. It’s a testament to the idea that the most precious presents don’t have to be extravagant; they simply need to come from the heart.
This simple, elegant, and deeply sentimental project is perfect for anyone looking to preserve a cherished memory or to give a loved one a unique token of affection. With minimal materials and straightforward steps, you can create a beautiful keepsake that will be treasured for years to come. So, gather your materials, pick your favorite photo, and embark on this wonderful DIY adventure. The smiles and appreciation you’ll receive will be your greatest reward.
Don’t just make a gift; craft a memory. Happy creating!