
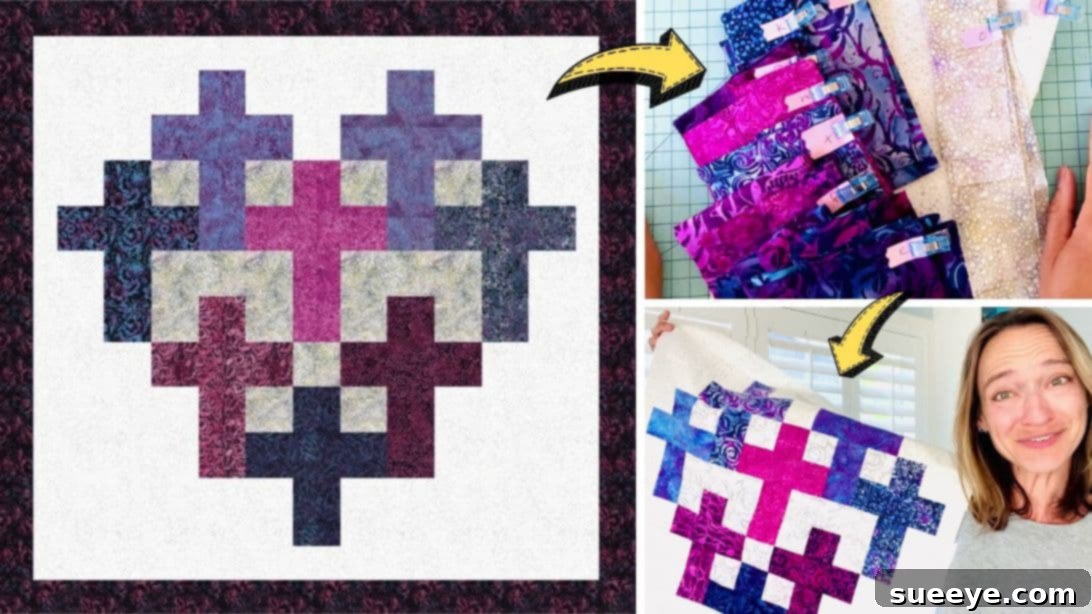
Mastering the Heart Cross Quilt: A Comprehensive Step-by-Step Tutorial
Embark on a heartwarming creative journey with this detailed guide to crafting a beautiful Heart Cross Quilt. This project, inspired by the talented Faith and Fabric on YouTube, offers a truly personal and meaningful way to express love and appreciation to family, friends, and cherished loved ones. Whether you’re a seasoned quilter or just starting your fabric artistry adventure, this tutorial will walk you through every essential step. Imagine the joy of gifting a handmade quilt, personalized with your chosen fabrics or even a touch of embroidery, becoming a treasured keepsake for years to come. Much like a cherished quilt passed down through generations, this design carries a powerful message of affection and warmth. Prepare to transform simple fabric into a stunning, heartfelt masterpiece.
Why Choose the Heart Cross Quilt?
The Heart Cross Quilt isn’t just a visually appealing design; it carries profound symbolism. The interweaving heart and cross motifs represent enduring love, faith, and comfort, making it an exceptionally thoughtful gift for various occasions. It’s perfect for birthdays, anniversaries, graduations, holidays, or simply as a comforting gesture for someone special. Its versatile design allows for countless personalization options, ensuring each quilt is unique. Furthermore, the construction of this quilt is approachable for quilters of intermediate skill levels, with clear directions that break down the process into manageable steps. This project offers a wonderful opportunity to hone your quilting skills while creating something truly beautiful and imbued with personal meaning.
Your Essential Quilting Arsenal: Materials Needed
Before diving into the creative process, gathering all necessary materials is crucial for a smooth and enjoyable quilting experience. Precision and quality tools can significantly impact the final outcome of your Heart Cross Quilt.
- A Diverse Selection of Fabrics: Choose a variety of colors and patterns that complement each other and reflect the recipient’s taste or a specific theme. Consider cotton quilting fabrics for their ease of use, durability, and wide range of designs. You’ll need different fabrics for the main blocks and contrasting elements to make the heart and cross patterns pop.
- Coordinating Border Fabric: Select a fabric for the outer border that harmonizes with your chosen block fabrics. The border frames your quilt design, adding a professional and polished finish.
- High-Quality Needle and Thread: Opt for a strong, all-purpose polyester or cotton thread that matches or blends with your fabrics. Ensure your sewing machine needle is sharp and appropriate for quilting (e.g., a “quilting” or “microtex” needle).
- Fabric Pins or Wonder Clips: These are indispensable for holding fabric pieces securely together before sewing, ensuring accurate alignment and preventing shifting.
- Marking Pen, Pencil, or Chalk: Essential for transferring pattern markings, drawing cutting lines, or marking quilting lines directly onto your fabric without leaving permanent traces. Always test on a scrap piece first.
- Accurate Quilting Ruler: A transparent acrylic ruler, preferably with 1/4-inch markings, is vital for precise cutting and trimming of fabric pieces.
- Sharp Scissors or Rotary Cutter with a Cutting Mat: While scissors are useful for small trims, a rotary cutter combined with a self-healing cutting mat offers unparalleled speed and accuracy for cutting multiple layers of fabric. Safety is paramount when using a rotary cutter.
- Reliable Iron and Ironing Board: Pressing seams meticulously throughout the quilting process is critical for achieving flat, precise blocks and a professional-looking quilt top. Pressing helps seams lay flat, reducing bulk and ensuring accuracy.
- Dependable Sewing Machine: A standard sewing machine capable of a straight stitch is all you need. Ensure it’s in good working order and you’re comfortable with its basic operations.
- The Official Pattern Guide: Download the detailed pattern from Faith and Fabric Design. This guide provides precise cutting dimensions and assembly instructions, serving as your roadmap throughout the project.
- Batting: The crucial middle layer of your quilt, providing warmth, loft, and defining the quilted texture. Choose from cotton, polyester, wool, or blends, depending on your desired feel and drape.
- Backing Fabric: A single large piece of fabric for the back of your quilt. It should be slightly larger than your quilt top to allow for trimming after quilting.
Embarking on Your Quilting Journey: Step-by-Step Directions
Creating the Heart Cross Quilt is a rewarding process that unfolds in several distinct stages. By following these directions carefully, you’ll construct a beautiful and durable quilt top.
Step 1: Precision in Preparation – Pattern & Fabric Cutting
Your quilting adventure begins with careful preparation. First, download and thoroughly review your pattern guide from Faith and Fabric Design. Familiarize yourself with all the cutting requirements and assembly diagrams. The pattern will specify the exact dimensions for each fabric piece. Next, it’s time to select your fabrics. Consider pre-washing your fabrics to prevent potential shrinkage and color bleeding later on, especially if you’re mixing light and dark colors. Press them flat to remove any wrinkles, which is essential for accurate cutting. Using your rotary cutter, cutting mat, and quilting ruler, meticulously cut each fabric piece according to the pattern’s specifications. Precision here is paramount, as even slight inaccuracies can compound and affect the overall alignment of your quilt. As you cut, group the pieces for different sections of the quilt together. Labeling these groups with temporary fabric markers or sticky notes will prevent confusion as you move to the assembly phase, ensuring you always pick the correct fabric for each part of the block.
Step 2: Piecing the Heart of the Quilt – Sewing Individual Rows
With all your fabric pieces precisely cut and organized, the next step involves piecing together the individual rows that will form your quilt blocks. This is where the magic of quilting truly begins! Refer back to your pattern guide constantly to ensure you are joining the correct fabric pieces in the designated sequence for each row. The pattern will illustrate how to arrange your “black” (or dominant dark) and “blue” (or contrasting light) fabric sections to create the distinct heart and cross motifs. When sewing, maintain a consistent 1/4-inch seam allowance. This standard quilting seam allowance is crucial for ensuring your blocks finish at the correct size. After sewing each seam, take your pieces to the ironing board. Pressing seams correctly is just as important as sewing them accurately. For rows with your dominant dark fabric, press the seams toward the left. For rows with your contrasting light fabric, press the seams toward the right. This strategic pressing technique helps to “nest” your seams when joining rows later, reducing bulk and making it easier to align points for a flat, professional finish. Continually check your work against the pattern to catch any errors early.
Step 3: Assembling the Quilt Top & Adding the Border
Once all your individual rows are sewn and pressed according to Step 2, it’s time to assemble them into the complete quilt top. This is a thrilling stage where your design truly starts to emerge! Begin by carefully laying out all your completed rows in the correct order, referring to your pattern. When joining the rows, pay close attention to the direction of your stitching. Start by sewing the first two rows together from left to right. For the next pair of rows (or joining the third row to the combined first two), reverse your stitching direction, going from right to left. Continue to alternate the direction of stitching for each subsequent seam. This technique, known as “directional sewing” or “chain piecing,” helps to prevent bowing or stretching of your quilt top, ensuring that your rows remain perfectly aligned and your overall quilt top stays square. As you join each row, press the seams. Given your careful pressing in Step 2, your seams should “nest” beautifully, creating flat intersections and crisp points. Once all rows are joined and pressed, and your full quilt block is assembled, it’s time to add the border fabric. Measure your quilt top accurately, then cut your border strips according to these measurements, ensuring they are straight and even. Attach the border strips, starting with the side borders and then the top and bottom, or as your pattern recommends, ensuring mitered or butt joints are neat and square. Finally, trim any excess threads and square up your quilt top, preparing it for the next stages of quilting.
Step 4: Layering and Basting Your Quilt Sandwich
With your beautiful quilt top complete, the next critical step is to prepare your “quilt sandwich” – the layering of the backing, batting, and quilt top. This stage ensures all layers are securely held together for the quilting process. Start by laying your backing fabric on a clean, flat surface, right side down. Use masking tape to secure the edges to the floor or table, ensuring it’s smooth and taut. Next, carefully place your chosen batting on top of the backing, centering it and smoothing out any wrinkles. Finally, position your quilt top, right side up, on top of the batting, making sure it’s centered and perfectly flat. Once all three layers are aligned and smooth, it’s time to baste them together. There are several basting methods: pin basting (using safety pins every few inches), spray basting (using a temporary fabric adhesive), or hand basting (with large, loose stitches). Choose the method you’re most comfortable with, ensuring all layers are secured and no puckers or wrinkles are present. Proper basting is crucial for a smooth quilting process and a professional finish.
Step 5: The Art of Quilting Your Design
Quilting is the process of stitching through all three layers of your quilt sandwich – the top, batting, and backing – to secure them together and add texture and dimension to your design. This is where your quilt truly comes to life! You can choose between machine quilting or hand quilting, depending on your preference and skill level. For machine quilting, options include straight-line quilting (following the seams or creating parallel lines), stippling (a random, meandering pattern), or free-motion quilting (drawing designs with your machine). If hand quilting, use a thimble and short, even stitches to follow patterns or echo your pieced designs. Consider the density of your quilting; more quilting will result in a flatter, denser quilt, while less will create a softer, loftier feel. Experiment on scrap fabric if you’re new to quilting designs. This stage allows for immense creativity, enhancing the visual appeal and durability of your Heart Cross Quilt.
Step 6: The Finishing Touch – Binding Your Quilt
The final step in completing your Heart Cross Quilt is adding the binding. This professional finish encases the raw edges of your quilt, providing durability and a polished look. First, trim your basted and quilted project to square up the edges, removing any excess backing and batting. Next, prepare your binding strips. These are typically cut from coordinating fabric, usually 2.5 inches wide, and sewn together end-to-end to create one long strip. Press this strip in half lengthwise. Attach the binding to the front of your quilt, aligning the raw edge of the binding with the raw edge of the quilt, and sew with a 1/4-inch seam allowance, mitering the corners for a crisp finish. Once sewn to the front, flip the binding over to the back of the quilt, neatly folding it to cover the raw edge. Hand-stitch or machine-stitch the binding in place on the back. This final step not only secures all layers but also provides a beautiful frame for your cherished handmade quilt, ready to be loved and enjoyed.
Customizing Your Heart Cross Quilt for Unique Charm
While the basic Heart Cross Quilt pattern is inherently beautiful, its true magic lies in the endless possibilities for customization. Tailoring the quilt to its recipient or your personal aesthetic transforms it from a craft project into a deeply personal work of art. Consider playing with fabric choices: instead of traditional cotton, perhaps experiment with flannel for a cozier feel or batik prints for a more vibrant, artistic touch. The color palette can dramatically alter the mood – bright pastels for a baby quilt, rich jewel tones for a sophisticated throw, or muted earth tones for a rustic appeal. Beyond fabric, think about adding decorative elements. Hand embroidery can be used to add initials, a significant date, a special quote, or delicate floral accents within the heart or cross motifs. Appliqué, where fabric shapes are sewn onto the quilt top, could introduce additional elements like small birds, stars, or even a personalized silhouette. You might also vary the size of the quilt; scaling the pattern up or down can create anything from a small wall hanging or baby blanket to a generous throw or even a bed-sized quilt. Don’t shy away from experimenting with different quilting patterns in Step 5 – a dense custom design could add significant texture and visual interest. Each thoughtful detail you incorporate will make your Heart Cross Quilt truly one-of-a-kind and a reflection of your creative spirit.
Tips for a Successful Quilting Experience
Quilting is a journey of patience and precision, but even beginners can achieve fantastic results with a few helpful tips:
- Invest in Good Tools: Sharp rotary cutters, quality thread, and a reliable iron make a huge difference in accuracy and enjoyment.
- Press, Don’t Iron: When quilting, “pressing” involves lifting and lowering the iron, not sliding it, to avoid distorting your fabric pieces.
- Consistent Seam Allowance: A perfect 1/4-inch seam allowance is the cornerstone of accurate piecing. Practice until it’s consistent.
- Pre-wash Your Fabrics: Especially if you’re using fabrics of different fiber contents or colors, pre-washing prevents shrinkage and color bleeding later.
- Take Your Time: Rushing leads to mistakes. Enjoy the process, take breaks, and don’t be afraid to unpick stitches if needed.
- Square Up Frequently: Regularly check your blocks and quilt top for squareness. Trimming along the way prevents errors from compounding.
- Use Lots of Pins (or Clips): Secure your fabric layers generously, especially when joining long seams or matching points.
- Watch Tutorials: Videos like those from Faith and Fabric are invaluable for visualizing techniques.
Caring for Your Handmade Quilt
Once your beautiful Heart Cross Quilt is complete, proper care will ensure it remains a cherished item for years to come. For most cotton quilts, gentle machine washing on a delicate cycle with cold water and a mild detergent is recommended. Avoid harsh chemicals or bleach. Tumble dry on a low setting or, ideally, air dry flat to prevent stretching and preserve the quilting stitches. For the first wash, you might add a color catcher to absorb any potential dye run-off, especially if you used vibrant or dark fabrics. Store your quilt folded or rolled in a breathable cotton bag, away from direct sunlight and extreme temperatures, to prevent fading and deterioration of the fabric.
*All image credit belongs to Faith and Fabric via YouTube. Follow and subscribe to her channel for more inspiring quilting tutorials and design ideas!