
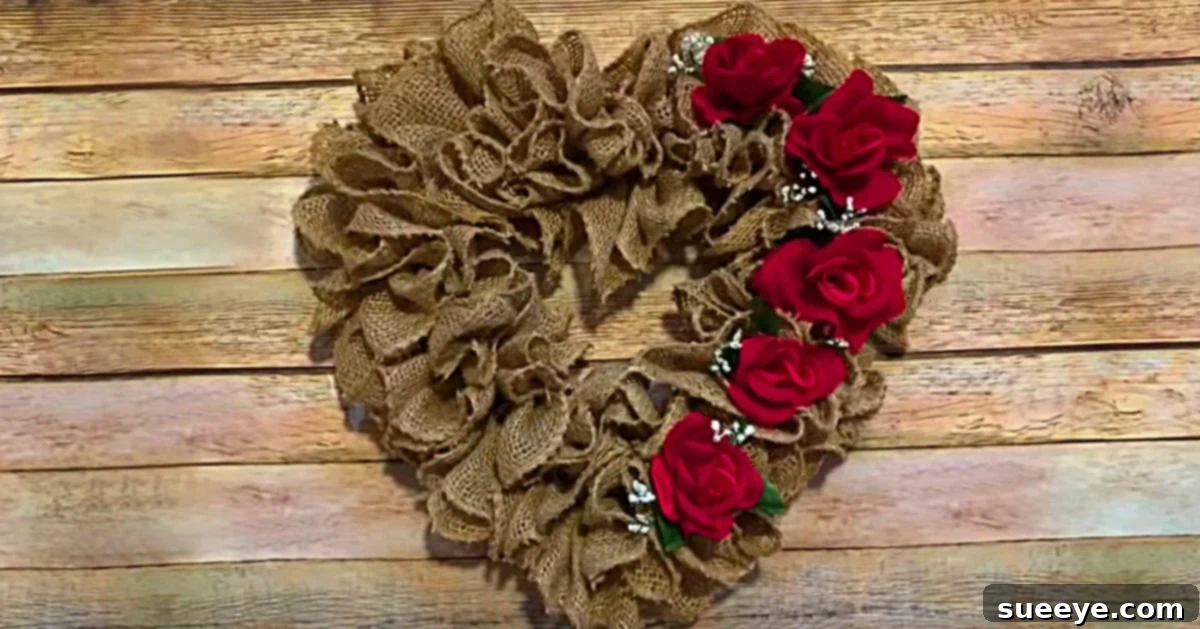
DIY No-Sew Burlap Ruffled Heart Wreath: Your Guide to Charming Valentine’s Day Decor
There’s something undeniably enchanting about ruffles – they add a touch of softness, whimsy, and elegance to any space. From cozy bed linens to flowing curtains, ruffles bring a delightful texture that transforms the ordinary into the extraordinary. So, why should our holiday decorations be any different? This Valentine’s Day, embrace your love for texture and create a stunning focal point with a DIY No-Sew Burlap Ruffled Heart Wreath. Forget complicated sewing machines or intricate patterns; this project is designed for everyone, offering a simple yet incredibly rewarding crafting experience that results in a beautiful, rustic, and deeply romantic accent for your home.
When I first stumbled upon a simple YouTube tutorial for a No-Sew Burlap Valentine’s Day Heart Shaped Wreath, I knew immediately it was the perfect project. It promised to blend seamlessly with my existing “femmy ruffle” decor while introducing a charming rustic touch that felt perfectly in tune with the spirit of Valentine’s Day. The best part? It’s incredibly forgiving and allows for immense creativity. If you’re looking for an affordable, personalized, and utterly delightful way to celebrate love, look no further than this easy-to-follow guide to making your own gorgeous burlap heart wreath.
Why Choose a DIY Burlap Ruffled Wreath?
Crafting your own decorations offers numerous benefits beyond just a beautiful end product. Here’s why a DIY burlap ruffled wreath is an excellent choice for your Valentine’s Day home decor:
- Cost-Effective: Compared to store-bought wreaths, making your own can significantly save you money, especially when you utilize coupons or materials you already have on hand. It’s a budget-friendly way to add seasonal charm.
- Personalized Touch: A handmade wreath reflects your unique style and personality, making your home decor truly one-of-a-kind. You can customize it to match your existing aesthetic perfectly.
- Therapeutic Crafting: Engaging in creative projects can be a wonderful stress reliever. The repetitive motion of ruffling burlap can be meditative, enjoyable, and a fantastic way to unwind.
- Eco-Friendly Option: Burlap is a natural, biodegradable material, making this a more environmentally conscious decorating choice compared to plastic or synthetic alternatives.
- Versatile Design: While perfect for Valentine’s Day, a burlap wreath can be easily adapted for other seasons and holidays with simple changes in decoration. It’s a versatile base for year-round creativity.
- No-Sew Simplicity: This project eliminates the need for any sewing skills or specialized equipment, making it accessible and enjoyable for crafters of all levels, including beginners.
Gather Your Materials: What You’ll Need for Your Burlap Heart Wreath
Before diving into the fun of creating your Valentine’s Day masterpiece, ensure you have all your supplies ready. One of the joys of this project is that many items might already be in your craft stash. Here’s a detailed list of what you’ll need to create your beautiful burlap heart wreath, making sure you’re prepared for every step:
- Heart-Shaped Wreath Form: This is the foundation of your wreath. You can find these at most craft stores like JoAnn’s, Hobby Lobby, or even online. They come in various sizes, so choose one that fits your desired display area. A wire or foam form works best for this no-sew technique.
- Roll of Burlap Ribbon (or Fabric): A standard roll of burlap ribbon, typically 4 to 6 inches wide, is ideal. If you’re using wider burlap fabric, you might need to cut it into strips of your desired width. The amount needed will depend on the size of your wreath form and how full you want your ruffles. A roll of 10-20 yards is a good starting point for a medium-sized wreath. Natural burlap is classic, but colored burlap (red, pink, white) can add a festive touch.
- Hot Glue Gun and Glue Sticks: Your best friend for securing decorations and making minor adjustments to your ruffles. Always exercise caution when using a hot glue gun, and ensure you have plenty of glue sticks on hand.
- Fabric Marker (Optional): Useful if you need to mark specific sections of your burlap or plan to cut it into strips from a larger piece of fabric.
- Sharp Scissors: Essential for cleanly cutting burlap. Dull scissors will fray the edges excessively, making your work more challenging.
- Floral Wire (or Craft Wire): This is crucial for securely attaching the burlap to the wreath form at the beginning and end of your weaving. It also helps to hold specific ruffle sections in place if needed. Choose a relatively thin, flexible wire that can be easily twisted.
- String or Ribbon (for hanging): To create a loop for effortlessly hanging your finished wreath. Choose something sturdy and complementary to your burlap, like jute twine, satin ribbon, or a rustic rope.
- Valentine’s Day Themed Decorations (Optional): This is where your creativity truly shines! Think artificial flowers (classic red roses, delicate pink hydrangeas, white baby’s breath), wooden letters (spell out “LOVE,” “XOXO,” or initials), red or pink ribbons, small heart ornaments (felt, glitter, or wooden), lace accents, beads, pearls, or even battery-operated fairy lights for an enchanting evening glow.
Remember to check for coupons when buying materials from craft stores; they can offer significant savings and make your DIY project even more affordable!
Step-by-Step Guide: Crafting Your Ruffled Burlap Heart Wreath
Now that you have all your materials, let’s get crafting! Follow these simple steps to transform plain burlap into a charming, rustic Valentine’s Day masterpiece that will warm any space.
Step 1: Preparing Your Workspace and Securing the Burlap Base
Before you begin, clear a spacious area to work in, ensuring you have enough room to maneuver your wreath form and burlap. Unroll a generous length of your burlap ribbon. Take one end of your burlap and position it on the back of your heart-shaped wreath form, ideally at the bottom V or the top curve – a less conspicuous spot. Using your floral wire, tightly secure this end of the burlap to the wreath form. Wrap the wire around the burlap and the wreath form several times, twisting the ends to ensure it’s firmly anchored. This initial anchor point is crucial for the stability of your entire wreath and prevents the burlap from unraveling.
Step 2: Crafting the Beautiful Ruffles Around the Form
This is where the magic happens and your wreath truly comes to life! With the burlap securely attached, begin to weave and gather the burlap as you move around the wreath form. The goal is to create beautiful, consistent ruffles. To do this, simply bunch the burlap fabric together, pushing it tightly against the previous section. You can achieve the ruffle effect by pleating small sections back and forth or by simply gathering the fabric and pushing it along the form, creating natural folds. As you work your way around the heart shape, continually push the gathered burlap close together. The more burlap you gather and compress, the fuller and more luxurious your ruffles will appear. Don’t worry about achieving absolute perfection at this stage; you can always adjust and fluff later to refine the shape and volume.
Step 3: Anchoring the End and Completing the Burlap Weave
Continue to ruffle the burlap all the way around your heart-shaped wreath form until you reach your starting point. You’ll want to ensure the entire wreath form is covered with luscious burlap ruffles, leaving no gaps. Once you’ve completed a full circuit, it’s time to secure the end. Take the loose end of your burlap and, just like you did at the beginning, use floral wire to firmly anchor it to the wreath form. Try to tuck the raw edge under the existing ruffles for a seamless and tidy look. Ensure both the beginning and end pieces are tightly secured so your ruffles don’t unravel over time, preserving the beauty of your creation.
Step 4: Fluffing, Shaping, and Perfecting Your Ruffles
Now that all the burlap is on the form and securely attached, take a moment to step back and admire your work. This is the stage where you give your wreath its final shape and volume. Gently fluff up the ruffles, pulling them outwards and evening out the distribution of the burlap around the heart. You can adjust the pleats and gathers to make the wreath look as full, symmetrical, and aesthetically pleasing as possible. Don’t be afraid to manipulate the fabric; burlap is quite forgiving and responds well to shaping. The goal is to create a soft, inviting, and uniformly ruffled texture across the entire wreath, ready for its final decorative touches.
Step 5: Personalizing with Valentine’s Day Decorations
With your beautifully ruffled burlap base ready, it’s time to add the personal touches that truly make it a Valentine’s Day masterpiece. This is where your creativity takes center stage, allowing you to infuse your personality into the decor! Using your trusty hot glue gun, carefully attach your chosen decorations. Consider adding:
- Artificial Flowers: Classic red or pink roses, delicate baby’s breath, or a mix of various floral elements can add a touch of romance and vibrant color.
- Wooden Letters: Spell out “LOVE,” “XOXO,” or your initials for a truly personalized statement that speaks volumes.
- Ribbons: A delicate bow made from satin or lace ribbon can complement the rustic burlap beautifully, adding elegance and softness.
- Small Heart Ornaments: Tiny wooden, felt, or glitter hearts scattered among the ruffles can enhance the Valentine’s theme.
- Beads or Pearls: String them along the wreath or glue individual pieces for a touch of refined elegance and sparkle.
- Fairy Lights: For an enchanting evening glow, weave a string of battery-operated LED fairy lights through the ruffles, creating a magical ambiance.
Remember, there’s no single “right” way to decorate. Let your imagination guide you! Play with different arrangements before applying glue to ensure you absolutely love the final look. Once everything is glued securely, attach a loop of sturdy string or ribbon to the back of the wreath for easy hanging on a door, wall, or mantelpiece.
Tips for a Perfect and Unique Burlap Wreath
To elevate your DIY burlap wreath and make it truly stand out as a piece of personalized home decor, consider these helpful tips:
- Vary Burlap Widths: Experiment with two different widths of burlap ribbon for added depth and texture in your ruffles. A wider base with a narrower top layer can create an interesting visual effect.
- Mix Colors: While natural burlap is classic, don’t shy away from incorporating red, pink, or white burlap strips for a more vibrant Valentine’s theme or a unique color palette.
- Add Other Textures: Weave in strips of lace, decorative mesh, velvet ribbon, or even fine tulle alongside your burlap for an elegant contrast and enhanced visual interest.
- Seasonal Versatility: This basic ruffled burlap wreath can be a year-round staple! Easily remove Valentine’s decorations and add spring flowers, fall leaves, or Christmas ornaments for other holidays and seasons.
- Hot Glue Gun Safety: Always work in a well-ventilated area and be mindful of the hot nozzle and glue. Use finger protectors or a silicone mat if you’re prone to accidental burns to ensure a safe crafting experience.
- Consider Hanging: Decide whether you want to hang your wreath indoors or outdoors. If outdoors, ensure all decorations are weather-resistant or apply a protective sealant to prolong its life.
- Practice Pleating: If you’re new to ruffling or pleating fabric, practice on a small scrap piece of burlap to get a feel for how to create consistent pleats and gathers before working on the main wreath.
Caring for Your Burlap Wreath
A well-made burlap wreath can last for years with proper care and maintenance. To preserve its beauty and extend its lifespan:
- Dust Regularly: Use a soft brush, a feather duster, or a hairdryer on a cool, low setting to gently remove dust accumulation from the ruffles.
- Store Properly: When not in use, store your wreath in a sturdy box or a dedicated wreath storage bag in a cool, dry place. This prevents crushing, dust accumulation, and protects it from potential damage.
- Avoid Direct Sunlight and Excessive Moisture: Prolonged exposure to direct sunlight can fade burlap over time, altering its natural color. Excessive moisture can lead to mildew, so avoid hanging it in highly humid environments or unprotected outdoor areas.
Embrace Your Creativity and Enjoy Your Handmade Charm!
This DIY No-Sew Burlap Ruffled Heart Wreath is more than just a decoration; it’s a testament to your creativity, a delightful expression of love, and a charming addition to your home decor. Whether you’re making it for your own space or as a heartfelt, handmade gift for someone special, the process is as enjoyable and fulfilling as the outcome. The beauty of DIY lies in the freedom to make it uniquely yours – there’s no right or wrong way, just pure imagination brought to life. I hope you enjoy crafting this beautiful burlap wreath as much as I did. It’s truly a super project that promises to bring rustic charm, a touch of romance, and a warm, inviting feel to your Valentine’s Day decor. Happy crafting!