
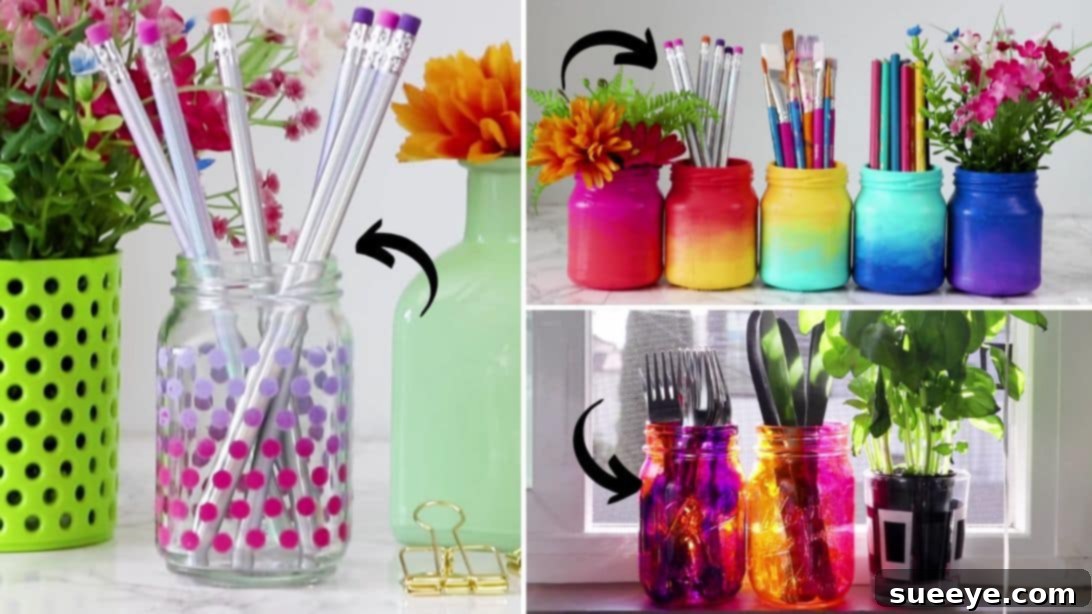
Transform Your Home Decor: 3 Creative DIY Mason Jar Projects
Mason jars are more than just simple containers; they are versatile canvases waiting to be transformed into beautiful, functional, and personalized pieces for your home. If you’ve been collecting these charming glass jars but aren’t quite sure how to unleash their full potential, you’ve come to the right place! This comprehensive guide, inspired by the creative minds at HGTV Handmade on YouTube, will walk you through three distinct, easy, and incredibly fun DIY projects. From vibrant rainbow gradients that capture every eye to playful polka dots that add a touch of whimsy, and elegant translucent tints that glow with subtle charm, you’re about to discover how simple it is to craft stunning decor that reflects your unique style. Get ready to turn your collection of ordinary mason jars into extraordinary works of art and elevate your home’s aesthetic without breaking the bank!
These DIY mason jar ideas are perfect for adding a personal touch to any room, creating thoughtful handmade gifts, or simply enjoying a relaxing and creative afternoon. Each project is designed to be accessible for crafters of all skill levels, ensuring satisfying results. So, gather your supplies, prepare your workspace, and let’s dive into the exciting world of mason jar transformations!
Essential Materials for Your Mason Jar Crafts
Before you embark on your creative journey, it’s always a good idea to gather all your materials. Having everything neatly organized will ensure a smooth and enjoyable crafting experience. Most of these items are readily available at craft stores, hardware stores, or even online, and you might already have some around your home.
- Mason Jars: The star of our projects! Any size or shape will work, but consider consistency in size if you plan to create a matching set, especially for the rainbow jars. Ensure they are thoroughly cleaned and completely dry before you begin.
- Acrylic Paint: You’ll need white acrylic paint for a base coat on some projects, and a variety of vibrant colors (e.g., red, orange, yellow, green, blue, indigo, violet) for the rainbow gradient effect. Water-based acrylics are recommended as they are easy to work with and clean up.
- Paintbrushes: An assortment of sizes will be beneficial. A wider flat brush is great for applying base coats quickly, while smaller, softer brushes are ideal for blending colors and intricate details.
- Spray Paint: Choose your desired color for the polka dot jars. A good quality, all-in-one primer and paint spray can often provide excellent coverage and adhesion to glass.
- Mod Podge: This versatile craft essential acts as a glue, sealer, and finish. For our translucent tinted jars, it’s the key ingredient for creating that beautiful stained-glass effect.
- Liquid Food Coloring: A range of liquid food coloring drops will allow you to create various translucent tints when mixed with Mod Podge. Experiment with different colors to find your favorites.
- Hole Punch Protectors (Reinforcement Labels): These small, circular adhesive stickers, typically used for loose-leaf paper, are perfect for masking out uniform polka dot patterns on your jars.
- Painter’s Tape: An indispensable tool for creating clean lines and masking off areas you don’t want painted, particularly useful for achieving neat edges on the polka dot jars.
- Thumbtack or Craft Knife: This precision tool will be helpful for carefully removing any tiny bits of paint that might bleed under the stickers, ensuring crisp, professional-looking polka dots.
- Optional but Highly Recommended: Paper towels or old rags for cleanup, rubbing alcohol for pre-cleaning jars, drop cloths or newspaper to protect your workspace, and small disposable cups for mixing paints or Mod Podge solutions.
Step-by-Step DIY Mason Jar Transformations
Now that you have all your materials ready, it’s time to unleash your inner artist! We’ll guide you through each project with clear, detailed instructions, along with helpful tips and creative ideas for displaying your finished masterpieces.
DIY Trick #1: Vibrant Rainbow Gradient Jars
Infuse your space with a spectrum of colors! These stunning rainbow gradient jars are perfect for adding a cheerful, artistic, and modern touch to any room. They make fantastic decorative pieces, charming flower vases, or even unique storage solutions for craft supplies, pens, or makeup brushes. The blending of colors creates a mesmerizing visual effect that is sure to brighten your day.
Materials for this project:
- Clean Mason jars (ideally of the same size for a cohesive set)
- White acrylic paint (for the base coat)
- A selection of rainbow-colored acrylic paints (e.g., red, orange, yellow, green, blue, indigo, violet)
- Assorted paintbrushes
- Water (for rinsing brushes) and paper towels
Directions:
- Prepare Your Jars: Begin by thoroughly cleaning your empty mason jars. Wash them with warm soapy water to remove any labels or residue, then rinse them well and let them air dry completely. For optimal paint adhesion, you can also wipe the exterior of each jar with rubbing alcohol and let it dry.
- Apply the Base Coat: Once the jars are impeccably clean and dry, apply two even coats of white acrylic paint to the entire exterior surface of each jar. The white base is crucial as it will ensure that your vibrant rainbow colors pop and appear true to their shade, preventing the natural tint of the glass from affecting the final hue. Allow the first coat to dry completely before applying the second, usually about 20-30 minutes.
- Organize Your Palette: Arrange your chosen rainbow acrylic paints in the order you wish to apply them. A classic rainbow sequence (red, orange, yellow, green, blue, indigo, violet) works beautifully, but feel free to experiment with your own color progression.
- Begin the Gradient Painting:
- Dip your paintbrush into your first color (e.g., red) and apply a generous band of paint around the bottom portion of the jar.
- Immediately after, pick up your second color (e.g., orange) and apply it directly above the first color, allowing the edges to slightly overlap.
- While both paints are still wet, use a clean, slightly damp paintbrush to gently blend the two colors together where they meet. Use light, quick, upward and downward strokes to create a smooth, seamless transition, ensuring there are no harsh lines.
- Continue Building the Rainbow: Repeat the blending process for all subsequent colors, working your way up the jar. Apply the next color, blend it seamlessly with the previous one, and continue this technique until the entire body of the jar is covered in a beautiful gradient.
- Finish the Rim: For a polished look, carefully paint the inside of the jar’s rim with the color that corresponds to the top section of your gradient, or a complementary color. This attention to detail will elevate the final appearance of your rainbow jars.
- Allow to Cure: Let your exquisitely painted rainbow jars dry completely. This might take several hours, or even overnight, depending on the thickness of the paint and ambient humidity. Once fully dry, they are ready to display and enjoy!
Tips for Perfect Rainbow Jars:
- Consistency is Key: For a professional and cohesive set, try to maintain roughly the same width for each color band across all your jars.
- Work Efficiently: Blending wet paint is crucial for a smooth gradient. If the paint starts to dry too quickly, you can apply another thin layer to reactivate it for easier blending.
- Practice Makes Perfect: Don’t be discouraged if your first attempt isn’t flawless. Gradient painting requires a little practice, so enjoy the process and learn from each jar.
- Seal for Durability: For enhanced durability and to protect your beautiful paintwork from scratches and moisture, consider applying a clear, water-resistant sealant spray (like Mod Podge Outdoor or an acrylic sealant) once the paint is fully cured.
Creative Uses for Rainbow Jars:
These captivating jars are incredibly versatile. Use them as vibrant flower vases to complement fresh bouquets, unique holders for pens, paintbrushes, or kitchen utensils, decorative centerpieces for parties and celebrations, or as charming storage for small items like buttons, beads, or hair ties. Grouping several rainbow jars together creates an eye-catching and cheerful display that brightens any corner of your home.
DIY Trick #2: Playful Polka Dot Jars
Add a whimsical and modern touch to your mason jars with this fun and surprisingly easy polka dot technique. This project uses negative space to create a striking pattern that’s both elegant and playful, making it perfect for contemporary decor, organizing craft supplies, or as stylish and personalized gift packaging. The contrast of the painted surface against the clear glass dots is visually appealing and highly customizable.
Materials for this project:
- Clean Mason jars
- Hole punch protectors (reinforcement labels)
- Painter’s tape
- Spray paint (in your desired color)
- Thumbtack or a fine-tipped craft knife
- Paper towels or newspaper (for preparing stickers and protecting surfaces)
Directions:
- Prepare Your Stickers: Before applying the hole punch protectors to the jar, gently press each sticker onto a clean paper towel a few times. This simple step helps to remove any excess adhesive, which prevents sticky residue from being left on your jar and ensures a cleaner, easier removal later.
- Apply the Polka Dot Pattern: Carefully place the prepared hole punch protectors onto the clean, dry mason jar to create your desired polka dot pattern. You can arrange them in a neat, symmetrical grid, a random scattering, or even overlap them for a more abstract and artistic effect. Ensure each sticker is pressed down very firmly to create a tight seal, which will prevent the spray paint from bleeding underneath.
- Mask Off Areas: Once your polka dot pattern is securely in place, neatly wrap painter’s tape around the top rim and the bottom base of the jar. This step is essential for creating clean, unpainted bands at the top and bottom, giving your jar a professional and finished appearance. Press the tape down firmly to seal its edges.
- Spray Paint the Jar: Move to a well-ventilated area, preferably outdoors, and place your jar on a protected surface (like old newspaper or a drop cloth). Apply several thin, even coats of your chosen spray paint over the entire jar, making sure to cover both the stickers and the exposed glass. Applying multiple thin coats is always better than one thick coat, as it prevents drips, ensures even coverage, and allows for a smoother finish. Allow each coat to dry to the touch (usually 5-10 minutes) before applying the next.
- Allow to Dry Completely: This is a critical step. Allow the spray paint to dry and cure completely before attempting to remove any stickers. Prematurely removing the stickers can lead to the paint peeling off, smudging, or leaving fuzzy edges. Check the spray paint can for recommended drying times, which can range from a few hours to overnight.
- Carefully Remove Stickers: Once the paint is fully dry and cured, gently and slowly peel off all the hole punch protectors. You should reveal clean, unpainted polka dots underneath, contrasting beautifully with the painted surface.
- Clean Up Bleeds (If Any): If, despite your best efforts, any tiny bits of paint have bled slightly under the stickers, grab a thumbtack or the tip of a craft knife. Very carefully and gently scratch off any errant specks of paint to sharpen the edges of your polka dots. Take your time with this step to avoid scratching the main painted surface.
Tips for Flawless Polka Dot Jars:
- Impeccably Clean Surface: Ensure your mason jars are absolutely spotless and free of any grease, dust, or fingerprints before applying stickers and paint. This is fundamental for good adhesion and a clean finish.
- Firm Pressure: Apply firm and even pressure to each hole punch protector after placement to ensure its edges are completely sealed against the glass, creating a crisp barrier against the paint.
- Ventilation for Spray Paint: Always prioritize safety by using spray paint in a well-ventilated area. Wearing a protective mask is also advisable to avoid inhaling fumes.
- Patience with Drying: The most common reason for smudged or messy polka dots is removing stickers too soon. Be patient and give the paint ample time to dry and cure fully.
- Experiment with Colors and Textures: Try different spray paint colors, from classic matte white to bold metallics or pastels. You can also experiment with different sizes of stickers or even other small die-cut shapes for varied patterns.
Creative Uses for Polka Dot Jars:
These stylish and playful jars are incredibly versatile. Use them for organizing small office supplies like paper clips or rubber bands, holding makeup brushes or cotton swabs, serving as unique decorative candle holders (use battery-operated tea lights for safety), or as charming gift containers for homemade cookies, candies, or small personalized presents. They add a touch of personality to any desk, vanity, or shelf.
DIY Trick #3: Elegant Translucent Tinted Jars
Create a beautiful stained-glass effect with these elegant translucent tinted jars. The subtle color allows light to shine through, transforming ordinary jars into ethereal decorative pieces. They are perfect as mood lighting with fairy lights, serene decorative accents, or charming luminaries for special occasions. The abstract patterns you can create add a unique artistic flair that catches the light beautifully.
Materials for this project:
- Clean Mason jars
- Mod Podge (matte or gloss, depending on your desired finish)
- Liquid food coloring (various colors)
- Paintbrushes
- Small disposable cups for mixing the tinting solution
- Parchment paper (for baking sheet)
Directions:
- Prepare Tinting Mixture: In separate small disposable cups, mix Mod Podge with a few drops of liquid food coloring. Start with a small amount of food coloring (2-3 drops) and mix thoroughly. Add more drops gradually until you achieve your desired translucent shade. Remember, a little goes a long way, and you’re aiming for a tint, not an opaque paint. Prepare as many different colors as you wish to use.
- Apply Interior Tint: Using a clean paintbrush, carefully coat the entire inside surface of your mason jar with your tinted Mod Podge mixture. You can create random abstract patterns, swirling designs, distinct blocks of color, or a single even coat across the interior. The goal is to cover the desired interior areas evenly.
- Apply a Second Coat for Vibrancy: For a richer, more vibrant tint and to ensure even coverage without patchiness, apply a second coat of the tinted Mod Podge mixture. Allow the first coat to set slightly (it should still be tacky but not wet) before applying the second. This prevents excessive dripping and helps build up the color intensity.
- Remove Excess Mixture: Once the interior is fully coated, turn the jar upside down on a piece of paper towel or newspaper for about 10-15 minutes. This allows any excess Mod Podge mixture to drip out, preventing puddles at the bottom of the jar and ensuring a more even and professional finish.
- Preheat Oven & Prepare for Baking: Preheat your oven to a very low temperature, around 175°F (80°C). While the oven preheats, line a baking sheet with parchment paper to prevent the jars from sticking and for easier cleanup.
- Bake the Jars: Place the jars upside down on the prepared baking sheet. Bake for approximately 30 minutes. The low heat in the oven helps to cure the Mod Podge, creating a durable, transparent, and beautiful finish.
- Turn Jars Over Mid-Bake: After about 10-15 minutes into the baking process, carefully (using oven mitts) turn the jars right-side up. This ensures that the bottom of the jar also dries and cures properly and that the tint sets evenly throughout.
- Cool Down Completely: Once baking is complete, turn off the oven and allow the jars to cool down completely inside the oven or on a wire rack. Glass can be fragile when hot, so handle with care.
- Display in Sunlight: For the most stunning effect, place your finished translucent tinted jars where they can catch ample natural sunlight. The light shining through the colored glass will create a magnificent glow, enhancing the beauty of your creation.
Tips for Gorgeous Translucent Jars:
- Test Your Colors: Always test a small batch of your Mod Podge and food coloring mixture on a scrap piece of glass or clear plastic to check the transparency and color intensity before applying it to your precious jars.
- Spotless Interiors are Crucial: Any dust, lint, or residue inside the jar will be trapped and highlighted by the translucent Mod Podge, so ensure the interiors are impeccably clean before tinting.
- Strive for Even Coats: While abstract patterns are fine, aim for relatively even coats to avoid streaking or uneven color saturation in areas that are meant to be uniformly tinted.
- Low Heat is Key: Do not bake the jars at too high a temperature. The low temperature is for gentle curing, not cooking. High heat can scorch the Mod Podge or potentially affect the glass.
- Alternative Drying Method: If you prefer not to use an oven, you can air dry the jars for 24-48 hours, turning them periodically to prevent pooling. However, oven curing often yields a more durable, clearer, and faster-drying finish.
Creative Uses for Translucent Tinted Jars:
These ethereal jars are perfect as decorative candle holders (always use battery-operated tea lights or fairy lights to avoid heat damage to the Mod Podge and for safety), elegant flower vases that softly diffuse light, unique mini terrariums, or simply as beautiful sun catchers on a windowsill. Group them by color or size for a sophisticated and serene display that enhances the ambiance of any room.
General Tips for All Your Mason Jar Crafts
No matter which mason jar project you choose to tackle, these universal tips will help ensure your crafting endeavors are successful, enjoyable, and result in beautiful, long-lasting creations.
- Cleanliness is Paramount: Always start with impeccably clean and dry jars. Any dust, grease, or lingering residue can prevent paint or adhesive from sticking properly, leading to an imperfect finish. A thorough wash with soap and water, followed by a wipe with rubbing alcohol, works wonders for preparing your surface.
- Patience with Drying Times: Rushing the drying process is perhaps the most common mistake in any DIY project. Always allow each coat of paint, Mod Podge, or sealant to dry completely before moving on to the next step, handling the jar extensively, or applying additional layers. This patience ensures durability, prevents smudges, and results in a flawless finish.
- Ventilation for Sprays: When working with spray paints, sealants, or any strong-smelling adhesives, always work in a well-ventilated area. Outdoors is ideal, but if inside, ensure windows are open and consider using a fan. Wearing a protective mask is also highly recommended to safeguard your respiratory health.
- Protect Your Workspace: Lay down old newspapers, cardboard, a plastic drop cloth, or even an old sheet to protect your tables, floors, and surrounding areas from accidental paint spills, drips, or overspray.
- Experiment and Personalize: Don’t be afraid to let your creativity soar! Experiment with different color combinations, unique patterns, or even add embellishments like twine, ribbons, lace, or personalized labels after your jars are completely dry. Your imagination is the only limit to creating truly unique pieces.
- Consider the Jar’s Purpose: Think about how you intend to use the finished jar when choosing your technique and materials. If you plan to use it for food storage, ensure any paints or coatings are applied only to the exterior, or opt for food-safe sealants. If the jar might be exposed to moisture, ensure your chosen paint and sealant are water-resistant for longevity.
Conclusion: Unleash Your Creativity with Mason Jars!
As you’ve seen, the humble mason jar offers an incredible foundation for endless creative expression and home decor enhancement. With these three easy and engaging DIY projects – from the vibrant energy of rainbow gradients to the chic simplicity of polka dots and the subtle elegance of translucent tints – you now have the tools and inspiration to transform ordinary glass into extraordinary pieces of art. Not only are these projects incredibly fun and rewarding to make, but they also allow you to create personalized decor that truly reflects your unique style, all while being a wonderfully sustainable way to upcycle. We hope you feel utterly inspired to gather your materials, follow these detailed steps, and bring your own unique vision to life. Don’t forget to share your amazing results and continue exploring the vast and imaginative world of DIY mason jar crafts!
*A special thank you and all image credits go to HGTV Handmade via YouTube for providing the brilliant inspiration and foundational ideas for these amazing transformations. Be sure to check out their channel for even more inspiring DIY content and creative projects!