
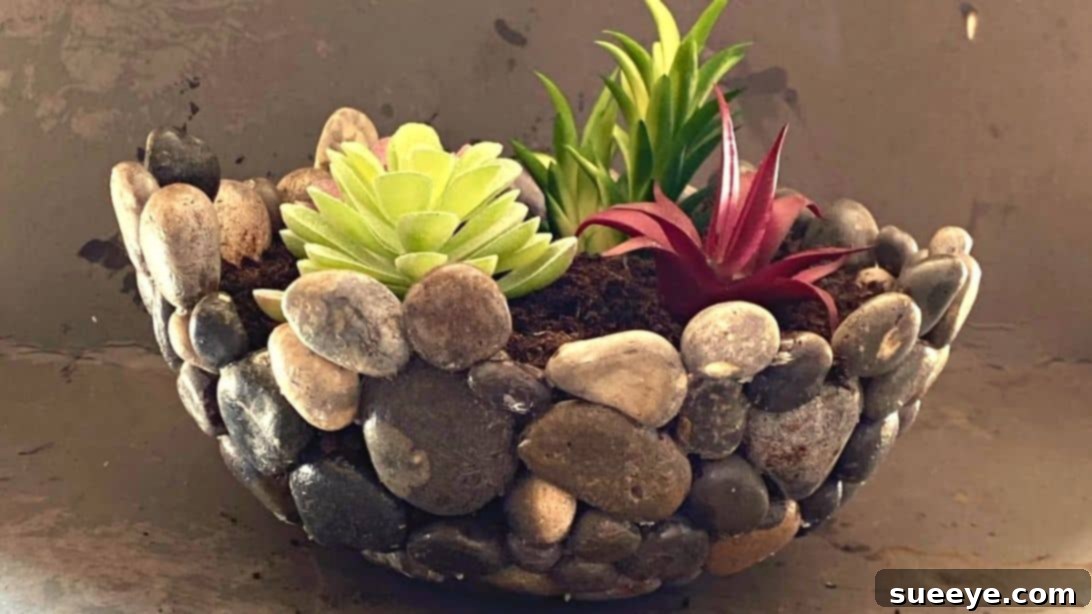
DIY Pebble Pot Tutorial: Craft Your Own Unique Stone Planter or Decorative Bowl
Unleash your creativity and bring a touch of natural elegance into your home with this engaging DIY pebble pot tutorial. Whether you’re looking for a charming new planter for your favorite succulents, a distinctive fruit bowl to adorn your kitchen counter, or a unique decorative piece to elevate any room, crafting your own pebble pot is a rewarding project. This versatile craft, inspired by the innovative ideas from The Lockdown Tinker on YouTube, offers a delightful way to connect with nature and personalize your living space. With just a few simple materials and a little patience, you can transform ordinary pebbles into an extraordinary piece of functional art. Follow our detailed instructions to create several of these beautiful, custom-made pots and bowls that are sure to impress.
Why Craft a DIY Pebble Pot?
Creating your own pebble pot goes beyond just a simple craft project; it’s an opportunity to infuse your home with character and handmade charm. In an era of mass-produced items, a DIY pebble pot stands out as a testament to your personal style and ingenuity. Here are just a few compelling reasons to embark on this creative journey:
- Unleash Your Creativity: From selecting pebbles of various sizes and colors to deciding the final shape and finish, every step allows for personal expression. No two pebble pots will ever be exactly alike, making each creation truly one-of-a-kind.
- Sustainable and Eco-Friendly: Utilizing natural materials like pebbles, often collected from beaches, rivers, or gardens, makes this a wonderfully sustainable craft. It’s a fantastic way to repurpose natural elements into something beautiful and functional, reducing the need for new manufactured goods.
- Cost-Effective Decor: Compared to purchasing high-end decorative bowls or planters, a DIY pebble pot is incredibly budget-friendly. Most materials are inexpensive, and the main ingredient—pebbles—can often be gathered for free.
- Versatile Home Accent: These pots aren’t just for plants. They make stunning fruit bowls, elegant catch-all dishes for keys and trinkets, unique centerpieces, or even charming gifts for friends and family. Their natural aesthetic complements a wide range of interior design styles, from rustic and bohemian to modern and minimalist.
- A Therapeutic Process: The act of collecting pebbles, carefully arranging them, and seeing your creation take shape can be incredibly meditative and relaxing. It’s a wonderful way to de-stress and engage in a mindful activity that yields beautiful results.
- Durability and Longevity: When properly constructed and sealed, a pebble pot is surprisingly robust and durable. It can withstand the elements if used outdoors (with appropriate drainage) and will be a long-lasting addition to your indoor decor.
Essential Materials for Your Pebble Pot
Before diving into the creative process, ensure you have all the necessary materials at hand. Most of these items are readily available at craft stores, hardware shops, or even in your own backyard!
- Pebbles: The star of your project! Collect a good variety of sizes, shapes, and colors. Smooth, relatively flat pebbles tend to be easier to work with, but a mix can create interesting textures.
- Strong Super Glue: Look for a super glue specifically designed for stone, ceramic, or multi-surface use. A gel formula can offer more control and less mess. Ensure it dries clear.
- Stone Sealer: Crucial for protecting your finished pot from moisture, enhancing the pebbles’ natural colors, and giving it a beautiful sheen. Choose a sealer suitable for natural stone that is non-toxic if using for food items.
- A Bowl (for shaping): This will serve as your mold. Select a bowl with the desired shape and size for your finished pebble pot. Plastic or glass bowls work well.
- Plastic Bag or Plastic Wrap: To line your mold bowl, preventing the pebbles and glue from sticking to it. A sturdy plastic bag or several layers of plastic wrap will work.
- Chisel or Craft Knife: For carefully scraping away any excess dried glue from the finished pot.
- Sanding Paper (fine-grit): To gently smooth any rough edges or glue spots after chiseling.
- Paper Towels or Cloth: For cleaning pebbles, drying them, and wiping away excess glue during construction.
- Gloves: Recommended for protecting your hands from super glue.
- Work Surface Protection: A newspaper or drop cloth to protect your workspace from glue.
Step-by-Step Directions: Crafting Your Pebble Pot
Follow these detailed steps carefully to construct a beautiful and durable pebble pot. Patience and attention to detail are key to achieving a professional-looking result.
Step 1: Pebble Preparation and Mold Setup
The foundation of a stunning pebble pot begins with careful preparation. Start by gathering a generous collection of pebbles. This is an excellent opportunity for a nature walk! Once collected, sort your pebbles by size and color. This step helps in planning your design and ensures a cohesive look, although a random mix can also be charming. Thoroughly wash all pebbles under running water to remove any dirt, dust, or debris. Clean pebbles ensure better adhesion with the super glue. After washing, spread them out on a paper towel or clean cloth and pat them completely dry. Any moisture can weaken the glue’s bond.
Next, select a bowl that will act as your mold. Consider the final shape and size you envision for your pebble pot. A wider, shallower bowl makes a great fruit bowl, while a deeper bowl is ideal for a planter. Line the inside of this bowl evenly with a plastic bag or several layers of plastic wrap. Ensure the plastic extends over the rim of the bowl, allowing for easy removal later. This plastic barrier is crucial to prevent your pebble pot from sticking to the mold.
Begin by carefully arranging a single layer of pebbles at the very bottom of your plastic-lined bowl, forming the base of your pot. Take your time to fit them snugly together. Once satisfied with the arrangement of your base layer, apply a small dab of strong super glue to all joining sides of the pebbles. Focus on the points where pebbles touch each other. Avoid excessive glue, as it can seep through and create visible residue. Allow this base layer to set for a few minutes to ensure stability before proceeding.
Step 2: Building Upwards and Curing
Once the base is stable, continue building your pebble pot upwards and around the contours of the mold bowl. Work in layers, placing pebbles on top of and alongside the previous layer. As you add each pebble, ensure you apply a small amount of super glue to all contact points where it meets other pebbles. This meticulous gluing process is vital for the pot’s structural integrity. You may find it helpful to work in sections, allowing small areas to dry partially before adding more weight above them. This prevents the structure from collapsing. Ensure the outer surface remains smooth and aesthetically pleasing, aligning with the shape of your mold.
Do not rush the building process. It’s often beneficial to build a few layers, then pause and allow the glue to cure for 15-30 minutes before continuing. This intermittent drying significantly enhances the pot’s strength. Keep building until your pebble pot reaches your desired height. Once the final layer is in place, stop adding pebbles and let the entire structure dry completely. For the best and most durable results, it is highly recommended to let the pot cure for at least 24 to 48 hours, or even longer, depending on the type of super glue used and ambient humidity. A longer drying time ensures maximum bond strength.
Step 3: Finishing Touches and Sealing
After the glue has fully cured and the pot is completely dry and rigid, it’s time for the finishing touches. Carefully remove the plastic-lined pebble pot from your mold bowl. The plastic bag should peel away easily. If there are any stubborn spots, gently wiggle the pot or carefully pull the plastic.
Next, examine your pebble pot for any visible excess glue that may have squeezed out between the pebbles. Using a small chisel or a craft knife, gently scrape off these glue remnants. Be careful not to dislodge any pebbles during this process. After removing the larger bits of glue, take a piece of fine-grit sanding paper and gently scrub the surfaces of the pebbles, particularly focusing on any rough areas or remaining glue spots. This step helps to smooth the surface and creates a more refined finish.
Finally, to protect your beautiful creation and enhance its natural beauty, apply a stone sealer. Wipe the sealer evenly around all surfaces of the pebble pot, both inside and out, using a soft cloth or brush. Ensure thorough coverage. The sealer will protect the pebbles from moisture, make them easier to clean, and often bring out their natural colors and shine. Allow the stone sealer to dry completely according to the manufacturer’s instructions, which typically takes several hours. Once dry, your exquisite DIY pebble pot is ready for use!
Tips for Success and Creative Variations
To ensure your pebble pot project is a resounding success and to inspire further creativity, consider these additional tips:
- Pebble Selection: While smooth, uniform pebbles are easiest, don’t shy away from incorporating a few uniquely shaped or colored stones for visual interest. Mixing sizes can also add a rustic charm.
- Glue Application: Less is often more with super glue. Use small dabs, and if you’re concerned about visibility, you can use a fine-tipped applicator or toothpick. Work in a well-ventilated area.
- Patience is a Virtue: The most common mistake is rushing the drying process. Allow ample time for the glue to cure fully at each stage to prevent structural weaknesses.
- Drainage for Planters: If you intend to use your pebble pot as a planter, consider drilling a small drainage hole in the bottom after it has fully cured and before sealing. Use a diamond-tipped drill bit for stone. Alternatively, use it as a cachepot for a potted plant that already has drainage.
- Customization Ideas:
- Color Scheme: Create patterns or gradients by carefully arranging pebbles of different natural hues.
- Embellishments: Once sealed, you can further decorate your pot with waterproof paints, small shells, or even mosaic tiles for added flair.
- Shape Variations: Experiment with different bowl shapes for your mold. A square or rectangular container can yield a modern pebble planter, while a shallow platter can become a unique serving tray.
- Safety First: Always wear gloves when handling super glue to protect your skin. Work in a well-ventilated area to avoid inhaling fumes.
Caring for Your Pebble Pot
Your finished pebble pot is designed to be durable, but a little care can ensure it lasts for years. If used indoors, simply wipe it clean with a damp cloth as needed. If used as a planter, ensure proper drainage (if you’ve added holes) to prevent water from pooling. If placed outdoors, especially in areas with harsh weather, you might consider reapplying the stone sealer annually to maintain its protective layer and vibrant appearance.
Creative Uses for Your Handmade Pebble Pot
Once your DIY pebble pot is complete, the possibilities for its use are endless. Beyond being a striking planter or a rustic fruit bowl, here are some ideas to inspire you:
- Decorative Centerpiece: Fill it with decorative spheres, dried botanicals, or fairy lights for an eye-catching table display.
- Entryway Organizer: Use it in your foyer or mudroom as a stylish spot to drop keys, mail, or loose change.
- Bathroom Elegance: Hold guest soaps, rolled hand towels, or bath bombs in a unique, spa-like container.
- Desk Accessory: Organize pens, paperclips, or other office supplies with a natural touch.
- Unique Gift: A handmade pebble pot filled with a small plant or gourmet treats makes a thoughtful and personalized gift for any occasion.
- Candle Holder: Place a large pillar candle inside for a cozy, natural ambiance.
These amazing images and the initial inspiration for this project are all credited to The Lockdown Tinker on YouTube. We encourage you to check out their other fantastic content and follow for more creative DIY ideas!
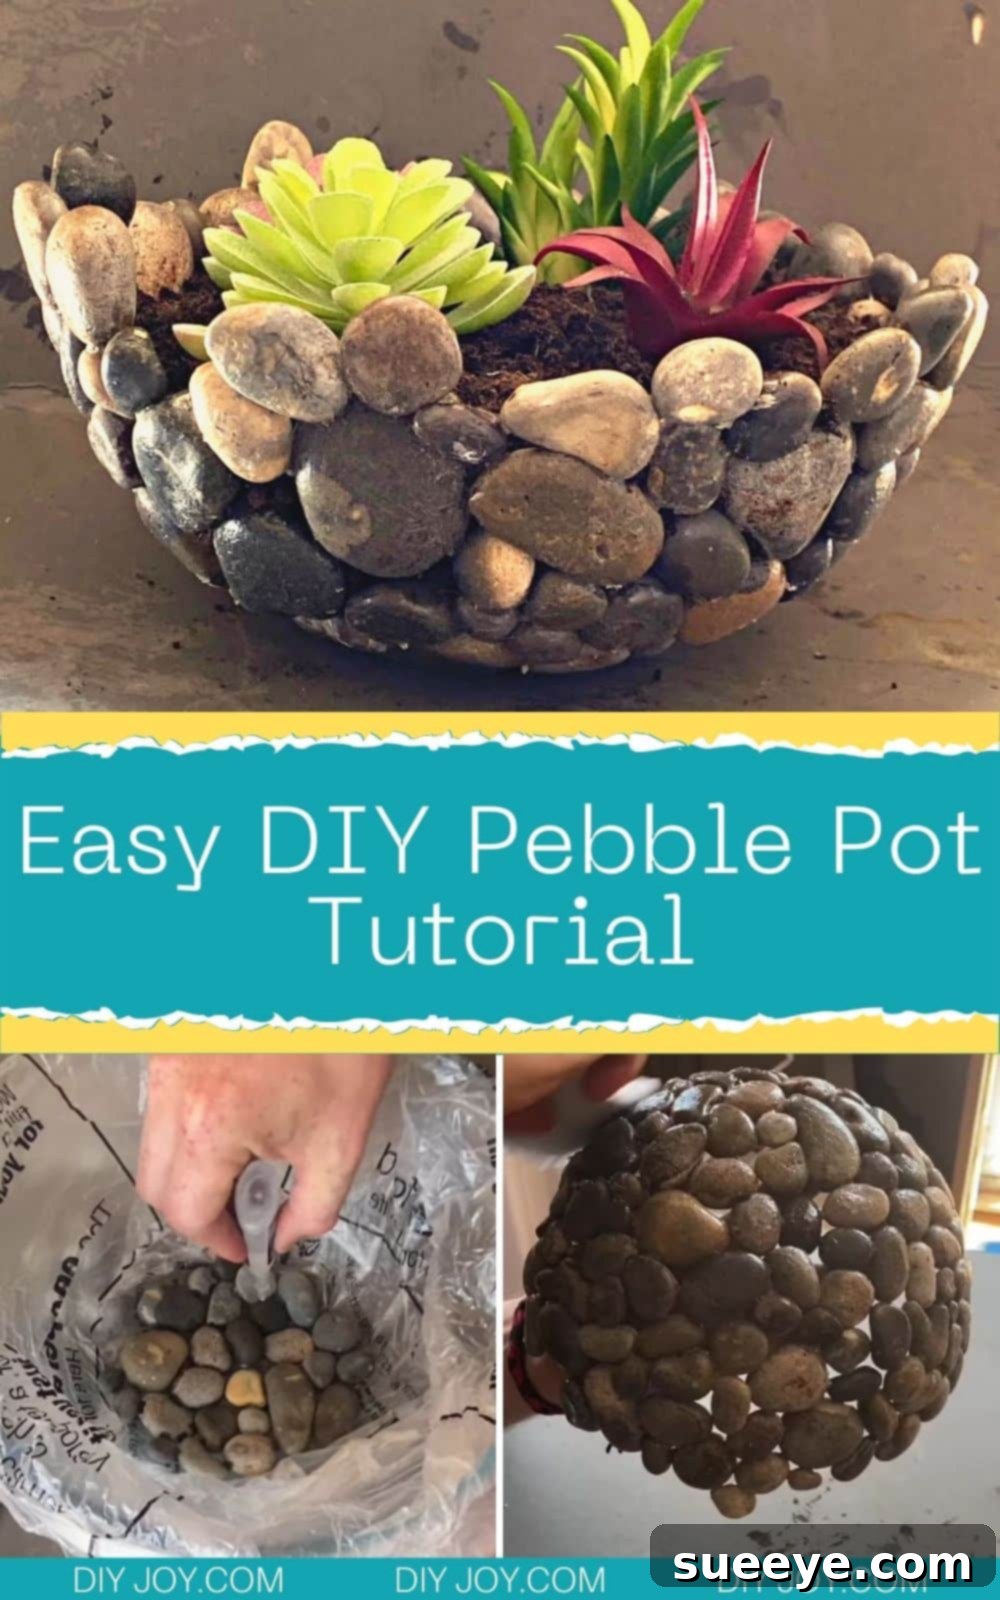
Conclusion: Embrace the Joy of Pebble Crafting
Crafting your own DIY pebble pot is more than just a project; it’s an opportunity to create something beautiful, functional, and deeply personal. From the satisfying process of selecting each stone to the final reveal of your unique creation, this tutorial empowers you to transform simple natural elements into a cherished piece of home decor. Whether gracing your garden with a new planter, serving as a rustic fruit bowl, or adding a distinctive touch to your living room, your handmade pebble pot will be a testament to your creativity and patience. We hope this comprehensive guide has inspired you to embark on your own pebble crafting adventure. Don’t hesitate to experiment with different pebble types, sizes, and colors to truly make each pot your own. Share your creations and inspire others to discover the joy of crafting with nature. Happy crafting!