
Craft Your Own Enchanting Recycled Wine Bottle Wind Chime: A DIY Guide for Garden Charm
The magic of a new home often lies not just within its walls, but in the outdoor spaces it offers. For our family, moving into a property with a spacious, verdant back garden was an absolute dream come true. We instantly found ourselves drawn to this new sanctuary, spending countless hours observing the vibrant wildlife that graced our humble abode. My daughter, in particular, was captivated by the diverse species of birds that frequented our garden. We soon noticed a fascinating pattern: these feathered visitors seemed especially attracted to the gentle, tinkling sounds of our existing wind chimes. This sparked an exciting idea within our family: what if we could create more melodic attractions to invite even more birds into our enchanting space?
Driven by this shared passion, I began searching for creative ways to enhance our garden’s appeal. My quest led me to an incredible resource on YouTube: an amazing recycled wine bottle video tutorial by Char’s Nest. This particular video elegantly demonstrated how to transform a simple discarded wine bottle and a few lengths of string into a charming, melodic wind chime. The concept was brilliant, sustainable, and perfectly aligned with our desire to embrace eco-friendly crafting. When I shared this discovery with my family, their enthusiasm was palpable – they were absolutely thrilled! Without hesitation, we decided to embark on this exciting DIY adventure right away, eagerly gathering some old wine bottles we had stored away in the garage.
Why Choose a Recycled Wine Bottle Wind Chime?
Opting to create a wind chime from a recycled wine bottle offers a multitude of benefits, extending far beyond simply crafting a decorative item. It’s a wonderful way to contribute to environmental sustainability, reduce waste, and add a uniquely personal touch to your outdoor living space. Each wine bottle, with its distinct shape and color, holds the potential to become a beautiful and functional piece of art.
The Charm of Handmade Garden Decor
A handmade wine bottle wind chime isn’t just a craft project; it’s a statement. It speaks of creativity, resourcefulness, and a love for personalizing your surroundings. Unlike mass-produced items, your DIY wind chime will possess an individual character, a story embedded in its creation. The gentle clinking of glass, unique to these upcycled chimes, produces a distinctive sound that can truly elevate the auditory experience of your garden, creating a serene and inviting atmosphere that both humans and local wildlife will appreciate.
Gathering Your Materials for This Eco-Friendly Craft
Before diving into the creation process, it’s essential to gather all the necessary tools and supplies. Most of these items are readily available, making this a truly accessible and rewarding DIY project. Remember, the beauty of crafting is in adapting and making it your own, so feel free to personalize your material choices where possible.
- A Wine Bottle: The star of our project! Choose a clean, empty wine bottle. Different bottle colors and thicknesses can produce varying sounds and aesthetic effects. Experiment with green, amber, or clear bottles to find your preferred look. Ensure it’s thoroughly washed and dried before you begin.
- A Glass Cutter: This specialized tool is crucial for safely and accurately scoring your wine bottle. You can typically find a reliable glass cutter at craft stores like Michael’s, or even at hardware stores. Investing in a good quality cutter will make the scoring process much smoother and safer. Always prioritize safety when working with glass.
- Some Twine or Strong Cord: You’ll need durable twine or a strong, weather-resistant cord to suspend the chime’s internal mechanism and for hanging the finished piece. Natural fibers like jute twine offer a rustic look, while synthetic cords might provide more durability against the elements. The length will depend on how long you want your chime to be.
- A Decorative Metal Piece (for the clapper/chime): This is what will strike the glass bottle to create the sound. You can use various items such as old spoons, metal washers, small bells, or even a robust metal bead. The material and weight of your chosen piece will significantly influence the tone and resonance of your wind chime, so pick something that has a pleasing sound when tapped.
- Scissors: A sturdy pair of scissors will be needed for cutting your twine or cord to the appropriate lengths, ensuring clean and precise cuts.
- Wooden Beads (Optional, but Recommended): Beads serve both a functional and aesthetic purpose. They can be used to space out components on your twine and add a beautiful visual element to your wind chime. Choose beads of various sizes and colors to complement your bottle and personal style. These can also add a subtle additional sound element.
- Safety Gear (Crucial): Always have safety glasses and gloves when cutting glass. Fine grit sandpaper or a Dremel tool with a grinding attachment will also be essential for smoothing the cut edges of the glass bottle to prevent injury.
Step-by-Step Guide to Creating Your DIY Wine Bottle Wind Chime
Creating a beautiful wind chime from an old wine bottle is a rewarding process that combines a bit of patience with a touch of creativity. Follow these detailed steps to bring your vision to life.
Step 1: Preparing Your Wine Bottle – The Art of Glass Cutting
The first and most critical step is to carefully cut the bottom off your wine bottle. This process requires precision and, most importantly, adherence to safety precautions. As demonstrated in the insightful recycled wine bottle video tutorial by Char’s Nest on YouTube, you begin by scoring a clean line around the bottle using your glass cutter.
To do this, position your glass cutter firmly against the bottle where you want the cut to be, typically about 1 to 2 inches from the bottom. Apply steady, even pressure and rotate the bottle (or the cutter, if it’s a bottle-cutting jig) to create a single, continuous score line. Avoid going over the same line multiple times, as this can lead to an uneven break. Once scored, you’ll need to use a method of thermal shock to separate the glass. This usually involves alternating between hot and cold water applications directly onto the score line. Carefully pour boiling water over the score, then immediately dip it into a basin of ice-cold water. Repeat this process several times until the glass separates cleanly. Remember to wear safety gloves and glasses throughout this stage to protect yourself from any sharp edges or splinters.
After the bottom section has separated, you will be left with a bottle that has a freshly cut, sharp edge. It is absolutely vital to smooth this edge thoroughly to prevent injury and create a polished look. Use fine-grit sandpaper, a diamond abrasive pad, or a Dremel tool with a grinding bit to carefully sand down and smooth out the sharp edges until they are safe to touch. This step ensures your wind chime is not only beautiful but also safe for everyone who might interact with it.
Step 2: Assembling the Chime – Creating the Melodic Core
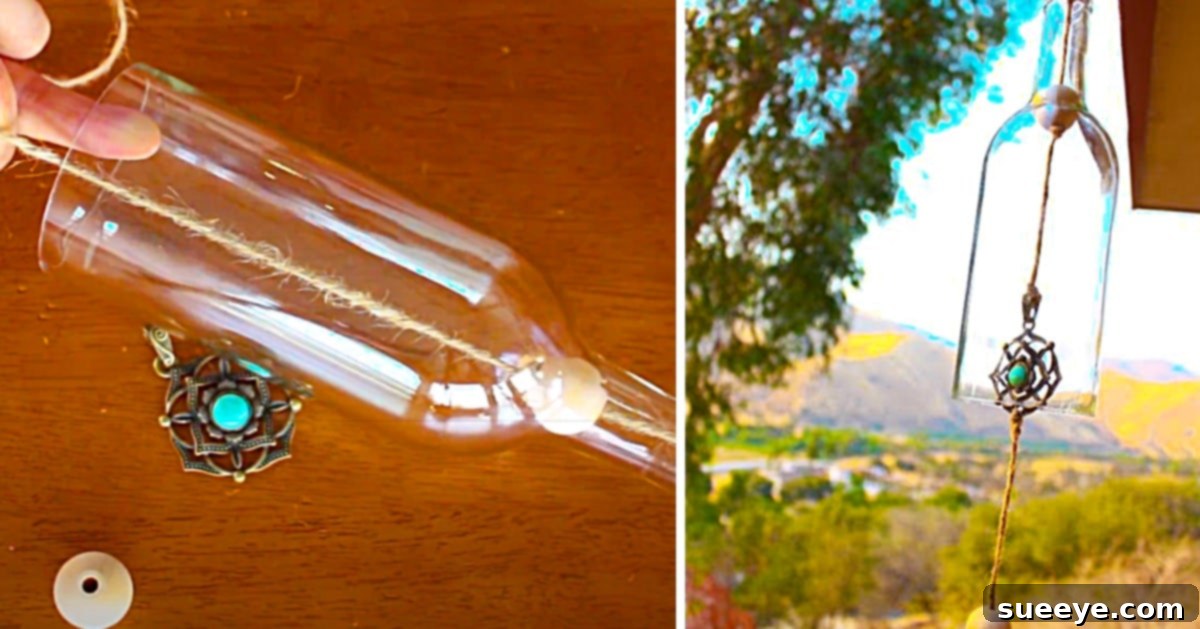
With your bottle safely prepared, the next step involves creating the internal mechanism that will produce the chime’s delightful sounds. This involves attaching what we can call the “pendulum” or “clapper” part of your wind chime to the center of the recycled wine bottle. This core piece needs to hang freely inside the bottle, designed to strike the glass when swayed by the breeze.
Begin by cutting a generous length of twine – enough to hang through the bottle’s neck, down to the bottom, and with extra length to tie knots and attach the clapper. Thread one end of the twine through the opening of the wine bottle, down to the cut end. On the inside of the bottle, at the very end of this string, securely tie your decorative metal piece. This could be a metal washer, a small bell, or any other item chosen to create a pleasing sound. Ensure it’s knotted firmly so it won’t slip off. The exact length of the twine inside the bottle will determine where the clapper hangs. You want it to hang just inside the cut rim of the bottle, allowing it to gently tap against the glass when the wind blows. Adjust the length as needed, tying knots or adding beads above the clapper to set its position.
Step 3: Adding the Hanging Mechanism and Decorative Elements
With the internal clapper secured, the next step is to create the top hanging mechanism and add any desired decorative elements. The remaining length of twine, which extends out from the bottle’s neck, will be used for this. Thread wooden beads onto this twine, arranging them in a pattern that you find aesthetically pleasing. These beads not only add visual interest but can also help space out the various components and provide stability.
Once you’ve added your desired number of beads, create a loop at the very top of the twine by tying a sturdy knot. This loop will serve as the hanger for your wind chime, allowing you to easily suspend it from a hook, tree branch, or pergola. Ensure the knot is secure enough to hold the weight of the entire chime, especially when subjected to windy conditions. You might also consider adding a small piece of wood or a larger bead just above the bottle’s neck, secured with a knot, to prevent the bottle from sliding up the string and to maintain the position of your internal clapper. Trim any excess twine, leaving just enough for a neat finish.
Customization Tips and Enhancements
The beauty of a DIY project lies in its potential for personalization. Don’t feel limited to a single bottle or simple design. You can elevate your wine bottle wind chime in numerous ways. Consider using multiple bottles of varying sizes and colors, hung at different lengths from a central piece of driftwood or a metal ring, to create a multi-toned symphony. You can paint designs onto your bottles using glass paint, etch patterns onto the surface, or even wrap them in decorative wire or colored string for added texture and visual appeal. Experiment with different types of beads – glass, ceramic, or even small shells – to find combinations that truly reflect your style and enhance the overall aesthetic of your garden decor.
Enjoying Your Handmade Masterpiece
Once your recycled wine bottle wind chime is complete, it’s time to find the perfect spot in your garden to hang it. Choose a location where it will catch the breeze, allowing the clapper to gently strike the glass and produce its unique, soothing melody. The subtle sounds will not only create a tranquil atmosphere for you and your family but, as we discovered, can also serve as a delightful invitation for local wildlife, particularly birds, to visit and linger in your garden. This wine bottle wind chime is truly a labor of love that brings joy to the family and a charming new element to the local wildlife.
The satisfaction of crafting something beautiful and functional from discarded materials is immense. This project is a testament to the power of upcycling and the simple pleasures of creating with your own hands. We hope you and your family enjoy the process and the beautiful, melodic results as much as we have. Happy crafting!