
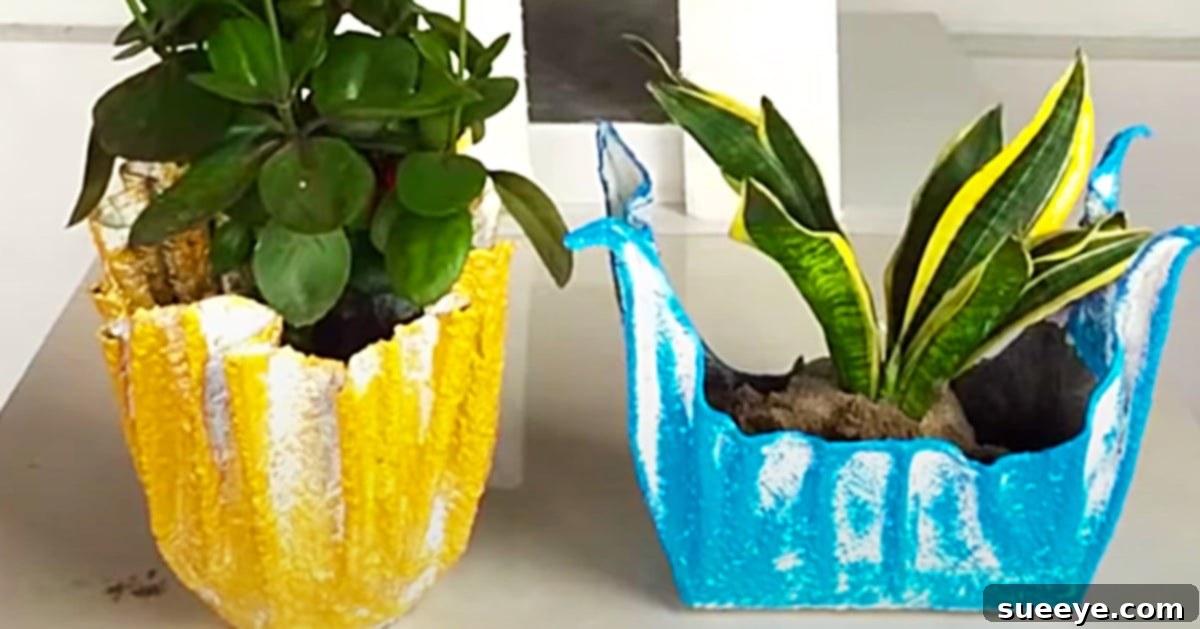
There’s a special kind of magic that houseplants bring to a home. They not only purify the air, promoting a healthier living environment, but also infuse spaces with natural beauty and a vibrant energy. The resurgence of “plant parent” culture, harking back to the bohemian vibes of the seventies, has turned cultivating indoor greenery into a beloved hobby for many. As our plant collections grow, so does the desire for equally captivating vessels to house them. While store-bought options are plentiful, there’s an undeniable charm and personal satisfaction that comes from creating your own unique planters.
Handmade decor pieces add an unparalleled touch of character to any home, especially when aiming for that coveted boho-chic or rustic aesthetic. In my quest for inspiring DIY planter ideas, I stumbled upon an ingenious and surprisingly simple technique that immediately caught my eye: cement-soaked towel planters. This brilliant concept, masterfully demonstrated in a tutorial by Cement Craft Ideas, transforms ordinary towels and quick-dry cement into extraordinary, sculptural plant pots. It might sound unconventional, but the resulting planters are truly a testament to creative upcycling, offering a rugged elegance that’s perfect for both indoor and outdoor settings.
Why DIY Cement Towel Planters Are a Must-Try Project
Beyond their stunning visual appeal, cement towel planters offer a host of benefits that make them a standout DIY project for crafters of all skill levels. Their unique, organic shape and textured finish provide a stark contrast to mass-produced pots, ensuring your plant display is one-of-a-kind. Here’s why these handmade treasures are gaining immense popularity:
- Unmatched Aesthetics: Each planter has a distinct, weathered, and natural look, akin to ancient pottery or found objects. This adds a strong rustic, industrial-chic, or even modern minimalist element to your decor, making them versatile for various interior design styles. The natural folds and drapes of the towel create unique contours, ensuring no two planters are exactly alike.
- Incredibly Durable: Once cured, cement is an exceptionally strong and long-lasting material. This makes these planters remarkably resistant to cracks, chips, and the wear and tear of daily use. They are particularly well-suited for outdoor environments, capable of withstanding various weather conditions from scorching sun to heavy rain, providing a long-term home for your plants.
- Budget-Friendly: Utilizing readily available and inexpensive materials like old, discarded towels and bags of cement, this project is remarkably cost-effective. Compared to purchasing high-end designer planters, which can often be quite costly, crafting your own allows for significant savings without compromising on style or quality.
- Highly Customizable: The creative possibilities with cement towel planters are virtually endless. You have complete control over the size and shape, determined by the towel dimensions and the mold you use. Furthermore, you can personalize your planters with various paints, stains, or leave them in their raw, natural gray state for a minimalist look. This allows you to perfectly match your specific style and existing decor.
- Eco-Conscious Crafting: In an age where sustainability is key, this project offers a fantastic way to upcycle old towels that might otherwise be destined for the landfill. By repurposing these materials, you’re giving them a new, beautiful purpose and contributing to a more sustainable lifestyle. It’s a rewarding way to craft with environmental responsibility in mind.
- Beginner-Friendly: Despite their impressive and professional appearance, the process of making cement towel planters is surprisingly straightforward and requires no advanced crafting skills. The steps are easy to follow, making it an accessible and enjoyable project even for novice DIYers looking to dip their toes into cement crafting.
Gather Your Materials: Everything You’ll Need for Crafting
Before diving into the creative process, it’s crucial to ensure you have all your supplies organized. Safety should also be a top priority when working with cement, so be sure to don the recommended protective gear.
- Quick-Dry Cement (e.g., Portland Cement): While standard Portland cement works, a quick-dry variety will significantly reduce your waiting time. Purchase in a manageable bag size appropriate for the number and size of planters you intend to make. Always store cement in a dry, airtight container to prevent premature hardening.
- Old Towels: The type of towel will influence the final texture and drape. Terry cloth towels are highly recommended due to their excellent absorbency and ability to hold shape well. Old bath towels, hand towels, or even thick cotton t-shirts can be repurposed. Consider the size of the towel relative to your desired planter dimensions – larger towels create larger, more substantial planters.
- Large Plastic Mixing Bowl or Bucket: A sturdy, disposable container is ideal for mixing the cement slurry. Choose one you don’t mind dedicating to craft projects, as cleaning cement from containers can be challenging.
- Water: Essential for mixing with the cement to create the slurry. Have a hose or a bucket of water readily available for mixing and cleanup.
- Stirring Stick/Trowel: A robust stirring stick, an old garden trowel, or a sturdy piece of wood is needed for thoroughly mixing the cement and water until a consistent slurry is achieved.
- Protective Gloves: Cement can be highly alkaline and irritating to the skin, causing dryness or even chemical burns. Wear sturdy rubber or nitrile gloves throughout the mixing and handling process to protect your hands.
- Dust Mask (Respirator Recommended): When mixing dry cement powder, fine particles become airborne. Inhaling these can be harmful to your respiratory system. An N95 dust mask or a more robust respirator is highly recommended.
- Safety Glasses: Protect your eyes from accidental splashes of wet cement or airborne dust particles.
- Plastic Sheeting or Tarp: Lay this down liberally to protect your work surface, ground, or workbench from cement spills and drips. Cement can be difficult to remove once dry.
- Mold for Shaping: This is the structure over which you will drape your cement-soaked towel. Excellent options include an old plastic bucket, a stack of bricks, an upturned flower pot, a sturdy cardboard box, or even an inflatable ball. Ensure it’s something stable and that you can easily remove the dried planter from without damaging it. Covering your mold with cling film or a plastic bag can aid in easier removal.
- Paint (Optional): If you wish to add color, use acrylic, exterior latex, or masonry paint. These types of paints adhere well to cement and offer good durability. Choose colors that complement your home or garden aesthetic.
- Sealer (Optional but Highly Recommended): A clear concrete or masonry sealer will protect your finished planter from moisture, prevent efflorescence (white powdery residue), and extend its life, especially if it will be exposed to outdoor elements.
- Measuring Cups/Containers (Optional): For precise cement-to-water ratios, which can be helpful for consistency, especially if making multiple planters.
Step-by-Step Directions: Crafting Your Unique Cement Towel Planter
Creating these distinctive planters is a surprisingly straightforward process, but paying close attention to detail, especially in the mixing and shaping stages, will yield the best and most durable results.
1. Prepare Your Workspace and Safety Gear
Begin by selecting a suitable workspace. A well-ventilated outdoor area, such as a patio, driveway, or a garage with good airflow, is ideal. Lay down plastic sheeting or a tarp generously to protect your ground or workbench from cement spills and drips, as cleanup can be challenging. Before handling any cement, put on your protective gloves, dust mask (or respirator), and safety glasses. Ensure your chosen mold (e.g., bucket, bricks) is stable and readily accessible on your protected surface. If using a porous mold, consider covering it with cling film for easier demolding later.
2. Mix the Cement Slurry to the Perfect Consistency
In your large plastic mixing bowl, combine the quick-dry cement powder with water. The ideal consistency is crucial: you’re aiming for something similar to thick pancake batter or a creamy milkshake – thick enough to fully saturate the towel and adhere well, but not so thin that it drips excessively or weakens the final product. Start by adding a measured amount of cement, then gradually add water, mixing thoroughly with your stirring stick. Continue mixing until all lumps are gone and you have a smooth, homogeneous slurry. Avoid making it too watery, as this can compromise the strength and curing of your planter.
3. Fully Saturate Your Chosen Towel
Once your cement slurry is perfectly mixed, carefully submerge your chosen old towel into the mixture. Using your gloved hands, work the cement into every fiber of the towel, ensuring it is completely and evenly saturated. Squeeze and massage the towel to remove any trapped air pockets and guarantee thorough coverage. The towel should feel heavy with cement but not be dripping excessively. Proper saturation is key for the structural integrity and a uniform, attractive finish of your final planter.
4. Shape Your Planter Over the Mold
After the towel is thoroughly saturated, carefully lift it from the mixture. Drape the cement-soaked towel over your chosen mold (e.g., an inverted bucket, a stack of bricks). This is where your creativity comes into play! Experiment with different folds, pleats, and gathers to create the desired shape and unique texture for your planter. You can aim for a simple, elegant drape, or more intricate, ruffled effects. Ensure the bottom edge is relatively even and that the planter will have a stable base once dry. If you intend to add drainage holes later, consider the thickness of the bottom part when shaping. Gently press the bottom edge onto your protected surface to create a flat, stable lip.
5. Allow to Dry and Cure Completely
Leave your newly shaped planter to dry and cure undisturbed in a stable position. This is the most crucial step for achieving maximum durability and strength. The drying and curing time will vary depending on the type of cement used, ambient temperature, and humidity. For quick-dry cement, 24 to 48 hours is usually sufficient, but for standard cement, it could take up to 72 hours or even longer. Ensure the planter is completely dry, hard to the touch, and fully cured before attempting to move it or demold it. Rushing this stage can lead to cracks, structural weakness, or a less durable final product.
6. Demold and Finishing Touches
Once your cement planter is fully cured and rock-hard, carefully remove it from its mold. It should lift off relatively easily, especially if you covered your mold. Inspect the planter for any rough edges, sharp points, or stray cement drips. These can be gently filed down with a piece of medium-grit sandpaper, a rasp, or carefully chiseled away with a utility knife for a smoother, more refined finish. This is also the stage where you can add drainage holes if your planter doesn’t naturally have gaps for water to escape. Use a masonry drill bit, starting with a small pilot hole and gradually widening it to the desired size.
7. Paint and Seal Your Unique Planter (Optional)
Your cement towel planter will undoubtedly look stunning in its raw, natural gray state, offering a beautiful minimalist or industrial aesthetic. However, if you wish to inject a pop of color or align it with a specific decor theme, now is the time to paint it. Use exterior-grade paints, such as acrylic or masonry paint, for best adhesion and longevity, especially if the planter will be used outdoors. Once the paint is completely dry, apply a clear concrete or masonry sealer. This step is highly recommended as it significantly protects the cement from moisture penetration, prevents staining, reduces efflorescence, and extends the overall life of your planter, making it much more resistant to the elements.
Creative Variations and Expert Tips for Your DIY Planters
The true beauty of this project lies in its remarkable flexibility. Don’t hesitate to experiment and personalize your creations to reflect your unique style and vision:
- Varying Shapes and Sizes: Go beyond a simple bucket. Try shaping over an inflated ball for a perfectly rounded pot, a plastic laundry basket for a more structured or square look, or even stacked plastic bottles for taller, narrower, more architectural designs. Different sized towels will also yield different sized planters.
- Explore Textural Finishes: The type of towel you use significantly impacts the final texture. A heavily worn-out terry cloth will often give a softer, more organic, almost fabric-like texture, while a thinner, smoother fabric might result in more defined folds and a sleek finish. Experiment with burlap for an even rougher, more rustic appeal.
- Coloring the Cement Itself: Instead of just painting the surface, consider adding concrete pigments or dyes directly to your cement mixture. This creates an all-over, integrated color that runs deep within the material, offering a richer, more durable hue that won’t chip or fade like surface paint.
- Multi-layered for Strength and Form: For thicker, even sturdier planters, or to achieve a more complex or exaggerated shape, you can apply multiple layers of cement-soaked towels. Allow each layer to partially dry or tack up before adding the next to ensure good adhesion and build up the desired thickness.
- Embedded Embellishments: Before the cement fully cures and hardens, you have a window to press decorative elements directly onto the surface. Think small pebbles, sea glass, mosaic tiles, or even robust metal charms for added flair and a truly customized look.
- Drainage is Absolutely Key: For the health of your plants, proper drainage is paramount. When shaping, try to create natural gaps or slight unevenness at the base for water to escape. Alternatively, be prepared to drill several drainage holes once the cement has fully cured using a masonry drill bit.
- Consider the Weight: Bear in mind that larger cement planters can become quite heavy, especially once filled with soil and a plant. Plan their final placement carefully before filling them, or consider adding casters for easier movement if they are very large.
- Indoor Use Protection: If your beautiful new planter is destined for indoor use, always place a protective saucer or tray underneath it. Even if sealed, cement can sometimes leach moisture or residue, and a tray will protect your floors and furniture.
Bringing Nature and Style Home with DIY Cement Planters
I genuinely adore this cement project and am always eager to craft more of these unique pieces. The transformation from a simple, discarded towel to a robust, artful planter is incredibly satisfying and a testament to the power of creative upcycling. Not only do these planters provide a stylish and long-lasting home for your beloved plants, but they also serve as a striking conversation starter, showcasing your creativity, resourcefulness, and personal touch in home decor.
Whether you’re looking to refresh your living room with a bohemian touch, add character to your patio or garden, or find the perfect handmade gift for a fellow plant enthusiast, these cement towel planters are an excellent choice. They embody the spirit of sustainable crafting, turning humble materials into durable, beautiful works of art that enhance any space. So, gather your supplies, embrace the creative process, and get ready to elevate your plant display with these magnificent, custom-made flower pots!