
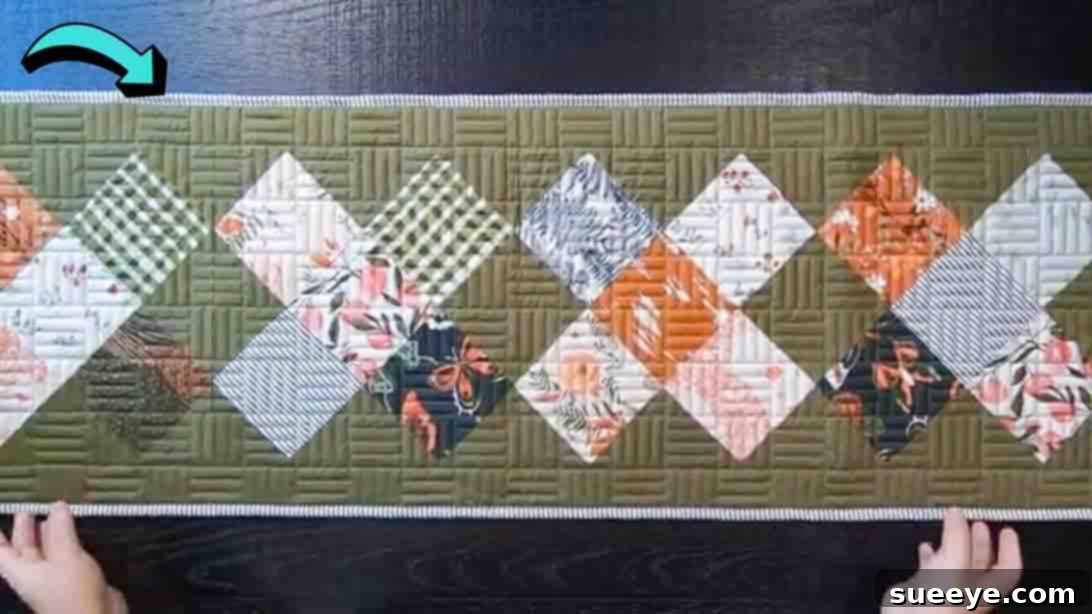
Are you looking for a delightful and rewarding quilting project that doesn’t demand months of your time? Perhaps you’ve been focused on larger quilts and yearn for a quicker, equally satisfying creative outlet. Look no further than this stunning quilted table runner, brought to life through the expert guidance of Moonkin Stitchery on YouTube. This project offers the perfect opportunity to dive into the world of quilting or to utilize that ever-growing collection of fabric scraps you’ve been saving. It’s an exceptionally approachable design, making it ideal for quilters of all skill levels, from absolute beginners to seasoned stitchers.
RELATED: Easy Log Cabin Quilt Using Fabric Scraps
The beauty of crafting a quilted table runner lies in its versatility and charm. Not only does it add a touch of handmade elegance to your home decor, but it also serves as a fantastic way to experiment with color palettes and fabric combinations without the commitment of a full-sized quilt. I particularly enjoy making these table runners, often tailoring them with different pieces of scrap fabrics from my personal stash to create unique designs. They make thoughtful and personalized gifts for loved ones, bringing warmth and character to any dining table or console. If you’re seeking your next creative adventure, consider embarking on this rewarding project today. Follow along with our detailed instructions and refer to the original video tutorial below for a comprehensive, step-by-step guide.
Why Choose a Quilted Table Runner for Your Next Project?
Quilted table runners are more than just decorative items; they are a fantastic blend of artistry and practicality. Their compact size makes them less intimidating than a full quilt, yet they still allow you to practice and perfect essential quilting techniques. Here are several compelling reasons why a table runner should be at the top of your crafting list:
- Quick Satisfaction: Unlike larger projects that can take weeks or months, a table runner can often be completed in a few sessions, providing a swift sense of accomplishment.
- Perfect for Scrap Busting: This project is an ideal “scrap buster,” allowing you to transform small, leftover fabric pieces into something beautiful and functional. It’s an eco-friendly way to reduce fabric waste and give new life to cherished remnants.
- Skill Development for Beginners: If you’re new to quilting, a table runner is a perfect starting point. You’ll learn fundamental skills such as accurate cutting, precise piecing, seam allowances, and basic quilting and binding techniques on a manageable scale.
- Versatile Home Decor: Table runners can instantly elevate the aesthetic of any room. Use them on dining tables, coffee tables, sideboards, or even dressers. They can be easily swapped out to match seasons, holidays, or your changing decor preferences.
- Thoughtful Handmade Gifts: A handmade quilted table runner makes a deeply personal and cherished gift. Tailor the colors and patterns to suit the recipient’s taste, creating a truly unique present for birthdays, housewarmings, or holidays.
- Experiment with Design: The smaller canvas of a table runner encourages experimentation. Play with bold color contrasts, intricate piecing, or different quilting patterns without the pressure of a large-scale commitment.
Understanding the “Creek Crossing” Design
The “Creek Crossing” design, as featured in this Moonkin Stitchery tutorial, is a charming and visually dynamic quilt pattern. It typically features a central “cross” element created from larger squares, surrounded and accentuated by half-square triangles (HSTs). The arrangement of these geometric shapes creates a sense of movement and depth, reminiscent of intersecting paths or flowing water, hence the evocative name. This pattern is particularly effective for showcasing a variety of fabrics, allowing both the central blocks and the surrounding triangles to shine. The strategic placement of different-sized HSTs adds complexity and visual interest, guiding the eye across the runner’s surface. Mastering this design not only results in a beautiful table runner but also provides valuable experience in working with angled cuts and precise piecing, which are cornerstones of many traditional and modern quilting patterns.
Essential Materials for Your Quilting Adventure
Before you begin your creative journey, gathering all the necessary materials is crucial for a smooth and enjoyable quilting experience. Accuracy in cutting and consistency in sewing are key to achieving a professional-looking finish, and having the right tools makes all the difference.
- Layer Cake (10″ squares): A layer cake is a pre-cut fabric bundle consisting of 42 squares, each measuring 10×10 inches. They are incredibly convenient as they typically feature coordinating prints from a single fabric line, ensuring a harmonious palette for your project. If you don’t have a layer cake, you can easily substitute with your own fabric scraps, ensuring they are at least 10×10 inches, or by cutting various fabrics into 10-inch squares from yardage. This project requires enough fabric to yield twenty 5″ squares, so plan accordingly for your desired look.
- 3/4 Yard Background Fabric: This fabric will provide the negative space and structure for your design, allowing your chosen layer cake prints to truly pop. Selecting a background fabric that either contrasts sharply or harmonizes subtly with your main prints can dramatically change the overall feel of your table runner. Standard quilting cotton is recommended for its ease of sewing and durability.
- Quilting Ruler (Acrylic): An essential tool for precise measurements and straight cuts. A clear acrylic ruler, at least 6″ x 24″, is highly recommended for its versatility in cutting various strip and square sizes.
- Rotary Cutter: This tool, combined with a cutting mat, allows for quick, clean, and accurate cuts through multiple layers of fabric. A 45mm rotary cutter is a good all-around size for most quilting projects. Always ensure your blade is sharp for effortless cutting.
- Self-Healing Cutting Mat: Protects your work surface and extends the life of your rotary cutter blade. A mat large enough to accommodate your longest cuts (e.g., 24″ x 36″) is ideal.
- Sewing Machine: Any basic sewing machine capable of a straight stitch will work perfectly. Ensure it’s in good working order, has a fresh needle (a universal 80/12 or 90/14 is suitable for quilting cotton), and is threaded correctly with good quality polyester or cotton thread.
- Iron and Ironing Board/Pressing Mat: Crucial for pressing seams after each step, which helps your blocks lie flat and ensures accurate alignment. A good steam iron is a quilter’s best friend.
- Fabric Pins or Wonder Clips: To hold fabric pieces together securely before sewing, preventing shifting and ensuring precise seam alignment.
- Seam Ripper: An inevitable but invaluable tool for correcting any stitching mishaps. Every quilter needs one!
- Thread: High-quality 100% cotton or polyester all-purpose thread that matches or blends with your fabrics.
Step-by-Step Guide: Crafting Your Creek Crossing Table Runner
Step 1: Precise Cutting for Perfect Pieces
Accuracy in cutting is the cornerstone of successful quilting. Take your time with this initial stage, as well-cut pieces will lead to perfectly matched seams and a professional-looking finished product. Before you start cutting, ensure all your fabrics are pressed smooth to remove any wrinkles or creases.
- Prepare the Layer Cake Squares: Take your 10″ x 10″ layer cake squares. Carefully cut each 10″ square into four smaller 5″ x 5″ squares. You will need a total of twenty of these 5″ squares for your table runner blocks. If you are using scrap fabrics, ensure they are first cut into 10″ squares before proceeding to cut them into 5″ squares.
- Prepare the Background Fabric for Half-Square Triangles (HSTs) – Smaller Size: From your 3/4 yard background fabric, cut one strip measuring 7 1/2″ by the width of the fabric (WOF). From this strip, subcut four individual 7 1/2″ x 7 1/2″ squares. Take each of these four 7 1/2″ squares and cut them twice diagonally, from corner to opposing corner. This will yield four triangles from each square, resulting in a total of sixteen smaller triangles. These triangles will later form the smaller half-square triangles (HSTs) when sewn to other pieces.
- Prepare the Background Fabric for Half-Square Triangles (HSTs) – Larger Size: Next, cut another strip measuring 4″ by WOF from your remaining background fabric. From this strip, subcut eight individual 4″ x 4″ squares. Take each of these eight 4″ squares and cut them once diagonally, from one corner to the opposing corner. This will yield two triangles from each square, resulting in a total of sixteen larger triangles. These will form the larger half-square triangles (HSTs) when pieced.
- Prepare Finishing Borders: Finally, from the remaining background fabric yardage, cut multiple 2 1/2″ wide strips by WOF. These strips will be sewn together end-to-end to create the continuous binding for your table runner. It’s always a good idea to cut a few extra strips than you think you might need.
Step 2: Assembling Your Quilt Blocks with Precision
This is where your table runner truly begins to take shape. The “Creek Crossing” design comes alive as you piece together your carefully cut fabric units. Remember to use a consistent 1/4″ seam allowance throughout all your sewing steps, and press your seams after each join to ensure flatness and accuracy.
- Lay Out Your Block Design: For each quilt block, you will need five of the 5″ x 5″ charm squares (from your layer cake) and various background triangles. Lay out your five different 5″ print squares in a cross pattern (one central square, and one on each side: top, bottom, left, right).
- Position the Smaller Half-Square Triangles (HSTs): Take four of the smaller background triangles (from the 7 1/2″ squares, cut twice diagonally). Position one triangle on each of the four corners of your cross layout. These triangles will form the corner points of your block.
- Position the Larger Half-Square Triangles (HSTs): Next, take four of the larger background triangles (from the 4″ squares, cut once diagonally). Place these triangles on the outer edges, in between the corner HSTs. Specifically, position them on the sides of the quilt block, adjacent to the central 5″ squares, filling the gaps to complete a larger square shape. Refer to the image below for the precise placement of each piece; visualizing the layout is key to understanding the pattern.
- Sewing the Block Together (Units, Rows, then Block):
- Sew Diagonal Seams: Begin by sewing the triangles to the sides of the 5″ squares where they meet, working outwards from the center. For the corner triangles, you’ll be sewing these to the adjacent 5″ squares. It’s often easiest to piece the block in smaller units first (e.g., squares with their directly attached triangles).
- Form Rows: Once you have these smaller units, assemble them into three horizontal rows: the top row (corner HST, 5″ square, larger HST, 5″ square, corner HST), the middle row (larger HST, 5″ square, center 5″ square, 5″ square, larger HST), and the bottom row (similar to the top).
- Join Rows: Carefully pin and sew these three rows together, matching up all seams as precisely as possible. Press your seams open or to one side after each row is joined to reduce bulk.
- Trim and Square Up: Once your entire block is sewn, it’s essential to “square up” the block. This means trimming any excess fabric so that your block measures exactly 13″ x 13″ square. Use your quilting ruler and rotary cutter to achieve perfect 90-degree angles and precise dimensions. A square-up ruler can be incredibly helpful here.
- Repeat for All Blocks: Repeat these steps to create a total of four identical quilt blocks. Consistency in sizing and piecing for each block is crucial for the final assembly of your table runner.
Step 3: Bringing It All Together, Quilting, and Binding
With all your beautiful quilt blocks constructed, it’s time to assemble your table runner, add the finishing touches of quilting, and bind the edges for a polished look.
- Assemble the Quilt Top: Once you have all four of your 13″ x 13″ quilt blocks, arrange them in a single row. Pin the blocks together, carefully aligning your seams, and sew them together with a 1/4″ seam allowance. Press the seams open or to one side to ensure the runner lies flat.
- Add the Borders (Optional, but Recommended): Take the 2 1/2″ wide strips of background fabric you cut earlier for the finishing borders. Measure the length of your assembled quilt top. Cut two border strips to this exact length. Pin and sew these strips to the long sides of your table runner. Press seams. Then, measure the width of the runner (including the newly added side borders). Cut two more 2 1/2″ strips to this width and attach them to the top and bottom edges of the runner. Borders frame your design and can help square up any minor imperfections.
- Prepare for Quilting:
- Backing Fabric: Cut a piece of backing fabric a few inches larger than your quilt top on all sides (e.g., 2-3 inches larger).
- Batting: Cut a piece of batting (cotton, polyester, or blend) to the same size as your backing fabric.
- Create the Quilt Sandwich: Lay your backing fabric face down on a flat surface, smooth it out. Place the batting on top of the backing. Finally, center your quilt top (face up) on top of the batting. Smooth out all layers, ensuring there are no wrinkles.
- Basting: Secure your quilt sandwich with your preferred basting method. This could be safety pins (spaced every 4-6 inches), basting spray, or hand basting with large stitches. Basting prevents the layers from shifting during quilting.
- Quilting the Table Runner: This step is where you stitch through all three layers (quilt top, batting, backing) to hold them together and add texture.
- Straight Line Quilting: A simple and effective method for beginners. You can use your sewing machine’s walking foot (highly recommended) to stitch straight lines, either “stitch in the ditch” (along the seams of your pieced blocks) or create parallel lines across the entire runner.
- Free-Motion Quilting: For those with more experience, free-motion quilting allows for intricate designs. Lower your feed dogs and use a darning foot to move the fabric freely under the needle.
- Hand Quilting: For a traditional touch, you can hand quilt with a needle and thread, creating small, even stitches.
- Trim and Square Up Again: Once quilted, trim the excess batting and backing fabric, squaring up the entire table runner.
- Binding the Edges: This final step gives your table runner a clean, durable finish.
- Prepare Binding Strips: Sew your 2 1/2″ WOF background strips together end-to-end to create one long continuous strip. Press seams open. Fold this long strip in half lengthwise, wrong sides together, and press well.
- Attach Binding to Front: Starting along one side, align the raw edge of your folded binding strip with the raw edge of your quilt top. Leave a tail of about 6-8 inches at the beginning. Sew the binding to the quilt top with a 1/4″ seam allowance, mitering the corners as you go. Stop about 6-8 inches before the starting point, trim the binding, and join the ends to create a continuous loop (you can find many tutorials online for this specific step). Finish sewing the binding to the front.
- Finish Binding to Back: Wrap the folded edge of the binding around to the back of the table runner. Secure it in place with pins or clips. You can hand stitch the binding to the back for an invisible finish or machine stitch it (stitching from the front, slightly past the ditch, to catch the binding on the back).
Customizing Your Creek Crossing Table Runner
The beauty of handmade quilting is the ability to infuse your personal style into every project. The Creek Crossing pattern provides a fantastic foundation for endless customization. Here’s how you can make this table runner uniquely yours:
- Color Palette Exploration:
- Seasonal Themes: Choose fabrics in reds, greens, and golds for a festive holiday runner; pastels for spring; bright florals for summer; or rich oranges, browns, and deep reds for autumn.
- Monochromatic Elegance: Select various shades and tints of a single color for a sophisticated, understated look.
- Bold Contrasts: Pair vibrant, high-contrast prints with a neutral background for a modern, eye-catching design.
- Eclectic Charm: Embrace the “scrap buster” nature fully by using a wide array of different fabrics, creating a truly unique and playful runner.
- Fabric Selection:
- Print Variety: Mix large-scale prints with small-scale prints, geometrics, stripes, and solids to add visual interest and depth.
- Textural Elements: While quilting cotton is standard, consider adding small touches of linen, chambray, or even a soft flannel (ensure they are preshrunk and compatible with quilting cotton) for subtle texture.
- Size and Shape Adjustments:
- Length Modification: To make a longer or shorter runner, simply adjust the number of quilt blocks you create. Each block finishes at 13″, so a three-block runner would be 39″ long before borders, a five-block runner would be 65″ long, and so on.
- Wider Runner: While this design is presented as a single row of blocks, you could technically create two or three rows of blocks side-by-side for a wider runner, though this would change its character significantly and likely make it suitable for a larger table.
- Table Topper: By making a 2×2 grid of blocks, you could create a square table topper instead of a runner.
- Quilting Designs:
- Beyond Straight Lines: If comfortable, explore simple curves, wavy lines, or small loop-de-loop designs.
- Highlighting Elements: Use your quilting to emphasize certain parts of the design, such as outlining the cross pattern or quilting a specific motif within the background triangles.
- Embellishments (Subtle):
- Consider adding a small decorative stitch to the binding, or a tiny fabric tag on the back with your name and date.
- Initial Wash: If you pre-washed your fabrics (which is highly recommended, especially for darker colors to prevent bleeding), your first wash of the finished runner will be less concerning. If not, wash it separately for the first few times.
- Washing Machine: Machine wash your table runner on a gentle cycle using cold water. Hot water can cause colors to bleed or fabric to shrink excessively. Use a mild detergent that is free of harsh chemicals or bleach.
- Drying: For best results, air dry your table runner by laying it flat on a clean surface or hanging it over a shower rod. This helps maintain its shape and prevents shrinkage. If you must use a dryer, tumble dry on the lowest heat setting and remove it while still slightly damp to avoid over-drying and potential shrinkage.
- Ironing: If needed, iron your table runner on a medium heat setting, using steam if desired. Place a pressing cloth over the runner to protect the fabric, especially if it has intricate quilting or darker colors. Press gently, avoiding dragging the iron, which can distort the fabric.
- Stain Treatment: Treat any spills or stains promptly. Blot gently with a clean cloth and a small amount of mild detergent, then rinse thoroughly with cold water. Avoid harsh scrubbing, which can damage the fabric fibers.
- Storage: When not in use, store your table runner folded neatly in a cool, dry place away from direct sunlight to prevent fading. Avoid storing it in plastic bags for extended periods, as fabric needs to breathe.
Remember, your table runner is a reflection of your creativity. Don’t be afraid to experiment and make it truly your own!
Caring for Your Quilted Table Runner
To ensure your beautiful, handmade quilted table runner remains vibrant and lasts for years, proper care is essential. Following these guidelines will help preserve its beauty and integrity:
By following these simple care instructions, your “Creek Crossing” quilted table runner will continue to be a cherished piece in your home or a beloved gift for years to come.
Your Beautiful Creek Crossing Quilt Awaits!
Congratulations on embarking on this wonderful quilting journey! The Creek Crossing Quilted Table Runner is a project that truly embodies the joy of handmade crafts. From carefully selecting your fabrics, whether from a curated layer cake or a diverse collection of scraps, to meticulously piecing each block, you’ve created a functional work of art. This tutorial, inspired by Moonkin Stitchery, has guided you through every step, transforming simple fabric pieces into a charming and elegant table accent. It’s a testament to how small scraps can be transformed into something magnificent, proving that beautiful quilting doesn’t always require vast amounts of new fabric.
Whether this is your very first quilting endeavor or another cherished addition to your growing collection, we hope you’ve found the process rewarding and inspiring. The satisfaction of seeing your finished table runner adorn your dining table, or presenting it as a heartfelt gift to someone special, is immeasurable. Remember, every stitch tells a story, and this Creek Crossing design will undoubtedly bring character and warmth to any space it graces. Don’t forget to share your finished projects with your quilting community and on social media – your unique creations are an inspiration to others! Happy quilting!