
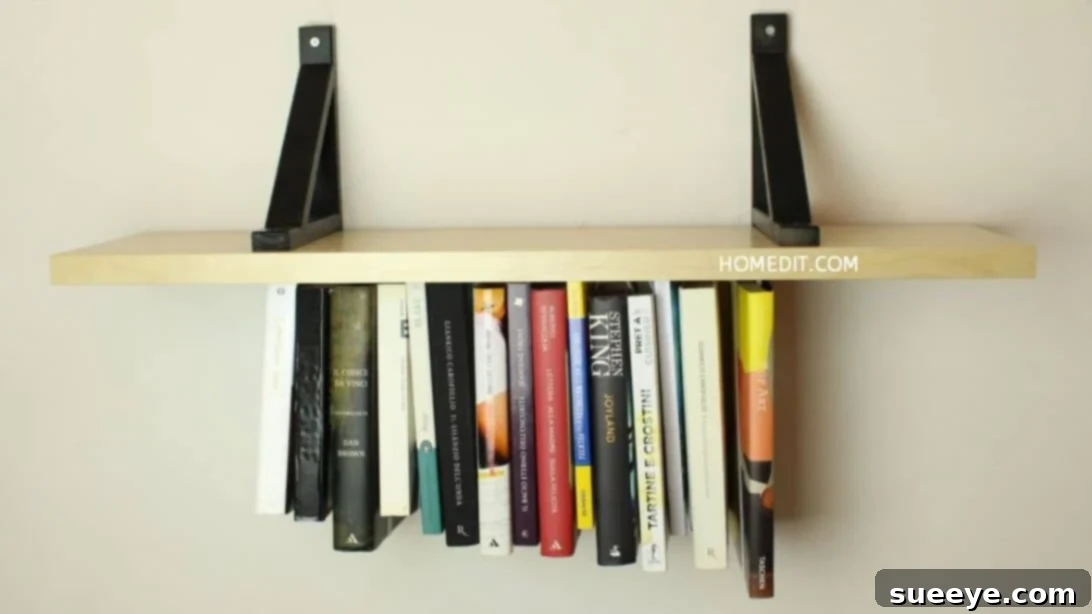
Master the Art of Space-Saving: Your Ultimate Guide to Building a DIY Upside-Down Shelf
In the quest for innovative home organization and unique decor, the DIY upside-down shelf stands out as a truly clever and stylish solution. This ingenious concept, popularized by creative minds like Homedit on YouTube, transforms a simple wooden board into a fascinating and functional storage display. Ideal for small spaces, minimalist aesthetics, or anyone looking to add a touch of whimsy to their walls, this project offers an unconventional way to store books, decorative items, and more, seemingly defying gravity.
The beauty of the upside-down shelf lies in its simplicity and adaptability. With just a few basic materials – primarily a wooden board and elastic – you can craft a piece that not only declutters your space but also serves as a striking focal point. This guide will walk you through every step, ensuring that even DIY novices can confidently create their own gravity-defying display. We’ll delve into the materials, provide detailed instructions, and explore creative customizations to make this project uniquely yours. Get ready to elevate your home organization game and impress your guests with this fantastic DIY creation!
Why Choose an Upside-Down Shelf? The Benefits Unveiled
Beyond its eye-catching design, the upside-down shelf offers a multitude of practical advantages that make it a worthwhile DIY endeavor:
- Optimized Space Utilization: This inverted design is a game-changer for smaller rooms or areas where traditional shelving might feel too bulky. By holding items from below, it frees up visual space and minimizes protrusion into the room. It’s perfect for apartments, offices, or narrow hallways.
- Unique Aesthetic Appeal: Unlike conventional shelves, the upside-down shelf is a conversation starter. Its unconventional orientation creates an illusion of books or items suspended in the air, adding a modern, artistic, and whimsical touch to your interior design. It’s a fantastic way to showcase your personality and creative flair.
- Versatile Storage: While excellent for books, the functionality extends far beyond. Imagine suspending small potted plants, cherished collectibles, photo frames, or even kitchen utensils (with appropriate modifications). The elastic mechanism securely holds a variety of items, making it incredibly adaptable to different needs and rooms.
- Cost-Effective Decor: Building your own shelf is significantly more economical than purchasing pre-made designer shelving. Using readily available and inexpensive materials, you can achieve a custom look without breaking the bank. This project is a testament to how DIY can blend affordability with high style.
- Beginner-Friendly Project: Despite its sophisticated appearance, the construction process is straightforward and requires only basic tools. It’s an ideal project for those new to DIY woodworking, offering a rewarding experience without complex joinery or advanced skills.
- Customization Opportunities: The core design is a canvas for your creativity. From choosing different wood finishes to experimenting with various elastic types or even incorporating alternative holding mechanisms, the possibilities for personalization are endless.
Gathering Your Essentials: Materials and Tools
Before you embark on this exciting DIY journey, ensure you have all the necessary materials and tools at hand. Preparation is key to a smooth and successful build. Most of these items are easily found at your local hardware store or craft shop.
Required Materials:
- Wooden Board: Select a sturdy, flat piece of wood. Common choices include pine, plywood, or MDF. A typical size might be 1×6 inches in width and thickness, with a length varying from 2 to 4 feet depending on how many books or items you plan to store. Consider the wood type and finish that best suits your home decor.
- Strong Elastic Band: The elastic is the star of this project, responsible for holding your items in place. Opt for a heavy-duty, wide elastic band (e.g., 1-2 inches wide) for maximum security and durability. Nylon or polyester elastic is recommended for its strength and longevity.
- Staple Gun & Heavy-Duty Staples: A reliable staple gun with staples long enough to penetrate the elastic and firmly embed into the wooden board is crucial. Ensure your staples are designed for wood to provide a secure hold.
- Books (for measurement): You’ll use actual books to determine the correct length and tension of your elastic loops. Have a few of your standard-sized books ready.
- Sharp Scissors: For clean and precise cuts of the elastic band.
- Mounting Brackets: Choose appropriate brackets for hanging your shelf securely on the wall. L-brackets are common and effective. Ensure they are strong enough to support the weight of your shelf and its contents.
- Screws and Wall Anchors: Depending on your wall type (drywall, plaster, wood studs), you’ll need suitable screws and, potentially, wall anchors to ensure the shelf is firmly mounted.
Recommended Tools (Optional, but helpful):
- Measuring Tape or Ruler: For accurate measurements of the board and elastic.
- Pencil: To mark measurements and bracket positions.
- Level: Essential for ensuring your shelf is perfectly horizontal on the wall.
- Drill: For pre-drilling pilot holes for screws, especially if mounting into studs or using wall anchors.
- Stud Finder: Highly recommended for locating wall studs, which provide the most secure mounting points.
- Sandpaper: To smooth any rough edges on your wooden board for a polished finish.
- Safety Glasses: Always wear eye protection when working with tools.
Step-by-Step Directions: Building Your Upside-Down Shelf
Follow these detailed instructions to construct your unique upside-down shelf. Take your time with each step to ensure a sturdy and aesthetically pleasing result.
Step 1: Prepare Your Workspace and Board
Begin by setting up a clean, flat, and stable work surface. This could be a workbench, a sturdy table, or even a protected floor. If your wooden board has any rough edges, now is the time to lightly sand them for a smooth, finished look. If you plan to paint or stain your board, do so before attaching the elastic and allow it to dry completely according to the product instructions.
Step 2: Securing the First Elastic Loop
Lay your prepared wooden board flat on your work surface. Take one end of your elastic band and position it along one of the long edges of the board. Ensure the elastic is flush with the edge and aligned straight. Using your staple gun, firmly secure this end of the elastic to the board. Fire multiple staples (3-5, depending on the width of the elastic) close together to create a strong anchor point. The staples should be evenly spaced and penetrate deeply into the wood.
Now, grab a book – preferably one of the thicker books you intend to store – and place it directly on the board, next to where you just stapled the elastic. Wrap the elastic band tightly over the top of the book, bringing it down the other side, and across the bottom of the book. Pull the elastic snugly, maintaining enough tension to hold the book securely without deforming it. Carefully mark or hold the point where the elastic meets the opposite edge of the board. Remove the book, then bring the elastic end to this marked spot and staple it down firmly, just as you did the first end. Trim any excess elastic with your scissors.
Step 3: Creating Additional Book Slots
With your first elastic loop complete, repeat the process for the rest of your desired book slots. Grab another book and place it next to the first elastic loop. Measure and staple the next section of elastic, ensuring consistent tension and spacing between each loop. If you have books of varying thicknesses, you might consider grouping similar sizes or adjusting the tension slightly for each loop to accommodate. Maintain an even distance between the elastic bands for a uniform look. Continue this process until you’ve created enough loops to fill the length of your wooden board, leaving a small margin at each end for mounting brackets.
Step 4: Attaching the Mounting Brackets
Once all elastic loops are securely stapled, it’s time to prepare your shelf for wall mounting. Place the mounting brackets on each end of the board, positioning them on the same side as the stapled elastic ends. Ensure the brackets are flush with the edges of the board and positioned symmetrically. Use screws appropriate for your brackets and board thickness to firmly attach them. If your brackets require specific orientation, follow the manufacturer’s instructions. Double-check that the brackets are stable and won’t wobble.
Step 5: Installing Your Upside-Down Shelf on the Wall
This is the crucial step where your shelf takes its final form. Identify the ideal location on your wall. Use a stud finder to locate wall studs for the most secure mounting. If studs aren’t available, ensure you use appropriate heavy-duty wall anchors for your wall type (e.g., drywall anchors, toggle bolts). Hold the shelf against the wall in the desired position, ensuring the elastic loops are facing downwards – this is what makes it an “upside-down” shelf. Use a level to mark the exact horizontal line where the shelf will be installed. Mark the screw holes through the mounting brackets onto the wall.
Pre-drill pilot holes as needed, then secure the shelf to the wall using screws through the mounting brackets. Ensure the shelf is incredibly stable and can bear the weight of your books and items. Once securely fastened, give it a gentle tug to confirm its stability. Your unique upside-down shelf is now ready!
Step 6: Styling and Enjoying Your New Shelf
With your shelf firmly mounted, it’s time for the fun part: filling it! Carefully slide your books or chosen decor items into the elastic loops. The tension of the elastic will hold them securely in place. Experiment with different arrangements, mixing books with small plants, trinkets, or other decorative elements to create a visually appealing display. Step back and admire your handiwork – a functional, stylish, and incredibly unique piece of home decor you built yourself.
Customization Ideas and Creative Variations
The beauty of DIY lies in its potential for personalization. While the basic design is fantastic, consider these ideas to make your upside-down shelf truly unique:
- Alternative Fasteners: Instead of elastic, you could experiment with thin leather straps, decorative ropes, or even custom-cut metal bars for a more industrial look. Just ensure your chosen alternative offers sufficient tension and security.
- Wood Finishes: Beyond natural wood, consider painting your board a bold color to match your room’s palette, applying a rustic stain, or distressing the wood for a shabby-chic vibe. A clear coat of sealant will protect the wood and enhance its longevity.
- Size and Configuration: Build multiple shelves of varying lengths and arrange them in a staggered or clustered pattern on a single wall for a dynamic display. You could also experiment with narrower boards for smaller items or wider boards for bulkier decor.
- Beyond Books: Think outside the box! This shelf can hold rolled towels in a bathroom, small craft supplies in a studio, spice jars in a kitchen, or even lightweight art pieces. The possibilities are truly endless with a little imagination.
- Integrated Lighting: Add a strip of LED lighting along the back or top edge of the board to illuminate your displayed items and create an inviting ambiance.
Maintenance and Care for Your DIY Shelf
To ensure your upside-down shelf remains a beautiful and functional part of your home for years to come, a little maintenance goes a long way:
- Regular Dusting: Dust the wooden board and elastic bands periodically to keep them looking fresh.
- Check Tension: Over time, elastic can lose some of its stretch. Occasionally check the tension of the bands to ensure they are still securely holding your items.
- Inspect Mounts: Every few months, gently check the mounting brackets and screws to confirm they are still tight and secure against the wall. Re-tighten if necessary.
- Weight Limits: Be mindful of the weight you place on the shelf. While sturdy, it’s designed for books and decorative items, not excessively heavy objects. Overloading can strain the elastic, staples, and wall mounts.
Conclusion: Embrace Your Inner DIYer
Building your own DIY upside-down shelf is more than just a home improvement project; it’s an opportunity to create something truly unique, functional, and stylish with your own hands. This project proves that creative storage solutions don’t have to be complicated or expensive. By following this comprehensive guide, you’ve not only learned how to construct a captivating piece of decor but also gained valuable DIY experience.
We extend our sincere thanks to Homedit via YouTube for inspiring this fantastic DIY project idea. Their innovative approach to home decor continues to spark creativity in countless individuals. If you loved building this upside-down shelf, we highly recommend visiting their channel for more inspiring tutorials and creative ideas!
Now, step back, admire your unique creation, and enjoy the perfect blend of functionality and artistic flair it brings to your home. Happy DIYing!