
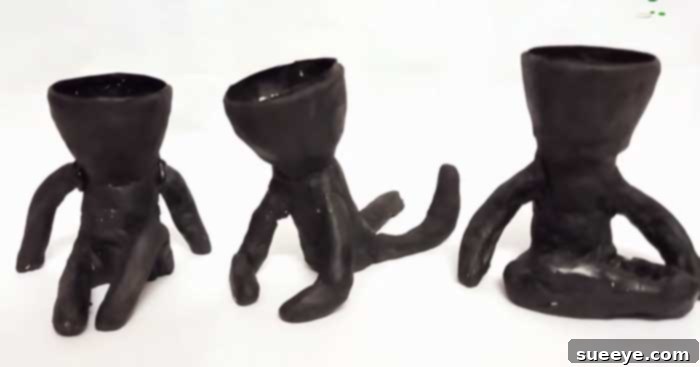
Transforming ordinary household items into extraordinary decor pieces is a truly satisfying endeavor. If you’re searching for a unique way to display your beloved plants and add a touch of whimsical charm to your space, look no further than these incredible DIY people plant holders. This ingenious project, expertly demonstrated by Arush Diy Craft Ideas, allows you to craft personalized, human-shaped planters that are as fun to make as they are to admire. Imagine tiny figures, each holding a vibrant plant, striking various poses around your home or garden.
The beauty of these creative plant holders lies in their customizable nature. You have complete freedom to bend the wire limbs into any pose you desire, creating dynamic scenes or serene figures. Furthermore, the final painting stage offers an exciting opportunity for artistic expression. Choose bright, bold colors, intricate patterns, or even subtle, realistic tones to match your existing decor or let your imagination run wild. This project is not just about making a plant holder; it’s about crafting a miniature character that brings personality and a unique focal point to any room. Get ready to dive into the world of upcycling and artistic crafting, turning simple materials into delightful decorative masterpieces that will surely spark conversation.
Essential Materials for Your DIY People Plant Holders
Embarking on any DIY project requires the right tools and materials, and this creative endeavor is no exception. Thankfully, many of the items needed for these charming people plant holders are likely already lying around your house, making it an incredibly budget-friendly craft. Gathering everything before you begin will ensure a smooth and enjoyable crafting experience. Here’s a detailed look at what you’ll need:
- Water or Coke Bottle: This forms the core body of your plant holder. Different sizes and shapes of bottles can create varied figure proportions, so feel free to experiment. A standard 1-liter or 2-liter bottle works well for a noticeable planter size.
- Exacto Knife or Utility Knife: Essential for precise and clean cuts on the plastic bottle. Always exercise extreme caution when using sharp tools.
- Craft Wire (medium gauge): This will form the skeletal structure for the arms and legs, allowing you to pose your figures. A wire that is sturdy enough to hold its shape but flexible enough to bend is ideal, such as 16-18 gauge floral or craft wire.
- Wire Cutters: Necessary for neatly cutting the craft wire to your desired lengths.
- Aluminum Foil: Used to add bulk and shape to the wire frame, making the figure more substantial before applying the putty. It’s lightweight and easy to mold.
- Wall Putty (or Air Dry Clay): This is the sculpting medium that will give your figures their smooth, durable outer shell. Wall putty, often used for patching walls, hardens well and provides an excellent surface for painting. Air dry clay can be a good alternative if you prefer a more traditional sculpting material.
- Acrylic or Craft Paints: Choose a variety of colors to bring your figures to life. Acrylic paints are versatile, quick-drying, and adhere well to the hardened putty surface.
- All-Purpose Glue (e.g., PVA or Craft Glue): Useful for ensuring the putty adheres firmly, especially in tricky areas or for adding decorative elements later.
- Paint Brushes: A selection of sizes, from larger flat brushes for base coats to fine-tipped brushes for adding intricate details like facial features or clothing patterns.
- Optional: Clear Varnish or Sealer: To protect your finished plant holder from moisture and wear, especially if it will be placed outdoors or in a humid environment.
- Optional: Sandpaper (fine-grit): For smoothing any rough spots on the putty once it’s dry, achieving a professional finish.
- Optional: Sculpting Tools: While not strictly necessary, small sculpting tools or even toothpicks can help create finer details in the putty before it dries.
Step-by-Step Guide to Crafting Your People Plant Holders
Creating these charming human-shaped plant holders is a rewarding process that combines upcycling with artistic expression. Follow these detailed steps to bring your imaginative figures to life. Remember, precision and patience are key, but don’t be afraid to add your unique flair at each stage.
Step One: Preparing the Bottle Base
The journey begins with preparing the foundation for your plant holder. Take your chosen plastic bottle (a water or soda bottle works perfectly). With your Exacto knife or utility knife, carefully cut off the bottom section of the bottle. The goal is to leave only the top portion, including the neck and the lid. This upper section will serve as the “head” and “torso” of your figure, with the bottle’s opening becoming the receptacle for your plant. It’s crucial to keep the lid on at this stage, as it will be integrated into the leg structure later. Ensure your cut is as straight and even as possible to provide a stable base for the subsequent steps. The size of the remaining bottle section will determine the overall stature of your finished figure, so consider this when selecting your bottle.
Step Two: Constructing the Wire Skeleton
Now, it’s time to give your figure its flexible skeleton. Using your Exacto knife, carefully cut two small, opposing holes on the sides of the bottle, specifically on the part that would typically be held for drinking. These holes should be large enough to thread your craft wire through. Take one piece of wire and string it through these two holes, creating the “arms” of your figure. Bend the wire slightly to give it a natural curve. Next, take a second, longer piece of wire. String this wire over the first one inside the bottle, essentially creating a cross-shape within the torso. Then, carefully thread the two ends of this longer wire through the bottle lid, which should still be securely screwed onto the bottle. These two ends will form the “legs” of your figure. This cross-wire technique within the bottle ensures stability and allows for dynamic posing of both the arms and legs.
Image inspiration by Arush Diy Craft Ideas via YouTube video.
Step Three: Building Volume with Aluminum Foil
With the wire skeleton in place, the next step is to add bulk and shape to your figure using aluminum foil. Before you start wrapping, it’s essential to bend the wire limbs into the exact pose you envision for your people plant holder. Whether it’s sitting, standing, or reaching out, finalize the posture now, as it will become much harder to adjust once the foil and putty are applied. Once the pose is set, begin wrapping the wire limbs and the middle part of the bottle (the torso) with aluminum foil. Crinkle and compress the foil firmly around the wire, building up the desired thickness and contours of the body. This foil layer provides a lightweight yet sturdy core for the putty, saving on material and making the figure less prone to cracking. Take your time to sculpt the general shape, paying attention to the proportions of the arms, legs, and torso. Ensure the foil is tightly packed so it doesn’t shift or create hollows.
Step Four: Sculpting with Wall Putty
Now for the transformative step: covering your foil-wrapped figure with wall putty. This is where your plant holder truly begins to take on its human-like form. Prepare your wall putty according to the manufacturer’s instructions, ensuring it’s a smooth, workable consistency. Begin applying a generous layer of putty over the entire foil and bottle structure. Don’t worry about perfection at this stage; focus on getting a good, even coating. For areas where the putty might have trouble adhering, particularly on the smooth plastic of the bottle’s neck, you can apply a thin layer of all-purpose glue first to provide better grip. Once the initial layer is on, start smoothing it out using your fingers or a flat tool, occasionally dipping them in water for a smoother finish. You can build up layers gradually, allowing each to firm up slightly before adding more. This allows you to refine details, create texture for clothing, or even sculpt subtle facial features if desired. The putty provides a robust and paintable surface once fully cured. Allow ample drying time, which can vary depending on the putty’s thickness and humidity.
Image inspiration by Arush Diy Craft Ideas via YouTube video.
Step Five: Bringing Your Figure to Life with Paint and Details
Once the wall putty has completely dried and hardened (this could take 24-48 hours, depending on thickness), it’s time for the most exciting part: painting your people plant holders! Gather your acrylic or craft paints and a selection of brushes. Gently apply your chosen colors to the putty surface. You have complete creative freedom here. Consider giving your figures skin tones, painting on clothing, or even adding fun patterns and textures. Use smaller brushes for intricate details like eyes, mouths, hair, or small accessories. Don’t hesitate to layer colors or try shading techniques to add depth and personality. You could create a vibrant, abstract figure, a realistic miniature person, or even a whimsical creature. Once the paint is dry, you might consider applying a clear varnish or sealant to protect your artwork, especially if the planter will be exposed to moisture or sunlight. This step not only enhances durability but also adds a professional finish to your homemade masterpiece. Finally, place your favorite small plant or succulent into the bottle opening at the top, and watch your unique plant holder bring a smile to your face.
Creative Variations & Display Ideas for Your People Plant Holders
The beauty of these DIY people plant holders extends far beyond the basic creation process. Once you’ve mastered the fundamental steps, an entire world of customization and creative display possibilities opens up. This isn’t just a craft; it’s an opportunity to infuse your personal style into every detail, making each planter a unique piece of art.
Beyond the Basic: Customization Ideas
- Dynamic Poses and Interactions: Don’t limit your figures to simple sitting or standing poses. Imagine two figures interacting – one perhaps “waving” to the other, or a pair in a playful embrace, each holding a different plant. You could have a figure “leaning” on a miniature fence, or one with arms outstretched as if welcoming its plant. Experiment with different weights and balances to achieve these more complex stances.
- Themed Figures: Give your people planters a theme! Create miniature gardeners with tiny painted tools, whimsical fairies with delicate wings (made from fabric or wire), or even sports figures. You could dress them in specific outfits, like a tiny painted uniform or a cozy sweater. The possibilities are endless – think fantasy, professions, historical figures, or simply abstract color themes.
- Facial Expressions and Hair: Move beyond simple dots for eyes. Use fine brushes to paint nuanced facial expressions – a subtle smile, a thoughtful gaze, or a playful wink. Sculpting small noses or ears with putty before it dries adds a realistic touch. For hair, consider using textured paint, gluing on small pieces of yarn or twine, or even sculpting flowing locks with putty.
- Adding Accessories: Elevate your figures with miniature accessories. Tiny painted hats, scarves made from fabric scraps, delicate jewelry crafted from thin wire or beads, or even miniature books can add incredible character. These small details can truly define your figure’s personality and story.
- Textural Details: Before the putty fully dries, you can use various tools (toothpicks, old combs, textured fabrics) to create patterns on the “clothing” or “skin.” This adds an extra layer of visual interest and tactile appeal.
Inspiring Display Ideas for Your Unique Planters
Once your personalized people plant holders are complete, the next exciting step is deciding where and how to display them to maximize their impact. These aren’t just planters; they’re conversation starters and miniature works of art.
- Indoor Oasis:
- Windowsills: Line up a collection of figures on a windowsill, each holding a small succulent or herb. The natural light will make their colors pop.
- Bookshelves and Desks: Place them strategically among books or on your desk. A figure “reading” a miniature book next to a small plant can create a delightful vignette.
- Entryway Accent: A pair of welcoming figures near your front door or on an entryway table can set a cheerful tone for guests.
- Bathroom & Kitchen: Use them to hold small air plants or herbs in these often-overlooked spaces, adding a touch of green and personality.
- Outdoor Charm (with proper sealing):
- Patio or Balcony: If sealed with a waterproof varnish, these figures can bring a playful element to your outdoor living spaces. Imagine them peeking out from flower beds or sitting on patio furniture.
- Garden Features: Nestled among larger plants in your garden, they can add an unexpected whimsical surprise. Ensure they are well-sealed against the elements.
- Thoughtful Gifts: These personalized plant holders make incredibly heartfelt and unique gifts. Tailor the figure’s appearance, pose, and even the plant choice to suit the recipient’s personality or interests for a truly memorable present.
- Groupings and Scenes: Instead of individual planters, create small scenes with multiple figures interacting. A tiny “family” of plant holders, or a group appearing to converse, can tell a charming story.
Remember to choose plants that are suitable for the size of your bottle opening and the environment where your figure will be displayed. Small succulents, air plants, herbs, or tiny flowering plants are excellent choices. With these ideas, your DIY people plant holders are sure to become cherished decorative pieces that reflect your creativity and love for nature.
Embrace Your Creativity with DIY People Plant Holders
In a world of mass-produced items, there’s immense satisfaction in crafting something truly unique and personal. These DIY people plant holders offer a fantastic opportunity to unleash your creativity, transform everyday objects into charming art, and add a distinctive touch to your home decor. Inspired by the brilliant ideas from Arush Diy Craft Ideas, this project proves that beautiful and meaningful decor doesn’t have to be expensive or complicated.
From the initial snip of a plastic bottle to the final brushstroke of paint, each step in creating these human-shaped planters is an enjoyable journey of transformation. You’re not just making a container for a plant; you’re sculpting a character, giving it a pose, and bringing it to life with color and detail. Imagine the joy of seeing your personalized figures, each holding a vibrant plant, adorning your windowsill, bookshelf, or patio. They are more than just functional items; they are miniature stories waiting to be told, reflecting your artistic vision and passion for crafting.
Whether you’re a seasoned DIY enthusiast or just starting your crafting adventure, this project is accessible, engaging, and incredibly rewarding. It encourages upcycling, promotes sustainability, and results in a decorative piece that is sure to draw compliments and spark conversation. So, gather your materials, clear your workspace, and get ready to create your very own collection of whimsical people plant holders. Let your imagination guide your hands, and watch as ordinary household items evolve into extraordinary, cherished works of art. Start your creative journey today and discover the endless possibilities of personalized home decor!