
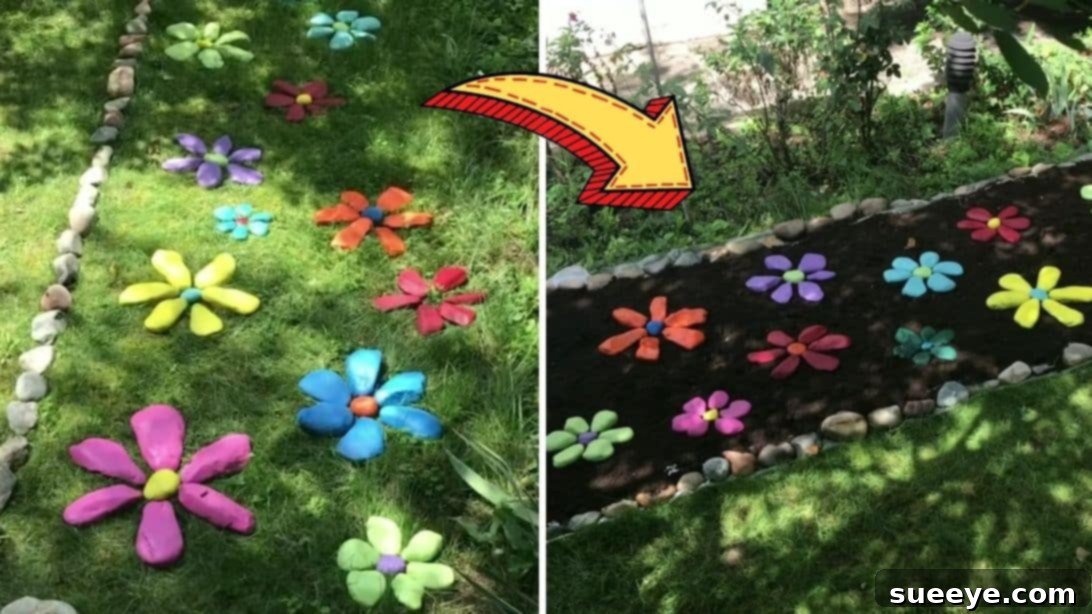
Transform Your Garden with DIY Rock Flowers: A Vibrant and Easy Project
Are you searching for an innovative and budget-friendly way to infuse your garden with a burst of color and unique charm? Look no further! This comprehensive guide will walk you through creating stunning rock flowers, an ingenious and delightful project perfect for gardeners of all skill levels. Inspired by the creative minds at Decor Home Ideas on YouTube, this DIY endeavor allows you to craft vibrant, long-lasting blossoms from ordinary stones, turning your outdoor space into a captivating landscape. Whether you’re aiming to add whimsical accents, define garden borders, or simply express your artistic side, these colorful rock flowers are a fantastic solution. Prepare to dive into an engaging project that promises to brighten your garden and impress your guests, all without requiring a green thumb or extensive gardening experience.
Why Choose DIY Rock Flowers for Your Garden Decor?
Beyond their undeniable aesthetic appeal, rock flowers offer numerous advantages over traditional floral arrangements. Unlike live plants, they require absolutely no watering, pruning, or protection from pests and harsh weather conditions, making them an incredibly low-maintenance landscaping solution. Their durability ensures that your garden remains vibrant and cheerful year-round, regardless of the season. Moreover, this project is remarkably cost-effective. By utilizing readily available materials like river rocks and inexpensive spray paint, you can achieve a high-impact transformation without breaking the bank. It’s an eco-friendly option too, as you’re repurposing natural elements into beautiful art. The creative freedom is boundless; you can choose any colors, sizes, and arrangements to perfectly match your garden’s theme or your personal style, making each rock flower unique. This project is not just about decoration; it’s about crafting lasting beauty that enhances the character and appeal of your outdoor living space.
Essential Materials for Your Rock Flower Garden
- River Rocks or Flat, Smooth Stones: The cornerstone of your project. Look for rocks with varied shapes and sizes, especially some flatter ones that can resemble petals or central flower parts. Their smooth surface ensures optimal paint adhesion and a professional finish.
- Assorted Spray Paints (Weather-Resistant): Choose a variety of bright, vibrant colors to create a cheerful and diverse garden display. Opt for exterior-grade, weather-resistant spray paints to ensure your colors remain vivid and don’t fade or chip over time. Consider a clear protective sealant spray as well for added longevity.
- Nylon Sheet or Landscape Fabric (Optional but Recommended): This provides an excellent weed barrier beneath your rock flower bed, preventing unwanted growth and maintaining a neat, tidy appearance for your display.
- Mulch or Garden Dirt: Used as a base or filler around your finished rock flowers, providing a natural look and helping to anchor the display.
Tools and Safety Considerations
- Protective Gloves: Essential for handling rocks and especially when using spray paint to protect your hands.
- Safety Glasses: Crucial when spray painting to prevent paint particles from irritating or damaging your eyes.
- Old Cardboard or Drop Cloth: A large piece of cardboard or a durable drop cloth will protect your work surface from overspray and keep your area clean.
- Stiff Brush and Soap: For thoroughly cleaning your rocks before painting, ensuring a smooth, debris-free surface.
- Water Source (Hose/Bucket): For washing rocks.
- Newspaper or Small Blocks: To elevate rocks slightly during painting, allowing for better coverage on all sides without touching the wet surface.
Always work in a well-ventilated area when using spray paint, preferably outdoors. Follow the manufacturer’s instructions for all paint products, including drying times and safety warnings.
Step-by-Step Guide to Creating Your DIY Rock Flower Garden
Step 1: Gathering and Preparing Your Stones
The foundation of a beautiful rock flower garden lies in the careful selection and preparation of your stones. Head to a local riverbed, if accessible, to gather a diverse collection of river rocks. These are often naturally smooth, beautifully shaped, and come in various sizes, making them ideal for this project. Look for stones that are relatively flat and smooth, as these will be easier to paint and arrange. Keep an eye out for shapes that naturally resemble flower petals or rounder stones that can serve as centers. If a river isn’t an option, local landscaping supply stores, craft stores, or even your own backyard might provide suitable alternatives. The key is to find stones that are flat enough on at least one side for stable placement and smooth enough for paint to adhere well.
Once you’ve collected your stones, bring them home and group them by size and potential use (e.g., larger stones for main petals, smaller ones for filler, and elongated ones for garden bed edging). Before any painting can begin, thorough cleaning is paramount. Use a stiff brush, soap, and water to scrub away any dirt, mud, algae, or loose debris. This step is critical because any residue can prevent the paint from adhering properly, leading to a patchy finish or premature chipping. After washing, rinse the stones thoroughly and lay them out on a clean surface, such as an old towel or a dry patch of ground, under direct sunlight or in a well-ventilated area. Ensure they are completely dry before proceeding; moisture trapped on or within the stones can cause paint to bubble or peel. Lay a large piece of cardboard or a drop cloth on your designated work surface to protect it from paint.
Step 2: Unleashing Color – Painting Your Petals
With your stones clean and dry, it’s time to bring them to life with color! Place your prepared stones on the cardboard or drop cloth, spaced out enough so that you can easily spray all sides. Shake your chosen can of spray paint thoroughly for at least one minute to ensure the pigment is well-mixed. When applying the paint, hold the can approximately 7 to 15 inches away from the stone surface. This distance helps prevent drips and ensures an even, smooth coat. Keep the can as vertical as possible and use steady, sweeping motions across the stones. Apply several thin coats rather than one thick one. Thin coats dry faster, adhere better, and reduce the likelihood of paint running or creating unsightly drips. Allow each coat to dry completely according to the manufacturer’s instructions before applying the next.
Once one side is dry, carefully turn the stones over and paint the other side, repeating the same process. Don’t forget to paint the edges for a fully finished look. Experiment with different vibrant colors to create a diverse and eye-catching array of flowers. You might choose bright reds, sunny yellows, calming blues, or lush greens to mimic natural flora, or go for more whimsical purples, pinks, and metallics. Once all paint coats have dried thoroughly on both sides, consider applying a clear, weather-resistant sealant spray. This extra step will protect your rock flowers from UV rays, moisture, and general wear and tear, significantly extending their vibrancy and lifespan in the garden.
Step 3: Designing Your Garden Bed
Now for the exciting part: arranging your newly painted rock flowers! First, select an ideal spot in your garden. Consider areas that could use a splash of permanent color, a focal point, or an interesting border. Think about how the colors of your rock flowers will complement the existing greenery and structures in your garden. Once you’ve chosen the perfect location, begin outlining or edging the area where your rock flower bed will be. Use the leftover, unpainted stones (or any suitable border material) to create a defined boundary. This gives your display a neat, professional appearance and helps contain the base material.
Next, prepare the ground within your outlined bed. This is where the optional nylon sheet or landscape fabric comes in handy. Laying this fabric down will act as an effective weed barrier, preventing grass and weeds from growing up through your rock flowers and minimizing future maintenance. Cut the fabric to fit the shape of your bed and secure it with landscape pins if necessary. If you’re not using a nylon sheet, simply clear the chosen area of any existing weeds or debris. Once the ground is prepared, you can add a layer of mulch or fresh garden dirt. This serves as a soft, natural base for your rock flowers, helping to stabilize them and integrate them seamlessly into your garden landscape. The depth of this layer can vary, but generally, a few inches will suffice to create a slight rise and provide a good foundation.
Step 4: Arranging Your Blossoms
Now, the artistic phase – arranging your colorful rock flowers! There’s no single right way to do this; let your creativity guide you. A good starting point is to place your larger “flower” compositions first, establishing the main focal points of your display. These could be clusters of rocks forming a large bloom or individual sizable painted stones. Once the larger elements are in place, begin to fill in the spaces with smaller rock flowers. You can create depth and visual interest by layering some stones slightly over others, or by propping them up gently to give a more three-dimensional effect. Experiment with different arrangements:
- Clusters: Create small groupings of similar-colored flowers for a cohesive look.
- Rainbow Effect: Arrange them in a gradient of colors for a striking visual.
- Mixed Garden: Mimic a natural flower bed by mixing various colors and sizes randomly.
- Path Edging: Use a line of rock flowers to border a pathway or patio.
Step back frequently to assess your design from different angles. Adjust stones as needed until you’re happy with the overall composition. Once satisfied, you can gently press the base of each rock into the mulch or dirt to secure it. If you used a nylon sheet, ensure the rocks are firmly placed to prevent them from shifting. Your DIY rock flower garden is now complete, ready to be admired!
Tips for a Stunning and Long-Lasting Rock Flower Display
- Choose Quality Paint: Invest in high-quality exterior spray paints that are explicitly labeled as weather-resistant or outdoor-grade. This is crucial for resisting fading from UV exposure and preventing chipping from rain or frost.
- Seal for Durability: After all paint layers are completely dry, apply several coats of a clear, UV-resistant outdoor sealant. This creates a protective barrier, making your rock flowers incredibly durable and ensuring their colors remain vibrant for years.
- Vary Shapes and Sizes: Don’t limit yourself to perfectly round or flat rocks. Incorporate stones of various irregular shapes and sizes to add natural texture and interest to your display. Some elongated stones can make great “leaves” or stems.
- Consider Design Themes: Before painting, think about a color scheme or theme for your garden. Will it be a riot of bright, contrasting colors, or a serene collection of pastels? Planning ahead can create a more harmonious look.
- Involve the Family: This is a fantastic project for all ages! Let children pick their own rocks and paint them. It’s a fun, creative activity that gets everyone involved in beautifying the garden.
- Add Details: Use fine-tipped paint markers or brushes to add intricate details like veins on petals, dots, or even small ladybugs for extra charm after the base coats are dry.
- Placement Matters: Consider sunlight and shade patterns in your garden. While rock flowers don’t need sun to grow, placing them where they catch natural light can enhance their colors and make them sparkle.
- Mix with Live Plants: Integrate your rock flowers with actual plants. They can provide year-round color in flower beds, act as playful markers, or add interest during the dormant seasons when live flowers aren’t blooming.
Maintenance and Longevity of Your Rock Flower Garden
One of the greatest benefits of a DIY rock flower garden is its minimal maintenance requirements. Once installed, your colorful display will generally last for many years with little attention. However, a few simple steps can ensure their longevity and keep them looking their best:
- Occasional Cleaning: Over time, dust, dirt, or even algae might accumulate on your rock flowers, especially in humid environments. A gentle rinse with a garden hose or a wipe-down with a damp cloth is usually sufficient to restore their vibrancy. Avoid harsh chemicals unless absolutely necessary, as they could potentially damage the paint or sealant.
- Check for Chips or Fading: While durable, extreme weather conditions or accidental knocks can sometimes cause small chips or minor fading. Periodically inspect your rock flowers. If you notice any significant wear, a quick touch-up with matching spray paint or a fresh coat of sealant can easily refresh their appearance.
- Weed Management: If you used a landscape fabric, weed growth will be minimal. However, stray weeds can still sprout around the edges or in the mulch. Regular weeding, either by hand or with a hoe, will keep your rock flower bed looking neat and tidy.
- Re-arrange as Desired: The beauty of rock flowers is their flexibility. If you ever feel like a change, you can easily re-arrange their layout, add new colors, or even move them to a different spot in your garden without any hassle.
Conclusion: Unleash Creativity in Your Garden
Creating a DIY rock flower garden is a wonderfully rewarding project that offers a unique blend of creativity, affordability, and lasting beauty. With just a few simple materials and a willingness to get a little colorful, you can transform ordinary stones into extraordinary botanical art that brings joy and vibrancy to your outdoor space year-round. This project not only enhances the aesthetic appeal of your garden but also provides a low-maintenance solution for continuous color, freeing you from the demands of traditional gardening. So, gather your rocks, pick your favorite hues, and embark on this delightful journey to craft a garden that truly reflects your personal style. Your vibrant, custom-designed rock flowers will undoubtedly become a cherished feature, admired by all who visit your beautifully enhanced outdoor sanctuary. Start crafting today and watch your garden blossom with unique, permanent charm!
*All image credit belongs to Decor Home Ideas via YouTube.