
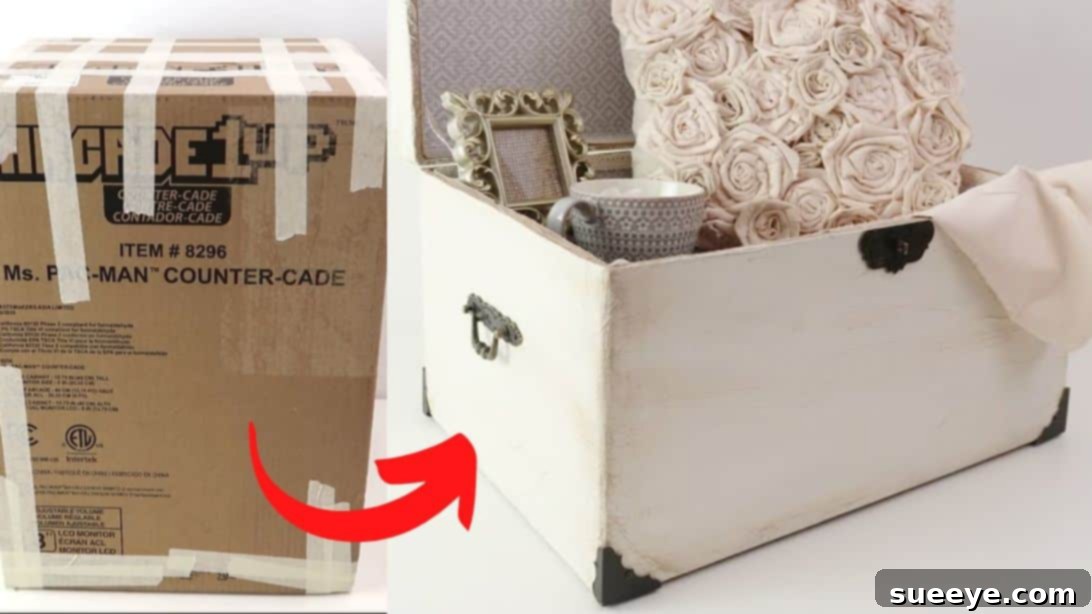
Transform a Cardboard Box into an Elegant Shabby Chic Chest: The Ultimate DIY Guide
Are you searching for a unique way to add character and storage to your home without breaking the bank? Look no further! This comprehensive guide will walk you through creating a stunning **shabby chic chest DIY** from an ordinary **cardboard box**. This project is not only incredibly cost-effective but also remarkably elegant, making it a perfect fit for a variety of interior design styles, including **rustic decor**, **cottage style**, and **nautical interiors**. Inspired by the simple yet beautiful creation from DIY Karem, this craft demonstrates how easily you can achieve a high-end look with everyday materials. Imagine a charming chest that you can leave open, showcasing decorative items, or use to neatly tuck away essentials. Get ready to unleash your creativity and build a truly bespoke piece for your living space!
This project goes beyond just crafting; it’s about upcycling and adding a personal touch to your home. The beauty of a **shabby chic storage chest** lies in its distressed, antique-like finish, which evokes a sense of history and warmth. By repurposing a cardboard box, you’re not only creating a unique decorative item but also contributing to sustainable living. The process is surprisingly straightforward, and the result is a piece that looks far more sophisticated than its humble origins suggest. Whether you’re a seasoned DIY enthusiast or a beginner looking for a rewarding project, this **cardboard box craft** is designed to be accessible and fun. Let’s gather our supplies and begin this exciting transformation!
Why Choose a Shabby Chic Cardboard Chest for Your Home?
Opting for a DIY shabby chic chest made from a cardboard box offers a multitude of advantages that go beyond its aesthetic appeal:
- Cost-Effective Decor: High-quality decorative chests can be expensive. This DIY project utilizes readily available and inexpensive materials, making it a budget-friendly alternative to store-bought options. You’ll be amazed at how a simple cardboard box can be transformed into something so luxurious.
- Sustainable Upcycling: Give new life to discarded cardboard boxes, reducing waste and promoting an eco-friendly approach to home decor. It’s a fantastic way to practice sustainability while beautifying your space.
- Endless Customization: Unlike mass-produced furniture, your DIY chest can be fully customized to match your existing decor or personal style. Choose your preferred paint colors, distress levels, hardware, and embellishments to create a truly unique piece. This makes it ideal for specific themes like a **rustic home accent** or a **nautical storage solution**.
- Lightweight and Versatile: Cardboard chests are much lighter than their wooden counterparts, making them easy to move around and reposition as your decor needs change. Their versatility means they can serve as decorative accents, toy storage, blanket bins, or even unique gift boxes.
- Rewarding Craft Experience: There’s immense satisfaction in creating something beautiful and functional with your own hands. This project is engaging and offers a tangible reward, boosting your crafting confidence.
- Perfect for Specific Interior Styles: The shabby chic aesthetic blends seamlessly with **cottage style decor**, providing a soft, romantic touch; complements **rustic interiors** with its distressed charm; and can be adapted for **nautical themes** by incorporating marine-inspired hardware or colors.
Materials You’ll Need for Your Elegant Chest
Gathering all your materials before you start will ensure a smooth and enjoyable crafting process. Here’s what you’ll need to create your own **DIY shabby chic chest**, with explanations for each item:
- Cardboard Box: The foundation of your chest. Choose a sturdy box of the desired size and shape. A rectangular box works best for a traditional chest look.
- Brown Craft Shipping Filler: This crinkled paper adds an incredible textured base, mimicking aged wood or leather, which is essential for the shabby chic look.
- Ribbon: Optional, but can be used for decorative purposes, such as lining edges or creating bows, adding an extra touch of elegance.
- Felt Pads: To attach to the bottom of your finished chest, protecting your floors and furniture surfaces from scratches.
- Wood Glue: A strong adhesive specifically for wood, crucial for securely attaching the paint stir sticks to reinforce the cardboard.
- Mod Podge or White School Glue: Your primary adhesive for applying the craft paper and the vinyl liner. Mod Podge also serves as a sealant, providing a protective top coat.
- 1 Package of Dollar Tree Wood Planks (or similar thin wood strips): These will be used to create internal supports for mounting the hardware, ensuring everything is securely attached.
- Vinyl Top Liner: For lining the inside of the chest, giving it a clean, finished look and adding durability. Choose a pattern or solid color that complements your exterior design.
- Rustoleum Chalked Chiffon Cream (or similar chalk paint): Chalk paint is ideal for the shabby chic style as it provides a matte, velvety finish that’s easy to distress. The “Chiffon Cream” offers a classic, soft, and elegant base color.
- Rustoleum Chalked Aged Glaze (or similar antiquing glaze): This specialized glaze is key to creating that worn, vintage appearance. It settles into crevices and softens the base color, giving an authentic aged effect.
- Decorative Hardware Lock and Handles: Choose pieces that match your desired aesthetic. Ornate, vintage-style metal hardware will significantly enhance the shabby chic appeal and add functionality.
- Decorative Corners: Metal corner protectors further enhance the antique look and protect the chest’s edges, contributing to both aesthetics and durability.
- Hinges: Necessary for attaching the lid to the main box, allowing it to open and close smoothly. Select hinges appropriate for the size and weight of your lid.
- Paint Stir Sticks: These versatile sticks, often free from paint stores, will be cut down and used as internal reinforcements for mounting your hardware, providing a solid surface for screws.
- Painter’s Tape: Useful for holding pieces in place while glue dries and for creating clean lines if you plan any masking.
- Standard Craft Tools: Scissors, utility knife, ruler, pencil, paintbrushes, cloth, screwdriver, hot glue gun.
Step-by-Step DIY Guide to Crafting Your Shabby Chic Chest
Follow these detailed instructions to transform your cardboard box into a beautiful and functional **DIY storage chest**.
Step 1: Preparing Your Cardboard Base for Transformation
Begin by ensuring your cardboard box is clean, dry, and free from any existing tape or labels. First, use strong packing tape to securely seal all the bottom openings of the box. This creates a solid foundation. Next, carefully cut the top flaps of the box to create a separate lid. Precision is key here; a clean, straight cut will ensure your lid fits snugly and looks professional. You want a distinct top piece that can be hinged later, so measure twice and cut once. This initial preparation sets the stage for a robust and aesthetically pleasing chest.
Step 2: Adding Rustic Texture with Crumpled Paper
This step is crucial for achieving that authentic aged texture. Take generous sheets of your brown craft shipping filler paper and crumple them thoroughly. The more you crumple, the more natural and organic the texture will appear. Once crumpled, gently unfold them slightly. Apply a liberal amount of Mod Podge or white school glue to a section of your cardboard box. Press the crumpled paper onto the glued surface, smoothing it out just enough to adhere, but allowing the crinkles and folds to remain prominent. Work in sections, ensuring complete coverage of the entire box exterior, including the lid. This process creates a beautiful, textured surface that will absorb the paint and glaze, enhancing the distressed look. Allow the glue to dry completely, which might take several hours, to ensure a solid and stable base for painting.
Step 3: Achieving the Signature Shabby Chic Finish
Now for the fun part – bringing the shabby chic aesthetic to life with paint! Begin by painting the entire textured box and lid with two thin, even coats of Rustoleum Chalked Chiffon Cream ultra-matte paint. Allow each coat to dry thoroughly before applying the next to prevent stickiness and ensure even coverage. Once the cream paint is completely dry, it’s time to apply the aged glaze. Dip a clean cloth or a dry brush into the Rustoleum Chalked Aged Glaze. Lightly wipe or brush the glaze over the painted surfaces, focusing on the textured areas and corners where natural wear would occur. The key here is not to apply too much; a little goes a long way. Immediately, use a clean, dry cloth to gently wipe off the excess glaze, allowing it to settle into the crevices of the crumpled paper. This technique creates a beautiful, subtle antiqued effect, making the chest appear genuinely old and worn. For added detail, you can use a small brush to apply a bit more glaze to specific areas or use a stencil for delicate corner patterns, just be mindful not to overdo it. Repeat this process for both the main box and the lid. Let both pieces dry completely, ensuring the glaze is fully set.
Step 4: Reinforcing and Preparing for Hardware Installation
To ensure your decorative hardware is securely attached and functional, we’ll need to reinforce the cardboard. Take your paint stir sticks and measure them against the mounting points of your chosen lock, hinges, and handles. Use a utility knife or strong scissors to cut the stir sticks to the appropriate lengths. These pieces of wood will act as anchors. Apply a generous amount of strong wood glue to one side of each cut stir stick and adhere them to the inside of the cardboard box where your hardware will be placed. For instance, place strips where the hinge screws will go on both the box and the lid, and where the lock and handles will be mounted. To keep them firmly in place while the wood glue dries, use painter’s tape to secure them from the outside. Allow the wood glue to cure completely, which might take several hours or even overnight, creating robust attachment points for your hardware.
Step 5: Attaching Decorative Hardware and Corners
With the internal reinforcements dry and secure, it’s time to attach the functional and decorative hardware. Carefully position your hinges on the back edge of the chest, aligning them with the wooden stir stick reinforcements inside. Use a small screwdriver to screw the hinges into place. Ensure the lid opens and closes smoothly. Next, attach your decorative lock kit and handles to their predetermined positions on the front and sides of the chest, again screwing them into the hidden wooden supports. Take your time to align everything perfectly for a professional look. Finally, apply a small amount of hot glue to the back of your decorative metal corners and press them firmly onto the corners of your chest and lid. These corners not only add to the antique aesthetic but also provide a little extra protection to the cardboard edges.
Step 6: Finishing the Interior with a Vinyl Liner and Felt Pads
To give your **shabby chic chest** a clean, polished interior and protect its contents, we’ll line it with vinyl. Measure the interior dimensions of your box and lid and cut the vinyl top liner accordingly, allowing for slight overlaps if desired. Apply a thin, even layer of Mod Podge to the interior surfaces of the chest and lid, one section at a time. Carefully press the vinyl liner into place, smoothing out any air bubbles with your hands or a craft roller. This creates a durable and easy-to-clean finish. Once the interior is complete, flip the chest over and attach felt pads to the bottom four corners. These pads will protect your furniture surfaces from scratches and allow the chest to slide easily without damaging your floors. Your beautiful **cardboard box craft** is now complete and ready to adorn your home!
Design Variations and Customization Ideas for Your DIY Chest
While the classic shabby chic look is timeless, this project offers incredible flexibility for customization. Consider these ideas to make your **DIY storage chest** truly your own:
- Paint Colors & Finishes: Instead of chiffon cream, try other chalk paint colors like soft blues, mint greens, or pastel pinks for a different vibe. Experiment with different distressing techniques; you can sand down edges for a more pronounced worn look or use a dry brush method for subtle highlights.
- Lining Alternatives: While vinyl is practical, you could line the interior with a beautiful fabric (like linen, burlap, or a floral cotton print) for a softer touch. Use spray adhesive for a smooth, wrinkle-free application. Decoupage with vintage maps, old newspaper clippings, or botanical prints for a unique, personal touch.
- Decorative Elements: Add wooden appliqués or mouldings to the exterior for a more intricate design. Stencils can be used to create patterns, monograms, or motifs on the lid or sides before or after applying the glaze. Consider adding small wooden feet to elevate the chest, giving it a more substantial furniture-like appearance.
- Themed Chests:
- Nautical: Use navy and white paint, add rope handles, and attach small anchors or seashell embellishments.
- Rustic Farmhouse: Opt for a distressed white or light gray, use iron-look hardware, and perhaps stencil a simple farm animal silhouette.
- Bohemian: Paint in vibrant colors, add tassels, beads, or hand-painted patterns.
- Vintage Library: Use darker glazes, add faux leather straps, and label the front with a vintage-style tag.
- Functional Additions: Install a small chain or ribbon on the inside to prevent the lid from opening too far. Add internal dividers to organize contents more effectively, turning it into a functional **DIY home decor** piece.
Tips for a Professional Finish
To ensure your **upcycled cardboard** chest looks its absolute best and stands the test of time, keep these tips in mind:
- Work in a Well-Ventilated Area: Especially when using paints, glues, and sealants, ensure good airflow to protect your health and facilitate drying.
- Thin Coats are Key: When painting, apply multiple thin coats rather than one thick coat. This prevents drips, ensures even coverage, and helps the paint cure properly, leading to a more durable finish.
- Patience with Drying Times: Rushing the drying process can lead to sticky surfaces, smudges, and an inferior final product. Always allow each layer of glue, paint, or glaze to dry completely before moving to the next step.
- Practice Makes Perfect: If you’re new to distressing or glazing, practice on a scrap piece of cardboard covered with the craft paper first. This will help you get a feel for the technique before applying it to your main project.
- Seal for Durability: After all paint and glaze are dry, consider applying a clear, matte sealant (like a clear spray lacquer or Mod Podge Sealer) over the entire exterior. This will protect the finish from moisture, dust, and wear, significantly extending the life of your **shabby chic chest DIY**.
- Use Quality Tools: Good quality paintbrushes will give you smoother application and are easier to clean. A sharp utility knife is essential for clean cuts.
Maintenance and Care for Your Cardboard Chest
While your new shabby chic chest is a beautiful addition, remember it’s made from cardboard. Proper care will help maintain its charm:
- Avoid Moisture: Keep the chest away from high humidity areas or direct contact with water, as cardboard can warp and weaken when wet.
- Gentle Cleaning: For light dust, use a soft, dry cloth or a feather duster. If a gentle wipe is needed, use a barely damp cloth and immediately dry the surface. Avoid harsh chemicals or abrasive cleaners.
- Handle with Care: Although reinforced, the chest is not designed for heavy loads. Be mindful of the weight of items stored inside.
- Protect from Direct Sunlight: Prolonged exposure to direct sunlight can fade the paint and glaze over time.
Conclusion: Your Unique Shabby Chic Creation
Congratulations! You’ve successfully transformed a simple cardboard box into a beautiful, functional, and uniquely styled **shabby chic chest DIY**. This project is a testament to the power of imagination and the rewarding nature of upcycling. Not only have you created a stunning piece of **rustic home decor** that perfectly complements cottage, rustic, or nautical interiors, but you’ve also done so affordably and sustainably.
Your new **DIY storage chest** is more than just a place to store items; it’s a conversation starter, a reflection of your personal style, and a charming addition to any room. We encourage you to embrace the creative process, experiment with different finishes, and truly make this project your own. Don’t forget to share your amazing creations! For more inspiring **DIY Karem tutorials** and other craft ideas, explore the wonderful world of upcycling and home decor. Happy crafting!