
Master the Courtship Star Quilt: An Easy Guide to Half-Square Triangle Magic
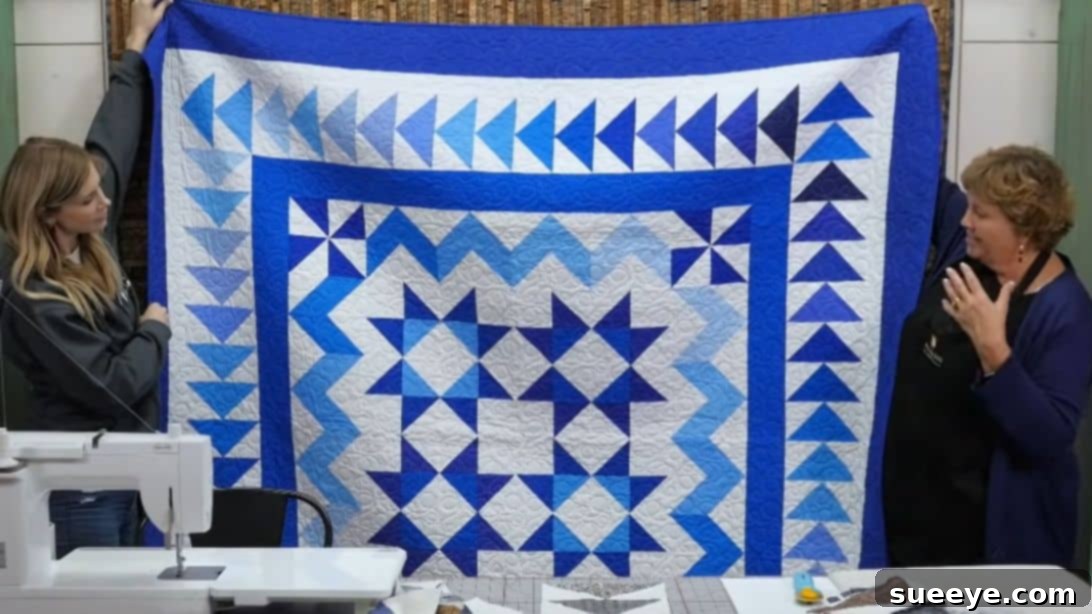
Embark on a delightful quilting journey with the captivating Courtship Star Quilt, a truly rewarding project brought to life by the expertise of Missouri Star. This generously sized quilt, despite its grand appearance, is surprisingly simple to construct, making it an ideal choice for quilters seeking both beauty and manageability. At its core, the Courtship Star Quilt pattern masterfully utilizes four distinct blocks, all born from the versatile Half-Square Triangle (HST). While the thought of making numerous HSTs might initially seem daunting, rest assured that quilting legend Jenny Doan has a brilliant solution: her famous “easy 8” method, which allows you to create eight perfectly precise HSTs from a single fabric pairing, significantly streamlining the process.
This project is not just about making a quilt; it’s an opportunity to expand your quilting repertoire. You’ll gain hands-on experience in crafting a variety of beloved quilt blocks, including the charming pinwheel block, the classic Ohio star block, the dynamic chevron block, and the elegant flying geese block. Each of these components is beginner-friendly, ensuring that even novice quilters can follow along with confidence. The instructions are designed to be clear and intuitive, guiding you every step of the way towards a stunning finished quilt. For a complete visual walkthrough and detailed instructions, be sure to watch the accompanying video tutorial. Prepare to immerse yourself in the joy of quilting!
Essential Materials for Your Courtship Star Quilt
Gathering your supplies is the first exciting step in any quilting adventure. For the Courtship Star Quilt, you’ll need the following carefully selected materials to ensure a beautiful and successful outcome:
- 1 package of 10″ background squares: These provide the foundational light or neutral tone against which your printed fabrics will truly pop, creating contrast and definition. Consider a crisp white, cream, or a very light gray.
- 1 package of 10″ print squares: This is where your personality shines! Choose a fabric collection that inspires you, whether it’s vibrant florals, modern geometrics, or soothing pastels. The variety in prints will add depth and interest.
- 1 yard of accent fabric: This fabric will be used sparingly to highlight certain elements or add a surprising burst of color or texture. Think about a fabric that complements your print squares but also stands out.
- 3/4 yard of inner border fabric: The inner border acts as a subtle frame for your pieced blocks, typically chosen to harmonize with your main fabrics without overpowering them. It helps to transition visually from the intricate center to the outer border.
- 1 1/2 yard of outer border fabric: The outer border provides a strong, finishing frame for the entire quilt. This fabric can be a bold print, a solid that echoes a color in your prints, or something that gives the quilt a distinct edge.
- 3/4 yard of binding fabric: Binding is the final touch that encases the raw edges of your quilt, providing durability and a professional finish. Choose a fabric that either blends seamlessly with your outer border or offers a playful contrast.
- 2 3/4 yards of backing fabric (108″ wide): The backing fabric is the “other side” of your quilt. A wide-back fabric (108″ wide) is often preferred for large quilts as it minimizes the need for seaming, resulting in a smoother, more continuous look.
Beyond these fabrics, don’t forget your essential quilting tools: a rotary cutter, cutting mat, quilting ruler, sewing machine, thread (matching your fabrics), an iron, and pins or clips. Accuracy in cutting and sewing is paramount in quilting, so having sharp tools and reliable equipment will greatly enhance your experience.
Step-by-Step Guide: Crafting Your Courtship Star Quilt
Step 1: Mastering Half-Square Triangles (HSTs) with the Easy 8 Method
The foundation of this quilt lies in creating accurate Half-Square Triangles (HSTs). Jenny Doan’s “easy 8 method” is a game-changer for efficiency and precision. Begin by selecting one 10″ print square and one 10″ background square. Place these squares right sides together, ensuring all edges align perfectly. Using a fabric marker or pencil, draw a diagonal line from corner to corner across the square in both directions, forming an ‘X’.
Next, you will sew 1/4″ seam allowance on both sides of each drawn diagonal line. This means you will have four lines of stitching in total, parallel to your drawn lines. Once all sewing is complete, carefully cut the combined square in half horizontally and then vertically. Finally, cut directly along the two diagonal lines you initially drew. This process will yield eight identical HST units. Press each unit open towards the darker fabric to minimize bulk and ensure a flat seam. For consistency and accuracy, trim all your HSTs to a precise 4 1/2″ square. Repeat this process with all the remaining 10″ squares in your fabric packs to create a large batch of beautiful HSTs.
Step 2: Constructing the Classic Pinwheel Blocks
The pinwheel block is a timeless favorite, and it comes together beautifully with your newly made HSTs. To form one pinwheel block, select four HST units made from the same fabric combination. Arrange these four HSTs so that their ‘points’ meet in the center, creating the iconic swirling motion of a pinwheel. The dark triangles should typically rotate in one direction (either clockwise or counter-clockwise) to achieve the pinwheel effect. Carefully sew these four HSTs together, treating them as a traditional four-patch block. Press your seams open or to one side to ensure the block lies flat. For the Courtship Star Quilt, you will need to create a total of four such pinwheel blocks, which will feature prominently in your quilt design.
Step 3: Assembling the Elegant Star Blocks
These star blocks form the dazzling focal points of your quilt. To create one star block, you will need a specific arrangement of HSTs and background squares. Gather four HSTs where the ‘middle’ fabric (often the accent fabric) forms the central point of the star. Next, select eight HSTs from a different fabric combination, which will create the outer points of your star. Finally, you’ll need four plain background corner squares. Arrange these units carefully, much like an Ohio Star block, with the central HSTs creating the star points, surrounded by the contrasting HSTs, and the plain squares filling the corners. Refer to the provided image or video for the exact layout. Stitch these units together in rows, then join the rows to complete your star block. You will need to make four of these striking star blocks for your quilt.
Step 4: Crafting Dynamic Chevron Blocks
The chevron block adds a wonderful sense of movement and direction to your quilt. To create a chevron, you will need four HSTs made from the same fabric combination. Arrange these four HSTs in a way that forms an arrow or a ‘V’ shape, with the dark or contrasting fabric pointing in a specific direction. Once you have the desired arrow arrangement, sew these four HSTs together, similar to how you would assemble a four-patch block. The precision of your HSTs will ensure a crisp, clean chevron pattern that stands out beautifully.
Step 5: Forming Graceful Flying Geese Units
Flying Geese units are classic components in many quilt designs, evoking the image of geese flying in formation. For this quilt, you will primarily use two HSTs joined together to create the distinctive shape. Arrange two HSTs side-by-side, ensuring that the dominant color or fabric forms the ‘goose’ and the other fabric forms the ‘sky’. The original pattern suggests using two HSTs with their respective colors placed together, forming a longer rectangular unit. This streamlined approach to Flying Geese makes them quick to produce and perfect for bordering or accenting other blocks.
Step 6: Assembling Your Quilt Top
With all your individual blocks expertly crafted, the exciting moment of assembling your quilt top arrives. Refer closely to the pattern layout provided in the video tutorial (or the image above) to understand the precise arrangement of your pinwheel, star, chevron, and flying geese blocks. Lay out all your finished blocks on a design wall or on the floor to visualize the full pattern before you begin sewing. Once you are satisfied with the arrangement, carefully stitch the blocks together into rows, ensuring consistent 1/4″ seam allowances. Press your seams after joining each row to maintain flatness. Finally, join your completed rows to form the full quilt top. This systematic approach ensures that your Courtship Star Quilt will come together seamlessly, showcasing your beautiful piecing.
Essential Quilting Tips for Success
Achieving a professional-looking quilt relies on a few fundamental quilting practices. Here are some tips to help you succeed:
- Precise Cutting: Always use a sharp rotary blade and an accurate ruler. Small inaccuracies in cutting can compound, leading to blocks that don’t fit together perfectly.
- Consistent Seam Allowance: A perfect 1/4″ seam allowance is crucial. Practice stitching on scrap fabric to ensure your sewing machine maintains this precise measurement.
- Pressing vs. Ironing: In quilting, we typically “press” seams rather than “ironing” them. Pressing involves lifting and placing the iron down, which avoids stretching the fabric. Press seams open or to one side consistently throughout your project.
- Chain Piecing: For repetitive units like HSTs, chain piecing (sewing multiple units one after another without cutting the thread in between) can save a significant amount of time and thread.
- Auditioning Fabrics: Before committing to sewing, lay out your fabrics and blocks to see how colors and patterns interact. This helps ensure your final arrangement is visually pleasing.
- Take Your Time: Quilting is a journey, not a race. Enjoy each step, and don’t be afraid to unpick and re-sew if something isn’t quite right. Patience is key to a beautiful finish.
The Enduring Charm of the Courtship Star Quilt
The Courtship Star Quilt stands as a testament to the timeless beauty of traditional block patterns combined with modern efficiency. Its design, featuring an intricate dance of pinwheels, stars, chevrons, and flying geese, offers a rich visual tapestry that will captivate anyone who sees it. What makes this quilt truly special is its accessibility. Thanks to Jenny Doan’s ingenious “easy 8” Half-Square Triangle method, what might appear to be a complex and lengthy project transforms into an achievable and incredibly enjoyable one, even for those new to the quilting world.
Beyond its aesthetic appeal, completing a quilt of this size and complexity provides an immense sense of accomplishment. Each precisely sewn HST, each perfectly aligned block, builds into a magnificent piece of textile art that you can proudly display or gift to a loved one. It’s a project that not only hones your quilting skills but also allows you to express your creativity through fabric selection and arrangement. Whether you choose vibrant, playful prints or serene, classic tones, your Courtship Star Quilt will be a unique reflection of your personal style and dedication to the craft.
Ready to Create Your Own Courtship Star Quilt with Jenny Doan?
Now that you have a comprehensive understanding of the materials and step-by-step process, you’re perfectly equipped to begin your Courtship Star Quilt. Dive into the wonderful world of Half-Square Triangles and watch as these simple units transform into stunning blocks and ultimately, a magnificent quilt. For the complete, detailed video tutorial, where Jenny Doan guides you through each segment with her characteristic warmth and clarity, be sure to watch the Missouri Star Quilt Company video linked at the beginning of this guide. Happy quilting, and enjoy the rewarding experience of creating a lasting heirloom!