
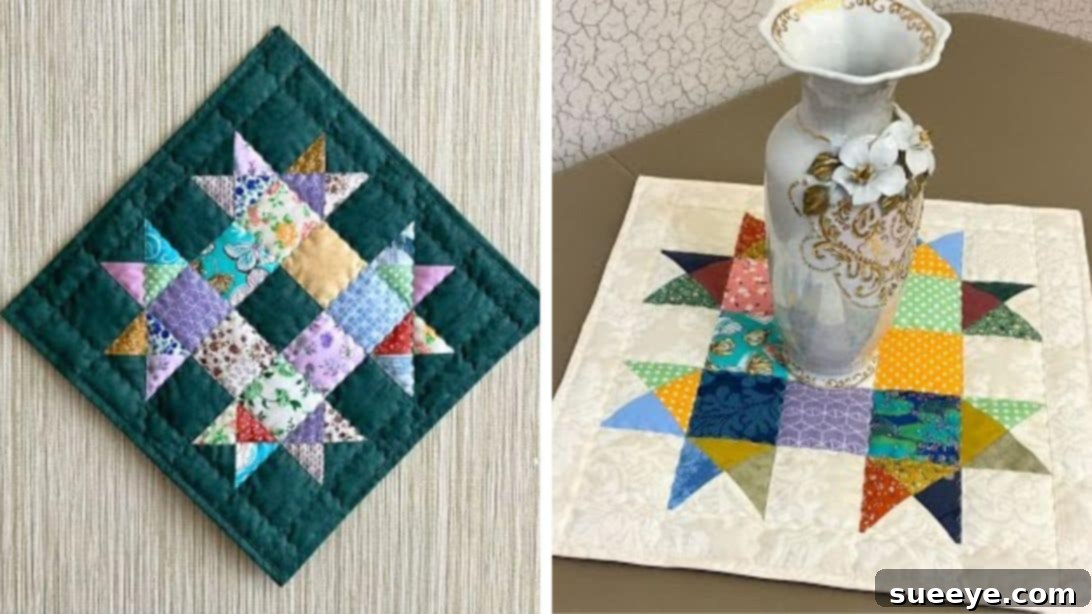
Transform your collection of 3-inch fabric squares into a stunning and versatile quilted table topper! This beginner-friendly sewing project, inspired by a captivating tutorial from The Melody of Sewing’s YouTube channel, offers a perfect blend of simplicity and elegance. Whether you’re a seasoned quilter looking for a quick make or a newcomer eager to dive into the rewarding world of quilting, this project is designed for you. Not only is it incredibly beautiful, but its adaptability allows it to effortlessly complement any season or home décor style. Imagine it adorned with rich browns, greens, and oranges for a cozy autumn feel, or vibrant reds and greens to celebrate the festive Christmas season. The possibilities for customization are truly endless, making this table topper a cherished addition to your home or a thoughtful handmade gift.
RELATED: Easy Country Charm Table Topper Tutorial
This exquisite table topper showcases how simple 3-inch squares can be transformed into intricate designs. The magic begins with easily constructed four-patch blocks, which then evolve into charming hourglass units. These dynamic blocks are then artfully arranged with solid background squares to form a captivating hashtag pattern, creating a modern and visually appealing design. The process is far less daunting than it appears, making it an ideal project for those looking to expand their quilting skills without feeling overwhelmed. Furthermore, the foundational block is incredibly versatile; you can scale it down to create a matching potholder or repeat it to craft a beautiful table runner or even a larger quilt. Ready to unleash your creativity? Dive into the detailed instructions below and watch your fabric scraps come to life!
Why Create a Quilted Table Topper? Benefits & Inspiration
Beyond being a delightful crafting experience, making a quilted table topper offers numerous advantages. It’s an excellent way to use up those smaller fabric scraps that accumulate in every quilter’s stash, transforming them into something functional and beautiful rather than letting them go to waste. For beginners, this project provides a fantastic opportunity to practice essential quilting techniques such as accurate piecing, pressing seams, and trimming, all on a manageable scale. You’ll gain confidence and build foundational skills that are crucial for more complex projects down the line.
A handmade table topper instantly adds a touch of personalized charm and warmth to any room. It acts as a focal point, drawing the eye and enhancing your existing home décor. Its seasonal versatility is another major draw. By simply changing your fabric choices, you can effortlessly update your living space to reflect holidays, seasons, or even just your mood. Imagine a pastel-themed topper for spring, a vibrant floral one for summer, or perhaps a serene blue and white design for a winter wonderland. This makes it an incredibly cost-effective way to refresh your home’s look throughout the year.
Moreover, a quilted table topper makes an incredibly thoughtful and personal gift. Whether for a housewarming, a birthday, or a holiday, a handmade item carries a special sentiment that store-bought gifts often lack. It’s a testament to your time, effort, and love, creating a cherished item that recipients will surely appreciate for years to come. Embrace the joy of creating something beautiful and functional with your own hands, and watch how this simple project brings immense satisfaction and elegance to your home.
Easy Quilted Table Topper Materials
To embark on this rewarding quilting journey, gather the following essential materials. Precision in cutting your squares is key to a successful and beautifully finished project.
- 20 pieces of 3-inch squares in various colors or coordinating prints. These will form the intricate patterns of your topper.
- 13 pieces of 3-inch background squares. Choose a solid or subtly textured fabric that contrasts nicely with your colored squares, allowing your design to pop.
- Standard quilting tools: A rotary cutter, self-healing mat, and an accurate quilting ruler are highly recommended for precise cutting.
- Sewing machine: Equipped with a fresh needle and good quality thread.
- Iron and ironing board: Essential for pressing seams flat and accurate.
- Fabric scissors or snips: For trimming threads.
- Optional: Spray starch for crisp pressing and a walking foot for quilting the layers later.
How to Make a Quilted Table Topper: Step-by-Step Guide
Follow these detailed instructions to create your charming quilted table topper. Remember, accuracy in cutting and a consistent 1/4-inch seam allowance are crucial for the best results.
Step 1: Constructing Your Four-Patch Blocks
The foundation of our design begins with two distinct types of four-patch blocks. Take your time with this step, as precision here will ensure your subsequent steps align perfectly.
- Create Four-Patch Block 1 (All Colored): Select four of your 3-inch colored squares. Arrange them into a 2×2 grid. Sew two squares together to form a pair, using a consistent 1/4-inch seam allowance. Repeat this with the other two squares to create a second pair. Now, with right sides together, align the seams of your two sewn pairs and stitch them together to complete your first four-patch block. You should aim for a block that measures approximately 5.5 inches square (accounting for seam allowances). Repeat this process to create a second identical “Four-Patch Block 1.”
- Create Four-Patch Block 2 (Alternating Colors): For this block, you will need two colored 3-inch squares and two background 3-inch squares. Arrange these four squares in an alternating pattern, ensuring that colored squares are diagonal to each other, and background squares are also diagonal to each other. Similar to the previous step, sew two squares together to form a pair (one colored, one background). Repeat with the remaining two squares. Then, join these two pairs, carefully nesting the seams where they meet in the middle, to form your “Four-Patch Block 2.” You will need to make two of these blocks as well.
- Pressing and Trimming: Once all four four-patch blocks are sewn (two of each type), it’s crucial to press your seams. For “Four-Patch Block 1,” press seams in one direction for one pair, and the opposite direction for the other pair, allowing them to “nest” when joined. For “Four-Patch Block 2,” you can press the seams open or in opposing directions to reduce bulk. Use a hot, dry iron and press gently from the top to flatten the block. If any blocks are slightly off, carefully trim them to a consistent 5.5-inch square using your rotary cutter and ruler, ensuring all corners are square.
Step 2: Joining Four-Patch Blocks to Create Larger Units
Now that your four-patch blocks are complete and perfectly pressed, we’ll combine them to prepare for the hourglass effect.
- Take one “Four-Patch Block 1” and one “Four-Patch Block 2.” Place them right sides together, ensuring all edges align perfectly. Pin generously around all four sides to hold them securely in place.
- Using your consistent 1/4-inch seam allowance, sew all around the outer perimeter of the stacked blocks. This creates a larger, enclosed unit.
- Repeat this entire process with the remaining “Four-Patch Block 1” and “Four-Patch Block 2,” creating a second identical enclosed unit.
- Press the seams open on these new larger units to further reduce bulk and ensure they lie flat. Accuracy in this step is vital for the next stage.
Step 3: Creating Hourglass Blocks from Diagonal Cuts
This is where the magic happens, transforming your simple squares into dynamic hourglass units. This technique is often referred to as “Quarter-Square Triangle” units, but in this specific application, it creates an hourglass effect when combined.
- Take one of the larger enclosed units you created in Step 2. Using your ruler and rotary cutter, carefully cut the block diagonally from corner to corner in both directions. You will make two cuts, forming an “X” across the block. This will yield four smaller triangular units.
- Repeat this cutting process with your second enclosed unit, resulting in another set of four triangular units. You now have a total of eight triangular units.
- Pressing and Opening: Gently take each triangular unit and press the seams open. This helps the fabric lie flatter and reduces bulk at the seams, which is crucial for accurate piecing later.
- Trimming to 3-inch Squares: Now, for each of these eight triangular units, you will need to trim them into perfect 3-inch squares. To do this accurately, align a 3-inch square ruler (or use your quilting ruler and mark a 3-inch square) so that the diagonal seam passes directly through the corners of your trimmed square. This ensures your hourglass pattern will be centered. Trim carefully, making sure each unit is a precise 3-inch square. This precision is critical for the final assembly of your table topper. These newly trimmed 3-inch squares are your hourglass blocks.
Step 4: Assembling the Main Topper Block in a Hashtag Pattern
With your hourglass blocks and remaining squares ready, it’s time to bring the main design to life. This step involves careful arrangement and systematic sewing to form the signature hashtag pattern.
- Arrange Your Blocks: Lay out all your newly trimmed 3-inch hourglass blocks and your remaining 3-inch colored and background squares on a flat surface, such as your design wall or a large table. Refer closely to the provided photo (or the video tutorial) to replicate the hashtag pattern. Typically, this pattern will involve alternating hourglass blocks with solid squares, creating a visually appealing grid. Ensure that the direction of your hourglass patterns is consistent or intentionally varied according to your desired aesthetic. This layout stage is crucial for visualizing your final design before you start sewing.
- Sewing in Rows: Once you are satisfied with your arrangement, begin sewing the squares together into horizontal rows. Take the first square of a row, place it right sides together with the second square, and sew them with a 1/4-inch seam allowance. Continue this process until all squares in that row are joined. Repeat for each row of your design.
- Pressing Row Seams: After each row is complete, press the seams. For adjacent rows, it’s highly recommended to press the seams in opposite directions (e.g., press seams of row 1 to the left, and seams of row 2 to the right). This technique, known as “nesting seams,” allows the seams of adjoining rows to interlock perfectly when you sew the rows together, ensuring precise alignment and reducing bulk.
- Joining the Rows: With your rows prepared, it’s time to assemble the entire block. Place the first row right sides together with the second row, carefully aligning all intersections where seams meet. Pin generously, especially at these critical points, to prevent shifting. Sew the rows together using your 1/4-inch seam allowance. Continue joining the remaining rows until your entire table topper block is formed.
- Final Press and Trim: Once the block is completely sewn, give it a final, thorough press. Press the entire block flat from the front, then turn it over and press from the back, ensuring all seams are smooth and flat. If necessary, use your rotary cutter and ruler to trim the outer edges of the completed block, ensuring it is perfectly square and measures 13 inches by 13 inches (or your desired final size, depending on how many blocks you created and how you arranged them). This final trim will ensure a crisp, professional finish and prepare your topper for backing and binding.
Quilted Table Topper Tutorial: Finishing Touches and Variations
Once your main table topper block is complete, the next steps involve adding batting, backing, quilting, and binding to give it a polished, durable finish. This tutorial focuses on the piecing, but here are some tips for completing your topper and exploring variations:
Finishing Your Table Topper: Batting, Backing, Quilting, and Binding
- Prepare Layers: Cut a piece of batting and a piece of backing fabric that are both a few inches larger than your finished pieced topper block on all sides.
- Create the Quilt Sandwich: Lay your backing fabric right side down on a flat surface. Place the batting on top, centered over the backing. Finally, place your pieced topper block right side up on top of the batting. Smooth out all layers, ensuring there are no wrinkles or puckers.
- Basting: Secure your quilt sandwich using safety pins, basting spray, or long basting stitches. This prevents the layers from shifting during quilting.
- Quilting: Stitch through all three layers (top, batting, backing) to hold them together. You can choose simple “stitch-in-the-ditch” quilting along the seam lines, straight line quilting, or free-motion quilting for a more intricate design. The choice is yours and adds a personal touch.
- Trim and Bind: Once quilted, trim the edges of your topper square, ensuring they are perfectly straight and square. Create or purchase binding strips (typically 2.5 inches wide, sewn together to form a continuous strip long enough to go around the perimeter of your topper). Attach the binding to the front of the topper by machine, then fold it over to the back and hand-stitch or machine-stitch it in place for a neat, finished edge.
Customization and Variations
The beauty of this pattern lies in its versatility. Here’s how you can make it truly your own:
- Seasonal Themes: Beyond fall and Christmas, consider bright yellows and blues for summer, pastels for spring, or deep jewel tones for a sophisticated look in any season.
- Size Adjustments:
- Potholder: Make just one of the 13-inch blocks, add a layer of Insul-Bright batting for heat resistance, and finish with binding.
- Table Runner: Create multiple 13-inch blocks and sew them together in a line (e.g., three blocks for a runner approximately 13×39 inches, plus binding allowance).
- Larger Quilt: Make several 13-inch blocks and arrange them in a grid, adding sashing (fabric strips between blocks) and borders if desired, to create a throw or bed quilt.
- Color Palettes: Experiment with monochromatic schemes for a minimalist look, or a scrappy mix of all your favorite fabrics for a vibrant, eclectic feel. Consider using only two contrasting fabrics for a dramatic effect, or a wide array of prints for a cheerful and busy design.
- Fabric Choices: While cotton quilting fabric is standard, don’t shy away from incorporating other materials like linen blends or even upcycled shirts for a unique texture and story.
Pro Tips for Quilters
- Accurate Seam Allowance: A precise 1/4-inch seam allowance is the cornerstone of successful quilting. Practice until it’s consistent. A quarter-inch presser foot can be a game-changer.
- Pressing, Not Ironing: When quilting, you “press” by lifting and setting the iron down, rather than sliding it across the fabric, which can distort your pieces.
- Chain Piecing: For efficiency, especially when making multiple similar units, use chain piecing. Sew units one after another without lifting the needle, creating a “chain” of stitched pieces.
- Starch for Stability: Applying spray starch to your fabric before cutting and pressing can make it more stable, easier to handle, and lead to more accurate cuts and seams.
- Rotary Cutter Blades: A sharp rotary cutter blade makes a world of difference in the accuracy and ease of your cutting. Change it often!
This easy quilted table topper project is a fantastic way to add a handmade touch to your home or create a meaningful gift. The blend of simple 3-inch squares transforming into an intricate hashtag design is incredibly satisfying. With a little patience and attention to detail, you’ll be proud to display your beautiful creation. So gather your fabrics, fire up your sewing machine, and enjoy the process of bringing this lovely design to life. Don’t forget to share your finished projects – we’d love to see your unique color combinations and interpretations!