
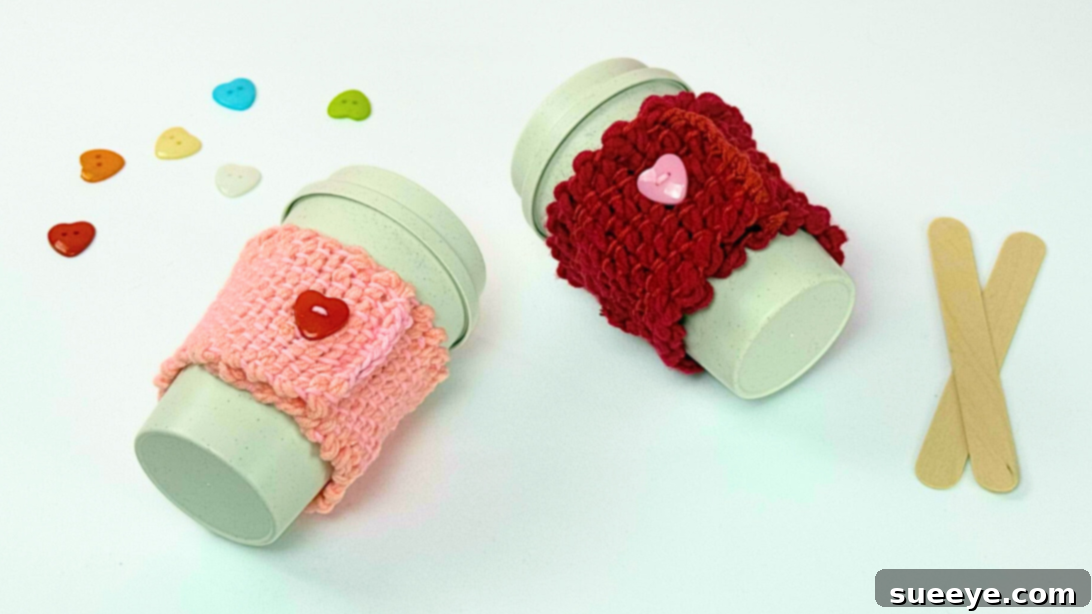
Embarking on new creative ventures is always exciting, especially when it involves the comforting embrace of yarn. My personal crafting journey began with a delightful tote bag, meticulously embroidered with vibrant fruits—a truly fun and summery project that sparked my passion for fiber arts. Following that success, I delved into the intriguing world of punch embroidery. While it presented its own unique set of challenges and rewards, the process was immensely enjoyable and broadened my crafting horizons. The natural progression for any yarn enthusiast, after experiencing the tactile satisfaction of embroidery, is often to explore the intricate art of crochet.
However, crochet can be a bit more daunting than traditional embroidery. Unlike embroidery, which is essentially a form of decorative sewing, crochet relies on a precise sequence of stitches and a specific pattern flow. A single misplaced stitch or an incorrect tension can easily unravel an entire project, leading to frustration for beginners. This potential for error often creates a barrier for those new to the craft, myself included.
For a considerable period, I found myself in a delightful internal debate: should I dive into the world of crochet or perhaps wait until I felt more confident? The appeal was undeniable; crochet offers the incredible versatility to create almost anything imaginable, from intricate garments and cozy accessories to charming amigurumi toys. Yet, as a complete novice, the sheer complexity and technical jargon associated with crochet patterns frequently left me feeling intimidated. That is, until I stumbled upon a truly brilliant project idea—a brilliant workaround that provides the aesthetic and tactile satisfaction of crocheting without requiring mastery of all the complicated stitches and technicalities. This innovative approach allows you to achieve the beautiful, textured look and feel of a crocheted item through a simplified DIY yarn project, making it perfectly accessible for anyone, regardless of their crafting experience.
RELATED: Easy Crochet Yarn Bow Tutorial
Discover the Easiest Way to Make a Woven Yarn Mug Cozy
This comprehensive tutorial will guide you through the process of crafting a charming and practical woven yarn mug cozy using just a few accessible materials: cardboard, your favorite yarn, and a simple popsicle stick. The core technique involved is basic weaving, a time-honored craft that is remarkably easy to learn. The primary challenge, if any, lies in cultivating the patience to steadily continue the weaving process until your cozy reaches its desired length and fullness. There’s a small, manageable touch of crocheting involved at the very end to secure your work, but rest assured, it’s nothing overly difficult or intimidating. Even if this is your very first foray into yarn crafts, this is an incredibly rewarding project you can absolutely tackle with confidence and enjoy every step of the way!
Why You’ll Love Crafting This Handmade Mug Cozy
If you’re a fan of handmade crafts that strike a perfect balance between simplicity and practicality, then this DIY woven yarn mug cozy is an ideal project for you. Imagine enjoying your morning coffee or evening tea wrapped in a cozy that you’ve created with your own hands! With just a handful of basic and inexpensive supplies, you can transform ordinary yarn into a beautiful, insulating sleeve that not only keeps your favorite beverages wonderfully warm but also adds a touch of personalized charm to your mug. This project is meticulously designed to be beginner-friendly, offering a relaxing and meditative crafting experience. Beyond its functional appeal, this handmade mug cozy also serves as an incredibly thoughtful and unique gift for friends, family, or colleagues. It’s a testament to the warmth of a handmade present, perfect for any occasion.
Benefits of Making Your Own Woven Mug Cozy
- Keeps Drinks Warm: The primary function, of course, is to provide insulation, ensuring your coffee or tea stays hot for longer, allowing you to savor every sip.
- Protects Hands: No more burnt fingers! A cozy acts as a comfortable barrier between your hand and a hot mug.
- Eco-Friendly: A reusable cozy is a wonderful alternative to disposable coffee sleeves, reducing waste and promoting sustainable habits.
- Personalization: Express your style! Choose yarns in colors and textures that reflect your personality or match your home decor.
- Stress Relief: The repetitive motion of weaving can be incredibly calming and therapeutic, offering a mindful escape from daily stresses.
- Perfect Handmade Gift: A woven mug cozy is a heartfelt, practical, and budget-friendly gift that shows you care. It’s ideal for birthdays, holidays, or just because.
- Develops Crafting Skills: It’s a fantastic entry point into fiber arts, building confidence for more complex projects like knitting or actual crochet.
What You’ll Need for Your Woven Yarn Mug Cozy
Gathering your materials is the first exciting step in any crafting adventure. For this easy DIY woven mug cozy, you’ll find that the necessary supplies are readily available and quite affordable. You might even have most of them lying around your house already!
How to Make a Woven Yarn Mug Cozy: A Step-by-Step Guide
-
Step 1: Create the Cardboard Weaving Loom (Frame)

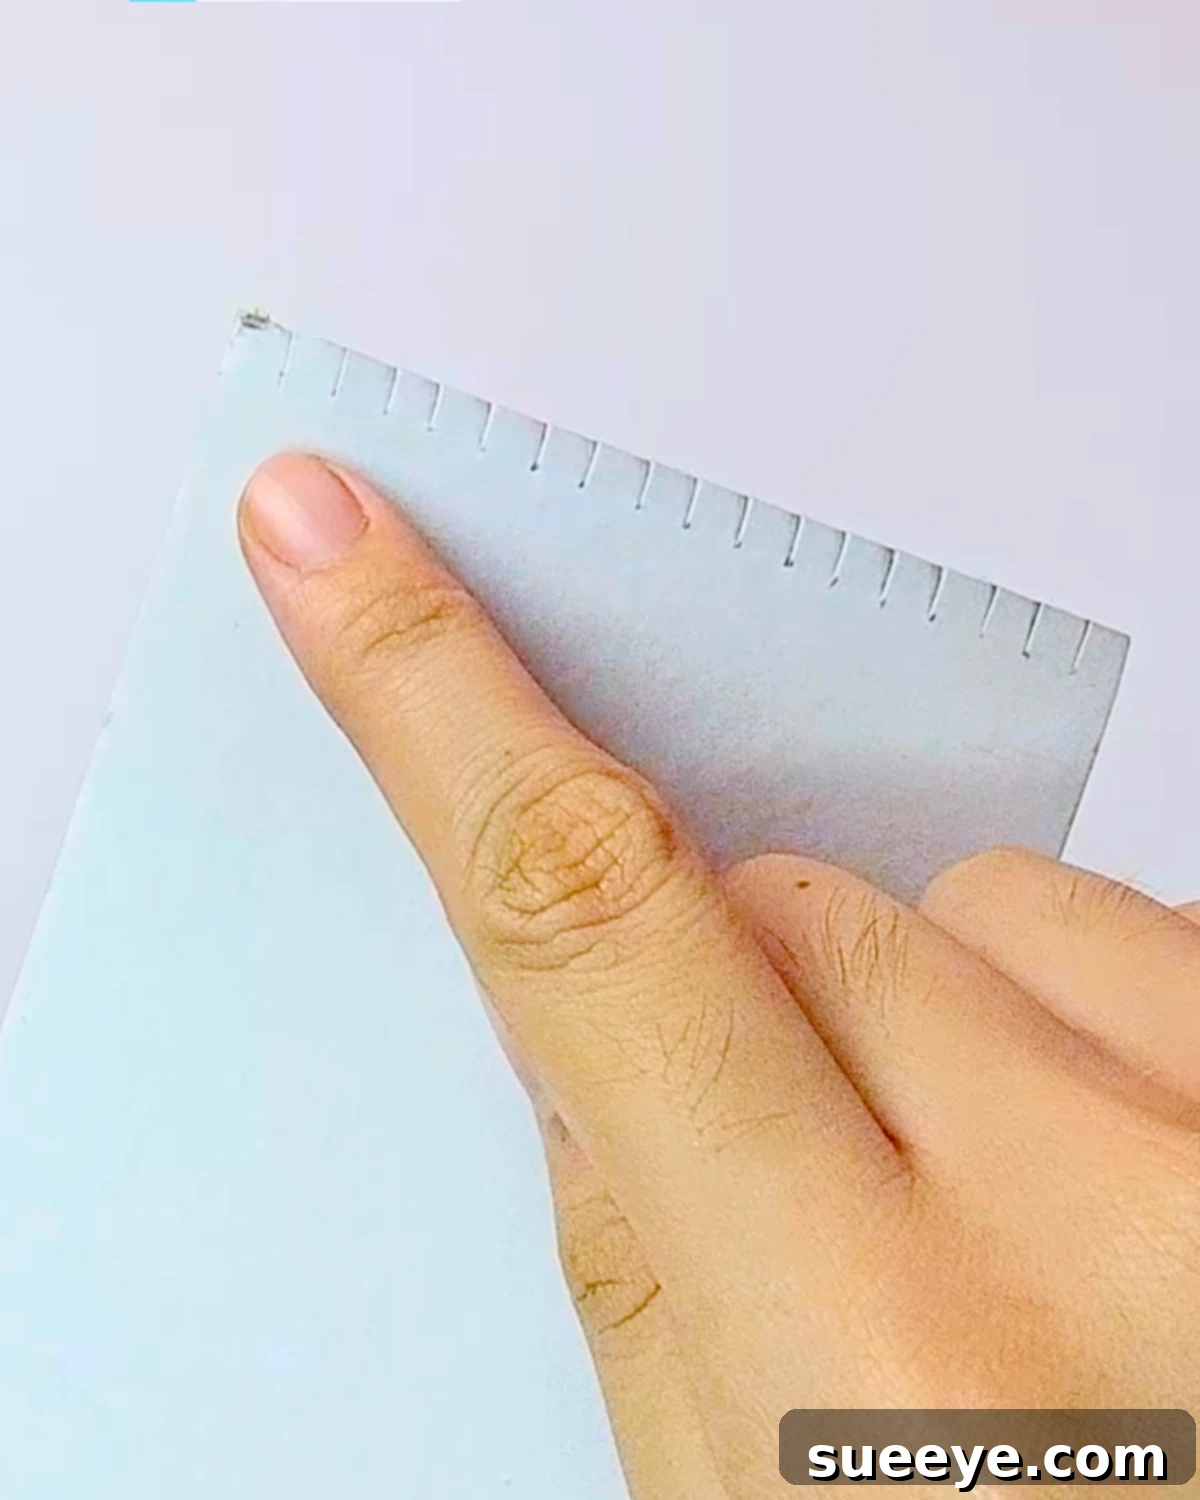
Begin by selecting a sturdy piece of cardboard, such as from a cereal box or shipping package. Carefully measure the total circumference (distance around) of your favorite mug or cup. This measurement will determine the length of your cardboard loom. Add a small allowance, perhaps an extra 1-2 cm, to ensure the cozy will comfortably fit around your mug with a slight overlap for the fastening. Next, decide on the desired width of your finished cozy; this will be the width of your cardboard piece. Using a ruler and craft knife or scissors, cut the cardboard to these precise measurements. Finally, along both of the shorter ends of your cardboard, create small, evenly spaced notches. These slits should be about 1 cm deep and 1 cm apart. These crucial slits will act as anchors, securely holding your warp (vertical) yarn strands in place during the weaving process, ensuring an even and consistent tension. -
Step 2: Set Up the Yarn Warps (Vertical Strands) for Weaving
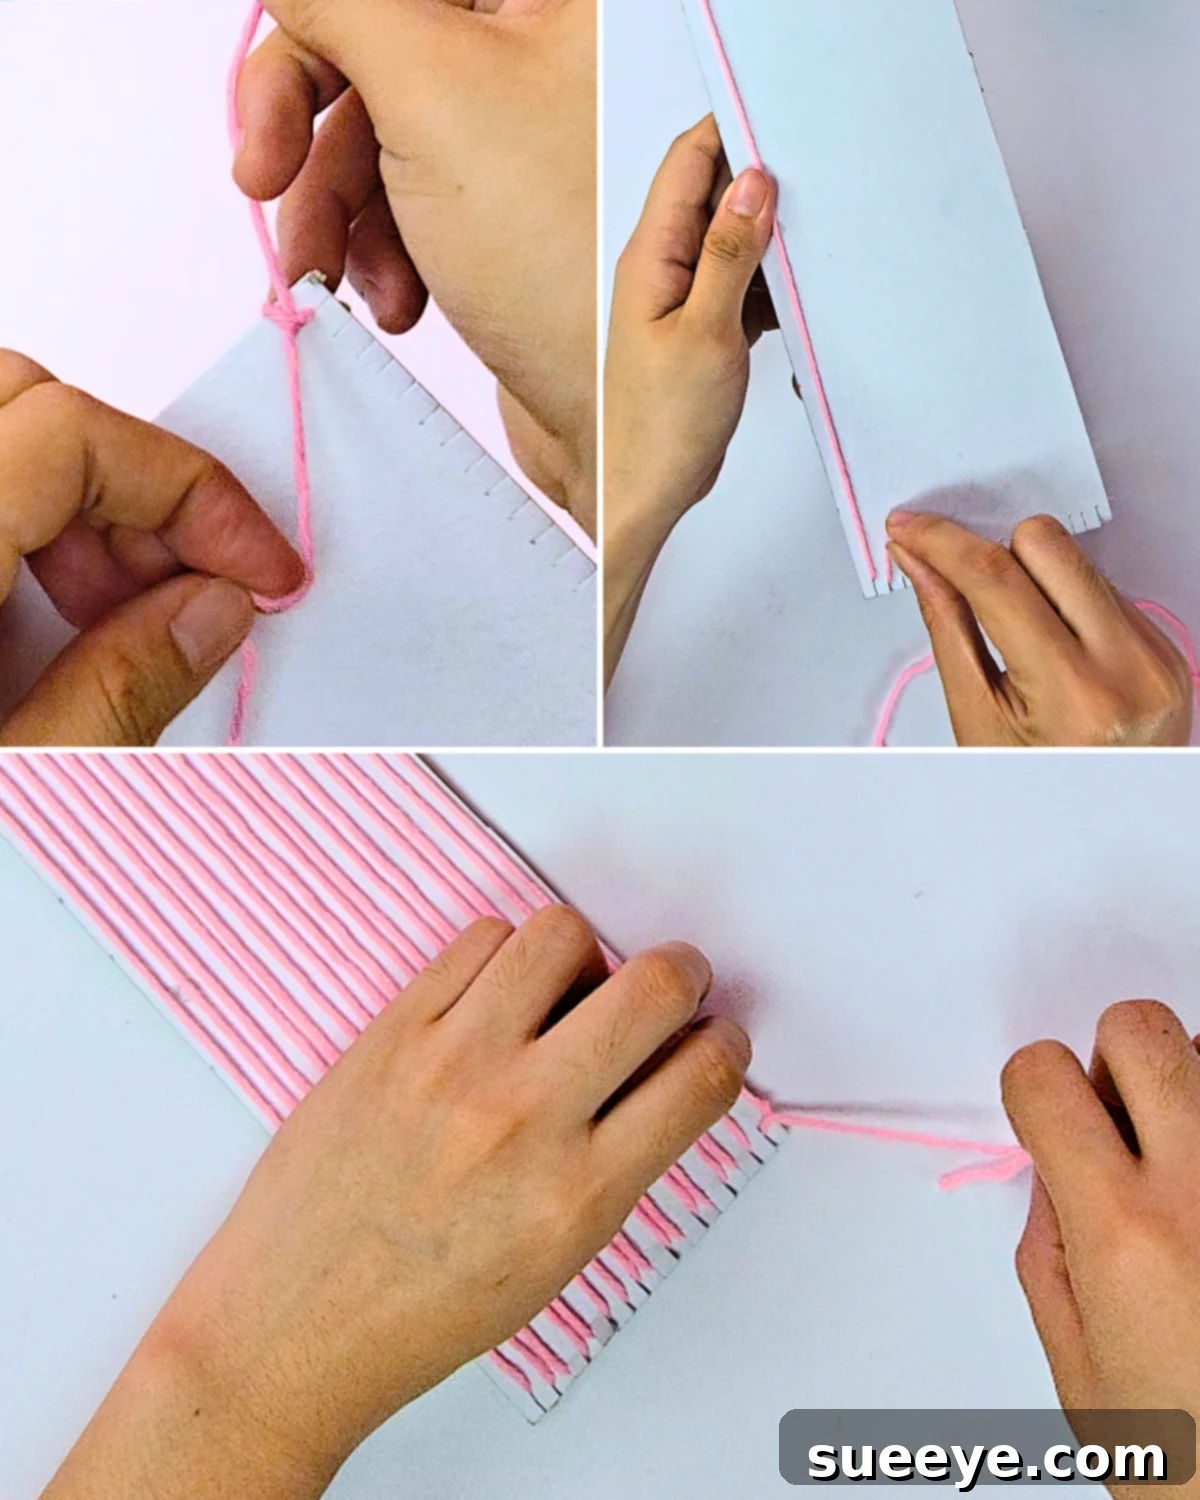
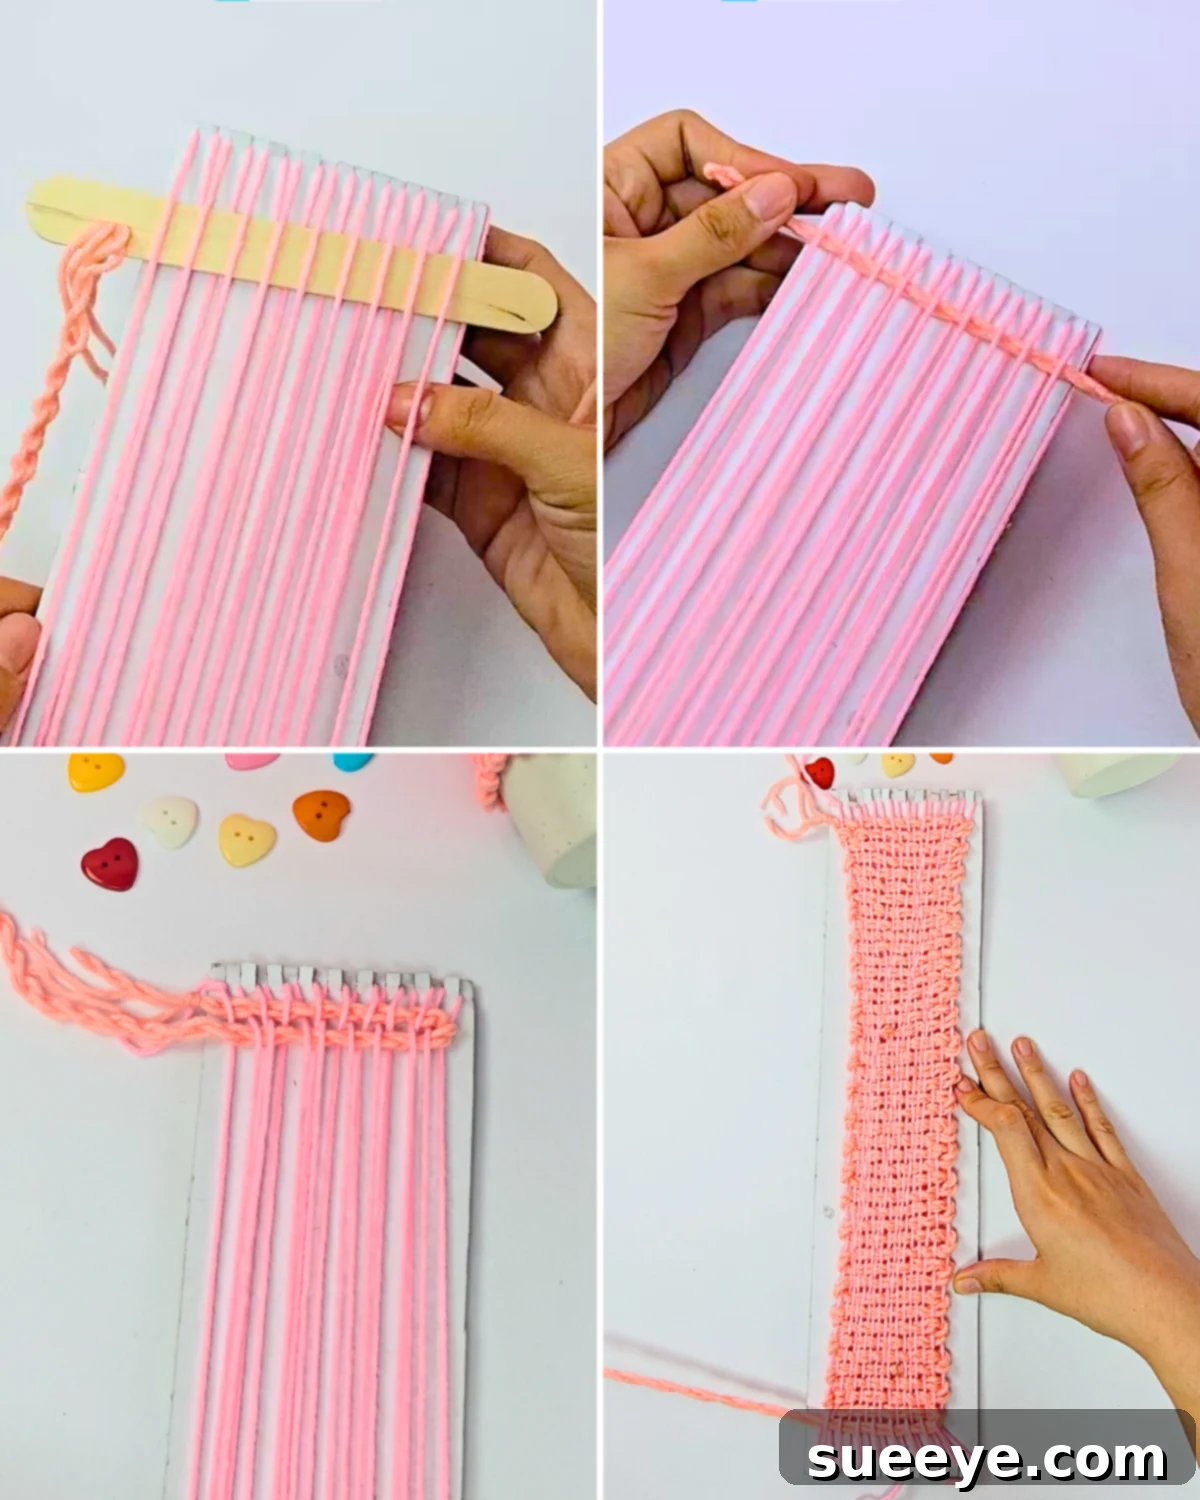
Now it’s time to prepare the foundational strands of your cozy. Take your chosen yarn for the warp – consider a contrasting color or a neutral shade that complements your weaving yarn. Start by tying one end of your yarn in a secure knot around the first top slit on your cardboard loom. This initial knot ensures your warp is firmly anchored. Then, stretch the yarn downwards, threading it through the corresponding slit on the bottom of the cardboard, and then bringing it back up through the next adjacent slit on the top. Continue this alternating pattern of wrapping the yarn around the top and bottom slits, ensuring each strand is taut but not overly tight. Maintaining even tension here is key for a consistent weave. Once all the slits are filled with vertical yarn strands, tie another secure knot at the last slit to hold them all firmly in place. These evenly spaced vertical strands now form the essential base, or “warp,” upon which you will weave your cozy. -
Step 3: Optional – Enhance Your Yarn with Thickness and Texture
You have the option to skip this step entirely and proceed directly to weaving with your yarn as is. However, if you desire a mug cozy with greater thickness, a richer texture, or a more robust feel, we highly recommend following these instructions to twist your yarn.
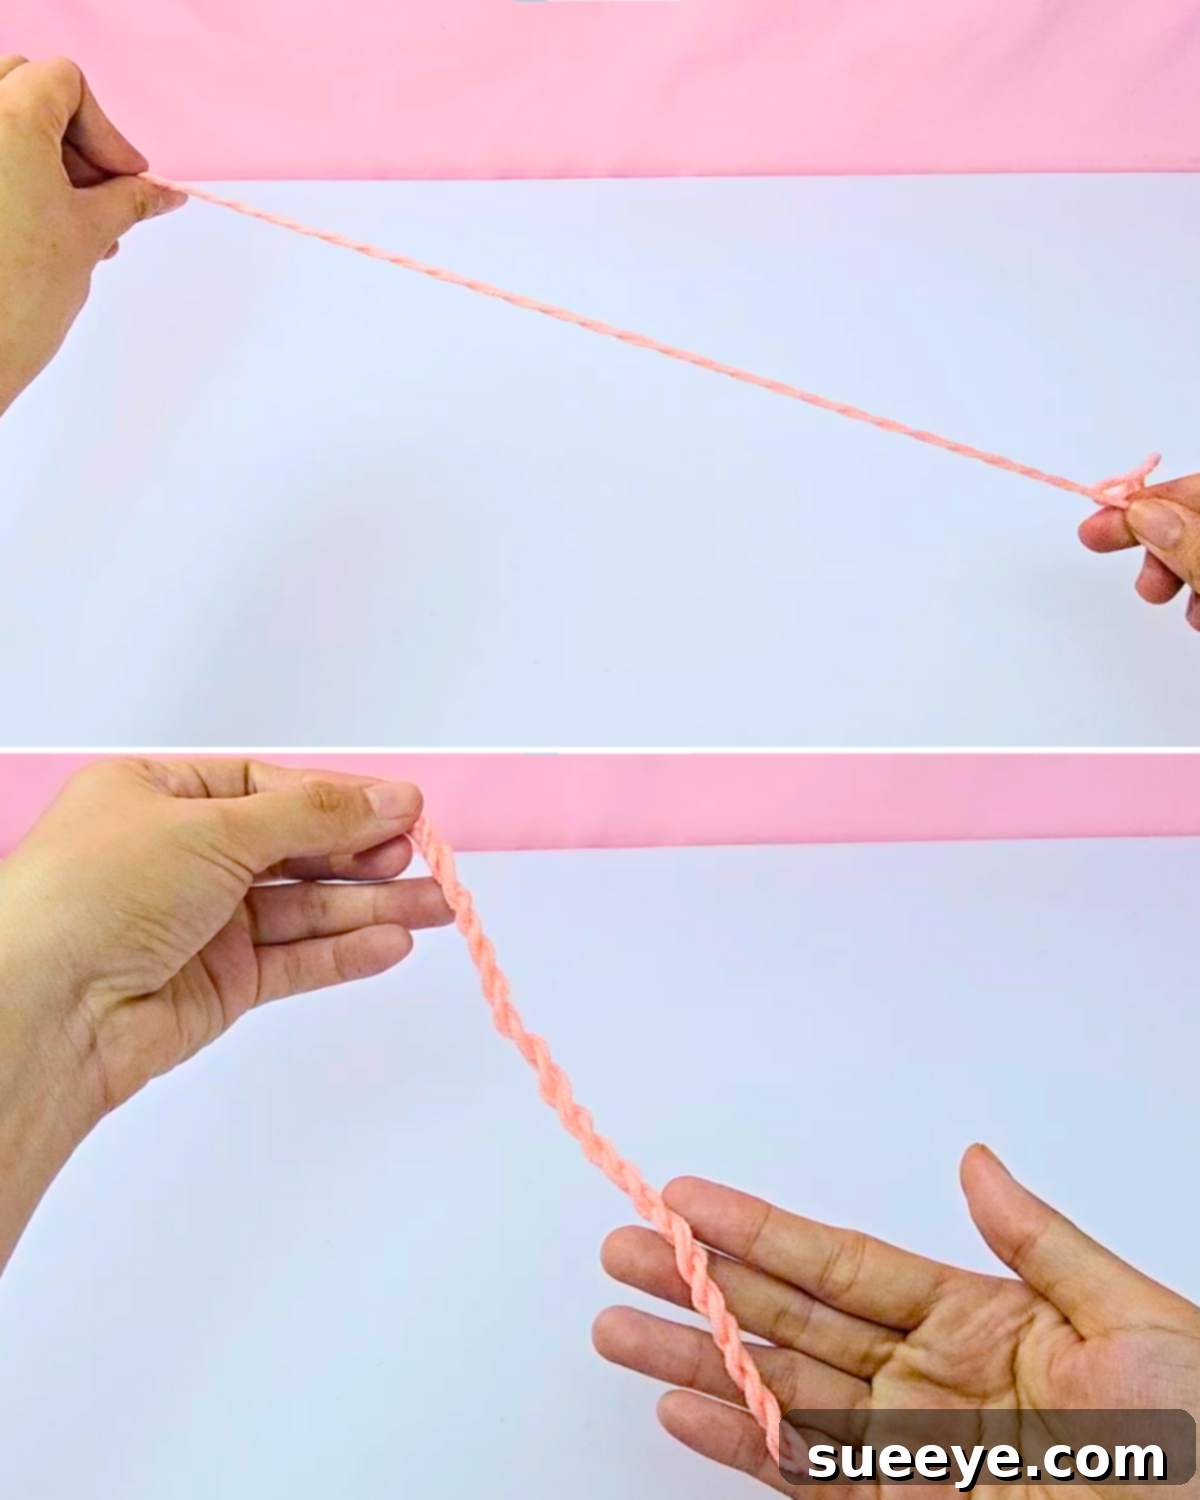
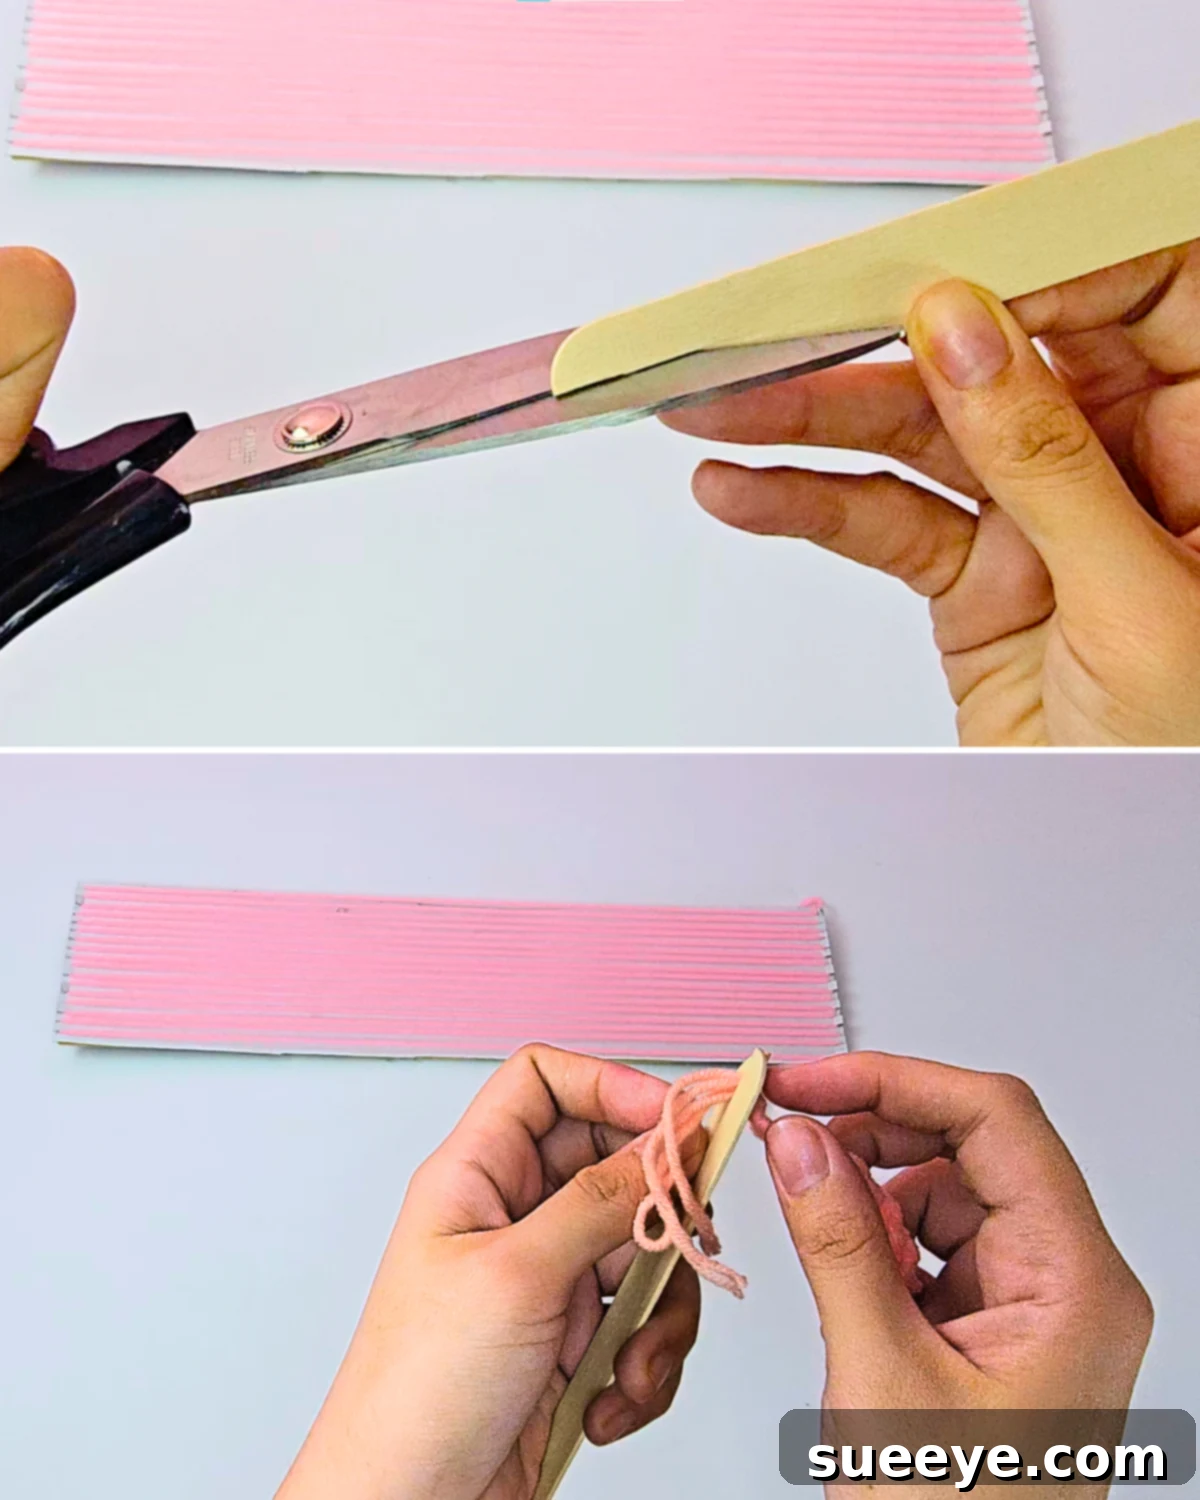
Cut a generously long piece of the yarn you intend to use for weaving – it’s always better to have too much than too little. Fold this long piece of yarn in half, bringing the two ends together. Hold both ends firmly in one hand and the looped center in the other, ensuring the yarn is taut. Now, simultaneously begin twisting the yarn in opposite directions. For example, twist the two ends clockwise while twisting the looped center counter-clockwise. Continue twisting until the yarn becomes very tightly coiled and starts to resist further twisting. Once it’s tightly twisted, gently bring the two ends together and release the tension. The yarn should naturally twist over itself, creating a thicker, more textured cord. Adjust the twists as needed, gently smoothing out any uneven areas, to achieve your desired level of thickness and texture. This twisted yarn will add wonderful dimension to your finished mug cozy.For the weaving yarn in this specific tutorial, I opted for a slightly different shade of pink, which adds a subtle visual contrast and depth. However, feel free to unleash your creativity! You could use the exact same color as your warp base for a monochromatic look, or experiment with wildly contrasting colors to create a bold and playful design.
-
Step 4: Prepare Your Weaving Tool
To make the weaving process effortless and efficient, we’ll create a simple yet effective weaving shuttle. Grab a standard wooden popsicle stick. Using a pair of sharp scissors or a craft knife (with caution!), carefully cut a small slit, approximately 1-2 cm deep, into one end of the popsicle stick. This slit will serve as a secure holder for your weaving yarn. Now, take the end of your prepared weaving yarn (the twisted yarn from Step 3, or your regular yarn if you skipped twisting) and gently thread it through this slit. Ensure it’s snugly held but still allows the yarn to feed through smoothly as you weave. This improvised weaving tool will help you easily pass the yarn over and under the warp strands. -
Step 5: Begin the Weaving Process
With your weaving tool loaded, it’s time for the magic to happen! Hold the cardboard loom steady. Begin by inserting the popsicle stick, with the weaving yarn attached, into the vertical warp strands. The basic weaving pattern is “over-under-over-under.” This means you will pass the popsicle stick over one vertical strand, then under the next, then over the next, and so on, in an alternating sequence across the entire width of the loom. Pull the yarn gently through, leaving a small tail (about 2-3 inches) at the beginning, which you will secure later. For the return pass, you will weave the popsicle stick back in the opposite direction, picking up the strands you skipped in the previous row. So, if you went “over” a strand on the first pass, you will now go “under” that same strand. This creates an interlocking fabric. Push each row of woven yarn down firmly but gently towards the bottom of the loom with your fingers or a comb to ensure a tight, even weave. Continue weaving back and forth, row after row, maintaining consistent tension, until the entire cardboard loom is fully covered with your beautiful twisted yarn, and your cozy reaches its desired length and density. -
Step 6: Finish and Fasten Your Woven Mug Cozy
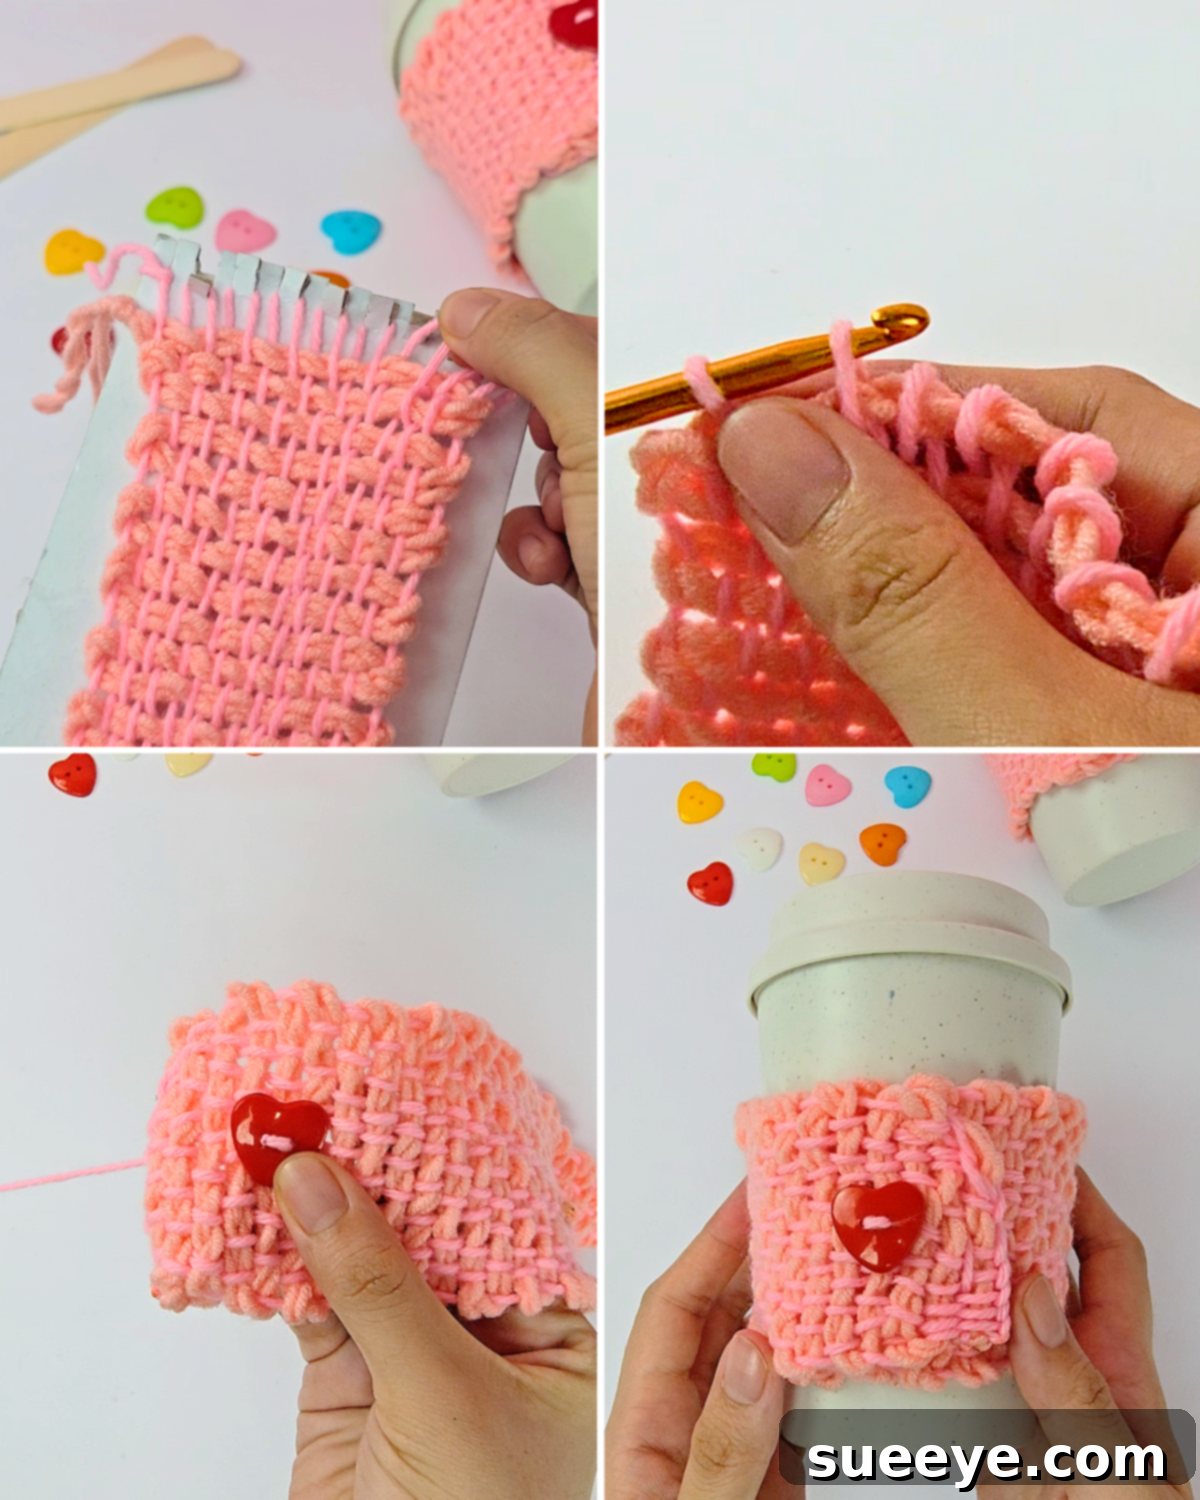
You’re almost there! Carefully and gently remove the yarn loops from the cardboard slits at both the top and bottom of your woven piece. This will release your cozy from the loom. Now, to secure the weave and prevent any unraveling, take your crochet hook. Along both raw ends of the cozy (where the loops were removed), make a series of simple chain stitches. This creates a neat, stable edge and gives your cozy a professional, finished look. If you’re not comfortable with a crochet hook, you can also carefully use a needle and matching thread to hand-stitch the ends, creating a similar secure finish. For the fastening mechanism, sew your chosen heart-shaped button (or any decorative button you prefer) onto one end of the cozy. Ensure it’s stitched securely. To wear your cozy, simply wrap the woven yarn around your mug, align the end with the button, and then gently pull the button through the weave on the opposite side until it sits snugly on top. This creates a functional and adorable closure that allows the cozy to be easily removed for cleaning or switching between mugs.
Materials
- Yarn (choose your favorite colors and textures!)
- Popsicle Stick (for your weaving tool)
- Needle (for sewing the button)
- Button (a decorative heart-shaped button or similar)
- Cardboard (for your DIY loom)
- Scissors (sharp pair for cutting yarn and cardboard)
- Crochet Hook (for securing the edges, optional but recommended)

Pro Tips for Your Perfect Woven Mug Cozy 💡
- MAINTAIN EVEN TENSION – Achieving a beautifully symmetrical and well-formed mug cozy largely depends on consistent yarn tension. While wrapping the warp strands and during the weaving process, consciously aim to keep the yarn taut but avoid pulling it so tightly that it distorts the cardboard or makes the weave difficult. Uneven tension can unfortunately lead to a cozy that appears lopsided or has an inconsistent texture, so a gentle, steady hand is key.
- EXPERIMENT WITH COLOR CONTRAST – To add striking visual interest and depth to your woven mug cozy, consider using a slightly different shade or even a completely contrasting color for your weaving yarn compared to the warp (the vertical base strands). A subtle variation in hue can create a sophisticated, layered effect, while bold contrasts can result in a vibrant, eye-catching design. Don’t be afraid to play with your color palette!
- ENSURE ALL ENDS ARE SECURE – The longevity and neatness of your handmade mug cozy depend significantly on how well you secure all your yarn ends. After starting and finishing your weaving, and whenever you introduce a new strand of yarn, knot the ends tightly and discreetly weave them into the existing fabric using a needle. This vital step prevents any frustrating unraveling and ensures your cozy maintains its pristine appearance through extensive use.
- CONSIDER THE CROCHET FINISHING – While securing the raw edges of your cozy with a simple needle and thread is perfectly acceptable and functional, using a crochet hook to create a chain stitch border offers a distinct advantage. This technique provides a much cleaner, more professional, and aesthetically pleasing finish, adding a refined touch that elevates the overall look of your project. If you’re new to crochet, a basic chain stitch is an excellent place to start!
- CLEANING AND CARE – To keep your woven yarn mug cozy looking its best, we recommend hand washing it gently in cool water with a mild soap. Avoid harsh detergents or vigorous scrubbing. Lay it flat on a clean towel to air dry, reshaping it slightly if needed. This gentle care will help preserve the yarn’s texture and color, ensuring your cozy remains a cherished item for years to come.
Customization Ideas for Your Woven Mug Cozy
Once you’ve mastered the basic technique, the possibilities for customizing your woven mug cozy are endless! Let your creativity shine:
- Yarn Choices: Experiment with different yarn weights (from fingering to bulky), fibers (wool, cotton, acrylic, blends), and textures (fuzzy, smooth, variegated). Each choice will dramatically change the look and feel of your cozy.
- Color Blocking: Instead of a single color for weaving, introduce stripes or blocks of different colors at various points in your weave for a more dynamic design.
- Embellishments: After weaving, consider adding small decorative elements. This could include a few simple embroidered stitches, small beads, or even a tiny fabric patch sewn onto the finished cozy.
- Button Styles: While a heart-shaped button is adorable, you can choose any button that matches your style – from vintage wooden buttons to modern metal clasps. You could even use a toggle button or a yarn loop closure instead of a button.
- Size Variations: This technique isn’t just for standard mugs! Adjust the cardboard frame dimensions to create cozies for travel mugs, mason jars, or even small flower pots.
Embrace the Joy of Crafting with Your Easy DIY Woven Yarn Mug Cozy
Crafting this easy DIY woven yarn mug cozy is more than just a project; it’s an invitation to unwind, explore your creativity, and create something truly special and practical with your own hands. It offers the satisfying experience of a handmade item, reminiscent of traditional crochet, but in a simplified, beginner-friendly format. Whether you’re looking to personalize your morning routine, create thoughtful gifts for loved ones, or simply enjoy a relaxing crafting session, this project is perfect. The warmth your mug will enjoy is only surpassed by the warmth you’ll feel from having made it yourself. Dive in, experiment with colors and textures, and discover the immense satisfaction that comes from bringing a beautiful, functional piece of yarn art to life. We guarantee you’ll love the results!
*If you loved this craft and are eager for more creative inspiration, be sure to visit our official website for a wealth of DIY projects! Don’t forget to follow our Facebook page to stay updated on our latest creations and subscribe to our YouTube channel for engaging video tutorials. Happy crafting!