
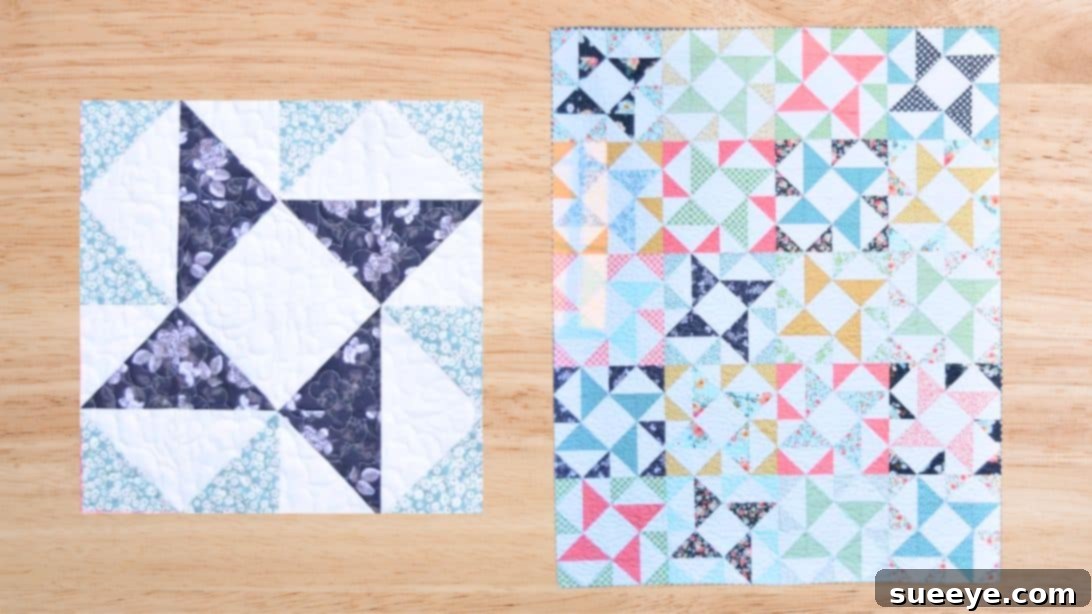
Master the Windmill Quilt: An Easy & Rewarding Half-Square Triangle Project for All Skill Levels
Dive into the delightful world of quilting with the timeless Windmill Quilt pattern! This classic design is renowned for its captivating visual movement and surprising simplicity, making it an ideal project for both seasoned quilters and enthusiastic beginners alike. If you have a passion for creating Half-Square Triangles (HSTs), then this sewing adventure is tailor-made for you. The entire block is constructed from these versatile units, providing an excellent opportunity to hone your HST skills and produce a stunning, dynamic quilt top.
Our comprehensive guide breaks down each step into easy-to-follow instructions, ensuring a smooth and enjoyable crafting experience. Even if you’re new to quilting, you’ll find the process incredibly approachable. For a visual walkthrough, be sure to check out Material Girl Quilts’ helpful video tutorial, which complements these written instructions perfectly.
RELATED: Explore another charming variation with the Breezy Windmill Quilt With Jenny Doan!
Mastering Half-Square Triangles: Essential Techniques for Perfect Blocks
Half-Square Triangles (HSTs) are fundamental building blocks in countless quilt patterns, and the Windmill Quilt is a beautiful testament to their versatility. While the concept is simple – two triangles sewn together to form a square – precision is key to achieving crisp, professional-looking results. Fortunately, there are several clever methods to streamline HST production, allowing you to create many units quickly and accurately. Understanding these techniques can significantly enhance your quilting efficiency and the overall quality of your projects.
Efficient HST Creation: Speed Up Your Quilting Process
For this Windmill Quilt, we’ll focus on a highly efficient method that yields 8 HSTs from just two squares. However, it’s worth exploring other techniques as your quilting journey progresses, as different patterns may benefit from different approaches:
- The Magic 8 Method: This popular technique is a game-changer for projects requiring a large number of HSTs. By marking and sewing two squares together in a specific way, you can achieve 8 perfectly sized half-square triangles from a single pair of larger squares. It’s incredibly satisfying and dramatically reduces cutting and sewing time compared to making them one pair at a time. This method is particularly beneficial for repetitive block patterns like the Windmill, ensuring consistency across all your units. The key is in accurately drawing diagonal lines and then stitching a precise 1/4″ seam on either side before cutting.
- The 4-at-a-Time Method: Another efficient technique involves sewing two squares, marking a single diagonal, sewing 1/4″ on both sides, and then cutting along that diagonal and the horizontal/vertical centers. This yields four HSTs from two squares. It’s a great intermediate option that offers a good balance between speed and precision, especially when you need a moderate number of HSTs.
- The 32-at-a-Time Method: Ready to take efficiency to the next level? For grand-scale projects or when you need an abundance of identical HSTs, this advanced technique allows you to create an astonishing 32 half-square triangles at once! It’s a fantastic hack for experienced quilters looking to save significant time on large quilt tops or charity quilts. If you’re curious to learn more about this impressive method and how it leverages larger fabric units, check out this detailed guide: Quilting Hack: Make 32 Half-Square Triangles at Once. Mastering such techniques can truly transform your quilting productivity and open doors to even more ambitious projects.
Regardless of the method you choose, remember that accuracy in cutting and a consistent 1/4″ seam allowance are paramount for perfectly matching points and square blocks. Don’t be afraid to experiment with different techniques to find what works best for your workflow and current project needs. The more comfortable you become with HSTs, the more confident you’ll feel tackling diverse quilting patterns.
Gather Your Supplies: What You’ll Need for Your Windmill Quilt
Before embarking on your quilting adventure, gathering all necessary materials will ensure a smooth and uninterrupted creative process. The beauty of this pattern is its adaptability; you can choose fabrics that match your decor, reflect your personality, or even utilize scraps from previous projects for a truly unique and personal look. For a quilt measuring approximately 64″ x 80″ when finished, here’s what you’ll need:
- One 10″ Square Pack of Colored Fabric: Often referred to as “Layer Cakes” in the quilting world, these pre-cut 10-inch squares are a fantastic time-saver. Choosing a pre-cut pack ensures a coordinated color palette, but you can also select your own assortment of prints and solids from your stash. The variety in this pack will create the dynamic “blades” of your windmills, so opt for fabrics with good visual interest.
- One 10″ Square Pack of Background Fabric: Select a contrasting fabric for your background. A solid white, cream, or light grey will make your colored windmills pop, creating a strong visual impact and allowing the intricate pattern to truly shine. Alternatively, a subtle tone-on-tone print can add texture without distracting from the main design. The key is to ensure good contrast with your colored squares to define the windmill shape clearly.
- 5 Yards of Backing Fabric: The backing fabric provides the foundation and comfort of your quilt. Choose a fabric that complements your quilt top in terms of color and style. You might opt for a single wide fabric (typically 108″ wide) to avoid piecing, or piece together standard width (42-44″ wide) fabrics to achieve the required size. Consider softness and durability, as this will be the side that often touches you.
- 2/3 Yards of Binding Fabric: The binding is the finishing touch that frames your quilt and protects its edges from wear and tear. It can be a coordinating color that blends seamlessly with your quilt top, or a bold contrasting color that acts as a decorative border, drawing attention to the edges. Ensure the fabric is sturdy and consider cutting it on the bias or cross-grain for flexibility around corners.
- Additional Essentials (Highly Recommended for Quilting Success):
- Rotary Cutter, Self-Healing Mat, and Quilting Rulers: These tools are indispensable for precise, consistent cuts, which are critical for accurate piecing.
- Sewing Machine with a 1/4″ Presser Foot: A specialized 1/4″ foot helps maintain that crucial consistent seam allowance.
- Good Quality Thread: Choose a polyester or cotton thread that matches or complements your fabrics. Using a good quality thread minimizes breakage and ensures strong seams.
- Iron and Ironing Board: For crisp pressing at every stage, which is fundamental to accurate quilting.
- Fabric Marking Tool: A Frixion pen (disappears with heat), tailor’s chalk, or a fine mechanical pencil can be used for drawing lines.
- Safety Pins or Spray Basting: Essential for temporarily securing your quilt layers (top, batting, backing) before quilting.
- Fabric Scissors: For general cutting and trimming.
Having these materials ready will set you up for success and allow you to fully immerse yourself in the creative process. Take your time selecting fabrics; the colors and prints you choose will largely define the character and overall aesthetic of your finished Windmill Quilt!
Crafting Your Windmill Quilt: Step-by-Step Block Construction
Now that you have all your supplies, let’s dive into the exciting process of bringing your Windmill Quilt to life! The construction primarily revolves around creating and arranging those magnificent Half-Square Triangles. Precision in cutting and careful pressing will be your best friends throughout this journey, ensuring your points match and your blocks lie flat.
Step 1: Creating Your Half-Square Triangles (HSTs) for the Windmill Block
This initial step is crucial for the overall accuracy and visual appeal of your quilt. We will use the efficient 8-at-a-time HST method, which significantly speeds up production while maintaining consistent sizing, a hallmark of professional-looking quilts.
- Prepare Your Squares: Take one 10″ colored fabric square and one 10″ background fabric square. Ensure both squares are well-pressed, smooth, and free of any wrinkles or creases, as this impacts cutting accuracy.
- Layer and Mark: Place the colored square and the background square right sides together, aligning all edges perfectly. Using a fabric-marking pen or pencil, draw a diagonal line from corner to corner across the square in both directions, forming a clear ‘X’ shape. These lines will serve as your cutting guides.
- Sewing Guidelines: With your sewing machine set to a standard stitch length, stitch a scant 1/4″ away from either side of each drawn diagonal line. This means you will have four seam lines in total, running parallel to the original diagonal markings. For instance, if you drew a line from top-left to bottom-right, you’d sew one line 1/4″ to its left and another 1/4″ to its right. Repeat for the other diagonal. A scant 1/4″ seam is slightly less than a full 1/4″, often ensuring your finished blocks are true to size after trimming.
- Cutting the Units: Once all four seam lines are sewn, carefully cut your large layered square. First, cut it in half horizontally and then vertically, creating four smaller squares. Next, cut directly along the two original diagonal lines you drew earlier. This will yield a total of eight triangular units.
- Pressing and Trimming: You will now have eight pairs of sewn triangles. Open each unit carefully so that the two fabric pieces are flat and form a square. Press the seams open or to one side (consistently choose one method for all HSTs for a flatter quilt top and easier matching of points) using a hot iron. Pressing flat is vital for sharp points and blocks that lie perfectly even.
- Perfecting Your HSTs: Using a quilting ruler with a 4 1/2″ square marking and a rotary cutter, trim each newly formed Half-Square Triangle to a precise 4 1/2″ square. This trimming step is absolutely critical for ensuring all your blocks are uniform in size, which makes assembling the quilt top much easier and more accurate. Discard any excess fabric.
You should now have 8 perfectly sized 4 1/2″ Half-Square Triangles from your original two 10″ squares. Repeat this precise process with all your remaining 10″ colored and 10″ background squares until you have a sufficient number of HSTs for your entire quilt. The diligence and precision in this step will pay dividends in the later stages of assembly, leading to a truly impressive finished quilt.
Step 2: Assembling the Dynamic Windmill Quilt Block
With your collection of perfectly trimmed Half-Square Triangles, it’s time to bring the iconic Windmill block to life. The magic happens in the precise arrangement, where the contrasting colors create the illusion of captivating spinning blades, giving the quilt its distinctive character.
- Select Your HSTs: For each 16-patch Windmill block, you will need 16 Half-Square Triangles. Typically, these will be 8 HSTs from one color combination (e.g., a specific print and background) and 8 from another (e.g., a different print and background, or simply reversing the dark/light placement of the previous HSTs). The key is to have enough contrast between the two sets of HSTs to clearly define the “windmill” motion and create visual depth.
- Design Your Block Layout: Lay out your 16 HSTs on a flat surface or a design wall. The classic Windmill pattern is essentially a 4×4 grid of HSTs.
- Central Pinwheel: Begin by forming the central “square on point” or a mini pinwheel. This is typically created by arranging four HSTs with their colored triangles pointing towards the center, creating a distinct square effect within the center of the block.
- Outer Blades & Flying Geese: Next, build out the surrounding units. The remaining HSTs will form “flying geese” units around the central square, with their dark or light triangles pointing in specific directions to create the dynamic windmill motion. Pay close attention to the orientation of each individual HST. One set of triangles will point in one direction (e.g., clockwise around the center), while the HSTs in the other pattern will be going in the opposite direction (e.g., counter-clockwise) to achieve the desired visual flow and create the illusion of movement. This interplay of direction is what gives the windmill its characteristic energy.
- Verify Orientation: This is a critical step! Before you start sewing, stand back and double-check that all your Half-Square Triangles are facing the correct direction according to your chosen pattern. A single misaligned HST can disrupt the entire block’s design and create a visual “speed bump” in your otherwise smooth windmill. Refer closely to the reference photo below for a clear visual guide on correct placement.
- Sewing in Rows: Once you are completely satisfied with your layout, carefully sew the HSTs together in horizontal rows first. For a 4×4 block, you will sew four HSTs together, end-to-end, to form one row, creating four distinct rows in total. Use a consistent 1/4″ seam allowance. Press the seams within each row in alternating directions (e.g., press seams of row 1 to the right, row 2 to the left, row 3 to the right, etc.). This “nesting” of seams will help reduce bulk and ensure your points align beautifully when you join the rows, creating a flatter, more professional finish.
- Joining the Rows: Finally, sew the four completed rows together, matching all seam intersections carefully. Pin liberally at these intersections to ensure your points match up perfectly, which is key to a crisp block. Sew the rows together with a 1/4″ seam. Press your completed Windmill Quilt Block one last time, making sure it lies flat and square, ready for assembly into the quilt top.
You have now successfully created a beautiful Windmill Quilt Block! Take a moment to admire your work and the intricate design you’ve brought to life before moving on to assemble the full quilt top. Each block is a miniature work of art, contributing to the grandeur of the overall quilt.
Step 3: Assembling the Quilt Top: Bringing All Your Blocks Together
The final stage of constructing your quilt top involves bringing all your individual Windmill blocks together to form a cohesive and striking design. This is where your vision truly comes to life, as the individual blocks merge into a larger, dynamic pattern.
- Block Quantity: For a quilt measuring approximately 64″ x 80″, you will need to create a total of 20 Windmill quilt blocks. This recommended layout suggests a configuration of 5 rows with 4 blocks in each row, creating a generously sized throw quilt or bed accent.
- Arranging Your Blocks: Lay out all 20 of your completed blocks on a design wall, the floor, or a large table. This allows you to visualize the entire quilt top before sewing. Experiment with different arrangements to achieve the visual effect you desire. You can alternate colors, create a gradient, or simply let the random placement of your fabric choices shine. Crucially, ensure the “spinning” direction of your windmills creates a pleasing overall flow throughout the quilt top. Take photos of different layouts to help you decide.
- Sewing Rows Together: Once you are happy with the layout, begin by sewing the blocks together within each row. Take the first four blocks of row 1 and sew them, end-to-end, with a consistent 1/4″ seam allowance. Press the seams within row 1 in one direction (e.g., to the right). Repeat this for row 2, but press the seams in the opposite direction (e.g., to the left). Continue this alternating pressing technique for all five rows. This is crucial for making the seams “nest” when you join the rows, which helps in creating perfectly matched points and a flatter quilt top.
- Joining Rows to Form the Top: With all five rows assembled and pressed, it’s time to connect them. Carefully align the first row with the second row, matching all seam intersections. Pin generously at these points, ensuring that your pressed seams interlock for perfect alignment. Sew the rows together with a 1/4″ seam. Repeat this process, joining row 3 to row 2, row 4 to row 3, and finally row 5 to row 4. Press these final seams open or to one side (your consistent method) to ensure your quilt top lies perfectly flat and smooth.
Congratulations! You have now completed your beautiful Windmill Quilt top. This is a significant milestone in your quilting journey. Take a moment to appreciate the intricate design and the hours of careful work that have gone into creating this stunning piece. The finished quilt top should measure approximately 64″ x 80″, a generous size perfect for a cozy throw, a striking bed accent, or a heartwarming gift.
Finishing Your Windmill Quilt: Beyond the Top
Completing the quilt top is a huge accomplishment, but the journey isn’t over yet! To transform your beautiful pieced top into a functional, durable, and truly finished quilt, you’ll need to complete three more essential steps: layering (basting), quilting, and binding. These steps not only add to the longevity of your quilt but also enhance its texture, warmth, and overall aesthetic appeal.
Basting: Layering for Stability and Longevity
Basting is the crucial process of temporarily securing your three quilt layers together: the quilt top (your beautifully pieced Windmill design), the batting (the soft inner layer that provides warmth, loft, and dimension), and the backing fabric. Proper basting prevents shifting during the quilting process, which is essential for ensuring a smooth, even finish and preventing puckers or stretched areas.
- Prepare Your Layers: Begin by preparing a clean, flat surface large enough to accommodate your entire quilt. Lay your backing fabric wrong side up, smoothing out all wrinkles. Secure it tightly to the surface using masking tape, painter’s tape, or clamps.
- Add Batting: Place your batting evenly over the backing, ensuring it’s slightly larger than your quilt top (typically 2-4 inches larger on all sides) to allow for shifting during quilting. Smooth it out gently to remove any creases.
- Position Quilt Top: Carefully center your completed Windmill Quilt top right side up over the batting. Begin smoothing it out from the center outwards to eliminate any puckers or trapped air, working your way to the edges.
- Secure with Basting: Use your preferred basting method to secure all three layers:
- Safety Pins: Use curved safety pins, placing them approximately every 4-6 inches across the entire quilt. This is a popular and reliable method for home quilters.
- Spray Basting: Apply a temporary adhesive spray specifically designed for quilting, following the manufacturer’s instructions carefully for ventilation and drying time. This method offers a smooth, pin-free surface for quilting.
- Hand Basting: Use long running stitches with a contrasting thread to secure the layers. This method is often preferred for larger quilts or intricate designs where a softer drape is desired.
Quilting: Adding Texture and Durability
Quilting is the process of stitching through all three layers (top, batting, backing) to hold them together permanently. This step is not only functional, preventing the batting from shifting and bunching, but it also adds beautiful texture, defines the piecing, and gives the quilt its characteristic durability and drape. You can choose from various quilting styles to complement your Windmill design:
- Stitch-in-the-Ditch: This involves stitching precisely along the seam lines of your pieced blocks. It’s a subtle method that emphasizes the piecing and adds definition without being too distracting from the Windmill pattern itself. It’s excellent for beginners looking to practice straight-line quilting.
- Free-Motion Quilting: For a more artistic and custom look, free-motion quilting allows you to create intricate designs, swirls, feathers, stippling, or meandering patterns across your quilt. This requires a bit more practice and a specialized free-motion foot, but it offers immense creative freedom and can add incredible depth and personality to your quilt.
- Straight-Line Quilting: Using your walking foot or a guide, you can quilt parallel lines, cross-hatching, or grid patterns across your quilt. This provides a clean, modern aesthetic and is excellent for beginners. You can quilt within the blocks, across the rows, or in diagonals to enhance the geometric nature of the Windmill design.
- Custom Quilting: This involves combining various techniques, perhaps highlighting specific elements of the Windmill blocks with different motifs, or outlining specific shapes.
Choose a quilting pattern that complements your Windmill design, your skill level, and the intended use of the quilt. Take your time, enjoy the rhythmic process of stitching, and watch as your quilt comes to life with beautiful texture and dimension.
Binding: The Perfect Frame and Protective Finish
The final step in completing your quilt is to bind its edges. The binding encases the raw edges of your quilt, provides a clean and professional finish, and adds a decorative border that frames your masterpiece. The binding fabric you selected earlier will be cut into strips, sewn together, and then carefully attached around the perimeter of the quilt.
- Prepare Binding Strips: Cut your 2/3 yard binding fabric into 2 1/2″ wide strips. Typically, you’ll cut these strips from selvage to selvage (cross-grain). Sew these strips together end-to-end (often on the diagonal, at a 45-degree angle, to reduce bulk) to create one continuous long strip, long enough to go around the entire perimeter of your quilt, plus about 10-12 inches extra for secure joining.
- Press and Fold: Press the long, continuous binding strip in half lengthwise, wrong sides together, to create a neat, folded edge.
- Attach to Quilt: With the raw edges aligned, sew the raw edge of the folded binding to the raw edge of your quilt top, working your way around the entire perimeter. Use a consistent 1/4″ seam allowance. When you reach the corners, carefully miter them for a neat and professional finish.
- Hand or Machine Finish: Once the binding is sewn to the front, flip the folded binding over to the back of the quilt, encasing the raw edges. You then have two options for securing it:
- Hand Stitching: Hand stitch the binding down to the backing fabric for a traditional, invisible, and heirloom-quality finish.
- Machine Stitching: Machine stitch the binding down from the front of the quilt (stitching in the ditch of the binding seam) for a quicker, more durable result that is often preferred for utility quilts.
With the binding complete, your Windmill Quilt is officially finished! You’ve transformed simple fabric squares into a beautiful, functional work of art that will bring warmth, comfort, and joy for years to come. Take immense pride in your accomplishment!
Your Completed Windmill Quilt: A Timeless Treasure
Congratulations on completing your stunning Windmill Quilt! This project is far more than just a collection of fabric squares; it’s a testament to your creativity, patience, and growing quilting skills. The dynamic movement of the windmill design, achieved through precise Half-Square Triangles, creates a visually captivating piece that will be cherished in your home, serving as a cozy throw, a beautiful wall hanging, or making a thoughtful, handmade gift for someone special.
Throughout this journey, you’ve not only mastered the art of HST creation and block assembly but also gained confidence in various essential quilting techniques, from precise cutting and pressing to basting, quilting, and binding. Each stitch tells a story of dedication, attention to detail, and passion for the craft. Remember that every quilt is unique, reflecting the maker’s personal touch in fabric selection, color placement, and quilting design, making yours truly one-of-a-kind.
Don’t stop here! The world of quilting is vast and full of exciting patterns, innovative techniques, and endless creative possibilities to explore. Use the foundational skills you’ve honed with this Windmill Quilt as a stepping stone for future projects. Perhaps you’ll experiment with different HST variations, explore intricate block designs, or delve into more complex quilting motifs. The joy of quilting lies in the continuous learning and the satisfaction of creating something beautiful with your own hands.
We encourage you to share your beautiful creation with friends, family, or online quilting communities – your exquisite work is sure to inspire others to embark on their own quilting adventures. We hope this detailed tutorial has provided you with all the guidance and inspiration you needed to successfully create your own timeless Windmill Quilt. Happy quilting, and may your next project be just as rewarding!