
Craft Your Own Cozy: An Easy DIY Mug Cozy Sewing Tutorial
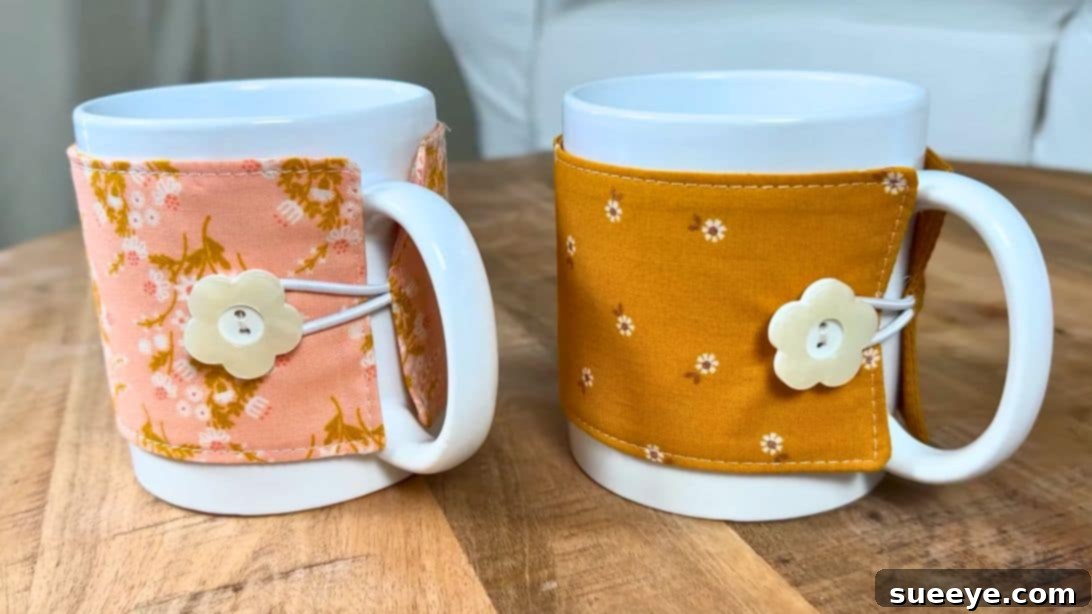
There’s immense satisfaction in creating something beautiful and functional with your own hands. As a seasoned crafter, I often find myself taking a delightful detour from larger, more intensive projects to indulge in smaller, quicker wins. These mini-projects are perfect for staying creative without the long-term commitment, and they often result in charming, practical items. One such project that recently captured my heart and needle is the adorable DIY mug cozy, a brilliant design I discovered through the wonderful tutorial by Stacey Lee Creative on YouTube. It’s a fantastic way to add a personal touch to your daily routine or create thoughtful gifts.
RELATED: Easy Sewing Tutorial & DIY Bowl Covers
This mug cozy isn’t just a pretty accessory; it’s incredibly functional. It’s perfect for those chilly mornings and evenings, not just in fall, but throughout any cold season. The beauty of this project lies in its versatility. By simply changing the fabric, you can transform its look to suit any occasion, holiday, or personal style. Imagine a festive print for Christmas, a pastel floral for spring, or a bold geometric pattern for a modern touch. The addition of a cute button, like the flower button Stacey Lee Creative uses, adds a delightful and unique touch that truly elevates the finished product.
If you’re someone who cherishes a warm cup of coffee, tea, or hot chocolate, this project is definitely for you. It keeps your beverage warm longer while protecting your hands from the heat of the mug. Beyond personal use, these handmade mug cozies make exceptional gifts for friends, family, teachers, or anyone special in your life, especially with the upcoming holiday season. They are thoughtful, practical, and show a genuine effort in crafting something unique. Ready to dive into this fun and rewarding sewing adventure? Continue reading and watch the video for the full instructions to create your very own custom mug cozy.
Why Every Mug Lover Needs a DIY Mug Cozy
While the aesthetic appeal of a mug cozy is undeniable, its practicality is what truly makes it a must-have accessory for any hot beverage enthusiast. Let’s explore the key benefits that make crafting your own mug cozy a worthwhile endeavor:
- Keeps Your Drinks Warmer, Longer: One of the primary advantages of a mug cozy is its insulating property. Just like a thermal sleeve, the fabric and fleece layers help to retain the heat of your coffee, tea, or hot cocoa, ensuring your drink stays enjoyably warm for an extended period. No more rushing to finish your beverage before it turns lukewarm!
- Protects Your Hands from Heat: Hot mugs can be uncomfortable, even painful, to hold. A cozy provides a protective barrier, allowing you to comfortably cradle your warm drink without singeing your fingers. It’s especially useful for mugs without handles or those thin-walled ceramic cups that transfer heat quickly.
- Adds a Touch of Personalized Style: This is where your creativity truly shines. A DIY mug cozy allows you to express your personality or match your decor. Choose fabrics that reflect your favorite colors, patterns, or themes. You can create seasonal cozies for holidays like Halloween or Christmas, or simply use designs that bring you joy every day.
- An Eco-Friendly Choice: Unlike disposable coffee sleeves, a fabric mug cozy is reusable, washable, and durable. By opting for a handmade cozy, you contribute to reducing waste, making it a small but meaningful step towards a more sustainable lifestyle.
- Perfect for Gifting: As mentioned, these cozies are fantastic gifts. They are thoughtful, personal, and suitable for almost anyone. Imagine pairing a handmade cozy with a gourmet tea bag or a special coffee blend – it creates an instant, heartwarming gift set for birthdays, housewarmings, or holidays.
- Beginner-Friendly Sewing Project: If you’re new to sewing or looking to brush up on basic skills, this project is ideal. It involves simple straight stitches, basic measurements, and manageable fabric pieces, making it a rewarding experience for crafters of all skill levels.
- Utilizes Fabric Scraps: For those with a stash of fabric remnants, this project is a great way to use up smaller pieces that might otherwise go to waste. It encourages mindful crafting and helps you declutter your fabric collection.
Essential Materials for Your DIY Mug Cozy
Gathering your materials is the first step towards bringing your mug cozy vision to life. The beauty of this project is that it requires only a few basic items, many of which you might already have in your sewing kit. Here’s what you’ll need, along with some tips for selection:
- 2 pieces of fabric strips: Choose two coordinating or contrasting fabrics to give your cozy a unique look. Cotton fabrics are generally easiest to work with for beginners, but you can explore flannel for extra warmth or even a thin canvas for durability. Aim for strips that are slightly larger than your mug’s dimensions initially, as you’ll trim them precisely.
- 1 piece of fusible fleece: This material is key for insulation and adding body to your cozy. Fusible fleece has a heat-activated adhesive on one side, making it easy to attach to your fabric with an iron. It provides both structure and softness, ensuring your cozy holds its shape and keeps your drink warm.
- Button: Select a button that complements your chosen fabrics and adds a decorative touch. This is your chance to personalize! A flower-shaped button, as seen in Stacey Lee Creative’s design, is adorable, but you can choose any shape, size, or color that catches your eye. Ensure it’s large enough to secure the elastic loop.
- Elastic: A small piece of elastic will create the loop closure for your cozy. This allows it to stretch and fit snugly around different mugs. A standard braided or knit elastic, about 1/4 inch wide, works perfectly.
- Mug: The mug you intend to use the cozy with (or gift it with) is crucial for accurate measurements. Different mugs have varying circumferences and heights, so measuring your specific mug ensures a perfect, custom fit.
- Measuring tape: Essential for taking precise measurements of your mug and fabric. A flexible tape measure is ideal for getting accurate circumference readings.
- Basic Sewing Supplies: Don’t forget your sewing machine (or needle and thread for hand sewing), fabric scissors or a rotary cutter, matching thread, an iron, and pins.
Step-by-Step Guide: Crafting Your Own Mug Cozy
Now that you have all your materials ready, let’s dive into the sewing process. Follow these detailed steps to create your charming DIY mug cozy:
Step 1: Precise Measuring and Cutting Your Fabric Pieces
Accuracy in this initial step is vital for a well-fitting cozy. First, take your chosen mug and carefully measure its circumference using your flexible measuring tape. This measurement will determine the initial length of your fabric strips. If your mug has a particularly chunky handle, you might want to slightly reduce this length, perhaps by about 1/4 inch, to ensure the cozy wraps snugly without excess bulk. Next, measure the height of your mug. From this height measurement, subtract 1/2 inch. This adjusted measurement will be the height of your fabric strips. The 1/2 inch reduction accounts for seam allowances at the top and bottom edges, ensuring the cozy sits perfectly below the rim and above the base of the mug, not interfering with drinking or the mug’s stability.
Once you have your fabric dimensions, cut your two fabric strips to these exact measurements. Then, cut your piece of fusible fleece. The fleece should be 1/2 inch shorter than both the length and the height measurements of your fabric pieces. This slightly smaller size prevents the fleece from getting caught in your seams, reducing bulk and making it easier to sew, especially when turning the cozy right side out.
Step 2: Fusing and Layering Your Fabric
With your pieces cut, it’s time to add structure and insulation. Take one of your fabric strips and place it right side down on your ironing board. Next, carefully position the fusible fleece on top of this fabric strip, ensuring the bumpy, adhesive side of the fleece is facing down onto the wrong side of your fabric. Using a warm iron (follow the manufacturer’s instructions for your specific fleece and fabric type), press firmly and evenly over the fleece. The heat will activate the adhesive, bonding the fleece securely to the fabric. Once fused, turn the fabric over and press on the other side to ensure a strong, complete bond.
Now, lay this fused fabric piece right side up. Take your second fabric strip and place it on top of the fused piece, ensuring their “right sides” (the decorative sides) are facing each other. Align all edges precisely. To keep everything in place for sewing, pin the two fabric pieces together along all four edges. Placing pins perpendicularly to the seam line can make them easier to remove as you sew.
Step 3: Preparing the Elastic Loop for Closure
The elastic loop is a crucial component for the cozy’s closure. Cut a 4-inch piece of elastic. Fold this elastic piece in half, aligning the two raw ends together. Now, carefully separate the two pinned fabric pieces slightly at one of the shorter ends. This will be the end where your button will eventually be. Place the folded elastic inside, positioning it right in the center of that short end, between the two fabric layers. The folded part of the elastic should be tucked securely inside, while the two raw ends should extend slightly beyond the fabric edge, ready to be caught firmly in your seam. Pin the elastic securely in place to ensure it doesn’t shift during sewing. This is a critical step to ensure a durable and functional closure.
Step 4: Sewing and Preparing for Turning
With your fabric layers pinned and the elastic secured, it’s time to sew! Using your sewing machine (or needle and thread), sew around the entire perimeter of your stacked fabric pieces. A standard seam allowance of 1/4 inch to 3/8 inch works well here. Remember to backstitch at the beginning and end of your seam to secure the stitches, especially where the elastic is placed, as this area will experience tension. Crucially, leave an opening of about 2-3 inches along one of the longer sides (or any side that is less conspicuous) that is NOT where the elastic is. This opening will be used to turn your cozy right side out.
Once you’ve sewn all around, carefully trim the corners of your cozy. Cut diagonally across each corner, getting close to the stitch line but being careful not to snip through your stitches. This step helps to reduce bulk in the corners, ensuring they lie flat and appear crisp once turned. Now, reach into the opening you left and gently pull the entire cozy right side out. Take your time with this step, especially when turning the corners. You can use a point turner, a chopstick, or a blunt pencil to carefully push out the corners from the inside, creating sharp, defined points.
Step 5: Closing the Opening with a Neat Finish
With your cozy turned right side out and the corners nicely shaped, you’ll now address the opening you left. Gently fold the raw edges of the opening inwards, aligning them perfectly with the existing seam line. Press this folded opening with an iron to create a crisp, flat edge. This makes the next step much easier and ensures a professional finish. Once pressed, you have two primary options for closing the opening:
- Machine Topstitching: This is the quickest and often most durable method. Sew a straight stitch very close to the edge of the entire cozy, going all the way around. This not only closes the opening but also creates a clean, decorative topstitch around the perimeter, giving your cozy a finished look.
- Hand Stitching (Ladder Stitch): For an invisible finish, you can use a ladder stitch (also known as a blind stitch). This involves hand sewing the opening shut with tiny, hidden stitches, making the seam virtually disappear. This method is more time-consuming but results in a very polished look.
Choose the method that you prefer and that best suits your sewing skills and desired aesthetic.
Step 6: Attaching the Button for a Perfect Fit
This final step ensures your mug cozy fits perfectly. Wrap the finished cozy around your intended mug, ensuring it sits flat and comfortably. Take the elastic loop and gently pull it taut across the cozy, making sure it’s firm enough to hold the cozy in place but not so tight that it strains the fabric or makes it difficult to attach. While holding the elastic in this position, use a fabric marker or a pin to mark the exact spot on the cozy where the button needs to be sewn. This custom fitting ensures your cozy will be perfectly snug.
Once marked, take the cozy off the mug and securely sew your chosen button onto the marked spot. Use strong thread and make several passes through the buttonholes and fabric to ensure it is firmly attached and can withstand repeated use. A well-attached button is key to the longevity and functionality of your cozy. With the button sewn, your DIY mug cozy is complete!
Your Beautiful New DIY Mug Cozy Awaits!
Congratulations! You’ve successfully created a charming and practical DIY mug cozy. This project proves that even small sewing endeavors can yield incredibly satisfying results. Not only will your new cozy keep your favorite beverages warm and your hands protected, but it also adds a unique touch of handmade beauty to your daily routine.
Don’t be afraid to experiment with different fabrics, button styles, or even add embellishments like embroidery or appliqué to truly make each cozy your own. Imagine a whole collection of cozies, each tailored to a different season or recipient. They are perfect for last-minute gifts, stocking stuffers, or simply as a thoughtful gesture to show someone you care. This project is a testament to the joy of crafting, transforming simple materials into something both functional and delightful.
So, go ahead, brew yourself a warm drink, slip on your beautiful new cozy, and savor the comfort of your handmade creation. We hope this detailed guide has inspired you to pick up your needle and thread. Happy sewing!