
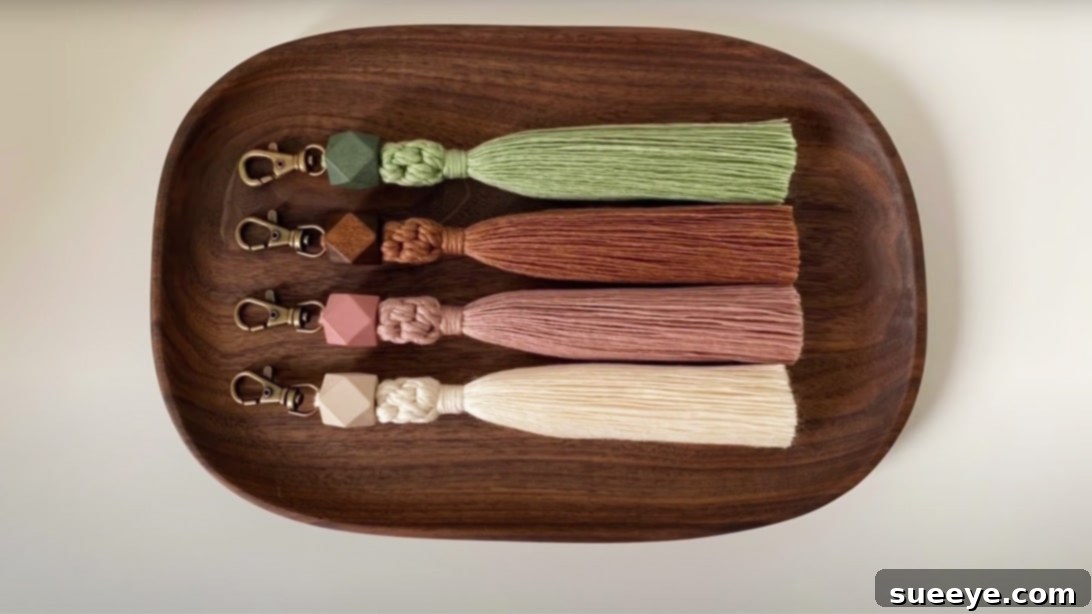
Mastering Macrame: Your Guide to Crafting Beautiful Tassel Keychains
Have you ever stumbled upon a charming handmade item, hesitated, and then regretted not buying it? That’s precisely what happened to me recently at the mall. I was captivated by some exquisite macrame tassel keychains, but for some reason, I walked away empty-handed. The regret was instant and gnawed at me all day, especially since the mall is quite a trek from my home. Rather than dwelling on it, I turned to the internet with a thought: “Why not make one myself?” This led me down a delightful rabbit hole, where I discovered LET BE’s fantastic YouTube tutorial. Their creation was not just beautiful; it surpassed anything I had seen in stores, sparking my immediate desire to learn.
To my pleasant surprise, the process of crafting these keychains is far simpler than it appears. A quick rummage through my trusty DIY craft kit revealed that I already possessed all the necessary materials. It was a perfect match, a sign that this project was meant to be. This comprehensive guide will walk you through each step, helping you create your own stunning macrame tassel keychain, whether for personal use, a thoughtful gift, or even to start a small crafting venture. Get ready to unleash your inner artisan and create something truly unique and beautiful!
Essential Materials for Your Macrame Tassel Keychain Project
Before diving into the creative process, gathering all your materials is crucial. Having everything at hand will make your crafting experience smooth and enjoyable. Here’s what you’ll need to create your bespoke macrame tassel keychain:
- Twisted Cotton Rope (4mm): This is the backbone of your macrame keychain. The 4mm thickness is ideal for creating a substantial yet elegant tassel. Cotton rope is soft, easy to work with, and produces beautiful, fluffy fringes. Look for natural, undyed cotton for a classic look, or choose vibrant colors to personalize your creation.
- Keychain (1.4cm x 4cm): A sturdy metal keychain ring or clasp will ensure your creation is durable and functional. This standard size is perfect for holding your keys securely and provides a good base for your macrame work.
- Wood Bead (2cm x 2cm): A natural wood bead adds a lovely organic touch and serves as a central decorative element. Feel free to experiment with different sizes, shapes, or even painted beads to give your keychain a unique flair.
- Tape Measure: Precision is key in macrame. A tape measure ensures your cords are cut to the exact length, which is vital for achieving a symmetrical and professional finish in your knots and tassel.
- Sharp Scissors: You’ll need good quality, sharp scissors for clean and precise cuts, especially when trimming the tassel for a crisp, even edge. Dull scissors can fray your rope and make the finishing process difficult.
- Needle: A tapestry needle or a large-eye needle will be essential for threading cords through the wood bead and for securing certain knots discreetly. Its blunt tip helps prevent snagging.
- Fur Brush: This specialized brush is used to untwist, unravel, and fluff the cotton rope strands, creating that iconic soft, full, and luxurious tassel effect. A pet brush with metal bristles can also work wonders.
- Comb: A fine-tooth comb helps to further straighten and separate the individual threads of your tassel after brushing, ensuring it looks smooth, polished, and free of tangles.
- Flat Iron: Yes, a hair flat iron! This unexpected tool is incredibly effective for achieving perfectly straight and sleek tassel fringes. It gives your keychain a professional, finished appearance that truly elevates its handmade quality.
Understanding the Macrame Knots You’ll Master
This macrame keychain project utilizes a few fundamental knots that are surprisingly easy for beginners to learn and master. Familiarizing yourself with them beforehand will boost your confidence and help you understand the construction of your keychain:
- Lark’s Head Knot: This is a foundational knot often used to attach cords to a ring, dowel, or in our case, the keychain itself. It creates a neat, secure loop and two working ends from a single piece of cord. It’s known for its strength and clean appearance.
- Overhand Knot: One of the most basic and widely used knots, the overhand knot is simple yet effective. In this project, it’s used to secure strands together, preventing them from unraveling and providing structural integrity at key points.
- Wrapping Knot (or Gathering Knot): This decorative and functional knot is used to neatly bundle a group of cords together, forming the ‘neck’ or ‘head’ of your tassel. It creates a clean, cylindrical wrap that holds all the tassel strands in place.
- Crown Knot: While not a traditional macrame knot with a specific name like “square knot,” the instructions describe forming a distinctive crown-like pattern by crossing and folding cords. This knot is primarily decorative, adding a lovely texture and volume, and provides structural integrity by holding multiple cord segments in a compact form.
Step-by-Step Guide: Crafting Your Macrame Tassel Keychain
Let’s begin the exciting journey of creating your very own macrame tassel keychain. Follow these detailed instructions carefully for the best results, paying attention to tension and neatness at each stage.
Phase 1: Preparing Your Cords
To start, you’ll need to prepare your cotton rope. Using your tape measure and sharp scissors, cut five individual cords, each precisely 60 cm (approximately 23.6 inches) in length. This consistent length is vital for maintaining symmetry throughout your project and ensuring a well-proportioned keychain. These five cords will form the main body, decorative knots, and the flowing tassel of your keychain.
Phase 2: Attaching the Wood Bead and Initiating the Decorative Knots
- Prepare the First Cord for Attachment: Take one of your 60cm cords. Gently untwist this cord into its three individual thinner strands. You’ll be using these more delicate strands for a refined connection through the wood bead.
- Attach to Keychain with Lark’s Head Knot: Fold the untwisted cord in half, creating a loop. Thread this loop through your metal keychain ring. Then, bring the two tail strands of the cord through the loop you just created and pull them tightly. This forms a secure Lark’s Head Knot, firmly attaching your first cord to the keychain.
- Thread the Wood Bead: Next, thread both of the tail strands from the Lark’s Head knot onto your needle. Carefully push the needle and cords through the center hole of your wood bead. Pull the strands through until the bead rests snugly against the Lark’s Head knot on the keychain, positioned directly below the ring.
- Form the First Crown Knot Base: Now, take two *new* 60cm cords. Cross these two cords precisely at their very center point, creating an ‘X’ shape. Ensure the crossing point is neat and tight.
- Begin the Crown Knot’s First Folds: Keeping the center point stable with one hand, take the top-left cord and fold it clockwise, laying it over the top-right cord. Then, take the bottom-right cord and fold it clockwise, laying it over the bottom-left cord. You’re essentially creating two overlapping loops.
- Complete the Crown Knot: Carefully thread the end of the top-right cord through the loop created by the bottom-left cord. Simultaneously, thread the end of the bottom-left cord through the loop created by the top-right cord. Gently pull all four cord tails away from each other, adjusting the knot as you go. The goal is to create a tight, symmetrical, and crown-like knot that sits neatly just below your wood bead.
Phase 3: Connecting and Securing Your Knots for a Fuller Look
- Secure the Crown Knot to the Keychain Assembly: To ensure the crown knot is firmly attached and doesn’t slide, use a separate, thin piece of thread (about 15-20cm) and your needle. Pass the needle and thread through the very center of the crown knot, then carefully loop it around the two original strands emerging from the wood bead. Pull the thread tightly to cinch the crown knot securely against the base of the wood bead. Remove the temporary thread.
- Reinforce with an Overhand Knot: Take the two main strands emerging from the bottom of the crown knot. Pull them together firmly and tie a simple Overhand Knot directly beneath the crown knot. This adds another layer of security and defines the top of your tassel. Crucially, do *not* cut these two strands; leaving them long will contribute significantly to a fuller, more luxurious tassel later on.
- Repeat Crown Knots for Added Volume and Texture: To create a more substantial and visually interesting element above your tassel, you will repeat the crown knot process two more times using your remaining cords.
- Second Crown Knot: Take two more of your 60cm cords. Cross them at the center as before. This time, start by folding them *clockwise* as you did for the very first crown knot (Step 5). Adjust and secure it tightly, ensuring it sits neatly just below the previous overhand knot.
- Third Crown Knot (Alternating Direction): For this final crown knot, take your very last 60cm cord. Integrate it into the existing cords you are working with. Cross the cords as usual, but for this knot, fold them *counter-clockwise*. This alternating direction adds an intriguing visual texture and an artisanal touch to your piece. Adjust and secure it tightly, creating a robust and attractive base for your tassel.
Phase 4: Shaping the Tassel and Applying Finishing Touches
Now comes the most satisfying part: transforming the cords into a beautiful, flowing tassel!
- The Wrapping Knot – Creating the Tassel’s Neck: Gather all the remaining cord ends (including the two strands you left long from step 8) neatly and tightly together. Take a separate short piece of cord (about 20-30cm long) to create a neat wrapping knot. Form a small loop with this short piece, lay it over your gathered cords with the loop pointing downwards. Start wrapping the tail end of the short cord tightly around all the gathered cords, beginning from the top. Once you’ve wrapped about 1.5-2 cm (approximately 0.6-0.8 inches), thread the working tail end through the bottom loop you initially created. Then, pull the top end of the loop firmly until the bottom loop and the threaded tail are pulled up inside the wrapped section, creating a neat, hidden knot. Trim any excess ends of the wrapping cord close to the bundle. This wrapping knot forms the distinctive ‘neck’ of your tassel.
- Untwist and Fluff the Tassel: Now, it’s time to create the beautiful, soft, and full tassel. Take each individual cord that makes up the tassel and carefully untwist it into its finer, single strands. This might require a little patience, but the result is absolutely worth the effort for that classic macrame look. Once all cords are untwisted, use your fur brush to gently brush out the threads. This separates and fluffs them, giving your tassel a wonderfully full and even texture.
- Measure and Trim the Tassel: Using your tape measure, ensure all the brushed-out threads are of a consistent length. Neatly cut the threads to approximately 15 cm (about 6 inches) from the base of the wrapping knot. Aim for a clean, crisp, and straight line across the bottom of the tassel to achieve a polished finish.
- Straighten and Comb for Professionalism: For a truly professional and sleek finish, take your flat iron (set on a low to medium heat). Carefully straighten the individual threads of the tassel by running the flat iron over small sections. This will make them smooth and uniform. After flat-ironing, use your fine-tooth comb to further straighten and separate any remaining tangled threads, ensuring a beautifully smooth and flowing tassel.
- Final Trim for Perfection: Hold your completed keychain up by the ring and visually inspect the tassel from all angles. Trim any tiny stray or uneven cords one last time to achieve a perfectly symmetrical, uniform, and polished look. Your macrame tassel keychain is now complete!
Tips for a Perfect Macrame Tassel Keychain
- Practice Makes Perfect: Macrame is a skill that improves with practice. Don’t get discouraged if your first attempt isn’t absolutely flawless. Each keychain you make will be better than the last!
- Consistent Tension: Maintaining even tension on your cords when tying knots is paramount for a neat, symmetrical, and professional appearance. Uneven tension can lead to a lopsided or loose structure.
- Quality Materials: Investing in good quality cotton rope will significantly impact the final look and feel of your keychain. Natural cotton not only looks beautiful but is also soft and pleasant to touch.
- Personalization is Key: This project is a fantastic canvas for your creativity! Experiment with different colored ropes, types of beads (wooden, ceramic, glass), or even add a small charm to make your keychain truly unique and reflective of your style.
- Secure All Knots: Always pull your knots tightly. A loose knot can unravel over time, compromising the durability and aesthetic of your keychain. Give each knot a gentle tug to ensure it’s firm.
- Work on a Clean Surface: Macrame projects can accumulate dust or fuzz, especially with cotton rope. Work on a clean, flat surface to keep your materials pristine.
The Joy of Crafting Your Own Macrame Keychain
There’s a unique satisfaction that comes from creating something beautiful and functional with your own hands. Beyond the practical use of a keychain, this DIY project offers a myriad of benefits:
- Personalized Style: You get to choose the colors, beads, and even the length of your tassel, ensuring your keychain perfectly matches your aesthetic or that of the recipient if it’s a gift. It’s an expression of your individuality.
- Thoughtful and Unique Gifts: Handmade macrame keychains make exquisite, heartfelt, and memorable gifts for friends, family, or colleagues. A personalized, handcrafted item shows a level of care and effort that store-bought items simply cannot replicate.
- Mindful Activity: The repetitive, rhythmic motion of macrame knotting can be incredibly therapeutic and meditative. It’s a wonderful way to unwind, reduce stress, and focus your mind away from daily distractions.
- Cost-Effective Creativity: Once you have a basic set of tools (scissors, tape measure, needle), the cost of materials for multiple keychains is often significantly less than buying a single handmade item from a boutique.
- Skill Development: You’ll learn fundamental macrame techniques and knots that can be applied to a myriad of other, more complex projects, from stylish wall hangings and plant hangers to decorative bags and jewelry. It’s a gateway to a broader world of fiber art!
- Sustainable Crafting: Choosing natural cotton rope and wood beads makes this a relatively eco-friendly craft, especially when compared to plastic alternatives.
Unleash Your Creativity: Your Macrame Journey Begins Here!
From a momentary pang of regret at the mall to the triumphant completion of a beautiful, handcrafted item, the journey of making your own macrame tassel keychain is incredibly rewarding. This project is not just about tying knots; it’s about connecting with a traditional craft, expressing your creativity, and creating something tangible that you can use daily or gift with immense pride. It’s a testament to the power of DIY and the joy of bringing an idea to life with your own hands.
Whether you’re a seasoned crafter looking for a quick and satisfying project or just starting your DIY adventures, this macrame keychain tutorial provides a clear, engaging, and detailed path to success. So, gather your materials, follow these steps with enthusiasm, and prepare to be amazed at what you can create. We wholeheartedly encourage you to share your finished keychains with us – seeing your unique creations is always a source of great inspiration! Happy knotting and crafting!