
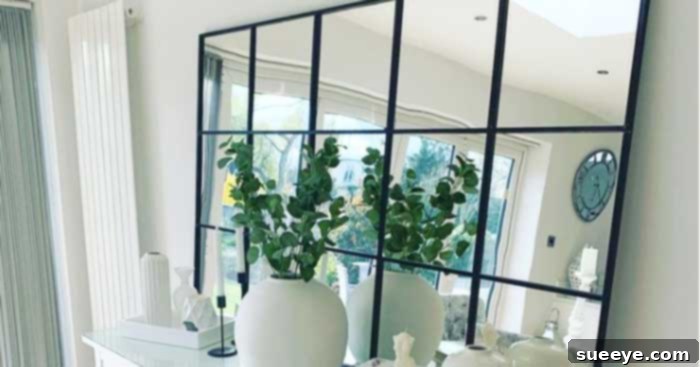
Have you ever found yourself scrolling through beautiful home decor magazines or wandering the aisles of high-end stores like Anthropologie or Urban Outfitters, admiring their magnificent, oversized mirrors? These mirrors, often featuring elegant grid patterns or sleek, minimalist frames, have a magical way of transforming a room, making it feel larger, brighter, and infinitely more stylish. They serve as more than just reflective surfaces; they are true statement pieces, focal points that elevate the entire aesthetic of a space. However, this level of designer charm often comes with a hefty price tag, making these coveted items seem like an unattainable luxury for many.
For a long time, I shared this dilemma. The hunt for an expansive, yet affordable, mirror for my room felt endless. Every mirror that caught my eye online or in a boutique store carried a price that was simply out of reach. That was until I discovered an ingenious solution that not only promised to deliver the desired aesthetic but also fit perfectly within a reasonable budget. My search for the perfect blend of style and affordability finally ended when I stumbled upon this inspiring video by Designed by Smashley. This fantastic DIY project wasn’t just a solution; it was a revelation! The result in my own room has been nothing short of spectacular, exceeding all my expectations and proving that high-end style can absolutely be achieved through a bit of creativity and DIY effort.
Imagine creating a magnificent, custom-sized grid mirror that looks like it walked straight out of a designer catalog, but for a fraction of the cost. This project is surprisingly accessible and yields a truly professional-looking piece of furniture. It’s perfect for adding a touch of modern elegance to bedrooms, living rooms, entryways, or even a home gym. Let’s gather our tools and materials and embark on this rewarding journey to craft your very own statement mirror.
Essential Materials for Your DIY Grid Mirror Project:
To embark on this exciting DIY venture and create your stunning large grid mirror, you’ll need to gather a few essential tools and materials. Many of these items might already be in your workshop, but if not, they are readily available at most hardware stores. Remember, precise measurements are key to a professional finish, so ensure your measuring tools are accurate. For exact dimensions of the wooden components and more detailed guidance, always refer to the description box of Designed by Smashley’s original YouTube video.
- Plywood: This forms the sturdy base of your mirror. Choose a suitable thickness for stability and ensure it’s a good grade for painting or finishing.
- Miter Saw: Essential for making precise, clean cuts on your wood slats, ensuring tight joints and a professional grid appearance.
- Measuring Tape: Accuracy is paramount! A reliable measuring tape will be your best friend for every step of this project.
- Ruler: For drawing straight lines and marking precise measurements on your wood.
- Pencil: For marking cut lines and drilling points.
- Screws: To reinforce the plywood base, creating a strong foundation for your mirror.
- Drill: Necessary for pre-drilling holes for screws and facilitating easier assembly.
- Sander or Sandpaper: Crucial for smoothing rough edges and achieving a flawless finish on your wood slats before painting.
- Bar Clamps: Indispensable for holding wood pieces together securely while glue dries, ensuring strong, even bonds.
- Bungee Cords: An excellent alternative or addition to bar clamps for applying pressure and holding components during drying.
- Suction Cups: Extremely helpful for safely handling and positioning the mirror tiles during installation, reducing the risk of smudges or breakage.
- Caulking Gun: Used for applying wood glue and mirror adhesive neatly and consistently.
- Staple or Nail Gun: For quickly and securely fastening wood slats to the plywood base. A brad nailer is ideal for this.
- 5/8′ Brad Nails: The perfect size for reinforcing the wood slats without splitting the wood.
- Wood Glue (e.g., Gorilla Wood Glue): A strong adhesive is vital for creating durable joints between wood pieces.
- Spackling Compound: Used to fill nail holes and any minor imperfections, creating a smooth surface ready for paint.
- Safety Gear: Don’t forget safety glasses, gloves, and a dust mask when cutting, sanding, and painting!
Remember to consult the original video’s description for exact dimensions and specific product recommendations to ensure your project’s success.
Step-by-Step Instructions: Crafting Your Custom Grid Mirror
Step One: Building the Robust Plywood Foundation
The first and arguably most critical step in constructing your custom grid mirror is preparing a solid and stable foundation. Begin by connecting two pieces of 4×8 plywood planks. The size of your plywood will dictate the overall dimensions of your mirror, so ensure it matches your desired final look. Lay the two planks side by side on a flat, level surface, carefully aligning their edges. Apply a generous, even layer of high-quality wood glue along the seam where the two pieces will meet. Wood glue, like Gorilla Wood Glue, is excellent for creating a bond that’s often stronger than the wood itself once fully cured.
Once the glue is applied, firmly press the two plywood pieces together, ensuring they are perfectly flush. To hold them securely in place while the glue sets, utilize bar clamps across the seam, applying even pressure along the entire length. For added reinforcement and to prevent any shifting, you can also wrap bungee cords tightly around the entire assembly. This combination of clamping and bungee cords ensures a strong, enduring bond. Allow the glue ample time to dry completely, typically several hours or overnight, as per the manufacturer’s instructions. A well-cured foundation is essential for the longevity and stability of your beautiful new mirror.
Image credit: Designed by Smashley via YouTube video.
Step Two: Precisely Crafting the Grid with Wood Slats
With your plywood base firmly set, it’s time to bring the distinctive grid pattern to life. This step requires precision and careful measurement. Begin by attaching your horizontal wood slats to the plywood using a strong adhesive, such as Gorilla Wood Glue. Before permanently affixing them, it’s highly recommended to dry-fit your mirror pieces into the proposed sections to accurately measure out the exact distance required for each slat. This ensures that every mirror tile will fit perfectly within its designated square.
Apply wood glue to the back of each horizontal slat and carefully position it onto the plywood. Use a ruler or measuring tape to ensure consistent spacing between each slat. Once the horizontal slats are in place, repeat the entire process with the vertical slats. This creates the interlocking grid structure. As you work, continuously check that your slats are perfectly straight and perpendicular to each other to form clean, square openings for the mirrors. After the glue has had some time to set (but not necessarily fully cure), go back and reinforce all the slats with 5/8-inch brad nails using your staple or nail gun. These nails provide extra structural integrity, ensuring your grid remains strong and durable for years to come. Be mindful of nail placement to avoid splitting the wood, aiming for the center of the slats.
Step Three: Achieving a Flawless Finish – Spackling, Sanding, and Painting
Now that your grid structure is complete, the focus shifts to creating a smooth, professional finish that truly elevates the mirror’s appearance. The first task is to meticulously spackle over all the nail holes you created in the previous step. Apply a small amount of spackling compound to each hole, ensuring it’s slightly mounded. Allow the spackle to dry completely according to the product’s instructions, which typically takes a few hours. Once dry, take your sander or sandpaper and carefully sand down the spackled areas until they are perfectly flush with the wood surface. This step is crucial for achieving an even, seamless look; any bumps or imperfections will be visible through the paint.
After all the spackling has been smoothed, sand the entire surface of the wood slats with fine-grit sandpaper. This will create a perfectly smooth canvas, ideal for paint adhesion and a superior finish. Wipe away all dust thoroughly. Now comes the exciting part: spray painting the slats with your desired color. For best results, apply a coat of primer first, especially if you’re painting a dark wood light, or if you want enhanced durability. Then, apply several thin, even coats of spray paint, allowing each coat to dry completely before applying the next. This layered approach prevents drips and ensures a smooth, durable, and vibrant finish. Choose a color that complements your room’s existing decor, whether it’s a classic black, a crisp white, a trendy gold, or a bold accent color. The transformation will be remarkable!
Image credit: Designed by Smashley via YouTube video.
Step Four: Carefully Installing the Mirror Tiles
The final step brings your grid mirror to life: installing the mirror tiles. This requires a gentle touch and careful attention to detail. Before you begin, ensure all your mirror pieces are perfectly clean and free of dust, smudges, or fingerprints. Using high-quality mirror adhesive (Gorilla Glue is mentioned in the original, but ensure it’s mirror-safe or use a dedicated mirror adhesive), apply a thin, even bead to the back of each mirror tile. Avoid applying too much adhesive, as excess can squeeze out and be difficult to clean.
Carefully place each mirror tile into its designated square within the painted grid. Suction cups are invaluable here for safely handling the mirrors and guiding them precisely into position without touching the reflective surface directly. Press each mirror firmly but gently into place to ensure good contact with the adhesive. Work systematically, ensuring each mirror is perfectly aligned within its square and flush with the surrounding wood slats. Once all the mirrors are installed, allow the adhesive to cure completely, which might take 24-72 hours depending on the product. During this time, avoid moving the mirror to ensure the mirrors bond securely. The video specifically uses 1-inch by 1-inch mirror tiles, but you can adapt this based on your preferred grid size and mirror availability.
Embrace Designer Style with Your DIY Grid Mirror
And there you have it! This comprehensive DIY guide empowers you to create a truly magnificent, modern, and chic grid mirror for your home. This project delivers a high-impact aesthetic at a fraction of the cost you would incur buying a similar piece from high-end retail stores. Beyond the significant financial savings, there’s immense satisfaction in knowing you’ve crafted a beautiful, custom piece of decor with your own hands.
Why Choose This DIY Grid Mirror?
- Unbeatable Value: Recreate the coveted Anthropologie or Urban Outfitters look for a mere fraction of the price. The cost of materials is significantly less than a pre-made designer mirror.
- Complete Customization: You have full control over the size, the number and spacing of grid sections, and the color of the frame. Match it perfectly to your existing decor or use it as an opportunity to introduce a fresh accent.
- Enhanced Space: Large mirrors are renowned for making rooms feel more expansive and brighter by reflecting light and creating an illusion of depth. This mirror will visually open up any space.
- A Statement Piece: Far from being just a functional item, this grid mirror acts as a stunning piece of art, commanding attention and adding a sophisticated focal point to any room.
- Sense of Accomplishment: There’s a unique pride that comes with creating something beautiful and functional for your home. This project is rewarding from start to finish.
Tips for Success and Longevity:
- Measure Twice, Cut Once: Precision is your greatest ally in this project. Double-check all measurements before cutting to ensure a seamless grid.
- Safety First: Always wear appropriate safety gear, including eye protection, gloves, and a dust mask, especially when cutting wood or handling mirrors.
- Quality Materials: Investing in good quality plywood, strong wood glue, and suitable paint will greatly impact the final look and durability of your mirror.
- Patience is Key: Allow adequate drying time for glue, spackle, and paint. Rushing these steps can compromise the integrity and finish of your project.
- Consider Your Placement: Think about where your mirror will reside. Will it lean against a wall for a casual, modern look, or will you need to add hanging hardware for a more permanent wall-mounted solution?
This DIY grid mirror is more than just a home decor project; it’s an opportunity to infuse your personal style into your living space and enjoy the satisfaction of a job well done. So, gather your materials, follow these steps, and get ready to admire your stunning, custom-built masterpiece. Your friends and family will be amazed, and your wallet will thank you!