
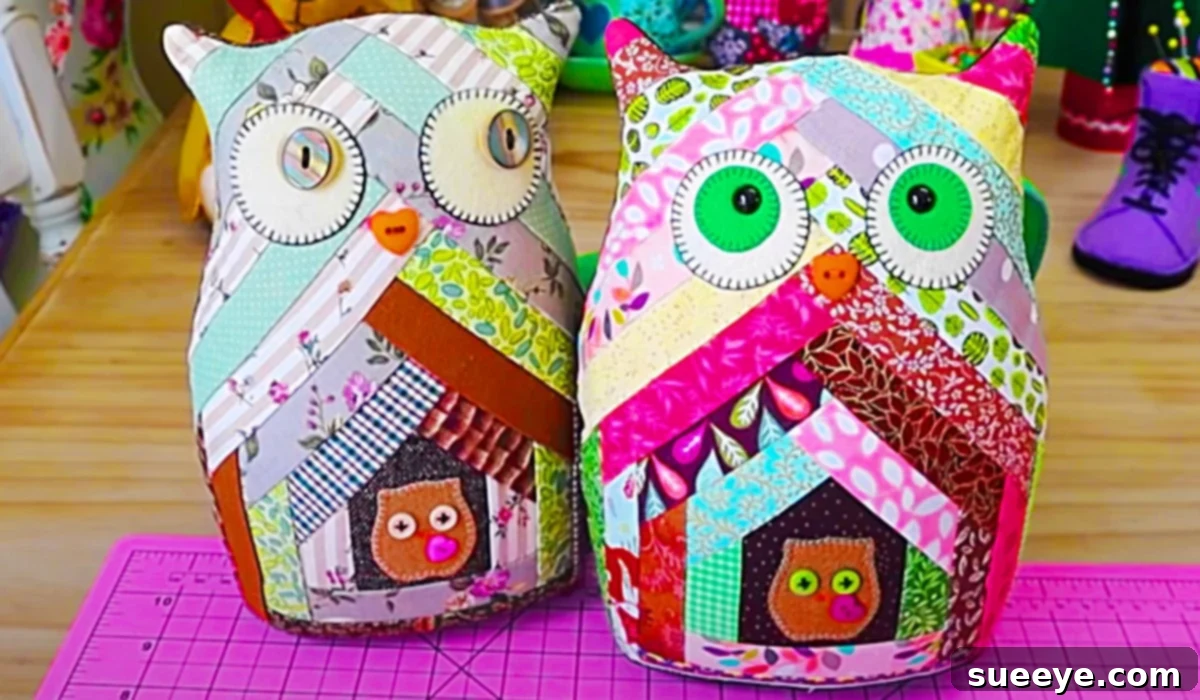
How To Create a Charming Patchwork Owl: Your Ultimate DIY Guide with a Free Pattern
There’s something uniquely special about a handmade gift. It carries the warmth of your effort, the thoughtfulness of your design, and a personal touch that store-bought items simply can’t replicate. If you’re searching for a heartwarming project that combines creativity with a dash of charm, look no further. This delightful patchwork owl tutorial offers everything you need to craft a truly memorable keepsake or a decorative accent for your home.
Inspired by the excellent video tutorial from Pay It Forward on YouTube, this project caught my eye for its simplicity, charm, and the wonderful benefit of a free pattern. Whether you’re a seasoned crafter or just starting your sewing journey, this guide, combined with the comprehensive video, will walk you through each step, making the process enjoyable and the outcome beautiful. Imagine the joy of presenting a unique, handcrafted owl to a loved one, or simply adding a touch of whimsical handmade decor to your own space.
Why Choose a Patchwork Owl Project?
Owls have long captivated our imaginations with their wise, mysterious, and often adorable presence. They are popular motifs in home decor, fashion, and toys, symbolizing wisdom, intuition, and a connection to nature. A patchwork owl project takes this beloved creature and infuses it with personalized artistry through fabric selection and stitching. Patchwork, a traditional craft, allows you to utilize an array of fabric scraps, creating a unique tapestry of colors and patterns that makes each owl one-of-a-kind. It’s an excellent way to use up leftover fabric pieces, giving them new life in a meaningful creation.
Beyond being an enchanting gift, crafting a patchwork owl is a deeply rewarding experience. It’s a fantastic way to develop your sewing skills, from cutting and piecing fabric to intricate embellishment. The process itself can be therapeutic, offering a mindful escape as you focus on each stitch. The end result is not just a toy or a decoration, but a tangible representation of your creativity and dedication. This specific project is designed to be accessible, providing a clear path to success even for those new to sewing, thanks to the free pattern and detailed video instructions.
Essential Materials for Your Patchwork Owl Creation:
Before you embark on this creative adventure, gather these fundamental materials. Having everything ready will ensure a smooth and enjoyable crafting experience:
- Free Owl Pattern: This is your blueprint! Make sure to download and print it accurately. A local print shop can often print large patterns for a minimal fee if you don’t have a home printer.
- Assorted Felt Pieces: Ideal for adding textural elements like wings, beak, or even decorative accents. Choose colors that complement your cotton prints. Felt is easy to cut and doesn’t fray, making it perfect for appliqué.
- Assorted Cotton Prints: This is where the “patchwork” magic happens! Gather a variety of cotton fabrics – scraps from previous projects, fat quarters, or new prints that catch your eye. Mix and match patterns, colors, and scales to give your owl a truly unique and vibrant personality.
- Medium Weight Heat and Bond Paper: This iron-on adhesive is crucial for securing your felt or smaller fabric pieces without stitching, especially for appliqué details. It adds structure and makes attaching pieces much easier.
- Medium Weight Fusible Woven Interfacing: Applied to the back of your main fabric pieces, interfacing provides stability and body to your owl, helping it hold its shape and preventing the fabric from stretching during stuffing.
- Buttons (of your choice): These will serve as the charming eyes of your owl. Select buttons that reflect the character you envision for your owl – large, small, shiny, matte, black, or colorful. This is an excellent opportunity to add a personalized touch.
- Embroidery Floss: For adding details like eyebrows, eyelashes, a mouth, or decorative stitching on the wings. Choose colors that contrast or complement your main fabrics for a striking effect.
- Polyester Filling: This soft, resilient stuffing will give your owl its cuddly, three-dimensional form. Ensure you have enough to stuff your owl firmly but evenly, avoiding lumps.
- General Sewing Requirements: This includes essential tools like a sewing machine, coordinating thread, sharp fabric scissors, pins, an iron and ironing board, a seam ripper (just in case!), and a hand sewing needle for closing the final opening.
Step-by-Step Guide: Crafting Your Adorable Patchwork Owl
Creating your patchwork owl is a rewarding process broken down into manageable steps. Following these directions, coupled with the visual guidance from the Pay It Forward video tutorial on YouTube, will lead you to a charming finished product.
Phase 1: Preparation and Pattern Work
Step 1: Download and Print Your Free Pattern. Your journey begins by accessing the free pattern. Download it and print it at 100% scale to ensure the owl’s dimensions are correct. If you don’t have a printer at home, a local copy or mail store can usually print it for less than a dollar, making it easily accessible for everyone.
Step 2: Cut Your Fabric Pieces. Once your pattern is printed, carefully cut out all the paper pattern pieces. Lay them onto your chosen assorted cotton prints and felt pieces. For the main body, wings, and other structural parts, trace the pattern onto your fabric and cut accurately. For patchwork elements, you’ll be cutting smaller squares or strips of various cotton prints, which will then be pieced together to form the main body sections. Remember to transfer any markings from the pattern, such as dart lines or opening indicators.
Step 3: Prepare with Heat and Bond & Interfacing. Apply the medium-weight Heat and Bond paper to the back of any felt pieces or small appliqué fabric pieces that you plan to iron on. This will help them adhere smoothly without needing extensive stitching. For the main cotton body pieces that need structure, iron on the medium-weight fusible woven interfacing to their wrong sides. This adds stability and durability, which is especially important for stuffed items.
Phase 2: Assembly and Finishing Touches
Step 4: Sew the Main Owl Body. Take your prepared main cotton fabric pieces for the owl’s body. If you’re creating a patchwork design for the body, first sew your smaller fabric squares or strips together to form the larger body sections, pressing seams open. Once your main body panels are ready, place two body pieces right sides together. Pin them securely around the edges. Using your sewing machine, stitch around the perimeter, remembering to leave an unstitched opening of about 2-3 inches along one straight edge (usually the bottom) for turning and stuffing. Use a standard seam allowance, as indicated in the pattern.
Step 5: Attach Facial Features and Embellishments. Before turning the owl right side out, you might choose to add some facial features to one of the main body pieces (the front). Using your Heat and Bond, iron on felt pieces for the beak and wing details. Once the owl is turned right side out and lightly stuffed (or even before turning if you prefer), you can hand-sew the buttons for the eyes securely onto the face. Use embroidery floss to add personality – stitch eyebrows, eyelashes, or even a small smile. This step allows for significant personalization, giving your owl its unique expression.
Step 6: Turn, Stuff, and Close. Carefully trim the seam allowances, especially around curves, and clip any curves to ensure a smooth finish when turned. Turn the owl right side out through the opening you left. Gently push out all seams to create a neat shape. Now, it’s time to stuff! Begin filling your owl with polyester fiberfill, starting with the extremities (ears, corners) and gradually working your way to the center. Stuff firmly and evenly to avoid lumps, ensuring the owl maintains a good shape. Once your owl is plump and soft, use a needle and coordinating thread to hand-stitch the opening closed using an invisible stitch, such as a ladder stitch, for a clean, professional finish.
Tips for a Perfect Patchwork Owl:
- Fabric Harmony: When selecting your assorted cotton prints, try to choose fabrics that share a common color palette or theme. This creates a cohesive and visually appealing patchwork design. Don’t be afraid to mix bold patterns with subtle ones for interest.
- Precision is Key: In patchwork and sewing, accurate cutting and consistent seam allowances make a huge difference in the final outcome. Take your time with these steps to ensure all your pieces fit together perfectly.
- Even Stuffing: For a professional-looking stuffed owl, ensure the polyester filling is distributed evenly. Use small handfuls and gently push the stuffing into all corners and curves. Avoid overstuffing, which can distort the shape, or understuffing, which leaves the owl flimsy.
- Personalize, Personalize, Personalize! This is your chance to make the owl truly unique. Experiment with different button styles for eyes, add ribbons or bows, embroider an initial, or even sew on small fabric embellishments like tiny flowers or stars.
- Press as You Go: Ironing your seams flat after each sewing step (especially in patchwork) helps to create crisp, clean lines and a more professional finish.
- Watch the Video: The Pay It Forward tutorial is an invaluable resource. Watching the steps demonstrated visually can clarify any uncertainties and provide additional tips not easily conveyed in text.
Why This Project is Perfect for All Skill Levels
One of the greatest appeals of this patchwork owl project is its versatility across various crafting skill levels. For beginners, the free pattern provides simple shapes and clear cutting lines, while the video tutorial offers real-time visual guidance, making complex steps easy to follow. Learning basic sewing machine operation, straight stitching, and hand-sewing techniques is a fantastic entry point into the world of fabric crafts.
Intermediate and advanced sewers will find ample opportunity to elevate this project. They might choose to incorporate more intricate patchwork designs, add detailed embroidery patterns, or experiment with different fabric textures and embellishments. The basic structure serves as a canvas for boundless creativity, allowing seasoned crafters to refine their skills and produce an exceptionally intricate and personalized owl. It’s a project that grows with your abilities, always offering a delightful challenge.
Your Creative Journey with “Pay It Forward”
We are incredibly grateful to Pay It Forward on YouTube for sharing such a wonderful and accessible tutorial. Their clear instructions, coupled with the free pattern, empower crafters of all backgrounds to create something beautiful. The video format is particularly helpful, allowing you to pause, rewind, and re-watch sections as needed, ensuring you grasp every detail of the process. It transforms what might seem like a daunting project into an achievable and enjoyable crafting session.
Creating this patchwork owl is more than just a sewing project; it’s an experience. It’s an opportunity to tap into your creativity, learn new skills, and produce a handmade item that carries immense personal value. Whether it’s destined to be a cherished birthday gift for a niece who loves owls, a decorative accent for a nursery, or a comforting companion on a bookshelf, this little owl is sure to bring joy. So, gather your materials, embrace the process, and delight in the satisfaction of crafting something truly unique and adorable. Happy sewing!