
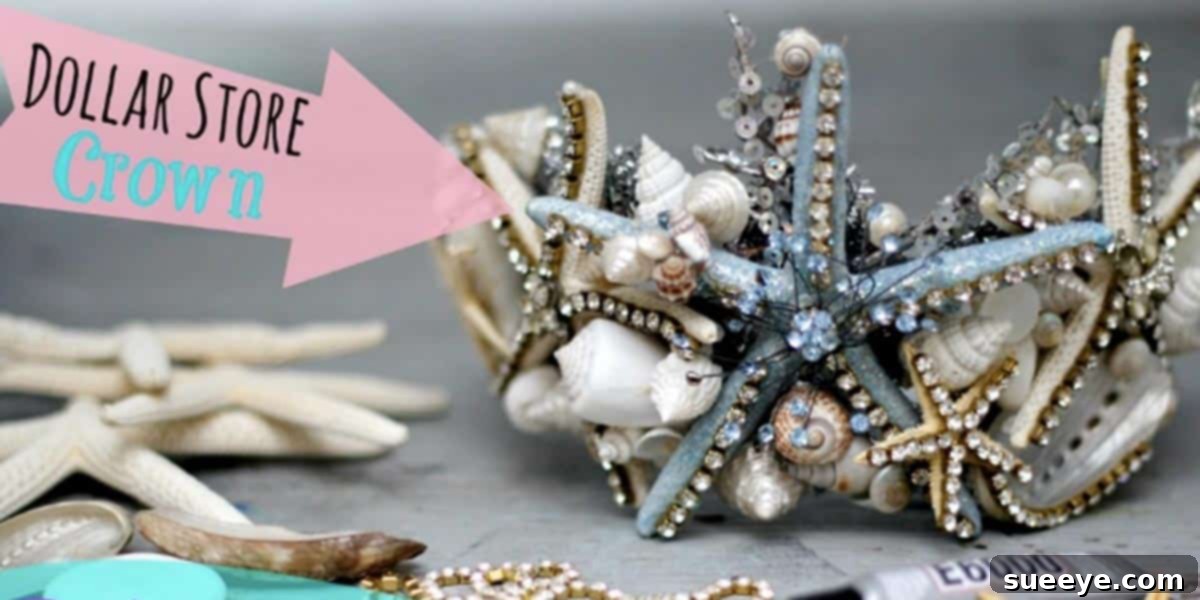
Craft Your Own Enchanting DIY Mermaid Crown: A Step-by-Step Guide to Ocean-Inspired Bling
Are you ready to dive into a world of oceanic enchantment and unleash your inner sea siren? Get your crafting supplies in order, because we’re about to embark on a magical journey to create the most fabulous DIY Mermaid Crown! Whether you’re preparing for a show-stopping Halloween costume, a captivating cosplay event, a whimsical photo shoot, or simply want to bring a touch of underwater royalty to a special little girl’s dress-up collection, this project promises to be an absolute delight. Imagine a crown shimmering with the treasures of the deep, sparkling with rhinestones, and adorned with natural seashells – all made by your own hands!
This isn’t just any craft project; it’s an opportunity to create a unique, personalized piece that truly captures the mystique and beauty of the ocean. Forget generic store-bought accessories; a handmade mermaid crown tells a story, brimming with character and individuality. It’s surprisingly simple to make, budget-friendly, and incredibly rewarding. So, let’s gather our materials, ignite our creativity, and transform a simple base into a stunning piece of wearable art.
The Inspiration Behind the Sparkle: Debi’s Creative Vision
We draw inspiration for this captivating project from the wonderfully imaginative world of Debi’s Design Diary. Debi is renowned for her innovative and entertaining DIY creations, and her approach to crafting is truly infectious. Her tutorials are not just instructional; they’re a source of pure joy and inspiration, encouraging crafters of all skill levels to think outside the box and embrace their unique artistic flair. Her spirited personality and clever techniques make even the most intricate projects feel approachable and fun. While we’ll adapt some of her brilliant concepts, the core idea of transforming humble materials into a dazzling mermaid tiara remains a testament to her creative genius.
Why Choose to DIY Your Mermaid Crown?
The allure of a DIY mermaid crown extends far beyond just saving a few dollars. It’s about personal expression, customization, and the sheer satisfaction of bringing a vision to life. Here’s why crafting your own ocean-inspired headpiece is an unparalleled experience:
- Unmatched Personalization: Unlike mass-produced items, your handmade crown can reflect your exact aesthetic preferences. Choose specific shell types, colors, and embellishments that resonate with your unique style.
- Budget-Friendly Glamour: Achieve a high-end, bespoke look without breaking the bank. Many essential components, like the crown base, can be sourced from dollar stores or craft supply retailers at very affordable prices.
- Versatility for Any Occasion: A mermaid crown isn’t just for Halloween. It’s perfect for themed birthday parties, theatrical performances, fantasy photo shoots, festival wear, or simply adding a touch of magic to everyday dress-up.
- Creative Outlet: Engaging in a craft project provides a wonderful opportunity for relaxation and creative expression. It’s a chance to step away from screens and immerse yourself in a tactile, rewarding activity.
- A Unique Gift: Handcrafting a mermaid crown for a friend or family member shows thoughtfulness and care, resulting in a cherished, one-of-a-kind present.
Gather Your Enchanted Materials: What You’ll Need
Before we embark on this creative adventure, let’s ensure we have all the necessary supplies. The beauty of this project lies in its flexibility; feel free to substitute items based on what you have readily available or what inspires you most. Think of your crafting space as your underwater grotto, ready to yield treasures!
The Essential Crown Base
- Plastic Tiara or Headband: Start with a simple plastic crown. Dollar stores are a fantastic resource for inexpensive options, offering a lightweight and sturdy foundation. Alternatively, craft stores like Michaels often carry more elaborate plastic tiaras in their bridal or party sections, which can provide a slightly more sophisticated starting point. Even a plain plastic headband can serve as a base for a smaller, more delicate design.
The Secret to Strong Adhesion: Metallic Pipe Cleaners
- Metallic Pipe Cleaners: This is a crucial, often overlooked ingredient! Pick up a pack of metallic pipe cleaners from any craft store. You might even stumble upon them at the dollar store. The metallic fibers of the pipe cleaner, when wrapped tightly around the plastic crown, create a textured surface that provides an incredibly strong grip for hot glue. This ensures your shells stay firmly attached, no matter how much dancing (or swimming, if you’re truly a mermaid at heart!) you do.
Treasures from the Deep: Seashells and Embellishments
- Assorted Seashells: This is where your crown truly comes to life!
- Natural Finds: If you’re lucky enough to live near a beach, a stroll along the shore can yield a beautiful array of unique shells. Clean and dry them thoroughly before use.
- Craft Store Options: For those without beach access, craft stores offer a wide variety of cleaned, sorted, and ready-to-use seashells in various shapes, sizes, and colors. Consider mixing larger statement shells with smaller, more intricate ones to add dimension.
- Rhinestone Chain and Vintage Jewelry: To add dazzling sparkle and an antique charm, scour your local craft store for rhinestone chain or raid your jewelry box for old necklaces, earrings, or brooches that can be repurposed. Broken jewelry pieces are perfect for this!
- Other Embellishments: Pearls (real or faux), glitter, small plastic starfish, beads, flat-backed cabochons, or even small pieces of sea glass can further enhance the oceanic theme and add individual flair.
The Bonding Agents: Adhesives
- Hot Glue Gun and Glue Sticks: Your primary tool for attaching shells and larger elements to the pipe cleaner-covered crown. A good quality glue gun with plenty of glue sticks will be your best friend.
- Strong Jewelry Glue (E6000, Aileen’s Tacky Glue, or similar): For attaching smaller, delicate embellishments like rhinestones, pearls, or tiny beads directly onto seashells, a strong, clear-drying jewelry adhesive like E6000 or Aileen’s Tacky Glue is ideal. These glues offer a superior, long-lasting bond for small, non-porous items that hot glue might struggle to hold securely.
Your Crafting Arsenal: Tools
- Scissors or Wire Cutters: For cutting pipe cleaners and potentially snipping parts of old jewelry.
- Newspaper or Craft Mat: To protect your work surface from glue drips.
- Tweezers (Optional): Useful for precisely placing small rhinestones or beads.
- Small Paintbrush (Optional): For applying glitter or clear sealant.
Crafting Your Ocean Gem: Step-by-Step Guide
Now that you have your supplies ready, let’s transform them into a magnificent mermaid crown. This project takes approximately an hour of active crafting time, plus additional drying time for certain glues.
Step 1: Preparing Your Crown Base with Metallic Pipe Cleaners
- Start Wrapping: Take your metallic pipe cleaner and begin wrapping it tightly around the entire surface area of your plastic tiara or headband. Start at one end, securing the beginning with a tiny dab of hot glue if needed, though tight wrapping usually suffices.
- Cover Every Inch: Ensure you cover all plastic surfaces – the band, the points, and any curves. Weave the pipe cleaner in, out, and around every part of the crown. The goal is to create a fuzzy, textured layer that completely encases the plastic.
- Secure and Trim: Once the entire crown is covered, trim any excess pipe cleaner and secure the end with a small amount of hot glue, pressing it firmly into the wrapped layers. This pipe cleaner base is crucial; it acts as a bonding agent, providing a superior surface for the hot glue to adhere to the shells, ensuring they won’t pop off during wear.
Step 2: Adorning Your Seashells with Dazzling Embellishments
Before attaching your shells to the crown, take some time to embellish them. This allows for easier handling and more precise placement of small details.
- Plan Your Design: Lay out your chosen shells and decide which ones will receive rhinestones, pearls, or pieces of vintage jewelry. Consider creating small clusters of rhinestones on larger shells or lining the edges of fan-shaped shells.
- Apply Jewelry Glue: Using your strong jewelry glue (like E6000), carefully attach rhinestones, pearls, or pieces of broken jewelry to the surface of your seashells. Apply the glue sparingly but effectively. Tweezers can be very helpful for placing tiny rhinestones.
- Let Them Dry: Allow ample drying time as per the glue manufacturer’s instructions. This is a critical step to ensure your embellishments are securely bonded before you handle the shells further. Rushing this can lead to your beautiful decorations falling off later.
Step 3: Attaching Your Embellished Seashells to the Crown
Now for the exciting part – bringing your crown to life by attaching your pre-embellished shells!
- Heat Up Your Glue Gun: Make sure your hot glue gun is fully heated and ready to go.
- Begin with Larger Pieces: Start by placing your larger, focal seashells. Experiment with their placement on the pipe cleaner-covered crown before applying glue. Think about visual balance and symmetry, or embrace an asymmetrical, organic look.
- Apply Hot Glue: Apply a generous amount of hot glue to the back of a seashell. Press it firmly onto the pipe cleaner base of the crown, holding it in place for a few seconds until the glue sets. The pipe cleaner’s texture will grip the hot glue beautifully.
- Layer and Fill Gaps: Continue attaching shells, layering them slightly to create depth and interest. Work your way around the crown, filling in any gaps with smaller shells, pieces of coral, or other chosen embellishments. Don’t be afraid to overlap shells to create a more dynamic, organic look, just like treasures found on the ocean floor.
- Ensure Stability: As you attach each piece, give it a gentle wiggle to ensure it’s securely fastened. If anything feels loose, add a bit more hot glue around the base of the shell for reinforcement.
Step 4: The Finishing Touches and Reinforcement
- Inspect and Reinforce: Once all your shells are attached, carefully inspect the entire crown. Look for any loose pieces or areas that might need extra glue. Add small dabs of hot glue where necessary to ensure everything is perfectly secure.
- Add Extra Sparkle (Optional): If desired, you can add a touch of glitter to certain shells or along the pipe cleaner base using craft glue and a brush, then seal it with a clear spray sealant for durability and to prevent glitter fallout.
- Final Polish: Gently remove any visible hot glue strings with your fingers or tweezers.
Tips for a Flawless and Fabulous Finish
- Work in Sections: Don’t try to place all your shells at once. Work in small sections, allowing the glue to set as you go.
- Experiment with Placement: Before applying any glue, lay out your shells on your work surface or even directly on the crown to visualize the arrangement. Take a photo to remember your favorite layout.
- Vary Shell Sizes and Textures: Use a mix of large, medium, and small shells, along with different textures (smooth, ridged, spiral) to create a more visually rich and interesting crown.
- Don’t Be Afraid to Layer: Overlapping shells can create a sense of depth and mimic the organic way shells might accumulate on a reef.
- Consider Color Palettes: Stick to a cohesive color palette (e.g., iridescent, natural tones, or bright pastels) for a harmonious look, or go wild with a vibrant, eclectic mix for a truly unique statement piece.
- Add More Than Shells: Incorporate elements like small silk flowers, artificial seaweed, or even painted beads to enhance the oceanic theme further.
Safety First! Crafting with Care
While this is a fun and rewarding project, remember to prioritize safety, especially when working with adhesives and hot tools:
- Hot Glue Gun Safety: Always use your hot glue gun with caution. The nozzle and melted glue can cause burns. Keep fingers clear and use a silicone mat or old newspaper to protect your work surface.
- Ventilation for Glues: When using strong adhesives like E6000, ensure you are in a well-ventilated area, as these glues can have strong fumes.
- Adult Supervision: If children are participating in this craft, ensure adult supervision is provided, particularly when using the hot glue gun and stronger adhesives.
Unleash Your Inner Ocean Goddess!
Congratulations, magnificent crafter! You’ve successfully created a breathtaking DIY Mermaid Crown that’s as unique and enchanting as the ocean itself. This project is a wonderful way to express your creativity, adding a personalized touch to any costume or special occasion. Wear your crown with pride, knowing you’ve crafted a piece of magic with your own hands. Get ready to sparkle, shine, and enchant everyone with your stunning, handmade ocean treasure!
Now that your crown is complete, get ready to dance, celebrate, and mesmerize. May your adventures be as boundless as the sea!