
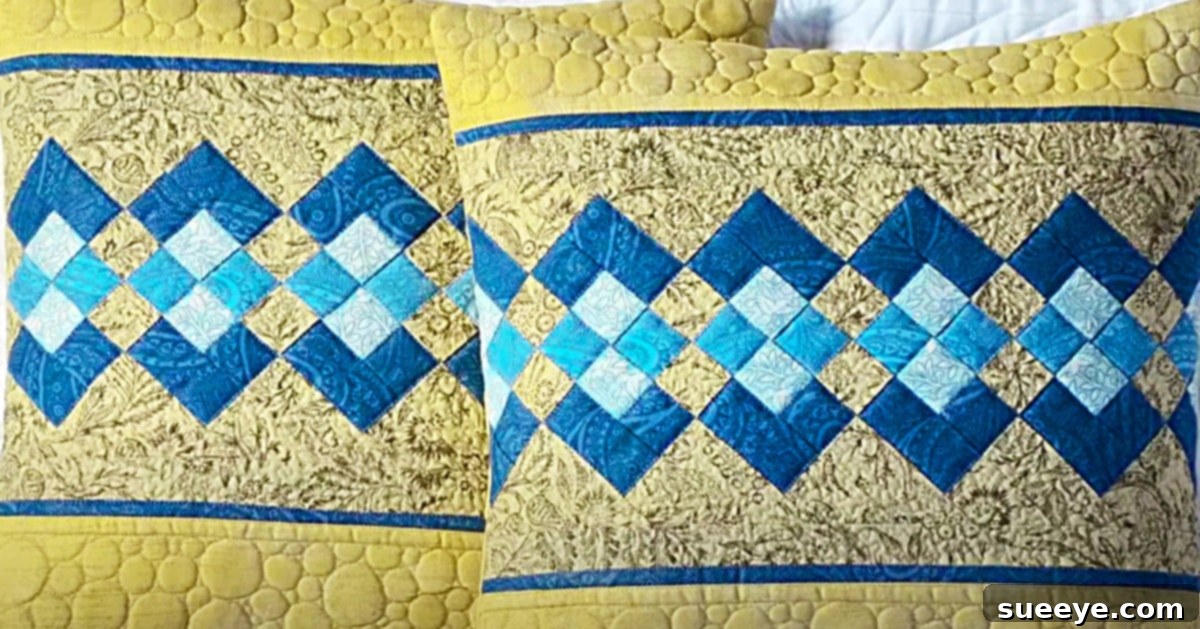
Embark on a delightful crafting journey with this incredibly rewarding patchwork pillow project. A cornerstone of inviting home decor, a handmade quilted pillow adds a touch of unique charm and warmth to any space. What makes this particular DIY sewing idea stand out is its accessible patchwork pattern, perfect for both seasoned crafters and those new to the world of fabric artistry. When I first discovered the brilliant patchwork pillow video tutorial by Liza Decor on YouTube, I was instantly captivated by its simplicity and the stunning results. The desire to create one for my own living room was immediate and compelling.
The beauty of this project lies in its flexibility and the joy of repurposing. You don’t need to break the bank to gather materials; in fact, using remnant fabrics or scraps is highly encouraged, making it an eco-friendly and budget-conscious craft. I personally started my project by gathering a few pieces of scrap remnant fabrics that I sourced from the clearance section at my local fabric store. The instructions provided are remarkably straightforward, guiding you through the process of cutting your fabric strips and seamlessly sewing them together. For those who love efficiency, pre-cut jelly roll strips are an excellent option for this fundamental pattern, and they can even be joined to create larger side panels for your pillow. Remember, the world of DIY is boundless; these ideas are not rigid rules but rather springboards for your creativity. Feel empowered to infuse your unique personal touches wherever your imagination leads you. There are no strict rights or wrongs in crafting; this is your creative adventure, so embrace it and let your individuality shine!
Craft Your Own Patchwork Pillows: A Guide to Beautiful Handmade Decor
Patchwork pillows are more than just decorative items; they are expressions of creativity, skill, and personal style. Each fabric scrap tells a story, and together they form a harmonious design that can brighten any sofa, armchair, or bed. This comprehensive guide, inspired by Liza Decor’s fantastic tutorial, will walk you through the process of creating your own unique patchwork pillows, offering tips, material insights, and a clear path to a beautiful finished product.
Why Embrace Patchwork Pillows?
The allure of patchwork pillows extends far beyond their aesthetic appeal. There are numerous compelling reasons to dive into this rewarding DIY project:
- Unleash Creativity: Patchwork allows for endless combinations of colors, patterns, and textures. You become the artist, designing a unique piece that reflects your personal taste and interior decor style.
- Budget-Friendly Decor: This project is a fantastic way to utilize fabric scraps, remnants, or even old clothes that might otherwise go to waste. It transforms discarded materials into cherished home accents, saving you money on new decor items.
- Sustainable Crafting: By upcycling fabric, you contribute to a more sustainable lifestyle, reducing textile waste and giving new life to forgotten materials.
- Skill Development: For beginners, patchwork is an excellent way to practice basic sewing techniques, such as accurate cutting, straight stitching, and seam pressing. For experienced sewers, it offers an opportunity to refine skills and experiment with new designs.
- Personalized Gifts: A handmade patchwork pillow makes a thoughtful and personal gift for friends and family, perfect for housewarmings, birthdays, or holidays.
- Therapeutic Hobby: Many find the rhythmic process of cutting, piecing, and sewing fabrics to be a wonderfully relaxing and meditative activity, a perfect escape from daily stresses.
Getting Started: The Joy of Fabric Selection
One of the most exciting aspects of creating patchwork pillows is selecting your fabrics. The possibilities are truly endless, and your choices will define the character of your finished piece. Don’s be afraid to experiment!
- Fabric Scraps: This project is ideal for using up those smaller pieces of fabric left over from previous sewing projects. Look for a variety of prints and solids to create visual interest.
- Jelly Rolls: Pre-cut 2.5-inch strips of fabric, known as jelly rolls, are a quilter’s best friend. They come in coordinated collections, making fabric selection a breeze and ensuring your patchwork will have a cohesive look.
- Fat Quarters: These are pre-cut pieces of fabric, usually 18×22 inches, often sold in bundles. They offer a larger canvas for cutting strips or other patchwork shapes.
- Upcycled Materials: Think outside the box! Old denim jeans, linen shirts, cotton dresses, or even charming tea towels can be cut into strips and incorporated into your design, adding a truly unique touch and a story to your pillow.
When selecting your fabrics, consider the overall color palette and how different patterns will interact. A good mix of large prints, small prints, and solid colors often creates the most dynamic and appealing patchwork. Always pre-wash and iron your fabrics before cutting to prevent shrinking or color bleeding after your pillow is made.
Essential Tools and Materials
Having the right tools makes any sewing project more enjoyable and ensures a professional finish. Here’s what you’ll need for your patchwork pillow adventure:
- Fabric: As discussed, choose from jelly rolls, assorted scraps, or fat quarters. Aim for cotton or cotton-blend fabrics for ease of sewing and durability.
- Thread: All-purpose polyester thread that matches or complements your fabric colors is ideal. Quality thread prevents breakage and ensures strong seams.
- A Rotary Cutter: This tool is indispensable for making precise, clean, and quick cuts, especially when dealing with multiple layers of fabric or long strips.
- A Cutting Mat: A self-healing cutting mat protects your work surface and provides grid lines for accurate measurement and cutting with your rotary cutter.
- A Quilting Ruler: A clear acrylic ruler with clear markings, typically 6×24 inches or 6×12 inches, is crucial for accurate measuring and straight cuts when used with a rotary cutter.
- A Pair of Fabric Scissors: Keep a sharp pair of scissors dedicated solely to fabric to ensure clean cuts and prolong their sharpness.
- A Sewing Machine: Any basic sewing machine capable of a straight stitch will work perfectly. Ensure it’s in good working order and threaded correctly.
- Iron and Ironing Board: Crucial for pressing seams open or to one side, which helps your patchwork lie flat and your finished pillow look crisp and professional.
- Pillow Insert or Stuffing: Once your pillow cover is complete, you’ll need a suitable insert (feather or synthetic) or loose fiberfill (Dacron) to stuff it.
- Pins or Fabric Clips: To hold fabric pieces together securely before sewing, preventing shifting.
Directions: Crafting Your Patchwork Masterpiece
While this project offers a creative outlet for personalization, following a clear sequence of steps is key to achieving a beautifully constructed pillow. This general guide complements the detailed visual instructions in the patchwork pillow video tutorial by Liza Decor on YouTube, which is an invaluable resource for seeing each step in action. You will start by cutting your strips of fabric with precision, a fundamental step for successful patchwork.
Step 1: Fabric Preparation and Precise Cutting
Begin by pressing all your chosen fabrics to remove any wrinkles. This step is vital for accurate cutting. Using your rotary cutter, cutting mat, and quilting ruler, meticulously cut your fabrics into uniform strips. The Liza Decor tutorial will guide you on the specific dimensions required for her design. Precision here is paramount; even slight variations in strip width can lead to distortions in your final patchwork block. If using jelly rolls, you might skip this step or cut them down further for smaller patches.
Step 2: Piecing the Patchwork Strips
Once your strips are cut, you will begin the exciting process of piecing them together. Following the pattern demonstrated in the video, arrange your strips in the desired sequence. With right sides together, stitch the strips lengthwise using a consistent seam allowance (typically 1/4 inch for quilting projects). After each seam, press it open or to one side with an iron. Consistent pressing ensures your fabric lies flat and prevents bulk, resulting in a smooth, professional finish for your patchwork panel.
Step 3: Assembling the Pillow Cover
With your patchwork panel complete, you’ll prepare the back of your pillow. The video tutorial will likely demonstrate an envelope back closure, which is common for pillow covers as it avoids zippers and is very beginner-friendly. Once the front patchwork panel and back pieces are prepared, place them right sides together, pin carefully, and stitch around the perimeter, leaving a gap for turning if you’re not using an envelope closure or a small opening for stuffing if you’re making a fully sewn cover. Trim the corners to reduce bulk and ensure crisp points.
Step 4: Finishing Touches and Stuffing
Then, you will just follow the directions in this video tutorial to finish this pillow, turning it right side out and ensuring all seams are neat. Once your cover is complete and all seams are tidy, it’s time to stuff it. You can use a pre-made pillow insert that fits your cover’s dimensions or generously fill it with Dacron or feather stuffing for a plush feel. If you left an opening for stuffing, hand-stitch it closed using an invisible stitch for a seamless finish.
Tips for a Flawless Patchwork Pillow
Achieving a professional-looking patchwork pillow is within reach with these helpful tips:
- Consistent Seam Allowance: A 1/4-inch seam allowance is standard in quilting. Use a quilting foot or mark your machine bed to ensure this allowance is consistent throughout your project. Inconsistent seams will cause your blocks to not line up correctly.
- Press, Don’t Iron: When joining fabric pieces, lift and place your iron (press) rather than sliding it (iron). This prevents distorting your fabric and ensures flat, accurate seams.
- Chain Piecing: For efficiency, especially when joining many identical pairs of strips, use chain piecing. Stitch one pair, then feed the next pair under the needle without lifting the presser foot or cutting the thread.
- Starch for Stability: Applying a light spray starch to your fabrics before cutting can add stability, making them easier to handle and cut more accurately, especially with thinner fabrics.
- Test Stitches: Before sewing your actual project, always do a test stitch on a scrap piece of fabric to check your tension and stitch length.
- Don’t Rush: Patchwork is a process that benefits from patience and attention to detail. Take your time, enjoy each step, and you’ll be happier with the outcome.
Personalization and Creative Variations
These patchwork pillows are truly amazing, and the best part is that each one can be a unique reflection of your style. I can’t wait to make another one, perhaps in a different size or with added embellishments. Here are some ideas to further personalize your creations:
- Varying Sizes: Experiment with different pillow sizes – from small accent pillows to larger throw pillows – by adjusting your fabric strip measurements accordingly.
- Quilting Details: Once your pillow top is pieced, you can add simple machine quilting lines to enhance the texture and secure the layers. Straight lines along the seams or simple wavy lines can add beautiful depth.
- Adding Trim: Incorporate piping, fringe, or pom-pom trim along the outer edge of your pillow cover for an elegant or playful touch. This is typically sewn in when assembling the front and back panels.
- Monogramming or Appliqué: Add a personalized touch by appliquéing a fabric shape, a monogram, or even some simple embroidery onto one of your patchwork blocks before assembling the pillow.
- Mix and Match Patterns: Don’t be afraid to combine different patchwork patterns. While this tutorial focuses on a strip-pieced design, you could incorporate simple half-square triangles or log cabin blocks into your pillow front for a more complex look.
Care and Maintenance for Your Handmade Pillow
To ensure your beautiful patchwork pillow remains a cherished part of your home decor for years to come, proper care is essential. Generally, if you’ve used 100% cotton fabrics, your pillow cover can be machine washed on a gentle cycle with cold water and a mild detergent. Tumble dry on low or air dry to prevent shrinking and preserve colors. If your pillow is filled with fiberfill, you might be able to wash the entire pillow, but always check the care instructions for your specific stuffing. For feather inserts, spot cleaning or professional dry cleaning is usually recommended.
In conclusion, creating patchwork pillows is a wonderfully rewarding experience that combines practicality with artistic expression. From selecting the perfect fabric scraps to the final stuffing, each step offers an opportunity for creativity and skill-building. The satisfaction of transforming simple strips of fabric into a beautiful, functional piece of home decor is immense. So gather your materials, fire up your sewing machine, and let Liza Decor’s tutorial guide you to your next stunning handmade creation. These amazing patchwork pillows are waiting to come to life in your home!