
The tradition of putting up a Christmas tree is a cherished ritual in countless households worldwide, symbolizing joy, hope, and the festive spirit of the holiday season. Beyond its role as a central decoration, it offers a wonderful opportunity for families and loved ones to bond, creating lasting memories together. Whether you gather around a grand fir, an elegant artificial tree, or a charming miniature, the act of decorating brings warmth and cheer to any home.
RELATED: Easy DIY Washcloth Christmas Tree
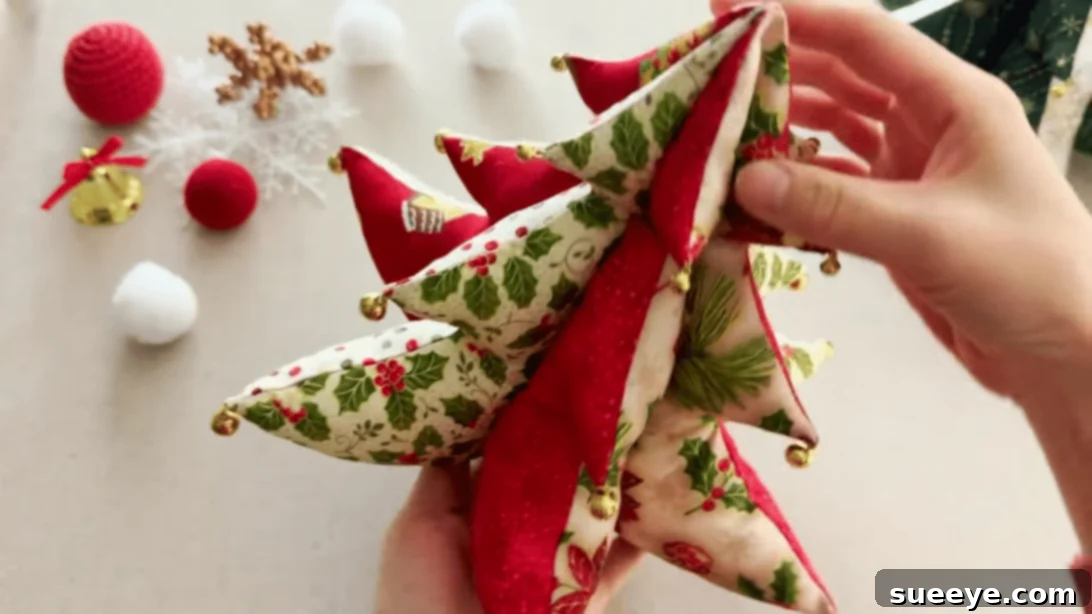
However, if you’re looking for a fresh take on holiday decor this year, perhaps you don’t have space for a traditional tree, or you’re simply eager to embark on new festive crafting projects, then we have an absolutely delightful idea for you. This adorable DIY fabric Christmas tree offers a unique blend of traditional charm and personalized creativity. It’s a fantastic project for crafters of all skill levels, allowing you to infuse your home with handmade warmth. Dive into this charming craft by watching the detailed video tutorial from Jia-sewing on YouTube, and discover the joy of creating your own festive fabric masterpiece.
Why Choose a Fabric Christmas Tree?
Opting for a fabric Christmas tree presents a host of advantages that go beyond its visual appeal. Firstly, these trees are incredibly durable and reusable. Unlike fresh trees that dry out or artificial trees that can shed needles, a fabric tree will maintain its beauty year after year, becoming a treasured part of your holiday traditions. This also makes them a highly sustainable choice, reducing waste and allowing you to craft unique decor that stands the test of time.
Safety is another significant benefit. Fabric trees eliminate the fire hazards associated with electrical lights on dry natural trees and are much safer around curious pets and small children, as there are no fragile ornaments to break or sharp needles to contend with. Their soft, plush nature makes them ideal for homes with little ones, offering a playful and safe decorative element.
Furthermore, a fabric Christmas tree offers unparalleled customization. You have complete creative control over the fabrics, patterns, and embellishments, allowing you to design a tree that perfectly complements your existing holiday decor or reflects your personal style. Whether you prefer a rustic, modern, whimsical, or traditional aesthetic, the possibilities are endless. They are also incredibly space-efficient, making them perfect for smaller apartments, dorm rooms, or as an charming accent in any corner of your home where a full-sized tree might not fit. Crafting one also provides a wonderful opportunity to use up fabric scraps, giving new life to materials that might otherwise go to waste.
Gathering Your Materials: What You’ll Need for Your Charming Fabric Tree
Before you begin sewing your festive fabric Christmas tree, gathering all your materials will ensure a smooth and enjoyable crafting experience. Here’s a detailed look at what you’ll need:
- 7 Assorted Print Fabrics: The heart of your tree’s character! Choose a variety of prints and colors that appeal to you. Consider coordinating colors for a cohesive look or contrasting patterns for a more whimsical feel. Cotton fabrics are generally easy to work with for this project, but feel free to experiment with different textures for added interest. Using fabric scraps is an excellent way to make this project even more eco-friendly and budget-conscious.
- Beads: These will serve as charming ornaments for your fabric tree’s tips. Select small, decorative beads that complement your chosen fabrics. You might opt for glass beads for a subtle sparkle, wooden beads for a natural look, or colorful plastic beads for a playful touch. Ensure they have a hole large enough for your needle and thread.
- Marking Pen, Pencil, or Chalk: Essential for transferring your template design onto the fabric. A fabric-specific marking pen that disappears with heat or water is ideal, but a sharp pencil or tailor’s chalk also works well, especially on lighter fabrics.
- Poly-Fil Fiberfill: This soft, resilient stuffing will give your tree its plush, three-dimensional form. Ensure you have enough to generously fill all sections of your tree, creating a firm yet cuddly shape. High-quality fiberfill will maintain its loft over time, keeping your tree looking plump and inviting.
- Ruler: A sturdy ruler, preferably a clear quilting ruler, will be invaluable for accurately measuring your template dimensions and ensuring precise cuts. Accuracy here will contribute to a beautifully proportioned finished tree.
- Scissors or Rotary Cutter and a Cutting Mat: For clean, precise fabric cuts. A good pair of fabric scissors is a must-have, but a rotary cutter used with a self-healing cutting mat offers exceptional speed and accuracy, especially when cutting multiple fabric layers simultaneously.
- Fabric Pins: These small but mighty tools will hold your fabric layers securely in place during tracing, cutting, and stitching. They prevent fabric shifting, ensuring your pieces line up perfectly.
- Needle and Thread: You’ll need a hand-sewing needle for closing the stuffing holes and attaching the beads, and a spool of good quality all-purpose sewing thread. Choose a thread color that either matches your fabrics closely or is a neutral shade like white or light gray.
- Iron, for Pressing: An iron is crucial for achieving crisp, professional-looking seams. Pressing your seams open after stitching ensures a flat, smooth finish, which is key to the tree’s overall appearance.
- Sewing Machine: While experienced hand-sewers could technically complete this project without one, a sewing machine will make the stitching process much faster, more consistent, and result in stronger seams, especially for the main construction of the tree pieces.
Crafting Your Fabric Christmas Tree: A Step-by-Step Guide
Step 1: Designing Your Template and Cutting Initial Layers
Begin by creating your tree template on a sturdy piece of paper or cardstock. This template will guide all your fabric cuts, so precision is key. The overall shape of each tree segment should be roughly triangular. The tutorial specifies a layered design, which means your tree will have different sized tiers to create its classic shape. For the bottommost layer, your template should be approximately 12 inches wide at its base and 10 inches tall. Then, for the second layer, you’ll need a template that’s about 8 inches wide, and for the topmost layer, approximately 5 inches wide, maintaining the same overall triangular style for each segment. Once your template is drawn, carefully cut it out.
Next, take five of your assorted fabric prints. Lay them out, stacking them neatly on top of each other. Ensure each fabric piece is large enough to comfortably accommodate your template with a little extra room around the edges. Place your largest template (the 12-inch base) on top of the stacked fabrics. To prevent any shifting while you trace and cut, secure the template in place using either a heavy object, like a book, or by pinning it meticulously through all fabric layers with fabric pins.
Step 2: Constructing the Base and Inner Structure
With your template securely in place on the stacked fabric, carefully trace around its shape using your marking pen, pencil, or chalk. Once traced, meticulously cut out all five fabric pieces following your traced lines. Set these pieces aside. These five pieces will form the main body of your tree, creating a full, multi-faceted appearance when assembled. Precision in cutting here will result in a more symmetrical and pleasing final tree.
Now, take your template and fold it neatly in half along its vertical axis. This folded template will be used for cutting the two remaining fabric pieces that will form the central spine of your tree. Place the folded template over your last two fabric prints, making sure their edges are aligned perfectly. Trace around the folded template. Stitch down the straight, folded side of these two pieces, creating a clean, central seam. After stitching, carefully cut out the curved edges of the shape. To ensure a flat, smooth finish, press the seams open with an iron. This step is crucial for achieving a professional look and will make the next assembly steps much easier.
Step 3: Assembling, Stuffing, and Embellishing Your Tree
Now it’s time to bring your tree to life! Take your initial five fabric pieces and pair them together (you’ll have two pairs and one single piece, or pair them as per your design). Place the fabric pieces right sides facing each other, aligning all edges carefully. Using your sewing machine (or hand-sewing if preferred), stitch around each pair, following the outer edges. Remember to leave a small opening—about 1-2 inches—at the bottom edge of each piece. This opening will be used for turning the fabric right side out and for stuffing. Once stitched, carefully trim any excess fabric around the seams, especially at the corners, to reduce bulk, taking care not to snip through your stitches.
Through the opening you left, gently turn each fabric piece right side out. Use a pointy tool, like a chopstick, a turning tool, or even the blunt end of your scissors, to carefully poke out the corners and curves, ensuring they are nicely defined. Press each piece with an iron to flatten the seams and give it a crisp finish.
Next, stack all your prepared fabric pieces together, aligning them at the center. Stitch along the middle of the stacked pieces. This central stitching will secure all layers together and create the distinct tiered, three-dimensional structure of your fabric tree. This is where your tree truly starts to take shape.
Now, it’s time to stuff! Take your Poly-Fil fiberfill and begin stuffing each side of your tree through the small openings. Stuff evenly and firmly, but not so tightly that the fabric distorts. The goal is a plump yet soft appearance. Once adequately stuffed, hand-stitch the opening closed using a ladder stitch or invisible stitch for a neat, inconspicuous finish. Finally, to add a touch of sparkle and detail, sew a small bead to each tip of the tree segments. These beads act as tiny ornaments, completing your charming fabric Christmas tree. You can also sew beads or other small embellishments all over the tree for a more decorative look.
Tips for a Perfect Fabric Christmas Tree
To ensure your fabric Christmas tree turns out beautifully, consider these helpful tips:
- Fabric Selection: Don’t be afraid to mix patterns and textures. A combination of solids, small prints, and large prints can create a dynamic and visually interesting tree. Consider using holiday-themed fabrics, or go for a specific color palette like Scandinavian-inspired neutrals or vibrant jewel tones.
- Precision is Key: Take your time with tracing and cutting. Any inaccuracies at this stage will be noticeable in the final product. A sharp rotary cutter can make a significant difference in achieving clean, straight lines and smooth curves.
- Pressing Matters: Ironing seams open at each step isn’t just for aesthetics; it helps your pieces lie flat and come together smoothly, resulting in a more professional and polished finish.
- Stuffing Technique: When stuffing, use small handfuls of fiberfill and push them into the corners and tips first. Distribute the stuffing evenly to avoid lumpy spots. If your tree feels too soft, add a bit more; if it feels too hard, gently massage it to redistribute the filling.
- Embellishment Ideas: Beyond beads, consider adding small buttons, tiny bows, embroidered details, or even small jingle bells for a touch of sound. You could also sew on sequins or glitter fabric for extra sparkle.
Variations and Personalization
This basic fabric tree design is wonderfully versatile. Here are some ideas for personalization:
- Different Sizes: Scale your template up or down to create trees of various heights, from miniature desk ornaments to larger floor decor. A collection of different-sized trees makes a charming display.
- Weighted Base: For a more stable tree, especially if making a larger version, consider adding a small bag of rice or poly pellets inside the bottom layer before stuffing with fiberfill. This will give it more weight and prevent it from toppling over.
- Appliques and Embroidery: Before sewing your fabric pieces together, you could add small fabric appliques (like stars, snowflakes, or tiny hearts) or intricate embroidery designs to some of your fabric panels for extra detail.
- Scented Stuffing: Mix a small amount of dried lavender, cedar shavings, or cinnamon sticks with your fiberfill for a subtle, natural holiday scent.
- Pincushion Tree: If you’re a sewer, make a smaller version and fill it with crushed walnut shells instead of fiberfill. This creates a functional and decorative pincushion.
Caring for Your Fabric Christmas Tree
One of the best features of a fabric Christmas tree is its durability and ease of care. To keep your handmade treasure looking its best year after year:
- Storage: Store your fabric tree in a dry, dust-free environment. A breathable fabric bag or a sturdy box will protect it from dust and potential damage during the off-season. Avoid compressing it too much to maintain its plush shape.
- Cleaning: If your tree gets dusty, gently dab it with a lint roller or a soft, damp cloth. For tougher spots, spot clean with a mild soap and water solution, being careful not to saturate the fabric. Allow it to air dry completely before storing.
Creating your own fabric Christmas tree is a rewarding project that allows you to infuse your home with unique, handmade charm. It’s a delightful way to celebrate the holiday season, offering a personalized touch that mass-produced decorations simply can’t match. Whether displayed on a mantelpiece, a shelf, or as part of a festive centerpiece, your fabric tree will surely be a conversation starter and a source of joy for years to come. So, gather your materials, follow Jia-sewing’s excellent tutorial, and get ready to create a beautiful, custom piece of holiday decor!
*All these amazing images are thanks to Jia-sewing via YouTube. Do visit her channel to see more videos like this!