
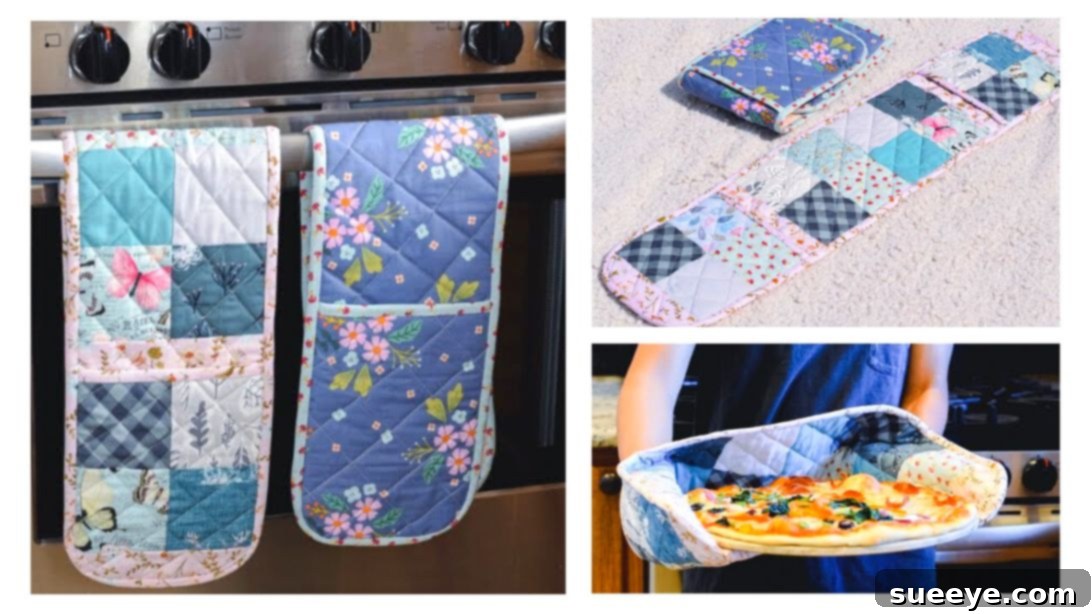
Craft Your Own Adorable Double Oven Mittens from Fabric Scraps: The Ultimate DIY Guide
Unleash your creativity and give new life to your leftover fabric pieces by crafting these utterly adorable and highly functional double oven mittens. This isn’t just another sewing project; it’s a fantastic way to utilize those precious fabric scraps that often go unused, transforming them into something both practical and beautiful for your kitchen. Imagine the joy of gifting these handmade treasures to friends and family – they are sure to be cherished for their thoughtful design and everyday utility! Whether you’re a seasoned quilter or a sewing enthusiast looking for your next rewarding project, this detailed tutorial will guide you through every stitch.
Join us as we dive into the delightful world of scrap fabric sewing with this comprehensive guide inspired by the brilliant instructions from Joan Sewing Studio on Youtube. Follow along with our step-by-step instructions below, and be sure to watch the accompanying video for visual clarity and expert tips that will make your crafting experience even smoother.
Materials You’ll Need for Your Double Oven Mittens Project:
Before you begin, gather all the necessary supplies. Using high-quality materials, especially for heat protection, is crucial for both the durability and safety of your oven mitts. Here’s what you’ll need:
- 32 pieces of 4″ squares: These small fabric squares are perfect for showcasing your favorite patterns and colors. They will form the decorative panels of your oven mitts, making this project ideal for using up a variety of scrap fabrics.
- 1/2 yard of cotton quilting fabric: This will be used for the backing and lining pieces, providing a sturdy and comfortable base for your mitts. Opt for 100% cotton for its natural heat resistance and breathability.
- 34 1/2″ x 15″ insulated batting: This specialized batting is the hero of your oven mitts, providing essential heat protection. It’s designed to reflect heat, keeping your hands safe from hot dishes. Insulated batting, such as Insul-Bright, is a non-negotiable for effective oven mitts.
- 34 1/2″ x 7 1/2″ cotton batting: Adding an extra layer of cotton batting provides additional cushioning and absorbency, enhancing comfort and heat resistance. This also helps to give your oven mitts a lovely quilted texture and feel.
- Cotton thread: Choose a strong, high-quality cotton thread that matches or complements your fabric choices. Cotton thread is preferred for its heat resistance compared to polyester, which can melt at high temperatures.
- Basic sewing notions: Don’t forget your sewing machine, fabric scissors or rotary cutter, cutting mat, ruler, pins or fabric clips, an iron, and a pressing mat. A circular item (like a plate or a small bowl) will also be handy for shaping corners.
Having all your materials prepared beforehand will ensure a smooth and enjoyable crafting session!
Step-by-Step Guide to Crafting Your Double Oven Mittens:
Follow these detailed instructions to construct your beautiful and practical double oven mitts. Precision in cutting and sewing will result in a professional-looking finish.
Step 1: Constructing Panel A – The Four-Patch Block Foundation
Begin by selecting four of your 4-inch fabric squares. Arrange these squares into a pleasing 2×2 grid to form your first “four-patch block.” This block will be a central decorative element. With right sides together, sew the two squares of the upper row using a precise 1/4-inch seam allowance. This standard seam allowance is crucial for quilting accuracy. Once sewn, press the seam allowances towards one side to ensure a flat, crisp finish. Next, sew the two squares of the second row, but this time, press the seam allowances in the *opposite* direction. This alternating pressing technique helps to reduce bulk when you join the rows and allows the seams to nest perfectly, creating sharper corners. Finally, sew the two rows together, aligning your seams carefully. Press this final seam open or to one side, whichever provides the flattest result. This completed piece is your Panel A.
Step 2: Adding Panel B Strips to Panel A
Now, prepare two pieces of fabric for Panel B, each measuring 7 1/2 inches by 2 inches. These strips will frame the bottom edge of your four-patch block. Take one of your Panel A blocks and sew one of the Panel B strips to its lower edge, again using a 1/4-inch seam allowance. Press the seam open or towards the darker fabric to minimize show-through. You will need to create two identical blocks using this method, as these will form the pocket sections of your double oven mitts.
Step 3: Preparing Panel C Rectangles
For Panel C, accurately cut two pieces of fabric, each measuring 7 1/2 inches by 9 inches. These rectangles will serve as a crucial component in the layered structure of your mitts. Precision here will ensure all your panels align correctly later on.
Step 4: Assembling Panel D – The Center Strip
Gather eight more of your 4-inch fabric squares. Lay them out in two rows of four squares each. Following the same principles as Step 1, sew two squares together at a time in each row, ensuring you maintain a consistent 1/4-inch seam allowance. Press the seams in alternating directions to keep the fabric flat and reduce bulk. Once all the pairs are sewn, join the two rows together to create a longer rectangular block. Press the final seam. This larger pieced rectangle is your Panel D, which will form the central decorative band of your main oven mitt body.
Step 5: Completing the Front Panel with Panel E
Cut two pieces for Panel E, each measuring 7 1/2 inches by 10 1/2 inches. These will be the end pieces that frame your central Panel D. Take your assembled Panel D and sew one Panel E piece to each of its short sides, ensuring a straight and even attachment. Use a 1/4-inch seam allowance and press your seams flat. This combination of Panel E – Panel D – Panel E will become the complete ‘front panel’ of your double oven mitts, showcasing your beautiful pieced design.
Step 6: Creating Panel F – The Back Panel Foundation
For Panel F, select sixteen of your remaining 4-inch squares. Arrange these into two rows of eight squares each. Just like with Panel D, sew the squares together in pairs, then join those segments to form the full rows. Remember to press your seams in alternating directions as you go to ensure a smooth, flat finish and to prevent bulk. Finally, sew the two long rows together to create a large rectangular block. This forms the foundation for what will become the back panel of your double oven mitts.
Step 7: Finalizing the Back Panel with Panel G
Now, cut two pieces for Panel G, each measuring 7 1/2 inches by 3 1/2 inches. These strips will complete the structure of your back panel. Sew one Panel G piece to each of the short sides of your assembled Panel F. Use a 1/4-inch seam allowance and press your seams for a tidy appearance. This combination of Panel G – Panel F – Panel G now forms the complete ‘back panel’ of your double oven mitts, providing a cohesive and finished look.
Step 8: Assembling and Quilting the Main Oven Mitt Body
This is a crucial layering step for heat protection. First, lay your completed back panel right side down on a flat surface. Next, cut a piece of the insulated batting measuring 7 1/2 inches by 34 1/2 inches, and carefully place it directly on top of the back panel. This insulated layer is vital for heat resistance. On top of the insulated batting, place a piece of 100% cotton batting, cut to 9 1/2 inches by 34 1/2 inches. This adds an extra layer of protection and comfort. Finally, take your front panel and lay it on top of all the layers, right side up, ensuring it is centered and aligned. Now, it’s time to baste all these layers together. You can use large basting stitches, safety pins, or temporary fabric adhesive spray to secure everything and prevent shifting during quilting. Once basted, quilt your panel in any design you desire – straight lines, a cross-hatch pattern, or free-motion quilting. Quilting not only adds a beautiful texture but also secures all the layers permanently, preventing the batting from bunching up with use and washings. Once quilted, set this main body panel aside.
Step 9: Preparing and Quilting the Pocket Panels
Take your chosen lining fabric and lay it wrong side up. Cut two pieces of insulated batting, each measuring 7 1/2 inches by 9 inches. Place one piece of insulated batting on top of the lining fabric. Then, position one of your Panel A (which includes Panel B strips) fabric blocks on top of the insulated batting, right side up. Baste these three layers together thoroughly. As you did with the main body, quilt these pocket panels in your chosen design. This quilting step is crucial for securing the layers, adding durability, and ensuring effective heat protection for your hands. Repeat this process for the second pocket panel, creating two complete, quilted pocket sections.
Step 10: Shaping the Corners for a Professional Finish
To give your double oven mittens a soft, professional, and more ergonomic finish, you will need to round off all the corners. Grab a circular item from your household – a dinner plate, a small bowl, or even a large cup can work perfectly. Place the circular item on each of the four corners of your main oven mitt body panel. Trace around the curve, and then carefully trim away the excess fabric, creating beautifully rounded corners. Repeat this process for the corners of both of your prepared pocket panels. This step not only enhances the aesthetics but also makes the binding process in the final step much smoother and neater.
Step 11: Attaching the Pocket Panels to the Main Body
With your main oven mitt body panel laying flat, right side facing up, it’s time to position the quilted pocket panels. Take one of your completed pocket panels and carefully place it on one end of the main panel, ensuring the right sides are facing up and the raw edges are aligned. The pocket should cover the end of the main panel, forming the opening for your hand. Use fabric clips or pins to securely fasten the pocket panel in place along its raw edges. Repeat this process for the second pocket panel on the opposite end of the main body panel. Double-check that both pockets are evenly positioned and securely clipped, as this will ensure a neat finish in the next step.
Step 12: Binding Your Double Oven Mittens for a Flawless Finish
The final step in creating your beautiful double oven mittens is binding. Binding provides a clean, professional edge, encasing all the raw seams and adding durability to your project. You’ll need to cut strips of fabric for your binding – typically 2.5 inches wide, joined end-to-end to create a continuous strip long enough to go around the entire perimeter of your double oven mitts (including the pocket openings if desired for an extra neat finish, though usually binding the outer edge is sufficient). Attach the binding strip by sewing it with a 1/4-inch seam allowance around the entire outer edge of your assembled oven mitts, carefully navigating the rounded corners. Fold the binding over to the other side and hand-stitch or machine-stitch it in place, creating a neat, enclosed edge. Take your time with this step, especially around the curves, to ensure a smooth and even bind. Once complete, your adorable double oven mittens are ready to protect your hands and brighten your kitchen!
Your Handmade Double Oven Mittens: A Testament to Creativity and Practicality
Congratulations! You have successfully transformed simple fabric scraps into a functional and charming kitchen essential. These adorable double oven mittens are not just practical for handling hot dishes, but they also serve as a beautiful reminder of your crafting prowess and commitment to sustainable living by repurposing materials. Every time you reach for them, you’ll appreciate the care and effort you put into their creation.
Don’t stop here! Consider making several pairs in different color schemes to match various seasons or kitchen decors. They make exceptional, personalized gifts for housewarmings, holidays, or just because. Imagine gifting a set of these unique, handmade oven mitts – it’s a gift that truly comes from the heart and showcases your talent. Share your creations on social media and inspire others to embark on their own sewing adventures. Happy sewing!