
Craft Adorable DIY Sock Snowman Ornaments: Your Ultimate Guide to Inexpensive Christmas Decor
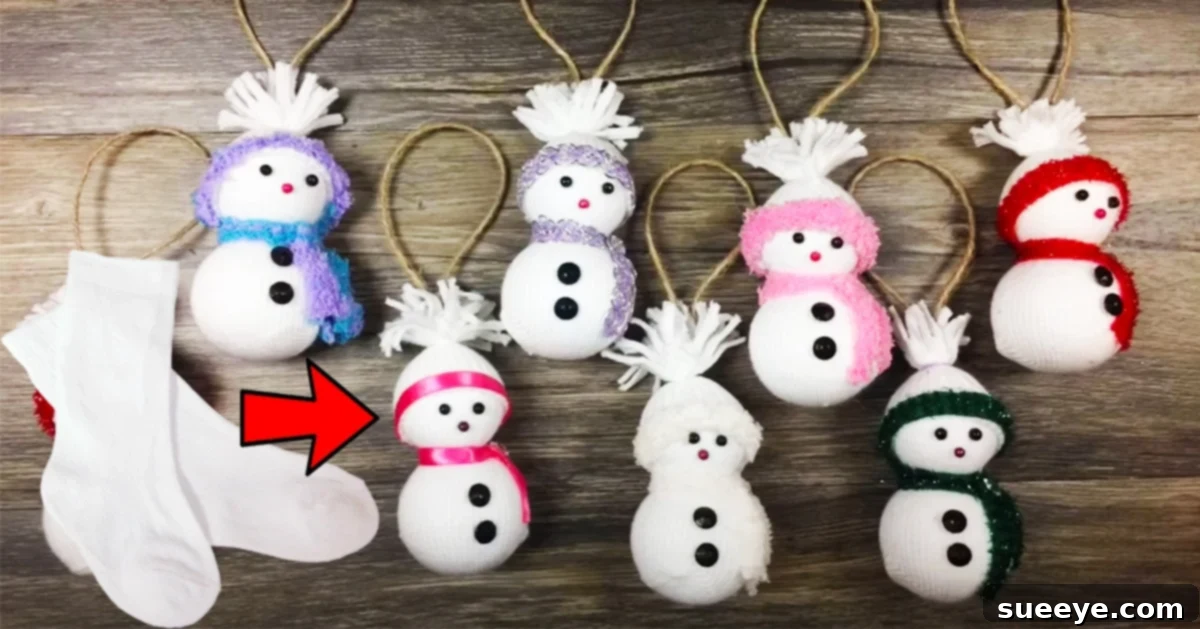
The holiday season ushers in a wonderful opportunity to infuse our homes with warmth, joy, and personalized charm. While store-bought decorations are plentiful, there’s an undeniable magic in handmade Christmas decor. This year, embrace your creative spirit with these delightful DIY sock snowman ornaments. Brought to life by the ingenious ideas from El Mundo De Lala on YouTube, these small and irresistibly cute snowmen are perfect for gracing your Christmas tree, adding a whimsical touch to garlands, or even serving as thoughtful, personalized gifts. Beyond their undeniable appeal, this project stands out as a brilliant way to repurpose old socks and other household items, transforming them into festive treasures. It’s an incredibly accessible and inexpensive Christmas craft, making it an ideal activity for families and crafters of all skill levels.
The beauty of crafting your own holiday decorations lies in the ability to create something truly unique and meaningful. These sock snowman ornaments exemplify this perfectly. Imagine a collection of these cheerful characters, each with its own personality, hanging from your tree. Not only are they adorable, but the process of making them is also incredibly rewarding. It’s a fantastic opportunity for children to engage in a fun and easy Christmas craft for kids, fostering their creativity and fine motor skills. Furthermore, the concept of giving new life to items you already own, such as unused socks, aligns perfectly with an eco-conscious approach to holiday decorating. This guide will walk you through everything you need to know to create your own charming army of sock snowmen, transforming simple materials into cherished holiday keepsakes.
Why Choose DIY Sock Snowman Ornaments for Your Holiday Decor?
In a world increasingly focused on sustainability and mindful consumption, crafting homemade decorations offers a refreshing alternative to mass-produced items. These DIY sock snowman ornaments check all the boxes for a perfect holiday project:
- Unbeatable Affordability: With most materials likely already in your home, this is one of the most budget-friendly Christmas decor ideas you’ll find. Say goodbye to expensive store-bought ornaments!
- Eco-Friendly Repurposing: Give new purpose to those lone socks that have lost their match, or socks that are simply no longer worn. It’s a wonderful way to reduce waste and teach children about recycling and upcycling.
- Family Fun for All Ages: This craft is simple enough for younger children to help with (under supervision for hot glue), yet engaging enough for older kids and adults. It’s a fantastic activity to bond over during the holiday season.
- Personalized Charm: Each snowman can be customized with different sock patterns, fabric scraps for scarves and hats, and unique facial expressions. No two snowmen will be exactly alike, adding to their bespoke charm.
- Versatile Decor & Gifting: Beyond hanging on the tree, these snowmen can adorn wreaths, garlands, mantelpieces, or even act as creative gift toppers. They also make incredibly thoughtful and unique Christmas gifts for friends, teachers, or family members.
- Quick & Easy Production: Once you get the hang of it, you can easily create a batch of these snowmen in one sitting, making them ideal for school projects, craft fair inventory, or simply filling your home with festive cheer.
Essential Supplies for Your Sock Snowman Creation
Gathering your materials is the first exciting step in any craft project. The beauty of these sock snowmen lies in their simplicity and reliance on common household items. Here’s a comprehensive list of what you’ll need to bring your frosty friends to life:
- Foam Balls:
- 1.97″ (approximately 5 cm) foam ball for the body.
- 1.57″ (approximately 4 cm) foam ball for the head.
- Tip: Styrofoam or even tightly crumpled newspaper/fabric scraps can work as alternatives if foam balls aren’t readily available, though foam balls provide a smoother finish.
- Small White Socks: These form the snowman’s “skin.” Crew socks or ankle socks work best, ideally new or very clean ones to ensure a pristine white appearance.
- Small Hair Tie Rubber Bands: Essential for cinching the sock to form the snowman’s shape and secure the stuffing.
- Fabric Material for Scarf and Beanie: Get creative! This can be anything from colorful felt scraps, flannel, fleece, or even pieces from an old sweater.
- Pins: Small sewing pins with decorative heads (like pearl head pins) can be used for eyes, buttons, or to temporarily hold fabric in place.
- Fluffy Sock (or similar soft fabric): Specifically suggested for creating a cozy, textured beanie and scarf. The fluffier, the better for that authentic wintery look.
- Scissors: For cutting socks, fabric scraps, and any other materials.
- Nail Polish: A touch of orange or red nail polish can be used to paint a carrot nose or rosy cheeks. Acrylic paint or permanent markers are also great alternatives.
- Hot Glue Gun and Glue Sticks: Your best friend for securely attaching all the small embellishments, the hat, and scarf. Always use with adult supervision, especially when crafting with children.
- Optional Embellishments: Consider small buttons, beads, glitter, thin ribbon for a hanging loop, twigs for arms, or even tiny jingle bells for added festivity.
Step-by-Step Guide: Crafting Your Sock Snowman Ornaments
Creating these adorable easy DIY ornaments is a straightforward and enjoyable process. While we’ll outline the key steps here, for a complete visual demonstration and intricate details, we highly recommend watching the full tutorial by El Mundo De Lala on YouTube. Her video provides invaluable guidance for crafting the perfect snowman!
Phase 1: Forming the Snowman’s Body
- Prepare Your Sock: Take one of your white socks. If it has a heel, you might want to stretch it out a bit to make it easier to stuff, or orient it so the heel will be hidden.
- Insert the Foam Balls: Begin by carefully pushing the larger 1.97″ foam ball into the toe end of the sock. Work it gently until it’s snugly nestled at the bottom, forming the snowman’s body.
- Add the Head: Next, insert the smaller 1.57″ foam ball directly above the first ball, pushing it down so it sits securely on top. This will form the snowman’s head. You should now have two distinct foam ball shapes inside the sock.
- Shape and Secure: Gently smooth out the sock around the foam balls, ensuring there are no major wrinkles. Use one of your small hair tie rubber bands to cinch the sock tightly between the head and body, creating a defined neck. You can also use another rubber band above the head to create the top part of the head, or leave it for later cutting.
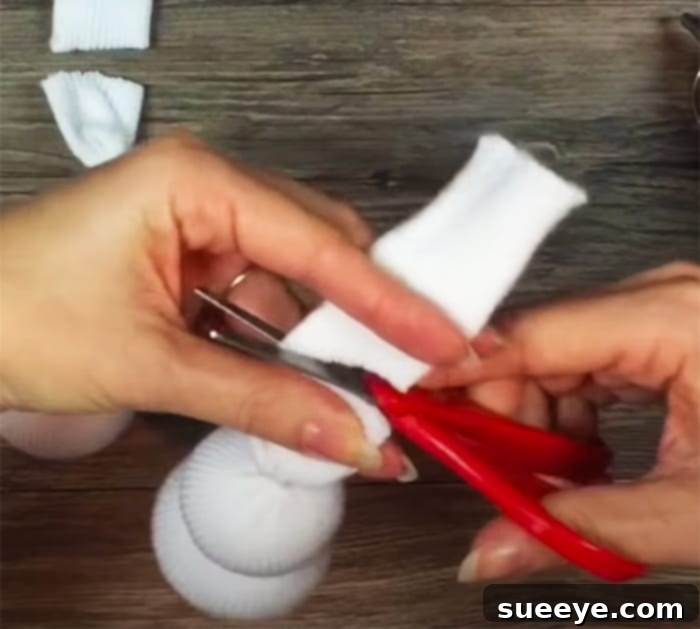
- Trim Excess Sock: Carefully cut off any excess sock fabric above the top rubber band, leaving a small margin. This excess piece can be repurposed for the snowman’s hat later, so don’t discard it!
Phase 2: Adding Personality – Hat and Scarf
This is where your snowman truly starts to come to life! The original inspiration uses a fluffy sock for an extra cozy touch, but any soft fabric works wonderfully.
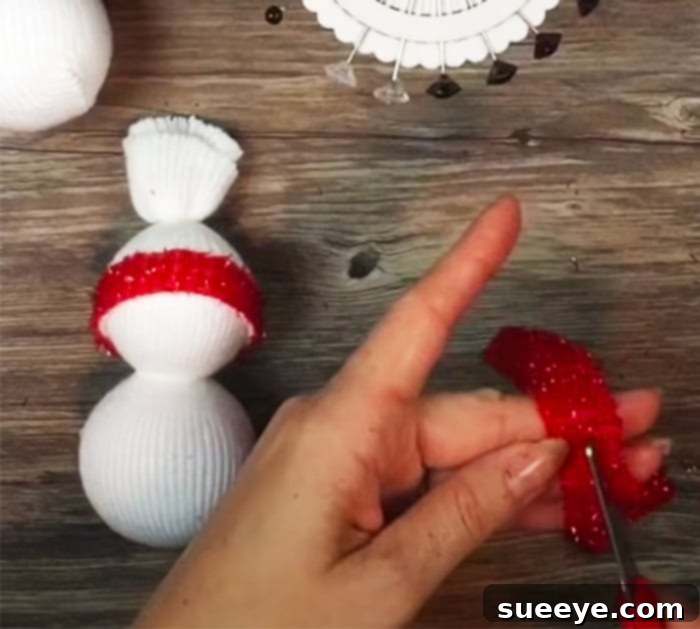
- Crafting the Beanie:
- Take the reserved piece of sock you cut off earlier, or a new piece of fluffy sock fabric.
- Wrap it around the top of the snowman’s head to measure. Cut it to size, ensuring it covers the top of the head and extends down slightly.
- You can either simply tie a knot at the top for a simple beanie look, or gather and hot glue the top closed, adding a small pom-pom for extra flair.
- Secure the beanie to the snowman’s head with a small dab of hot glue around the base of the hat.
- Creating the Scarf:
- Cut a long, thin strip of fabric from your chosen material (e.g., fluffy sock, felt, flannel). The length will depend on how many times you want it to wrap around the snowman’s neck and how long you want the ends to dangle.
- Wrap the fabric strip around the snowman’s neck, just below the head. You can tie it in a simple knot, a small bow, or let the ends hang freely.
- Use a tiny drop of hot glue to secure the scarf in place if desired, preventing it from slipping.
Phase 3: Adding Facial Features and Embellishments
This is where your snowman truly gains its unique character and charm. Don’t be afraid to experiment with different expressions!
- Eyes:
- You can use small black beads, tiny buttons, or even black fabric paint or a permanent marker for the eyes.
- For a quick and easy option, use two small black pearl-head pins pushed directly into the foam head.
- For a more permanent solution, hot glue the beads or buttons in place.
- Nose:
- A classic snowman nose is a carrot! You can draw a small orange triangle with an orange permanent marker or use orange nail polish.
- Alternatively, a tiny piece of orange felt, rolled into a cone and glued on, also works wonderfully.
- For extra dimension, a small bead or a tiny twig can mimic a nose.
- Mouth:
- A simple series of small black dots (made with marker, paint, or small black beads) forms a traditional coal mouth.
- A curved line drawn with a fine-tip marker can create a happy smile.
- Buttons: Hot glue two or three small buttons down the front of the snowman’s body for an adorable detail. You can use colorful buttons or classic black ones.
- Rosy Cheeks (Optional): A subtle dab of pink blush or a light touch of red nail polish can give your snowman a cheerful, rosy glow.
- Adding a Hanging Loop: If you intend for your snowman to be a Christmas tree ornament, cut a 6-inch loop of thin ribbon or string. Fold it in half and hot glue the ends securely to the top of the snowman’s head, hidden beneath the beanie.
Creative Variations & Inspiring Display Ideas
Once you’ve mastered the basic sock snowman, the possibilities for customization are endless! This allows you to truly make these festive decorations your own and ensure they complement your existing holiday theme.
Personalizing Your Snowmen:
- Socks of All Colors: While white socks are classic, don’t shy away from using patterned or colored socks for a whimsical twist. Think stripes, polka dots, or even holiday-themed prints!
- Hat and Scarf Materials: Experiment with different textures. Beyond fluffy socks, consider using plaid flannel for a rustic feel, sparkly tulle for a glamorous look, or small pieces of an old knit sweater for a cozy vibe.
- Embellishment Galore:
- Add small jingle bells to the hat or scarf for a festive sound.
- Glue tiny twigs to the sides for arms.
- Attach miniature charms or beads to the scarf.
- Use glitter glue to add a frosty sparkle.
- Unique Facial Expressions: Give your snowmen different personalities! Some can be smiling broadly, others with a mischievous wink, or a thoughtful frown.
Beyond the Christmas Tree: Displaying Your Creations:
These versatile little snowmen aren’t just for hanging! Here are some creative ways to incorporate them into your holiday decor:
- Wreath and Garland Adornments: Hot glue several snowmen onto a plain evergreen wreath or a festive garland for an instant upgrade.
- Gift Toppers: Attach a snowman to the top of a beautifully wrapped gift instead of a traditional bow. It’s a gift within a gift!
- Tabletop Centerpieces: Arrange a group of snowmen on a decorative tray with some faux snow, small pinecones, and battery-operated fairy lights for a charming winter wonderland centerpiece.
- Mantelpiece Decor: Line them up on your mantel alongside stockings and other festive elements.
- Door Decor: Hang a single snowman or a small cluster from a doorknob to welcome guests.
- Kids’ Room Decor: These are perfect for adding a touch of holiday cheer to a child’s bedroom without being fragile.
- Classroom Projects & Craft Fairs: Given their ease of creation and low cost, they’re excellent for school craft activities or selling at local holiday markets.
I am particularly excited to make these sock snowman ornaments this year! I have a collection of socks that, while still new, have gone unworn, making them perfect candidates for this upcycling project. The idea of transforming them into beautiful, mini festive decor items that can be hung anywhere – from the Christmas tree to a wreath or garland – is incredibly appealing. It’s a wonderful opportunity to create handmade Christmas gifts and decorations that carry a personal touch, spreading joy and warmth throughout the holiday season. So, gather your supplies, ignite your creativity, and embark on this delightful crafting journey. Happy crafting, and may your home be filled with the magic of handmade holidays!