
Transform Your Garden: Easy DIY Dragonflies from Recycled Materials
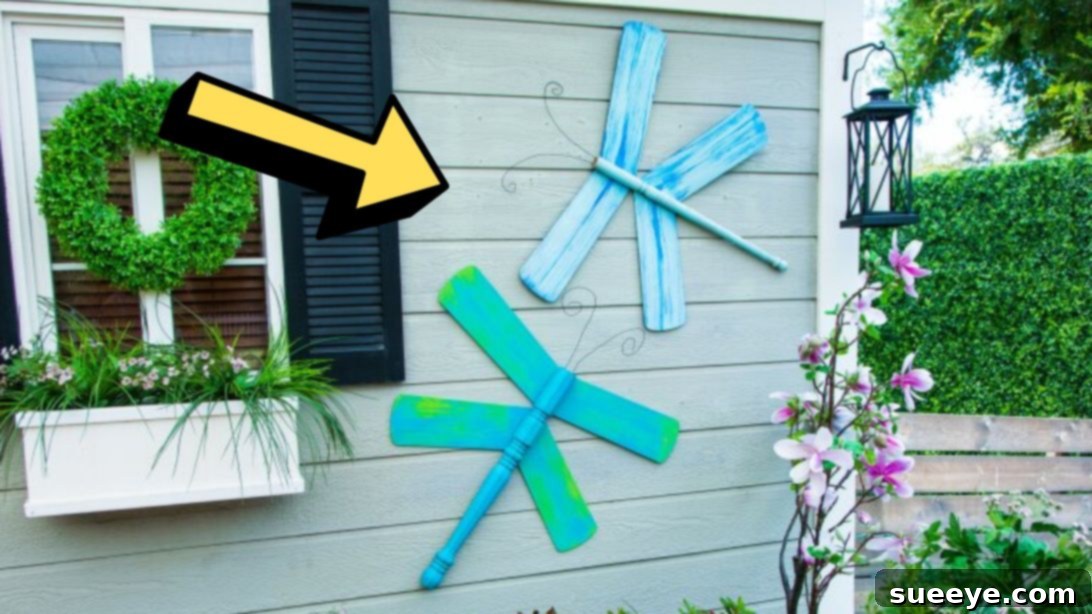
Are you looking for an innovative, eco-friendly way to add a whimsical touch to your garden or outdoor living space? Imagine vibrant dragonflies, crafted with your own hands from repurposed household items, gracing your walls, fences, or garden beds. This brilliant DIY project, originally shared by Hallmark Channel on YouTube, offers an incredibly rewarding way to create stunning garden art while giving new life to old table legs and ceiling fan blades. It’s a fantastic opportunity to unleash your creativity, contribute to a more sustainable lifestyle, and enhance your home’s curb appeal with unique, handcrafted decorations. Don’t miss out on transforming forgotten items into captivating garden creatures; let’s dive into making these charming DIY garden dragonflies today!
Why Choose DIY Recycled Garden Dragonflies?
In an age where sustainability is paramount, repurposing materials for decorative purposes is not just a hobby, but a statement. Crafting these garden dragonflies offers numerous benefits beyond just aesthetics:
- Eco-Friendly Approach: By utilizing old table legs and ceiling fan blades, you’re diverting waste from landfills and actively participating in the recycling movement. This project transforms what would typically be discarded into beautiful, functional art.
- Unique Garden Decor: Mass-produced decorations often lack character. Handmade dragonflies ensure your garden stands out with truly unique pieces that reflect your personal style and creative spirit. No two will be exactly alike, adding to their charm.
- Cost-Effective: You likely have some of the materials lying around your house or can source them inexpensively from thrift stores, garage sales, or community recycling centers. This makes it an incredibly budget-friendly way to elevate your outdoor decor.
- Creative Expression: From choosing vibrant paint colors to deciding on the perfect placement, this project allows for immense creative freedom. It’s an opportunity to experiment with different finishes, patterns, and even embellishments to make each dragonfly distinctly yours.
- Adds Whimsy and Charm: Dragonflies are often associated with change, transformation, and adaptability. Bringing these elegant insects into your garden decor can evoke a sense of peace, nature, and playful whimsy, enchanting visitors and delighting residents alike.
- Durable Outdoor Art: With proper preparation and weather-resistant finishes, these repurposed creations can withstand the elements, providing long-lasting beauty to your outdoor sanctuary.
Materials: Your Creative Toolkit for Garden Dragonflies
Gathering your materials is the first exciting step in bringing your garden dragonflies to life. This project brilliantly utilizes items you might already have, reducing waste and cost. Here’s what you’ll need:
- Old Wooden Table Legs: These will form the sturdy body of your dragonflies. Look for legs with interesting shapes or varying thicknesses for added character. Wood is ideal as it’s easy to work with and paint.
- Used Ceiling Fan Blades: The perfect shape and size for dragonfly wings! Seek out blades that are still intact and relatively flat. You’ll need at least four blades per dragonfly to create a natural wing span.
- Baling Wire (or other flexible sturdy wire): Essential for crafting the delicate, yet durable, antennae of your dragonflies. Ensure it’s pliable enough to coil but strong enough to hold its shape.
- Outdoor-Grade Paint: Choose vibrant colors that will pop in your garden and, most importantly, are designed to withstand outdoor conditions, protecting your creations from sun, rain, and temperature changes. Acrylic craft paints suitable for outdoor use or spray paints work wonderfully.
- Wood Glue: A strong adhesive specifically formulated for wood will ensure the fan blades securely attach to the table leg, forming the wings.
- Nail Gun (with appropriate nails): For a secure and lasting attachment of the wings to the body. If a nail gun isn’t available, strong wood screws and a drill can be an alternative, though the nail gun offers a cleaner finish.
- Wire Cutters: Necessary for cleanly cutting the baling wire to the desired lengths for the antennae.
- Electric Drill (with various drill bits): You’ll need this to create pilot holes for mounting the dragonflies and for inserting the wire antennae.
- Hot Glue Gun and Glue Sticks: Excellent for securing the wire antennae into place and for any minor embellishments you might wish to add.
- Measuring Tape or Ruler: For precise cuts and angles.
- Pencil or Marker: For marking cut lines.
- Safety Goggles and Gloves: Always prioritize safety when cutting, drilling, and painting.
Directions: Step-by-Step Crafting Your Garden Dragonflies
Creating these charming dragonflies is a straightforward process that yields incredibly satisfying results. Follow these detailed steps to bring your vision to life:
Step 1: Preparing Your Dragonfly Bodies and Wings
Begin by preparing the foundation of your dragonflies. Take your chosen table leg, which will serve as the body. Carefully remove any existing hardware, screws, or metal plates that might still be attached. A clean, smooth surface will be easier to work with. Set the prepared table leg aside; it will be ready for assembly in a later stage.
Next, turn your attention to the ceiling fan blades – these will become the elegant wings of your dragonfly. You’ll need four blades per dragonfly. Take the first pair of blades and, using a saw (a miter saw or a hand saw with a miter box works best for precision), cut the smaller, narrower end of each blade to a precise 15-degree angle. The goal here is to ensure that when these two blades are placed side-by-side, their cut edges align perfectly, forming a seamless V-shape that will attach neatly to the table leg. Repeat this process with the second pair of fan blades. These carefully angled cuts are crucial for achieving a natural and aesthetically pleasing wing configuration for your dragonfly.
Step 2: Assembling the Body and Wings
Now it’s time to join the wings to the body. Apply a generous, even layer of wood glue to the upper section of your table leg, where the wings will sit. Take one pair of your pre-cut ceiling fan blades, ensuring the angled edges are facing inward to create the wing shape. Carefully position this pair onto the glued section of the table leg. Once you’re satisfied with the placement, use your nail gun to securely attach the blades to the table leg. Drive nails through the fan blades into the table leg, spacing them evenly for maximum stability. Repeat this process with the second pair of fan blades, positioning them slightly lower on the table leg to create a natural, layered wing effect, similar to how a real dragonfly’s wings are positioned. Allow the wood glue to dry completely according to the manufacturer’s instructions before proceeding, ensuring a strong bond.
Step 3: Bringing Color and Life to Your Dragonfly
With the structure complete, it’s time to add personality through paint. Choose your desired outdoor-grade paint colors. You can opt for realistic dragonfly hues like blues, greens, and purples, or go wild with fantastical, vibrant shades. Paint the entire dragonfly – body and wings – ensuring thorough coverage. Don’t forget to paint all sides and edges. For a more durable finish, consider applying two coats of paint, allowing each coat to dry completely in between. Once painting is done, set your dragonfly aside in a well-ventilated area and allow it to dry fully. This drying process is crucial to ensure the paint cures properly and provides optimal weather resistance.
Step 4: Crafting and Attaching the Antennas
Every dragonfly needs its distinctive antennae! Take a length of baling wire (or your chosen sturdy wire) and cut two equal pieces, each about 6-8 inches long. Using your fingers or pliers, carefully coil one end of each wire piece to create a decorative spiral, mimicking the delicate tips of antennae. These coiled ends add a charming, artistic touch. Next, using your electric drill and a small drill bit (matching the gauge of your wire), drill two small, shallow holes at the very top of the table leg, where the dragonfly’s head would be. These holes should be just wide enough to snugly fit the wire. Apply a dab of hot glue to the uncoiled end of each wire antenna, then firmly insert them into the drilled holes. Hold them in place for a few seconds until the hot glue sets, ensuring the antennae are securely upright and positioned symmetrically.
Step 5: Installation and Display
Your magnificent garden dragonfly is almost ready for its grand debut! Decide where you want your dragonfly to live – on a garden wall, a fence post, a tree trunk, or even a shed. For secure mounting, drill a few pilot holes into the back of your dragonfly’s body (table leg). Then, select sturdy nails or screws that are long enough to penetrate both the dragonfly and your chosen mounting surface. Screw the dragonfly firmly into place, ensuring it’s stable and won’t be dislodged by wind or accidental bumps. You can install multiple dragonflies at varying heights and angles to create a dynamic, flying effect. Step back and admire your handiwork!
Personalize Your Dragonflies: Unleash Your Creativity
While the basic steps provide a fantastic foundation, don’t hesitate to add your personal flair to these garden creatures. Here are some ideas to inspire your customization:
- Vibrant Color Palettes: Experiment with iridescent paints, metallic finishes, or even glow-in-the-dark accents for evening appeal. Consider painting intricate patterns or designs on the wings.
- Embellishments: Attach glass beads, marbles, small mirrors, or mosaic tiles to the body or wings for added sparkle and texture. Use waterproof adhesive for outdoor durability.
- Different Sizes: Use varying sizes of table legs and fan blades to create a family of dragonflies, adding visual interest to your display.
- Textural Finishes: Before painting, you could sand areas or even apply texture paste to the table leg for an aged or weathered look.
- Eyes and Details: Add googly eyes or paint on realistic eyes to give your dragonflies more character. You can also paint subtle vein patterns on the wings for a touch of realism.
- Lighting Integration: For a magical evening effect, consider carefully wrapping small solar-powered fairy lights around the body or wings, ensuring they are securely fastened and waterproof.
Care and Maintenance for Long-Lasting Beauty
To ensure your DIY garden dragonflies remain vibrant and beautiful for years to come, a little care goes a long way:
- Weather Protection: Even with outdoor paint, an extra layer of clear, UV-resistant sealant spray can significantly extend the life of your dragonflies, protecting them from fading and chipping due to sun exposure and harsh weather. Apply this annually.
- Regular Cleaning: Periodically wipe down your dragonflies with a damp cloth to remove dirt, dust, and cobwebs, keeping their colors bright.
- Seasonal Storage: In areas with extreme winters, consider bringing your dragonflies indoors during the harshest months to prevent damage from freezing temperatures and heavy snow.
- Inspect for Wear: Occasionally check the integrity of the glue and nails. Reapply glue or add more fasteners if anything seems loose.
Creating these upcycled garden dragonflies is more than just a craft project; it’s an act of transforming the ordinary into the extraordinary, adding personal charm to your outdoor space, and embracing sustainable living. This project is a testament to the fact that beauty and creativity can be found in the most unexpected places.
A huge thank you to Hallmark Channel via YouTube for sharing this inspiring and resourceful project! If you enjoyed this creative journey and love crafting unique home and garden decor, be sure to visit their channel for more fantastic DIY ideas and don’t forget to subscribe for endless inspiration.