
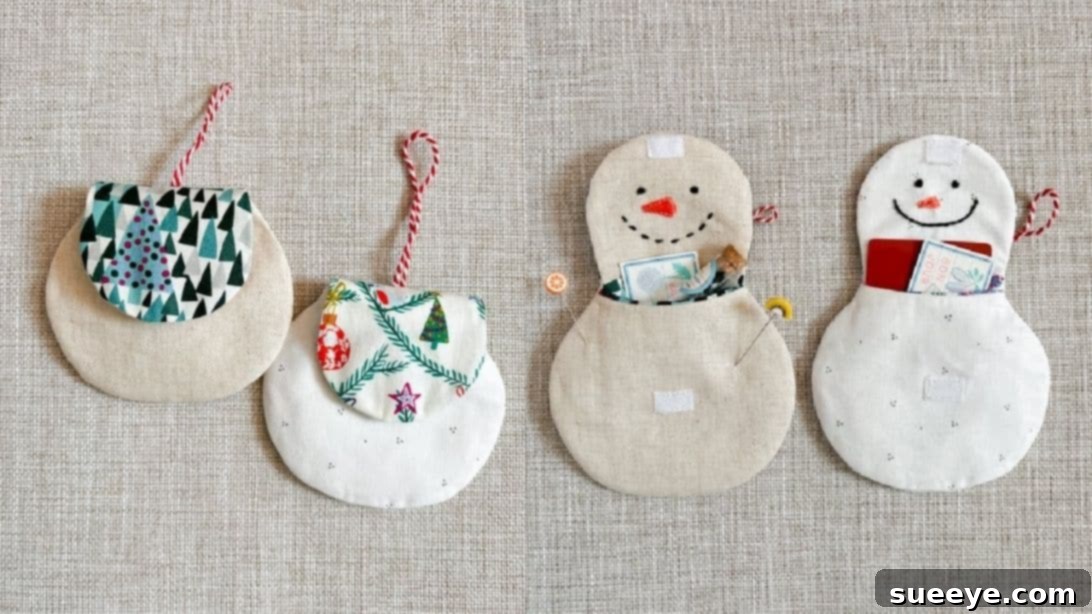
DIY Snowman Gift Card Holder: A Heartwarming Sewing Tutorial for Personalized Presents
In a world of mass-produced goods, there’s an undeniable charm and warmth in a handmade gift. Elevate your gift-giving experience and delight your loved ones with a beautifully crafted, personalized gift card holder. This DIY project isn’t just about utility; it’s a heartfelt expression of your affection, a tangible piece of your time and effort dedicated to making someone’s day special. Our delightful snowman gift card holder tutorial offers a unique opportunity to create something truly memorable, transforming a simple gift card into a cherished keepsake that radiates personal care and festive cheer.
Whether you’re a seasoned seamstress or just starting your journey into the world of fabric crafts, this project is designed to be incredibly beginner-friendly. We’ll guide you through each step with clear, concise instructions, ensuring a rewarding crafting experience. What’s more, this is an excellent opportunity to put those fabric scraps to good use, mixing and matching patterns and textures to create a collection of unique holders. Imagine the joy of presenting a gift card nestled inside a charming, hand-sewn snowman – it’s a gesture that speaks volumes, making your present stand out in a sea of generic envelopes! This tutorial, inspired by the creative genius of Minki Kim on YouTube, promises a fun, fulfilling activity that not only hones your sewing skills but also results in a truly heartwarming and unforgettable gift. Let’s embark on this creative adventure together and discover the unparalleled joy of handmade gifting.
Why Craft a Handmade Gift Card Holder?
Gift cards have become a ubiquitous and incredibly convenient present, offering recipients the ultimate freedom to choose exactly what they want or need. However, they can sometimes feel a little impersonal when simply tucked into a standard envelope. This is precisely where a handmade gift card holder truly shines. It transforms a practical and convenient gift into a deeply personal one, showing an extra layer of thought, care, and effort. Here’s why opting for a DIY holder elevates your present above the ordinary:
- A Unique Personal Touch: Every stitch, every fabric choice, and every embroidered detail carries your personal touch, making the gift holder unique and irreplaceable. It communicates a message of “I thought of you” in a way a store-bought item cannot.
- Environmentally Conscious Gifting: This project is a fantastic way to utilize fabric scraps and remnants, reducing waste and giving new life to forgotten materials. It’s a small step towards more sustainable crafting.
- Skill Development and Practice: For those looking to improve their sewing abilities, this project offers an excellent opportunity to practice and refine various sewing techniques, from basic straight stitching to more intricate applique and hand embroidery.
- Cost-Effectiveness: Often, you can create these beautiful and thoughtful holders using materials you already have on hand, such as fabric scraps, spare thread, and bits of felt, significantly saving on gift wrapping costs.
- Versatility for Any Occasion: While our tutorial focuses on an adorable snowman, the basic principles and techniques can be easily adapted for any theme, holiday, or personal preference. Think birthday cakes, Halloween pumpkins, or elegant floral designs.
- A Lasting Keepsake: Unlike a plain paper envelope that is quickly discarded, a handmade holder can be kept as a decorative item, a cherished memento, or even repurposed for organizing small items like jewelry, pins, or hair clips.
Essential Materials for Your Snowman Gift Card Holder
Before diving into the creative process, gathering all your materials is a crucial first step. For this project, we prioritize simplicity and accessibility, making it easy for crafters of all levels to participate. These carefully selected items will help you bring your adorable snowman gift card holder to life with ease and charm:
- White Print Fabric: You’ll need one piece measuring approximately 10 inches (25cm) x 10 inches (25cm). This fabric will form the main body and face of your snowman. A good quality quilting cotton or a similarly structured woven fabric is ideal, offering durability and ease of handling during sewing. Consider a fabric with subtle, delicate patterns like tiny snowflakes, polka dots, or a faint winter scene to add an extra layer of character to your snowman.
- Lining Fabric: Also requiring a 10 inches (25cm) x 10 inches (25cm) piece. This fabric will provide the interior finish and essential structure for your cardholder. You can choose a contrasting color or pattern to create a delightful visual surprise when the holder is opened, or opt for a complementary tone to maintain a cohesive and elegant look. Flannel or a soft cotton can add a cozy touch.
- Woven Fusible Interfacing: A matching 10 inches (25cm) x 10 inches (25cm) piece. This material is absolutely crucial for adding stability, body, and crispness to your fabric. It ensures your gift card holder has a nice, firm structure, preventing it from flopping and helping it maintain its shape over time while also protecting the contents. A medium-weight fusible interfacing is generally recommended for this type of project.
- Velcro: A small piece, about 1 inch (2.5cm) in length. This will create a secure and practical closure for your cardholder, ensuring the gift card remains safely tucked inside. Opt for sew-on Velcro rather than adhesive versions, as it provides a much cleaner finish and superior durability, standing up to repeated use.
- String or Cord: Approximately 6-8 inches (15-20cm) in length. This will form the charming hanger for your snowman’s head, allowing it to “swing” open gracefully. Choose a color that beautifully complements your selected fabrics – perhaps a festive red, a natural jute cord for a rustic feel, or a metallic gold for a touch of elegance.
- Black Embroidery Floss: A small amount, preferably using 2-3 strands for a noticeable yet delicate look. This will be used to hand-stitch the intricate facial features of your snowman, such as the eyes and mouth, adding personality and a handmade charm that machines can’t replicate.
- Orange Felt Scrap: A tiny piece, just large enough to cut a small carrot-shaped nose. This classic element adds a quintessential snowman detail and a vibrant pop of color against the white fabric.
- Basic Sewing Kit: Ensure you have a sharp pair of fabric scissors for clean cuts, a fabric marking pen or pencil for tracing patterns, a sewing machine (or hand-sewing needles if preferred), matching all-purpose thread, an iron, and an ironing board for pressing seams.
Step-by-Step Directions: Crafting Your Charming Snowman Gift Card Holder
Embark on this delightful crafting journey by following these detailed instructions. Each step is broken down to ensure clarity and success, allowing you to create a beautiful snowman gift card holder with confidence. Remember to enjoy the process and don’t hesitate to personalize your creation!
Step 1: Preparing the Snowman Face and Body
- Fuse the Interfacing: Begin by taking your white print fabric, which will serve as the main snowman body, and your woven fusible interfacing. Following the manufacturer’s specific instructions (usually involving heat and steam), carefully iron the fusible interfacing onto the wrong side of the white print fabric. This essential step is crucial for giving your fabric the necessary stiffness and robust structure, preventing it from sagging and ensuring your holder maintains its shape.
- Trace and Trim the Snowman Pattern: Once the interfacing is securely fused and cooled, retrieve your chosen snowman pattern. If you don’t have a specific pattern, a simple design consisting of a smaller round shape for the head and a slightly larger oval shape for the body works perfectly. Using your fabric marking pen or pencil, carefully trace the snowman outline onto the right side of your fused white fabric. Precisely cut out your snowman shape along the traced lines. This piece will form the charming front of your gift card holder.
- Embroider the Snowman’s Face: Now, let’s infuse personality into your snowman! Thread your needle with 2 strands of black embroidery floss. Hand stitch two small, neat circles for the eyes and a gentle, upward-curving line for the mouth onto the designated face area of your snowman piece. Take your time to create even, consistent stitches that capture a friendly and inviting expression.
- Attach the Felt Nose: Cut a small, elongated carrot-shaped nose from your orange felt scrap. Position it carefully in the center of the snowman’s face, just below the embroidered eyes. Using a matching thread (or a contrasting one for effect), stitch all around the edges of the felt nose to secure it firmly in place. Small, close stitches will ensure it doesn’t fray or detach.
- Prepare the Velcro Closure: Take your small piece of Velcro and cut it into two smaller, identical pieces. Stitch one part of the Velcro onto the forehead area of your snowman’s head. This will act as the ‘receiving’ end of your closure when the head is folded down. Ensure it’s centered and stitched securely.
- Assemble the Head and Body with Velcro: Carefully fold the head portion of your snowman piece downwards, aligning it precisely onto the body section. This fold should perfectly position the Velcro piece on the forehead over the spot where the other Velcro piece needs to be attached on the body. Stitch the remaining Velcro piece onto the body section, making sure it aligns perfectly with the piece already stitched onto the head. When closed, these two Velcro pieces should meet cleanly and secure the snowman’s head in a neatly folded position, creating a charming and functional closure.
Step 2: Constructing the Holder and Finishing Touches
- Prepare the Hanger String: Take your chosen string or cord. Fold it in half to form a loop, then tie a secure knot at the cut ends, ensuring the loop is stable. This loop will serve as the decorative and functional hanger for the snowman’s head, allowing it to “swing” open to reveal the gift card.
- Attach the String to the Body: Place the knotted end of the string loop upside down onto the top center edge of the snowman’s body (this is the section that will be covered by the head when closed). The loop itself should extend outwards beyond the raw edge, ready to be caught securely in a seam.
- Secure the Head Section: Carefully fold the snowman’s head down on top of the string, ensuring the knotted part of the string is neatly sandwiched between the head and body fabrics. Clip or pin the head firmly in place to prevent any shifting during sewing. Using your sewing machine, sew a straight seam across the top edge of the folded head. This seam will secure both the head in its folded position and the string loop firmly within the layers. Once sewn, open the fold and gently press the seam open and flat with a warm iron for a crisp, professional finish.
- Assemble Main Fabric and Lining: Now, take your partially assembled snowman front piece (with the head and Velcro attached) and your separate lining fabric. Place them right sides together, aligning all raw edges carefully. Clip or pin them securely around all four sides of the rectangle, ensuring no fabric shifts.
- Sewing the Perimeter (Partial): Using your sewing machine, sew around only the top and bottom edges of the rectangle, maintaining an approximate quarter-inch (6mm) seam allowance. It is crucial to leave both vertical side edges completely unsewn for now. This intentional opening will be used later to turn the entire project right side out.
- Create the Side Seams: Open up the sewn fabric pieces so they lie flat. Now, align the raw side edges. This action will effectively create two separate ‘tubes’ of fabric if you were to flatten it. Clip or pin these side edges together firmly and sew them, again using a consistent quarter-inch seam allowance. You are now essentially creating the internal side walls and structure of your gift card holder.
- Notch and Trim: To ensure clean, crisp corners and to reduce bulk in your seams, carefully make small V-shaped notches into the seam allowance around any curved edges of your snowman, taking care not to cut through your stitches. Additionally, trim the excess fabric from all four corners, cutting diagonally across them. This will allow the corners to turn out sharply.
- Turn Right Side Out: Gently flip your entire project right side out through the unsewn gap you left earlier. Use a blunt tool, such as a chopstick, a turning tool, or even a pen cap, to carefully push out all corners and edges from the inside. This action will create a neat, defined shape for your gift card holder.
- Close the Gap: Finally, locate the unsewn gap from where you turned the fabric. Fold the raw edges of this opening neatly inwards, aligning them precisely with the already sewn seam. Press this folded edge flat with an iron for a crisp finish. Hand stitch this gap closed using an invisible ladder stitch for a seamless appearance, or if you prefer, carefully topstitch it closed on your sewing machine, very close to the edge for a decorative finish. Your charming snowman gift card holder is now complete and ready to bring smiles!
Tips for a Flawless Handmade Gift Card Holder
Achieving a polished, professional-looking finish on your sewing projects often comes down to paying attention to a few key techniques and establishing good habits. Here are some valuable tips to keep in mind while crafting your snowman gift card holder, ensuring a beautiful result every time:
- Pre-Wash and Press Your Fabrics: Especially if you are mixing different fabric types (e.g., cotton and felt), pre-washing them helps prevent future shrinking and ensures all fabrics behave uniformly after assembly. Always press your fabrics before cutting to ensure they are perfectly flat and wrinkle-free, leading to more accurate cuts and seams.
- Use Sharp Tools: A sharp pair of fabric scissors is essential for clean, precise cuts that prevent fraying. Similarly, use a fresh, sharp sewing machine needle appropriate for your fabric type (e.g., universal needle for cotton). Dull tools can snag fabric, lead to uneven cuts, or cause skipped stitches.
- Pressing is Your Best Friend: This cannot be overstated. Ironing seams flat and pressing components at each stage of the project makes a huge difference in the final appearance. Pressing opens seams, flattens bulk, and gives your holder a crisp, professional look. Do not skip this step!
- Pin or Clip Generously: When joining fabric pieces, especially when dealing with multiple layers, curves, or when aligning delicate features, use plenty of pins or fabric clips. This prevents shifting and ensures your pieces stay perfectly aligned, leading to more accurate and neater sewing.
- Slow and Steady Wins the Race: When sewing, particularly around curves, intricate corners, or during the final topstitching, reduce your machine’s speed. This allows for greater control over your fabric and stitch placement, resulting in much neater and more consistent stitches.
- Test Your Stitches: Before committing to your main project, always test your stitch length and tension on a small scrap piece of your project fabric. This ensures your machine settings are optimal for the specific fabrics you are using, preventing puckering or loose stitches.
- Master the Invisible Ladder Stitch: For closing the final opening left for turning the fabric, the invisible ladder stitch (also known as a slip stitch) is highly recommended. It creates a seamless closure that blends beautifully with the rest of your work, giving your project a truly handmade-with-love finish.
Unleash Your Creativity: Customization Ideas for Your Gift Card Holder
While the snowman design is undeniably charming and perfect for winter gifting, the true beauty of DIY lies in the endless possibilities for customization. This basic pattern provides a fantastic canvas for your creativity. Here are some inspiring ideas to make your gift card holders truly unique and perfectly suited to any recipient or occasion:
- Explore Diverse Seasonal Themes: Adapt the applique design for other holidays or seasons. Instead of a snowman, consider a cheerful pumpkin for Halloween, a delicate heart for Valentine’s Day, a fluffy bunny for Easter, or a simple, elegant evergreen tree for a general festive feel that transcends just winter.
- Personalized Monograms and Names: For an extra special touch, embroider the recipient’s initials, their full name, or a significant date onto the back of the holder or the inside flap. This instantly transforms a sweet gift into a cherished, personalized keepsake.
- Experiment with Fabric Choices: Don’t limit yourself to cotton. Experiment with different fabric textures to alter the feel and appearance. Imagine a luxurious velvet for an elegant touch, rustic linen for a farmhouse chic look, or vibrant, playful patterns for a whimsical vibe. Coordinate colors to match a specific event or personality.
- Add Delightful Embellishments: Enhance the design with small decorative elements. Consider adding tiny buttons for eyes, delicate beads for a sparkly effect, sequins for a festive shimmer, or miniature bows and ribbons for extra charm. Always ensure any embellishments are securely attached, especially if the holder is intended for a child.
- Pocket Variations and Add-ons: Instead of just a simple gift card slot, consider adding a small, flat pocket to hold a tiny handwritten note, a small photo, or even a mini chocolate square. You could also create multiple card slots if the recipient is receiving several gift cards.
- Alternative Closure Mechanisms: While Velcro is practical and easy to use, explore other closure options for a different aesthetic. A snap button offers a clean, secure closure, a decorative fabric loop paired with a beautiful button can add elegance, or even discreet magnetic snaps can provide a sophisticated touch.
- Beyond Gift Cards: Think outside the box! These holders can also be used for small essential oils, a few special tea bags, a mini sewing kit, or even as a cute holder for earbuds or a USB stick.
Embrace the Joy of Handmade Gifting
There’s immense satisfaction in creating something beautiful and functional with your own hands, especially when that creation is destined to bring joy to someone else. This handmade snowman gift card holder is far more than just a clever place to stash a gift card; it’s a labor of love, a testament to your creativity, and a truly heartwarming present that will be remembered and appreciated long after the gift card itself has been spent.
We believe that every handmade item carries a piece of the maker’s heart, and that connection is what makes such gifts truly special. We encourage you to share your unique creations with us! Please take photos of your finished gift card holders and tell us about your experience crafting them. Did you discover a new favorite sewing technique? Did you personalize yours in a unique and imaginative way? Your crafting journey inspires others, and we absolutely love to see the diverse and wonderful interpretations of these tutorials from our creative community.
For more inspiring sewing projects, delightful craft ideas, and expertly guided tutorials, be sure to visit Minki Kim’s YouTube channel. Her innovative designs and clear, encouraging instructions make crafting accessible and enjoyable for everyone, regardless of skill level. Happy sewing, and most importantly, happy gifting!