
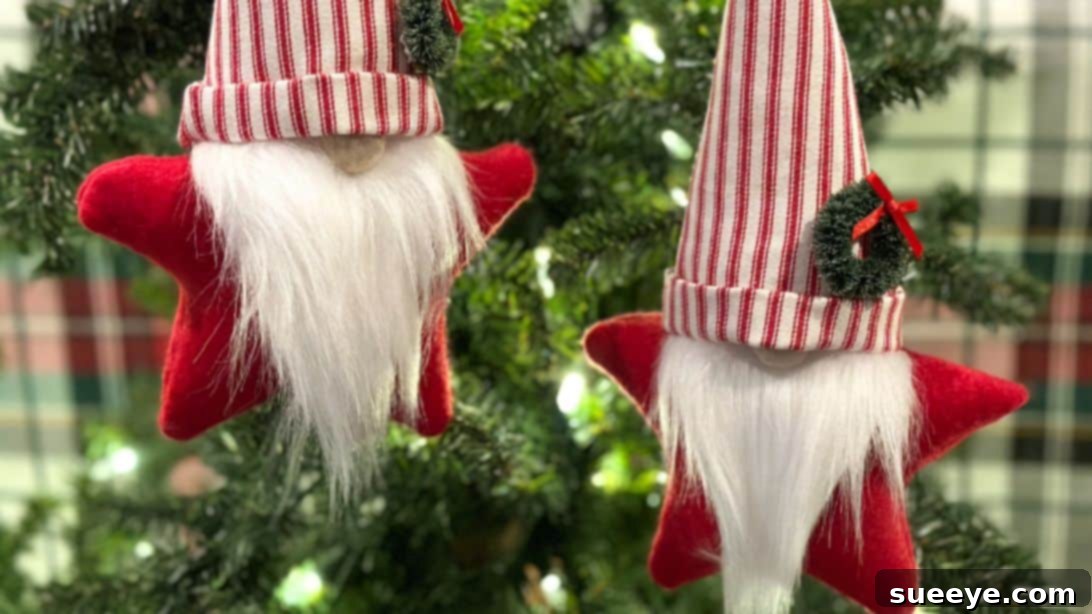
Craft an Adorable DIY Star Gnome Ornament: Your Easy Guide to Festive Decor
As the holiday season draws near, the magical task of decorating transforms our homes into cozy, festive sanctuaries. While glittering store-bought baubles have their charm, there’s an undeniable warmth and personal touch that comes from handmade ornaments. This year, why not infuse your Christmas tree with a touch of whimsical charm by crafting an adorable DIY Star Gnome ornament? This delightful project, inspired by the creative genius of Patti J. Good on YouTube, is incredibly easy, quick to make (often in under 10 minutes!), and wonderfully budget-friendly, especially since many supplies can be sourced from your local Dollar Tree.
Imagine your Christmas tree adorned with these charming little gnomes, each one uniquely crafted by your own hands. They not only serve as beautiful decorations but also carry the joy and effort of a fun crafting session. Whether you’re a seasoned crafter or just starting, this guide will walk you through every step to create these enchanting star gnomes.
Why Choose DIY Christmas Ornaments for Your Holiday Decor?
Opting for DIY Christmas ornaments offers a multitude of benefits beyond just saving money. Handmade decorations bring a unique character and narrative to your holiday display:
- Personalized Touch: Each ornament can reflect your personality, style, and cherished memories, making your tree truly one-of-a-kind.
- Memorable Family Activity: Crafting together is a fantastic way to bond with family and friends, creating new holiday traditions and lasting memories.
- Budget-Friendly Decor: Utilizing affordable materials, especially from stores like Dollar Tree, allows you to create stunning decor without breaking the bank.
- Meaningful Gifts: A handmade ornament makes a thoughtful and heartfelt gift, showing loved ones you put time and care into their present.
- Therapeutic and Relaxing: Engaging in creative projects can be a wonderful stress-reliever, offering a peaceful escape from holiday hustle and bustle.
The Enduring Charm of Christmas Gnomes in Holiday Decor
Gnomes have soared in popularity in recent years, becoming a beloved staple in holiday decor. These mythical creatures, often depicted with long beards and tall, pointy hats, are rooted in Scandinavian folklore, where they are believed to be guardians of the home, bringing good luck and protection to families. During Christmas, gnomes transform into festive figures, symbolizing the spirit of the season, warmth, and coziness.
A DIY Star Gnome combines this beloved folklore element with a classic holiday symbol, the star, creating an ornament that is both traditional and delightfully modern. Their whimsical appearance makes them perfect for adding a touch of playful enchantment to any Christmas setting.
Gather Your Essentials: Materials Needed for Your DIY Star Gnome
One of the best aspects of this Christmas gnome project is how accessible and inexpensive the materials are. Many items can be found at Dollar Tree or your local craft store, ensuring your creative venture is kind to your wallet. Here’s what you’ll need:
- Fleece fabric, red (for the star body, soft and easy to work with)
- Pillow ticking, red (for the hat, provides a lovely textured look)
- Poly-fil fiberfill (for stuffing, giving your gnome its plump shape)
- Faux fur (for the beard, choose a color that complements your fabric)
- Fabric pins (to hold patterns and fabric securely)
- Sharp scissors (for precise cutting)
- Hot glue gun and glue sticks (your main assembly tool for quick crafting)
- Upholstery needle (useful for threading details, if not, a regular needle will do for string)
- Red and white string (for hanging your ornament)
- Pipe cleaner (to give the star points shape and flexibility)
- Felt ball (for the gnome’s nose)
- Beads, optional (for added embellishment on the hanger)
- Mini wreath, optional (a cute detail for the hat)
- Pattern (Click here to download the template for your star and hat)
Crafting Your Enchanting Star Gnome: A Step-by-Step Guide
Follow these detailed instructions to bring your adorable star gnome to life. Patti J. Good’s method ensures a smooth and enjoyable crafting experience, even if you’re a beginner.
Step 1: Preparing the Star Base (The Gnome’s Body)
- Print and Cut the Star Template: Begin by printing the provided star pattern. Make sure it’s sized appropriately for your desired ornament. Carefully cut out the paper template.
- Cut the Fleece Fabric: Take your red fleece fabric and fold it in half, ensuring the edges are aligned. Lay the star template on top of the folded fleece. Pin the template securely in place with fabric pins to prevent it from shifting while you cut.
- Cut and Prepare the Star Shape: Using your sharp scissors, carefully cut around the template, through both layers of fleece fabric. Once cut, remove the template and pins.
- Assemble the Star: Using your hot glue gun, carefully apply a thin bead of hot glue along the raw edges of the fleece fabric, joining the two star pieces together. Leave one point of the star open and unglued. This opening will be used for turning and stuffing.
- Notch the Corners: To ensure your star turns out smoothly and its points are well-defined, make small notches into the seam allowance around the inner curves of the star and clip the outer corners. Be careful not to cut through the glued seam.
- Turn and Refine: Carefully turn the star right side out through the unglued opening. Use a blunt object, like the end of a chopstick or a turning tool, to gently push out each point of the star, making them as crisp and neat as possible.
Step 2: Adding Structure and Character (The Stuffing and Beard)
- Stuff the Star Body: Begin to generously stuff the star shape with Poly-fil fiberfill. Distribute the fiberfill evenly, ensuring the star is plump and holds its shape without being overly stiff.
- Insert the Pipe Cleaner: To give your star gnome’s body some poseability and structure, fold a pipe cleaner twice in half. Insert this folded pipe cleaner into the star, pushing it gently into the points. This is particularly useful for shaping the gnome’s “legs” or bottom points. Once the pipe cleaner is positioned, apply a small amount of hot glue to seal the open point of the star, securing the pipe cleaner inside.
- Craft the Gnome’s Beard: Take your faux fur fabric. Using the hat template or a separate beard template (if provided), cut a piece of fur for the beard. Remember to cut only the fabric backing with sharp scissors or a craft knife, keeping the fur fibers intact for a fuller look. Hot glue this fur beard piece to the front of your star body, positioning it where the gnome’s face would be.
- Prepare the Hat Template: Now, locate and cut out the hat template from your pattern sheet.
Step 3: Crafting the Gnome’s Signature Hat
- Cut the Hat Fabric: Fold your pillow ticking fabric with its right side facing in. Pin the hat template on top of the folded fabric and carefully cut out the hat shape, just as you did with the star.
- Form the Hat: With the right sides still together, hot glue the straight edges of the hat together, forming a cone.
- Create the Cuff: Fold the bottom cuff of the hat up about 1 inch towards the outside and hot glue it in place.
- Turn and Shape the Hat: Turn the hat right side out and gently poke out the point to ensure it’s nice and sharp.
- Refine the Cuff and Stuff: Fold the cuff again, this time about ½ inch, to create a neat finished edge. Now, lightly stuff the hat with some Poly-fil fiberfill to give it a soft, rounded shape. Don’t overstuff; it should be pliable.
Step 4: Assembling and Personalizing Your Gnome
- Attach the Hat: Carefully insert the bottom edge of the hat onto the top point of the star body, securing it with hot glue. Make sure the hat is centered and slightly tilted for a charming look.
- Add the Nose: Glue the felt ball onto the star, just above the beard and below the rim of the hat, to create the gnome’s adorable nose.
- Decorate the Hat (Optional): If you’re using a mini wreath, attach it to the bottom of the hat with a dab of hot glue, as demonstrated in Patti J. Good’s video, for an extra festive touch.
- Create the Hanger: Take a length of red and white string. Thread a loop of the string through the very tip of the gnome’s hat. You can use your upholstery needle for this. Tie a knot to secure the loop.
- Embellish the Hanger (Optional): If desired, insert a few decorative beads onto the string loop before securing them with a small dot of hot glue to prevent them from sliding off. This adds a lovely finished detail to your ornament.
- Display Your Masterpiece: Your charming DIY star gnome ornament is now complete! Hang it proudly on your Christmas tree, use it as a festive garland accent, or adorn a special gift package.
Tips for Personalizing Your Star Gnome Ornaments
While the basic pattern creates an adorable gnome, don’t hesitate to unleash your creativity and make each one uniquely yours. Here are some ideas for personalization:
- Fabric Choices: Experiment with different colors and patterns of fleece and pillow ticking. Plaid, striped, or even glittery fabrics can add a fresh look.
- Beard Varieties: Use different shades of faux fur—white, gray, brown, or even a whimsical colored fur—for distinct gnome personalities.
- Hat Embellishments: Attach mini bells, small buttons, glitter, faux berries, or even tiny painted designs to the hat for extra festive flair.
- Size Variations: Scale the pattern up or down to create gnomes of different sizes, from tiny ornaments to larger tabletop decor.
- Accessories: Give your gnome tiny eyeglasses made from wire, a small wooden staff, or a mini bundle of faux gifts for a storytelling touch.
- Expressive Noses: Instead of a plain felt ball, consider painting a small wooden bead for the nose or even lightly blushing the felt ball with a bit of chalk for a rosy cheek effect.
Displaying Your Handmade Star Gnomes: Creative Ideas
These DIY Star Gnomes are versatile and can be displayed in many charming ways beyond just the Christmas tree:
- Christmas Tree Stars: Their primary purpose, these gnomes will shine brightly among your other cherished ornaments.
- Garland Accents: String several gnomes together with fairy lights for a whimsical garland across your mantelpiece or staircase.
- Gift Toppers: Attach a gnome to a wrapped present for an extra special, handmade touch that doubles as a keepsake.
- Wreath Enhancements: Secure a gnome or two onto a festive wreath for your front door, welcoming guests with holiday cheer.
- Table Centerpieces: Arrange a collection of gnomes of varying sizes with pinecones, faux snow, and greenery for a delightful centerpiece.
- Kids’ Room Decor: These soft, friendly gnomes are perfect for adding a touch of festive magic to a child’s bedroom.
Care and Storage for Your DIY Star Gnome Ornaments
To ensure your beloved handmade gnome ornaments last for many Christmases to come, proper care and storage are essential:
- Gentle Cleaning: If your gnome gets dusty, gently brush it off with a soft, dry cloth or a soft-bristled brush. Avoid water or harsh cleaners, especially on the faux fur and felt.
- Careful Handling: While durable, hot-glued components can sometimes detach with rough handling. Always pick up your gnome carefully.
- Proper Storage: When the holidays are over, store your gnomes in a dry, cool place. A sturdy box lined with tissue paper or bubble wrap will protect them from dust and getting crushed. Avoid stacking heavy items on top.
- Avoid Direct Sunlight: Prolonged exposure to direct sunlight can fade fabric colors over time, so store them away from windows or bright lights.
Conclusion: Embrace the Joy of Handmade Holiday Decor
Crafting these easy DIY Star Gnome ornaments is more than just a craft project; it’s an opportunity to inject personal warmth and creativity into your holiday celebrations. With simple materials, a free pattern, and Patti J. Good’s clear guidance, you can quickly create charming decorations that will be cherished for years.
So, gather your supplies, put on some festive music, and embark on this delightful crafting adventure. Not only will you end up with adorable, unique ornaments, but you’ll also create wonderful memories in the process. Happy crafting, and may your home be filled with the magic of handmade holiday joy!
All image credit belongs to Patti J. Good via YouTube. Follow and subscribe to her channel for more inspiring DIY projects!