
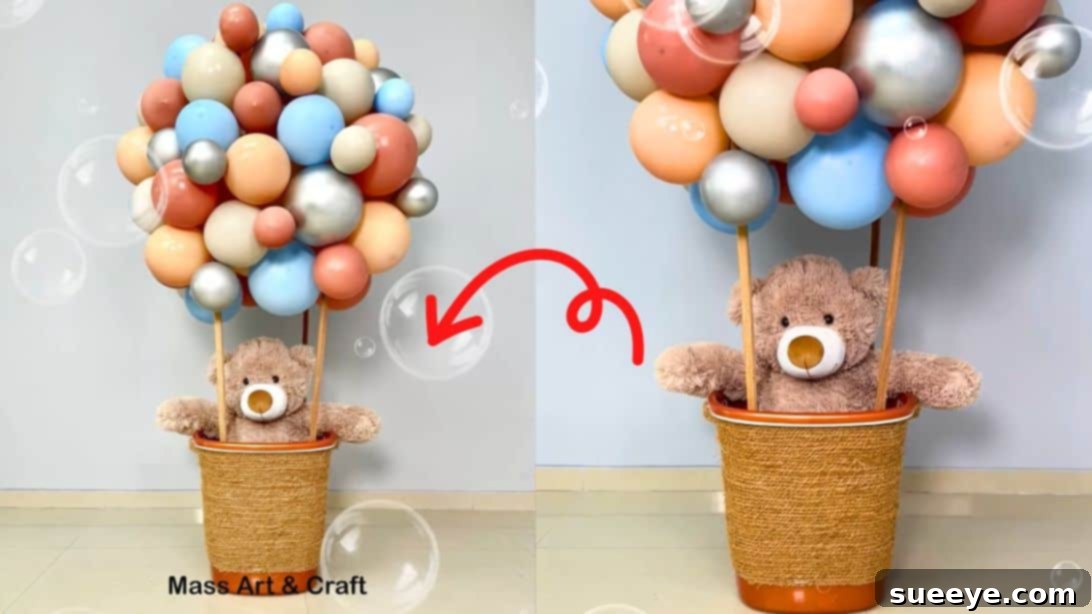
Create an Adorable DIY Teddy Bear Hot Air Balloon Decoration for Unforgettable Celebrations
Imagine a whimsical centerpiece that effortlessly captures hearts and ignites smiles at any event. This DIY teddy bear hot air balloon decoration is precisely that – an enchanting creation guaranteed to be a conversation starter and receive countless compliments. Perfect for adding a touch of magic to kid’s birthday parties, baby showers, or simply as a charming, unique decor piece for a nursery or playroom, this project combines simplicity with stunning visual appeal. What’s even better? It’s incredibly straightforward to craft, requiring just a handful of readily available materials. If you have a stash of balloons waiting for their moment to shine, now is the perfect opportunity to transform them into something truly special. Drawing inspiration from the creative minds at MASS Art and Craft, this comprehensive guide empowers you to recreate this delightful idea, allowing for endless customization in size, color, and theme to perfectly match your vision. Get ready to embark on a fun and rewarding crafting journey. Continue reading for a comprehensive step-by-step tutorial, complete with detailed instructions and helpful tips, or watch the inspiring video by MASS Art and Craft for a visual guide.
Why This DIY Hot Air Balloon Decoration is a Must-Try
In a world saturated with mass-produced decorations, a handmade piece like this teddy bear hot air balloon truly stands out. It’s more than just a decoration; it’s a statement of love, creativity, and thoughtfulness. Here are several compelling reasons why this DIY project is an absolute must-try for your next event or home decor:
- Unforgettable Visual Appeal: The whimsical design instantly draws attention, creating a magical focal point that guests of all ages will adore. It evokes a sense of wonder and adventure, making any space feel more inviting, festive, and joyful. Its unique charm transforms ordinary spaces into something extraordinary.
- Personalized Touch: Unlike generic store-bought items, this decoration can be entirely customized to reflect your specific vision. Choose colors that perfectly match your party theme, select a teddy bear or another beloved stuffed animal that holds special meaning, and adjust the size to fit your display area perfectly. This personal touch ensures your celebration is truly unique and memorable, reflecting your individual style.
- Budget-Friendly Creativity: Many of the core materials, such as balloons and a plastic basket, might already be lying around your home, or can be purchased very affordably from local craft or party supply stores. This DIY approach allows you to create a high-impact, luxurious-looking decoration without breaking the bank, offering significant savings compared to custom-ordered or specialty decor items.
- Easy and Rewarding Process: You absolutely don’t need to be an expert crafter or have years of DIY experience to achieve stunning results with this project. The steps are simple, clearly outlined, and designed to be accessible for beginners, making it a fantastic project for anyone looking to tap into their creative side. The satisfaction of crafting something so beautiful and impactful with your own hands is incredibly rewarding and boosts confidence.
- Versatile for Various Occasions: While undeniably perfect for children’s birthday parties, the timeless charm of this hot air balloon extends far beyond. It’s an ideal decoration for baby showers, gender reveal parties, enchanting nursery decor, adorable bedroom accents, or even as a unique and charming prop for photoshoots. Its broad appeal means it can be adapted for numerous celebrations and settings throughout the year.
- Engaging Crafting Experience: This project offers a delightful opportunity for a fun activity that can even involve older children (with appropriate supervision, especially when using a hot glue gun). It fosters creativity, encourages teamwork, and provides a wonderful bonding experience. The process itself is enjoyable, leading to a delightful and cherished end product.
By investing a little time, creativity, and a dash of effort, you’ll produce a cherished decoration that leaves a lasting impression on everyone who sees it and brings a genuine smile to every face. Let’s gather our supplies and begin this enchanting journey into the world of DIY decor!
Essential Materials You’ll Need
Before diving into the creative process, it’s crucial to ensure you have all the necessary supplies readily on hand. Most of these items are easily found at local craft stores, party supply shops, dollar stores, or online retailers. Gathering everything beforehand will make your crafting experience seamless, efficient, and thoroughly enjoyable. A little preparation goes a long way in ensuring a smooth project execution.
- Plastic Basket: Opt for a lightweight yet sturdy plastic basket. If your chosen basket comes with an attached handle, carefully remove it using scissors or pliers, as we’ll be covering the basket for a cleaner finish. The size of the basket will dictate the overall scale of your hot air balloon.
- Jute String: This natural fiber string is perfect for giving the basket a charming, rustic, and textured look, transforming it into a realistic gondola. You’ll need a generous amount to wrap the entire exterior of the basket thoroughly.
- 4 Long Slender Wooden Sticks: These will form the essential support structure, or “rigging,” for your balloon. Dowel rods, thin bamboo skewers, or even sturdy chopsticks (if making a smaller version) work exceptionally well. Ensure they are straight and strong enough to bear the weight of the balloon cluster.
- Heavy-Duty Tape: For securing the wooden sticks firmly to the basket, providing additional stability beyond what hot glue alone can offer. Duct tape, strong packing tape, or even electrical tape are ideal choices for this crucial step.
- Hot Glue Gun and Glue Sticks: An indispensable tool for this project, perfect for securing various elements quickly and effectively. Always handle a hot glue gun with caution, and ensure proper ventilation. Keep extra glue sticks on hand.
- Big and Small Balloons in Different Colors: You’ll need one large, round balloon to serve as the main core of your hot air balloon. Additionally, gather a generous supply of smaller balloons in various complementary or contrasting colors to create the voluminous, cloud-like canopy effect around the main balloon.
- Masking Tape: Useful for temporarily holding components in place and providing a gentle yet firm bond when securing the large central balloon to the wooden sticks. Its low tack allows for adjustments if needed.
- Double-Sided Tissue Tape: This specialized tape is fantastic for easily and discreetly attaching the numerous small balloons to the large central balloon. It provides a strong, clean bond without the mess of liquid glue and is ideal for balloon crafting.
- Teddy Bear (or other stuffed animal): The star passenger for your hot air balloon! Choose one that fits comfortably and proportionally inside your basket. This adds the endearing “teddy bear” element to your decoration.
- Scissors: A good pair of sharp scissors is essential for cutting jute string, tape, and any other materials precisely and cleanly.
- Electric Balloon Inflator or Pump: While inflating balloons by mouth is possible, an electric inflator or a hand pump will save you a significant amount of time and effort, especially given the large number of small balloons required for this project.
With your materials meticulously gathered and ready to go, you’re all set to transform these simple items into a captivating work of art that will bring joy and wonder!
Step-by-Step Guide: Crafting Your Hot Air Balloon Decoration
Now, let’s bring this delightful project to life! Follow these detailed instructions carefully, taking your time with each step to ensure a beautiful, sturdy, and long-lasting final product. Remember, precision, patience, and attention to detail will yield the most professional and enchanting results.
Step 1: Preparing the Basket Base
Your journey begins with transforming the humble plastic basket into a charming and authentic-looking hot air balloon gondola. First, if your chosen plastic basket comes equipped with a handle, carefully remove it using a pair of sturdy scissors or pliers. We aim for a smooth, unobstructed top edge for our design. Next, take your roll of jute string and begin wrapping it tightly and methodically around the entire exterior surface of the basket. Start from the very bottom and work your way upwards towards the rim. Apply small dots or thin lines of hot glue at regular intervals – specifically at the beginning and end of the string, and occasionally along the basket’s seams or every few wraps – to secure the jute firmly in place. Ensure that there are no visible gaps of the plastic basket showing through and that the entire surface is covered for a cohesive, rustic, and polished look. This step not only significantly enhances the aesthetic but also provides a better, more textured surface for the upcoming attachment of the support sticks.
Step 2: Constructing the Balloon Frame
This critical step involves creating the essential support structure that will securely hold your main balloon aloft. Take your four long, slender wooden sticks. Using your hot glue gun, apply a generous amount of hot glue to one end of each stick. Carefully position and glue one stick vertically into each of the four inner corners of the now jute-wrapped basket. Hold each stick firmly in place for a few moments until the hot glue sets and cools, creating an initial bond. To ensure maximum stability, durability, and a robust structure that can withstand display, reinforce these attachments with heavy-duty tape. Wrap the heavy-duty tape securely and tightly around the base of each stick, where it meets the edge of the basket. Press firmly to create a strong, unyielding bond. These sticks will extend upwards, forming the scaffold ready to support the main balloon, so ensure they are as straight, evenly spaced, and stable as possible.
Step 3: Attaching the Main Balloon
Now, it’s time to infuse the “balloon” part of our hot air balloon with life! Using your electric balloon inflator or a hand pump, inflate one of your large, round balloons. The chosen size of this balloon should be proportionate to your basket and tall enough to extend well above the tops of the wooden sticks, providing ample surface area for the subsequent attachment of smaller, decorative balloons. Once the balloon is perfectly inflated, carefully position it atop the four wooden sticks. It should rest snugly and securely on the top ends of the sticks, creating the basic silhouette of the hot air balloon. To secure it firmly and prevent any unwanted shifting or movement, use masking tape. Wrap several strips of masking tape around the top portion of each wooden stick and extend them onto the surface of the large balloon itself. Apply enough tape to ensure it’s stable and centered, but always be gentle to avoid accidentally popping the balloon. This large balloon forms the crucial core structure onto which all the smaller, colorful, decorative balloons will be meticulously attached.
Step 4: Creating the Cloud Effect with Smaller Balloons
This is the most visually impactful step where your hot air balloon truly begins to take shape and gain its enchanting, voluminous, cloud-like appearance. Begin by inflating your collection of small balloons. To add visual interest and a more organic texture, inflate them to a variety of sizes – some slightly larger, some perfectly round, and others a bit smaller. For each small balloon, stick a piece of double-sided tissue tape onto its surface. Starting from the bottom of the large central balloon, begin carefully and strategically attaching these small, inflated balloons around its entire surface. Work your way upwards and around, covering as much of the large balloon as possible. Crucially, remember to alternate colors and sizes as you go, creating a vibrant, dynamic, and visually appealing pattern. Don’t strive for perfect, robotic symmetry; a slightly organic and varied placement often looks more natural and artistically appealing. The double-sided tissue tape will provide a strong, clean, and invisible bond without the need for messy liquid glue, ensuring a professional finish.
Step 5: Filling Gaps for a Fuller Look
As you meticulously cover the large central balloon with the smaller ones, you might inevitably notice some tiny gaps, bare spots, or areas where the underlying large balloon is still visible. This is completely normal and an anticipated part of the process! To achieve a lush, completely full, and professionally finished look, simply inflate even smaller balloons than before, or slightly underinflate some of your small balloons to fit perfectly into those snug spots. Use additional pieces of double-sided tissue tape and carefully stick these tiny balloons into any remaining spaces, ensuring they blend seamlessly with the existing cluster. This meticulous step is absolutely essential for creating a truly seamless, voluminous, and impressive canopy that genuinely gives the illusion of a buoyant, floating hot air balloon cloud. Take a step back and view your creation from various angles and distances to ensure all areas are adequately filled and there are no noticeable voids.
Step 6: Welcoming Your Teddy Bear Passenger
The final and perhaps most endearing touch is adding your special, charming passenger to the gondola. Carefully place your chosen teddy bear (or any other beloved stuffed animal that fits the theme) into the basket. Position it thoughtfully so it looks as though it’s happily enjoying the ride, perhaps peeking over the edge of the basket with an expression of wonder. If you want to ensure the teddy bear doesn’t shift or fall out, especially if the decoration will be moved frequently or displayed in a high-traffic area, you can secure it with a small dab of hot glue on its feet or a piece of double-sided tape applied to its base. And just like that, your delightful DIY teddy bear hot air balloon decoration is now complete, ready to enchant, inspire, and bring joy to everyone who sees it!
Tips for Customization and Personalization
One of the greatest joys and advantages of embarking on DIY projects is the incredible freedom to make them uniquely yours. While the basic instructions provide a fantastic and sturdy foundation, here are some inspiring ideas to further customize and personalize your teddy bear hot air balloon decoration, ensuring it perfectly matches your vision and occasion:
- Theme Adaptation: If you’re crafting this for a specific party theme (e.g., “Under the Sea,” “Space Adventure,” “Royal Ball”), seamlessly incorporate themed elements. This could include using character balloons, matching your color palette precisely, or adding small, relevant accessories to the basket (e.g., a tiny pirate telescope for an adventure theme, or a miniature crown for a princess party).
- Color Palette Variations: Don’t feel limited to a mixed bag of colors. Opt for a sophisticated monochromatic scheme (e.g., all pastels for a serene baby shower), a bold two-tone design to perfectly match specific brand colors or decor, or a gradient effect for a more artistic flair.
- Different Passengers: While a teddy bear is classic, feel free to switch it up! Place a different beloved stuffed animal, a small doll, a collection of mini action figures, or even a tiny decorative plant in the basket to suit the recipient’s preferences or the event’s theme.
- Add Magical Lighting: Weave a string of battery-operated fairy lights (LEDs are highly recommended as they produce minimal heat) through the cluster of smaller balloons or wrap them artfully around the jute-wrapped basket for a magical, soft glow. This is especially beautiful for evening events, dimly lit rooms, or as a charming night light in a nursery.
- Hanging Options: If you wish to create an even more immersive floating effect, attach clear fishing line or a thin, strong ribbon to the top of the balloon structure. Ensure it’s balanced and secured at multiple points for safe suspension from the ceiling or a sturdy fixture.
- Banners and Flags: Create tiny pennant banners or decorative flags with personalized messages (e.g., “Happy Birthday [Name],” “It’s a Boy/Girl,” “Welcome Baby”) and attach them to the wooden sticks, the basket, or even subtly among the balloons for an extra festive touch.
- Basket Embellishments: Further decorate the jute-wrapped basket with elegant fabric ribbons, delicate lace, small artificial flowers, charming bows, or even hand-painted details for an additional layer of charm and sophistication.
- Size Variations: Experiment with different sized baskets and balloons to create an entire fleet of hot air balloons! A large one can serve as a grand centerpiece, while smaller versions can be used as delightful table accents, party favors, or hung at varying heights to create a dynamic display.
Let your imagination soar and don’t hesitate to experiment! These small, thoughtful touches can truly transform your decoration into a one-of-a-kind masterpiece that reflects your personal creativity and brings even more joy to your celebration.
Perfect Occasions for Your Whimsical Creation
The inherent versatility and universal appeal of this teddy bear hot air balloon decoration make it suitable for a truly wide array of events and settings. Its charming design ensures it will be a captivating focal point wherever it’s displayed. Here’s a closer look at the numerous occasions where this enchanting piece can truly shine and add a touch of magic:
- Children’s Birthday Parties: Undoubtedly a showstopper for any kid’s celebration, regardless of age. It instantly adds a magical, adventurous, and whimsical theme that children will absolutely adore. It serves not only as a vibrant decoration but also as a delightful talking point and a symbol of fun and imagination.
- Baby Showers and Gender Reveals: A wonderfully delightful and deeply symbolic decoration for celebrating and welcoming a new arrival. You can easily customize it with soft pastel colors, or specifically with pink and blue balloons for a charming gender-specific theme, making the reveal even more memorable and picture-perfect.
- Nursery or Child’s Bedroom Decor: Beyond fleeting parties, this hot air balloon makes a permanent, enchanting, and inspiring addition to a child’s room. It fosters dreams of adventure, exploration, and imagination. If equipped with LED fairy lights, it can even serve as a gentle, whimsical night light, creating a soothing atmosphere.
- Photo Booth Prop: Create truly memorable and adorable snapshots! Guests of all ages, especially children and parents, will absolutely love posing with this unique, three-dimensional, and highly photogenic prop, leading to cherished photographic memories.
- School Fairs or Charity Events: This eye-catching centerpiece is guaranteed to attract attention and curiosity, adding a wonderfully festive and inviting atmosphere to any public event, drawing people in with its unique charm.
- Baby Announcement Photoshoots: What a heartwarming and creative way to announce a pregnancy or the birth of a new baby! This hot air balloon serves as an incredibly charming and symbolic prop for those precious announcement photos, adding a touch of sweetness and anticipation.
- Themed Events: Perfect for travel-themed parties, “Up”-inspired celebrations, or any event that calls for a touch of classic adventure and wonder.
No matter the occasion you choose, this DIY hot air balloon is guaranteed to bring immense joy, inspire wonder, and infuse a unique touch of fantasy into any environment, making your moments truly special.
Care and Maintenance for Lasting Enjoyment
To ensure your beautiful DIY hot air balloon decoration remains a delightful and impressive sight for as long as possible, especially if you plan to reuse it for multiple events or keep it as a permanent piece of cherished decor, consider incorporating these practical care and maintenance tips:
- Gentle Handling: Always handle the entire decoration with care, especially the delicate balloon cluster. Balloons can pop if they are mishandled, squeezed too tightly, or come into contact with sharp objects, rough surfaces, or excessive pressure.
- Temperature Control: Avoid exposing the decoration to extreme temperatures. Direct and prolonged sunlight can cause balloons to expand excessively and potentially pop, fade their colors, or degrade the material. Conversely, very cold temperatures can cause balloons to deflate rapidly or become brittle. Display indoors or in shaded areas to preserve its integrity.
- Regular Dusting: For long-term display, gently dust the jute-wrapped basket and the balloons with a soft, dry cloth, a feather duster, or a soft-bristled brush to keep it looking fresh and clean. Avoid using wet cloths on the balloons as this can leave streaks.
- Thoughtful Storage: If you intend to store the decoration for future use, consider its components. Carefully deflate the balloons if they are reusable (e.g., foil balloons) or gently remove them if they are single-use latex balloons. The basket and the sturdy wooden frame can then be stored in a cool, dry place, ideally within a protective box or bag to prevent dust accumulation, crushing, or damage. You can always re-inflate or attach new balloons for your next event, making the core structure reusable.
With proper and mindful care, your enchanting hot air balloon decoration can continue to bring joy, wonder, and a touch of whimsy to many occasions and for a significant period of time.
Important Safety Considerations
While this DIY hot air balloon project is designed to be fun, creative, and safe for most ages, it’s always important to keep a few key safety points in mind, especially when children are involved or when the decoration is displayed in areas accessible to them:
- Hot Glue Gun Safety: Always exercise extreme caution when using a hot glue gun, as the tip and the glue itself can reach high temperatures and cause burns. It is strongly recommended that adults supervise children closely during this step, or that an adult handles all hot gluing tasks personally.
- Choking Hazard: Uninflated or broken balloons, particularly latex ones, can pose a significant choking hazard for young children, toddlers, and pets. Always keep uninflated balloons out of their reach and immediately dispose of any popped or broken balloon pieces to prevent accidental ingestion.
- Balloon Allergies: Be mindful of potential latex allergies. If anyone attending your event or living in your home might be sensitive to latex, opt for non-latex alternatives such as foil balloons or other synthetic materials for the balloon cluster to ensure everyone’s comfort and safety.
- Stable Placement: Ensure the finished decoration is always placed on a stable, flat surface where it won’t easily tip over or be knocked down, especially if it’s tall or top-heavy. If you choose to hang the decoration, use strong, reliable ceiling fixtures and sturdy clear fishing line or durable ribbon, checking periodically for secure attachment.
- Flame Retardancy: If you decide to incorporate lights into your decoration, ensure they are battery-operated LED fairy lights, as LEDs produce minimal heat. Always keep the decoration well away from open flames, candles, fireplaces, heating vents, or any other heat sources to prevent fire hazards.
Prioritizing these safety considerations ensures that everyone can enjoy your beautiful, handmade creation worry-free and in a secure environment.
Embrace the Magic of DIY Crafting
Creating this DIY teddy bear hot air balloon decoration is far more than just a simple craft project; it’s a delightful opportunity to infuse your celebrations and living spaces with a profound sense of personal magic and charm. From the thoughtful selection of each material to the meticulous arrangement of vibrant, colorful balloons, every single step in this process is a chance to express your unique creativity, engage in a rewarding activity, and build something truly special from scratch. The end result is a captivating, whimsical, and utterly charming centerpiece that will undoubtedly draw admiration, spark conversations, and create lasting, cherished memories for all who encounter it.
Whether it’s soaring gracefully above a birthday cake, greeting delighted guests at a baby shower, gracing a nursery with its gentle, imaginative charm, or serving as a cheerful photo prop, this handmade hot air balloon promises to elevate any environment it inhabits. We extend our sincere gratitude and appreciation to MASS Art and Craft for generously sharing such an inspiring, achievable, and utterly delightful project with the crafting community. Their dedication to creative crafting continues to be a wonderful and invaluable resource for DIY enthusiasts of all skill levels. We highly encourage you to visit and subscribe to their YouTube channel for a plethora of other fantastic craft ideas that will undoubtedly ignite your imagination, teach you new skills, and help you bring even more beauty and handmade joy into your world. So, gather your materials, let your imagination take flight, and embark on this wonderful crafting adventure. Happy making!