
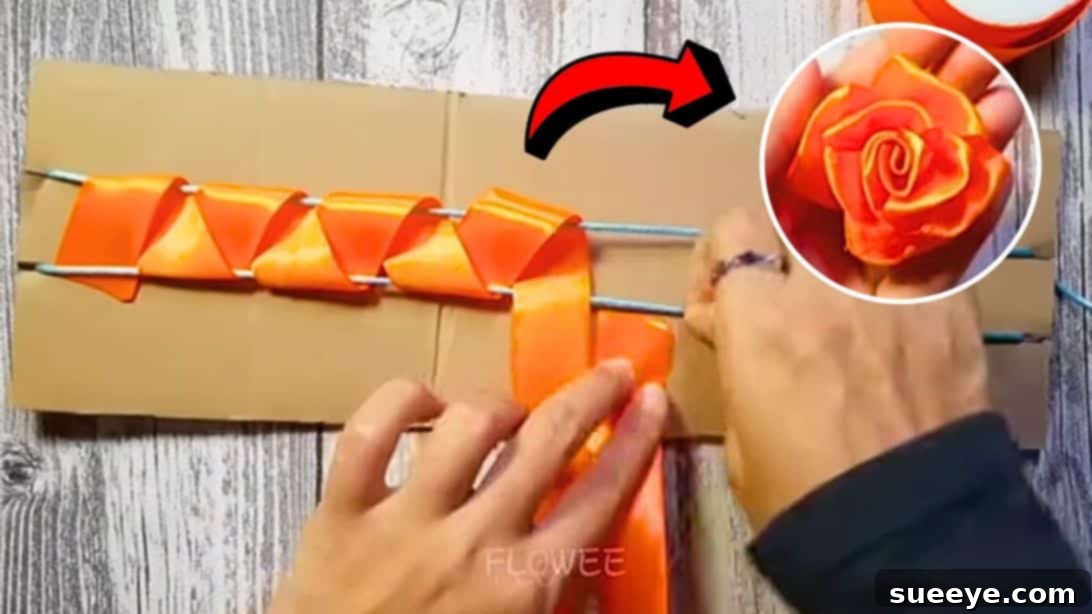
Have you ever admired the exquisite beauty of satin ribbon flowers, assuming their creation was a complex craft reserved for seasoned artisans? Many aspiring crafters share this sentiment, often shying away from attempting these delicate embellishments. However, the perception of difficulty can be misleading, especially when equipped with the right technique. The intricate appearance of a handcrafted ribbon flower often belies a surprisingly straightforward process, especially with a clever trick up your sleeve.
We’ve discovered an ingenious method, popularized by the talented creator FLOWEE on YouTube, that demystifies the art of making satin ribbon flowers. This technique transforms a potentially challenging project into an accessible and rewarding experience, ensuring perfect results every time. It’s a game-changer for anyone looking to add a touch of handmade elegance to their projects, from home decor to fashion accessories.
Since learning this simple yet effective trick, creating beautiful ribbon flowers has become a staple in countless craft endeavors. Its ease and consistency make it suitable for a wide range of applications, and we’re confident that even absolute beginners will find this method incredibly straightforward. Forget the frustration of fiddly folding and imprecise stitching; this guide will walk you through each step, making the process enjoyable and successful. Dive in and discover how to craft these stunning satin ribbon flowers by following our detailed instructions below, and for a comprehensive visual aid, be sure to watch FLOWEE’s original video tutorial.
RELATED: How to Make a DIY Lily Flower Using Satin Ribbon
Essential Materials for Crafting Your DIY Ribbon Flower
Gathering your materials before you begin ensures a smooth and uninterrupted crafting session. Here’s a list of what you’ll need to create your beautiful satin ribbon flowers, along with a brief explanation of why each item is important:
- 2.5cm or 2-inch Satin Ribbon: The star of our project! This width is ideal for creating a beautifully proportioned flower. Satin’s glossy finish and soft drape are perfect for flower petals, catching the light elegantly. You’ll want a generous length, typically around 70cm (27.5 inches) per flower, so ensure you have enough for multiple creations.
- Sturdy Cardboard: This will serve as the base for our unique weaving jig. A piece approximately 30 inches long and a few inches wide is sufficient. Look for firm cardboard from an old box or craft supply. Its rigidity is crucial for holding the ropes taut.
- Durable Rope or String: Essential for creating the parallel strands of our weaving jig. The rope should be thin enough to easily insert through cardboard notches but strong enough to withstand tension. Twine or a thin cord works perfectly.
- Needle and Thread: For securing the ribbon and forming the flower. A sharp needle that can easily pass through multiple layers of ribbon and a strong, coordinating thread (or a neutral color) are necessary. A basic sewing kit will usually have what you need.
- Sharp Scissors: For precise cutting of both ribbon and rope. A clean cut prevents fraying and ensures neat edges, which are particularly important when working with satin.
- Ruler: A standard 30-inch ruler (or one that matches the length of your cardboard) is crucial for accurate measurements when creating the weaving jig. Precision here will make the weaving process much easier.
- Marker, Pen, or Pencil: For marking your cardboard precisely. Any writing tool that creates clear, visible marks will work.
- Lighter: A small lighter is used to carefully seal the ribbon ends, preventing fraying. This step is vital for a durable and professional-looking finish. Exercise caution when using an open flame.
Step-by-Step Guide: How to Craft a Stunning Ribbon Flower with Ease
Embark on your journey to creating beautiful satin ribbon flowers with these detailed instructions. Each step builds upon the last, so take your time and enjoy the process of bringing your floral vision to life.
Step 1: Constructing Your Weaving Jig for Perfect Petals
The foundation of this easy ribbon flower technique lies in creating a simple yet effective weaving jig. Start by taking your long piece of cardboard. Lay your 30-inch ruler precisely over the center of the cardboard, ensuring it’s straight. With your marker, carefully mark the cardboard at each end and along both sides of the ruler’s length. These marks will guide where your rope strands will sit. Next, using your scissors or a craft knife, create small, shallow notches at each of these markings. These notches don’t need to be deep, just enough to secure the rope. Now, take your rope and insert it horizontally through the corresponding notches on opposite sides of the cardboard. You should end up with two perfectly parallel strands of rope stretched across the cardboard, spaced approximately one inch apart. This spacing is critical for achieving the ideal petal width and form. Ensure the rope is taut but not so tight that it warps the cardboard.
Step 2: Preparing and Initial Weaving of Your Satin Ribbon
With your jig ready, it’s time to prepare your satin ribbon. Cut a single piece of ribbon to a length of approximately 70cm (or 27.5 inches). To prevent the ribbon from fraying, which is common with satin, carefully singe both cut edges with a lighter. Hold the lighter flame briefly near the edge, just enough to melt the fibers slightly, but be careful not to burn the ribbon itself. Once sealed, take one end of your ribbon and insert it underneath the lower of the two parallel rope strands on your cardboard jig. Pull a small length through, leaving about a 1-inch tail. Now, take the longer end of the ribbon and loop it over the upper rope strand. Pull it through, then bring it back over the upper strand again, and finally, pull it underneath the lower strand. This establishes the initial pattern for your weaving.
Step 3: Completing the Ribbon Weave and Preparing for Gathering
Continue the weaving pattern established in Step 2, moving methodically along the length of your rope strands. The pattern is a simple over-and-under motion: lay the ribbon over the lower strand, then insert it underneath, looping it, and pull it over the upper strand. Maintain consistent tension as you weave to ensure uniform petal size and appearance. This steady tension is key to a beautiful, symmetrical flower. Repeat this motion until you’ve reached the other end of your rope strands. As you weave, you’ll see a series of loops forming between the two rope strands. Once you’ve woven the entire length, gently pull and adjust the ribbon loops to make them tighter and more uniform, as demonstrated in FLOWEE’s video tutorial. This step refines the shape of your future petals. With the ribbon now tightly woven, it’s time to start sewing. Using your needle and thread, begin sewing along the upper edges of the ribbon loops with a simple running stitch. This stitch will secure the loops together and form the base for gathering them into a flower shape.
Step 4: Forming the Flower and Securing Its Shape
This is where your ribbon begins its transformation into a flower! Once you have completed the running stitch along the upper edges, carefully pull the two rope strands out from underneath the ribbon loops. Take care not to disturb the stitching or unravel the ribbon. With the ropes removed, gently pull the thread you used for the running stitch. As you pull, the looped ribbon will begin to gather and cinch, forming a ruffled, elongated shape. Now, take one end of this gathered ribbon and begin to roll it inwards, a small section at a time. As you roll, you’re creating the central bud and initial layers of your flower. After rolling a small section, use your needle and thread to stitch the bottom securely. This is crucial for holding the shape. Continue to roll the gathered ribbon around the center, carefully shaping it into a beautiful, multi-layered flower. With each rotation, secure the bottom with stitches, ensuring the flower holds its form firmly. Once you’ve rolled all the gathered ribbon and are satisfied with the flower’s appearance, finish by stitching the bottom securely with a tight knot. Trim any excess thread, and your exquisite satin ribbon flower is complete!
Congratulations! You’ve successfully created a stunning satin ribbon flower using a remarkably simple and effective technique. This method, shared by FLOWEE, truly makes the process accessible to everyone, regardless of their crafting experience. These versatile DIY ribbon flowers can elevate any project, from adorning hair accessories and brooches to enhancing gift wrapping, embellishing clothing, or adding a touch of elegance to your home decor arrangements. Their delicate beauty and handmade charm are sure to impress.
The satisfaction of crafting something so beautiful with your own hands is truly rewarding. We encourage you to experiment with different ribbon colors, textures, and even widths to create a diverse array of unique floral designs. Remember, practice makes perfect, but with this clever trick, you’re already well on your way to becoming a ribbon flower master. Unleash your creativity and enjoy the endless possibilities these charming little blooms offer!
*All image credit belongs to FLOWEE via YouTube. We highly recommend following and subscribing to her channel for more inspiring and easy-to-follow craft tutorials!