
Create Your Own Stunning DIY Clay Pot and Saucer Water Fountain: An Easy Step-by-Step Guide
Imagine the soothing sound of trickling water bringing a sense of calm and elegance to your garden. Many believe creating such a beautiful water feature requires complex tools or a professional touch, but what if we told you it’s simpler than you think? You can actually transform forgotten clay saucers and flower pots into a captivating DIY water fountain, adding a unique charm to your outdoor space without breaking the bank. This creative project not only enhances the aesthetic appeal of your garden but also provides a peaceful ambiance, making your outdoor area more inviting and relaxing.
This comprehensive guide will walk you through the process, demonstrating how incredibly easy and affordable it is to construct your very own multi-tiered fountain. Using readily available materials, many of which you might already have lying around, and some basic DIY skills, you can complete this rewarding project in just a few hours. Get ready to turn your garden, patio, or balcony into a serene oasis, enjoying the tranquil beauty of a custom-made water feature!
Why Build a DIY Clay Pot Water Fountain?
Embracing a DIY project like building a clay pot fountain offers a multitude of benefits beyond just enhancing your decor:
- Cost-Effective Garden Enhancement: Instead of investing in an expensive, pre-made garden fountain, you’re repurposing items you might already own or can acquire for very little cost. This makes beautiful garden features accessible on any budget.
- Eco-Friendly Repurposing: Give new life to old clay pots and saucers that might otherwise go to waste. This sustainable approach reduces landfill burden and champions environmental consciousness.
- Unique Aesthetic Appeal: Add a rustic, charming, and personalized focal point to your garden, patio, or balcony. The natural look and earthy tones of clay blend beautifully with almost any landscaping style, creating an authentic and timeless feature.
- Soothing Sounds for Relaxation: The gentle cascade of water creates a relaxing ambiance, effectively masking unwanted background noises and promoting a peaceful, meditative environment. This can significantly improve your outdoor experience, making it a perfect spot for unwinding.
- Attracts Local Wildlife: A fresh water source can attract birds, butterflies, and other small creatures, bringing more life, movement, and natural beauty to your garden. It provides a vital resource for local fauna, especially during warmer months.
- Personal Satisfaction and Accomplishment: There’s a unique sense of pride and accomplishment in crafting something beautiful and functional with your own hands. This project is not just about the fountain; it’s about the joy of creation.
- Customizable Design: While this guide provides a specific multi-tiered design, the underlying principles can be easily adapted. You can experiment with different sizes of pots, varying heights, and unique arrangements to truly make the fountain your own.
Materials You’ll Need:
Gathering all your materials before you begin will ensure a smooth and enjoyable building process. Quality materials contribute to the longevity and effectiveness of your fountain. Here’s a detailed list of what you’ll need:
- Submersible Water Pump: This is the heart of your fountain, responsible for circulating the water. Choose a pump specifically designed for outdoor use with an adjustable flow rate, typically suited for small to medium fountains. Ensure it has enough power (GPH – gallons per hour) to lift water to your desired height and comes with a suitable power cord.
- 18-inch Clay Saucer: This will serve as the foundational base and main water reservoir for your fountain. It must be sturdy, deep enough to fully submerge the pump, and completely free of cracks or leaks.
- 14-inch Clay Saucer: This saucer forms the second tier of your fountain, positioned above the base.
- 10-inch Clay Saucer: The smallest saucer, forming the top tier from which the water will ultimately spout.
- 2 pieces of 6-inch Flower Pots: These pots will act as essential support structures, elevating each saucer tier and creating the multi-level effect. Ensure they are clean, robust, and free of any damage.
- Flexible Water Hose Pipe: A durable and flexible hose is crucial for connecting your pump to the fountain tip, allowing water to flow upwards through the tiers. The diameter of the hose should precisely match your pump’s outlet nozzle to ensure a tight, leak-free connection.
- Fountain Tip (Nozzle): This decorative accessory attaches to the very end of the hose pipe at the top tier. It shapes the water flow into various spray patterns (e.g., bell, mushroom, jet), adding visual interest. Many pumps come with a selection of interchangeable tips.
- Waterproof Silicone Sealant (or Silicon Paste): Crucial for sealing all drilled holes and securing connections, this sealant prevents leaks and ensures your fountain holds water effectively. Opt for a clear, outdoor-grade, and non-toxic silicone.
- Electrical Tape: Used primarily for securing hose pipe connections to the pump and fountain tip, adding an extra layer of stability and leak prevention. It can also be used to insulate electrical connections if specified by the pump manufacturer, though modern pumps often have sealed units.
Tools Required:
Beyond the materials, you’ll need a few basic tools to execute the project efficiently and safely:
- Power Drill: An essential tool for cleanly drilling the necessary holes in your clay pots and saucers.
- Masonry Drill Bit: It is imperative to use a drill bit specifically designed for ceramic, tile, or masonry. A standard wood or metal bit will likely crack the clay. The size of the bit should match the outer diameter of your flexible hose pipe.
- Cutter or Utility Knife: For accurately trimming the flexible hose pipe to the correct lengths during assembly. A sharp blade ensures clean cuts.
- Safety Glasses: Always protect your eyes from flying debris when drilling clay.
- Work Gloves: To protect your hands during assembly, especially when handling clay, using tools, and working with silicone sealant.
For a clear visual demonstration of the entire process, we highly recommend watching the easy-to-follow video tutorial by DIY Stories on YouTube. It provides excellent insights and practical tips.
Step-by-Step Directions to Build Your DIY Clay Pot Fountain:
Step 1: Preparing Your Clay Pots and Setting Up the Base
The first crucial step is preparing your clay saucers and pots for drilling. Clay, while durable, can be brittle when dry. To make drilling easier and significantly reduce the risk of cracking, immerse all your clay saucers (14-inch, 10-inch) and both 6-inch flower pots in water for at least 30 minutes to an hour. This saturates the clay, making it softer and less prone to chipping or breaking during the drilling process. Once thoroughly soaked, carefully remove them from the water.
Next, it’s time to drill the necessary holes. Using your power drill fitted with the masonry bit, carefully drill a central hole in the bottom of the 14-inch clay saucer, the 10-inch clay saucer, and both 6-inch flower pots. The hole should be precisely large enough for your flexible water hose pipe to fit through snugly – a tight fit is desirable for better sealing, but avoid making it so small that you struggle to thread the hose. It is vital that you do NOT drill a hole in the largest, 18-inch clay saucer, as this will serve as your main water reservoir and must remain completely watertight.
With the holes successfully drilled, take your submersible water pump. Attach one end of the flexible hose pipe firmly to the pump’s outlet nozzle. Ensure this connection is as secure as possible; you can reinforce it with a strip of waterproof electrical tape if necessary, to prevent any accidental dislodging once the fountain is operational. Carefully place the water pump centrally inside the 18-inch clay saucer. Position it so that its power cord can exit the saucer discreetly without being pinched or unduly exposed to water, ideally along the rim or through a small, strategically placed notch if your saucer allows (though drilling a notch is optional and requires care).
Step 2: Assembling the Tiers and Fountain Spout
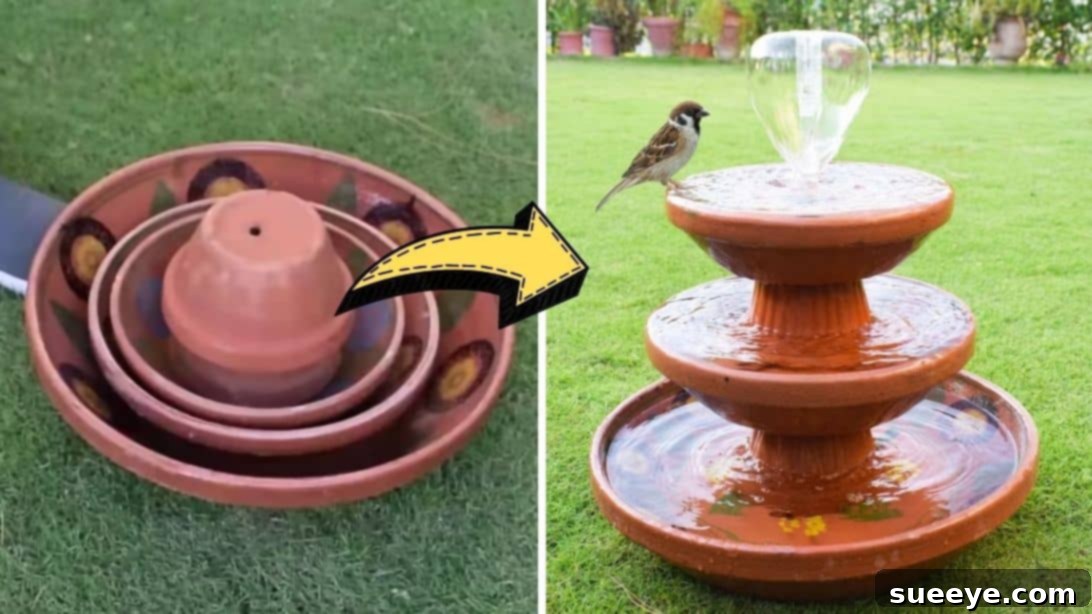
Now, let’s build the appealing multi-tiered structure of your water fountain. Begin by taking one of the 6-inch flower pots and placing it upside down directly over the water pump in the center of the 18-inch saucer. Carefully pull the flexible hose pipe up through the drainage hole of this inverted pot. This pot provides the first level of elevation and helps conceal the pump.
Next, place the 14-inch clay saucer right side up on top of the inverted 6-inch pot. Thread the hose pipe through the central hole you drilled in the bottom of this saucer. Ensure the saucer sits perfectly level and stable on the pot beneath it. The hose should now extend upwards, ready for the next tier of your fountain.
Grab the second 6-inch flower pot and place it upside down on top of the 14-inch saucer, carefully aligning it so the hose passes through its central hole. Pull the hose through this hole. This forms the second support layer, adding height and visual separation between the water basins.
Finally, position the 10-inch clay saucer right side up on top of the second inverted pot. Thread the hose pipe through its central hole for the last time. At this point, the hose should be extended well above the rim of this top saucer, ready for the fountain tip.
Carefully cut off any excess hose pipe, leaving just enough length to securely attach the fountain tip without it being excessively tall or too short to clear the saucer’s rim. Insert the fountain tip firmly onto the exposed end of the hose pipe. Again, ensure this connection is tight and secure; if your fountain tip has a threaded connection, twist it on firmly. Reinforce the connection with electrical tape if necessary to prevent any water from spraying out from this point, which could reduce the desired effect.
Step 3: Sealing, Filling, and Testing Your Fountain
Once all the tiers are assembled and the fountain tip is securely in place, it’s absolutely crucial to seal any potential leak points to ensure your fountain operates efficiently and without constant refilling. Apply a generous amount of waterproof silicone sealant around the base of the fountain tube where it enters the top 10-inch saucer. Also, carefully apply silicone around the holes of the 14-inch saucer and where the hose exits the inverted pots, particularly where the hose passes through the bottom of the saucers. This meticulous sealing prevents water from escaping through the drilled holes or gaps in the stacked structure. Allow the silicone to dry completely according to the manufacturer’s instructions (this usually takes several hours, sometimes up to 24 hours, depending on the product and humidity). Rushing this step is a common mistake and can lead to frustrating leaks later on, requiring you to dismantle and reseal.
Once the silicone has fully cured and dried, your fountain is finally ready for water. Carefully fill every saucer with a sufficient amount of clean water. Begin by filling the largest 18-inch saucer (your main reservoir) until the water pump is fully submerged and the water level is high enough to circulate effectively. Then, gradually fill the upper saucers, allowing the water to cascade naturally. Ensure the water pump’s power cord is safely connected to a weather-protected outdoor electrical outlet, preferably one with a Ground Fault Circuit Interrupter (GFCI) for maximum safety.
Finally, it’s time for the moment of truth: turn on the water pump! Observe the water flow carefully. If the flow seems too strong or too weak, adjust the water pump’s flow rate setting (if your pump has this feature). Keep a close watch for any immediate leaks around the base of the fountain or where the hose enters the saucers. If you notice any water escaping, turn off the pump immediately, drain the water, and thoroughly reapply silicone to the affected areas. Allow it to dry completely again before retesting. A little patience at this stage will save you a lot of hassle in the long run.
Tips for a Perfect DIY Fountain:
To ensure your DIY clay pot fountain is not only functional but also a true centerpiece, consider these additional tips:
- Optimal Placement: Choose a perfectly level spot in your garden or patio where your fountain will be visible and enjoyed. Consider its proximity to an outdoor electrical outlet and ensure the area can handle occasional water splashes without damaging nearby plants or surfaces.
- Enhance Stability: For added structural stability and longevity, especially in windy areas or if you have pets, you can use a strong, waterproof construction adhesive (in addition to silicone) to secure the pots and saucers together at their contact points.
- Decorate with Natural Elements: Elevate your fountain’s aesthetic appeal by placing decorative river stones, smooth pebbles, or even small, non-invasive aquatic plants (if suitable for your climate and water flow) in the saucers. This integrates the fountain more harmoniously into its natural surroundings.
- Prioritize Electrical Safety: Always use a Ground Fault Circuit Interrupter (GFCI) outlet for any outdoor electrical appliances. Ensure all electrical connections, especially those near water, are waterproofed and never handle the pump or electrical cords with wet hands.
- Minimize Algae Growth: To keep your fountain looking pristine and reduce the need for frequent cleaning, consider adding a small amount of non-toxic, fountain-safe algaecide to the water. Alternatively, using distilled water can significantly reduce mineral buildup and algae.
- Regular Water Level Monitoring: Water will naturally evaporate, especially on hot or windy days. Regularly check the water level in your main reservoir and refill as needed. Allowing the pump to run dry can cause irreversible damage and shorten its lifespan.
Maintenance for Your Clay Pot Water Fountain:
To ensure your DIY fountain remains a beautiful and functional feature for many seasons to come, regular and proper maintenance is essential:
- Routine Cleaning: Over time, dirt, leaves, pollen, and mineral deposits will inevitably accumulate. Drain the fountain periodically (e.g., monthly or bi-monthly, depending on environmental factors) and scrub the saucers and visible pump components with a soft brush and a mild, non-toxic soap. Always rinse thoroughly to remove all soap residue.
- Pump Care: The pump is the most vital component. Disassemble and clean your pump filter regularly according to the manufacturer’s instructions. Clogged filters significantly reduce water flow, put a strain on the motor, and can drastically shorten the pump’s lifespan.
- Consistent Water Refilling: Make it a habit to check the water level daily, particularly during warm, dry, or windy weather when evaporation is high. Always ensure the pump remains fully submerged to prevent it from overheating and breaking.
- Winterization Procedures: If you live in an area that experiences freezing temperatures, proper winterization is crucial. Before the first frost, drain all water from the fountain. Clean all components, dry them thoroughly, and store the water pump indoors in a dry, frost-free location to prevent damage from freezing water. The clay structure itself can often remain outdoors if protected from heavy snow and ice, or you may choose to bring it indoors as well to prevent cracking.
Troubleshooting Common DIY Fountain Issues:
Even with careful construction, you might encounter a few issues. Here’s how to troubleshoot common problems with your DIY clay pot fountain:
- Water Not Flowing or Weak Flow:
- Check Power: Ensure the pump is correctly plugged into a working GFCI outlet and receiving power.
- Water Level: Verify that the water level in the main reservoir is high enough for the pump to be fully submerged.
- Clogs: Inspect the pump’s intake, filter, and impeller for any clogs caused by leaves, debris, or algae. Clean thoroughly.
- Hose Kinks: Check the flexible hose pipe for any kinks or blockages that might impede water flow.
- Pump Malfunction: If all else fails, the pump itself might be faulty or at the end of its life.
- Leaks in the Fountain Structure:
- Silicone Seals: Carefully examine all silicone seals around the drilled holes and where the hose passes through the saucers. Look for any cracks, gaps, or areas where the seal might have failed. Drain the fountain and reapply silicone to the affected areas, ensuring proper drying time before refilling.
- Saucer Cracks: Inspect the clay saucers themselves for any hairline cracks that may have developed, especially after temperature fluctuations. These might require a more extensive repair with a waterproof sealant or replacement of the saucer.
- Noisy Pump Operation:
- Low Water Level: A pump running dry will often make a loud grinding or humming noise. Add more water to submerge it fully.
- Vibration: The pump might be vibrating against the bottom of the saucer. Adjust its position or place a soft rubber pad underneath to dampen vibrations.
- Debris: Debris caught in the impeller can cause noise; clean the pump thoroughly.
- Excessive Algae Growth:
- Cleaning Frequency: Increase the frequency of cleaning the fountain.
- Algaecide: Add a small, fountain-safe algaecide to the water.
- Sunlight Exposure: If possible, reposition the fountain to a shadier spot, as direct sunlight significantly promotes algae growth.
- Water Type: Using distilled water or rainwater can reduce mineral content, which algae feed on.
Conclusion: Your Garden’s New Centerpiece Awaits!
Transforming old clay pots and saucers into a beautiful, functional water fountain is a deeply satisfying and surprisingly straightforward DIY project that adds immense value to your outdoor living space. Not only does it offer a wonderful creative outlet, but it also provides a serene, personalized focal point for your garden, patio, or balcony. With the gentle, calming sound of flowing water and the rustic charm of repurposed materials, your homemade fountain will undoubtedly become a cherished addition, inviting relaxation and natural beauty.
So, gather your materials, confidently follow these step-by-step instructions, and prepare to enjoy the tranquility and aesthetic appeal that your very own DIY clay pot water fountain will bring. It’s a project that delivers on both creativity and functionality. Happy crafting, and enjoy your beautiful new water feature!
*All image credit for this tutorial belongs to DIY Stories via YouTube. We highly recommend following and subscribing to their channel for more inspiring DIY projects and helpful video guides!