
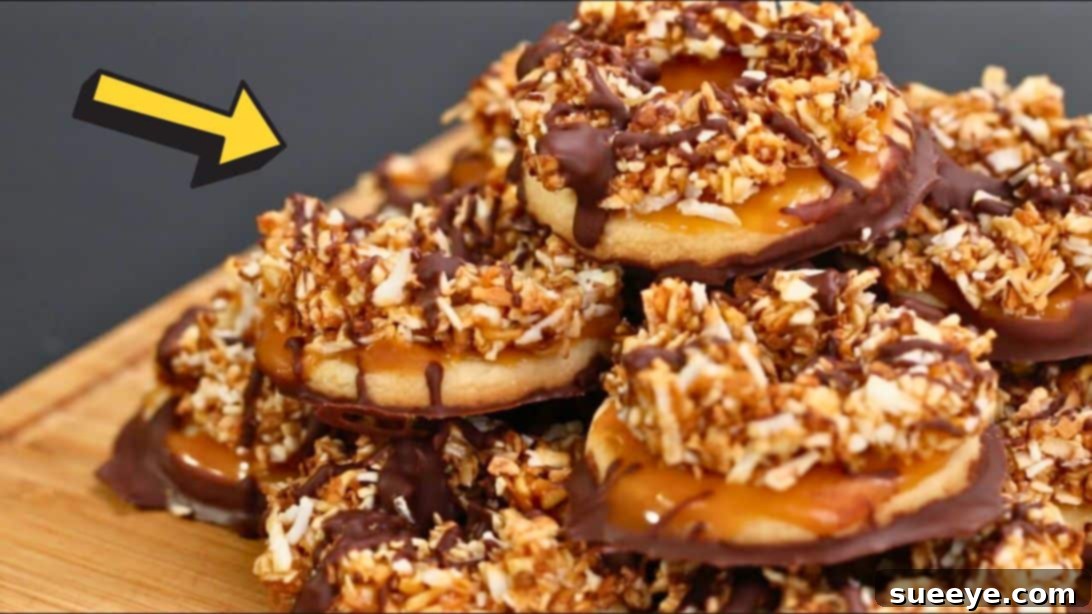
There’s an undeniable magic to the Girl Scout Samoas, also known as Caramel deLites – that irresistible blend of crispy vanilla cookie, rich, chewy caramel, sweet toasted coconut, and decadent chocolate. For many, these cookies represent a seasonal treat eagerly anticipated each year. But what if you could capture that same beloved flavor and texture in your own kitchen, any time you crave them? This comprehensive guide presents what might just be the best homemade Samoas recipe you’ll ever try, allowing you to recreate this iconic Girl Scout cookie with surprising ease.
Forget the wait and the limited supply! Our detailed copycat recipe draws inspiration from popular renditions, ensuring every bite delivers that perfect harmony of flavors and textures. Imagine a buttery, crumbly shortbread base, lovingly coated in a luscious, slightly salted caramel. This caramel then forms the perfect adhesive for a generous layer of beautifully toasted coconut, imparting a nutty depth and satisfying chew. Finally, a lavish dip in melted chocolate and an elegant drizzle complete this heavenly confection, creating a dessert that’s truly hard to resist. Prepare to impress yourself and everyone lucky enough to sample these delightful treats.
RELATED: Whip Up Deliciousness with Our Easy 4-Ingredient Condensed Milk Cookies Recipe
Why Homemade Samoas Are a Must-Try
While the original Girl Scout Samoas hold a special place in our hearts, making them at home offers several advantages. You have complete control over the quality of ingredients, ensuring freshness and flavor. Plus, the sheer joy and satisfaction of creating such an iconic treat from scratch is immeasurable. This recipe is designed to be accessible for home bakers, breaking down the process into simple, manageable steps. Whether you’re a seasoned baker or just starting out, you’ll find the journey to these homemade delights incredibly rewarding. Be warned, though: these cookies are so good, you might find yourself eating more than you intended – a testament to their irresistible charm!
If you have a love affair with coconut desserts, you’re in good company. Beyond Samoas, there’s a world of delicious coconut-infused treats waiting to be explored. Don’t miss these other fantastic recipes: Our Easy-to-Make Milk Coconut Fudge Recipe, and the delightful Easy White Chocolate and Coconut Candy Recipe.
Essential Ingredients for Perfect Homemade Samoas
Crafting the perfect Samoas starts with understanding the role each ingredient plays. Quality matters here, as each component contributes to the overall texture and flavor profile of these iconic cookies.
For the Buttery Cookie Base:
- 1 cup of unsalted butter: Room temperature butter is crucial for creaming properly, ensuring a light and airy cookie texture. Unsalted butter allows you to control the salt content precisely.
- 1/2 cup of granulated sugar: Provides sweetness and helps create that desirable crispy-crumbly texture.
- 2 cups of all-purpose flour: The structural backbone of our cookie. Sifting it will prevent lumps and ensure a tender crumb.
- 1/4 teaspoon of baking powder: A leavening agent that gives the cookie a slight lift and helps achieve a delicate, shortbread-like texture.
- 1/4 teaspoon of salt: Balances the sweetness and enhances all the other flavors in the cookie.
- 2 tablespoons of milk: Adds just enough moisture to bring the dough together without making it sticky or tough. Any type of milk (dairy or non-dairy) will work.
- 1/2 teaspoon of vanilla extract: Essential for that classic, warm vanilla cookie flavor. Opt for pure vanilla extract for the best results.
For the Irresistible Topping and Coating:
- 2 cups of soft caramel: This is the heart of your Samoas. You can use store-bought soft caramel candies (like Kraft Caramels, unwrapped and melted) or make your own homemade soft caramel for an extra touch of gourmet.
- 1/2 teaspoon of salt: A pinch of salt perfectly complements the sweet caramel, creating a delicious salted caramel effect that elevates the overall flavor.
- 3 tablespoons of heavy cream: Helps to thin the caramel slightly, making it smoother and easier to work with, while also adding richness.
- 1/2 teaspoon of vanilla extract: Enhances the caramel flavor, adding depth and warmth.
- 3 cups of toasted coconut flakes: Toasting the coconut is a non-negotiable step! It brings out a nutty, deeper flavor and a wonderfully crisp texture that raw coconut simply can’t match. Ensure it’s cooled before mixing with caramel.
- Melted chocolate (about 12-16 oz semi-sweet or milk chocolate chips/baking chocolate): The final luxurious touch. Use good quality chocolate for dipping and drizzling; semi-sweet is traditional, but milk or dark chocolate also works beautifully.
How to Make Homemade Samoas: A Step-by-Step Guide
Making homemade Samoas might seem intricate, but by following these detailed steps, you’ll achieve perfect results every time. Take your time, enjoy the process, and soon you’ll be enjoying these delightful cookies!
Step 1: Prepare the Cookie Dough Base
Begin by combining the butter and sugar in a large mixing bowl. Using an electric mixer (stand mixer or hand mixer), cream them together on medium speed until the mixture is light, fluffy, and pale yellow. This process incorporates air into the butter, which is vital for a tender, crumbly cookie texture. Scrape down the sides of the bowl as needed to ensure even mixing.
Step 2: Sift the Dry Ingredients
In a separate, medium-sized bowl, sift together the all-purpose flour, baking powder, and salt. Sifting is crucial as it removes any lumps from the flour and evenly distributes the leavening agent and salt, ensuring a consistent texture throughout your cookies.
Step 3: Combine Wet and Dry Mixtures
Gradually add the sifted dry ingredients to the creamed butter and sugar mixture. Mix on low speed, just until the flour is mostly incorporated and the mixture starts to resemble coarse crumbs. Be careful not to overmix at this stage; overmixing can develop gluten in the flour, leading to a tough cookie instead of the desired tender crumb.
Step 4: Form and Chill the Cookie Dough
Pour in the milk and vanilla extract into the crumbly mixture. Continue mixing on low speed until a soft dough forms. It should be cohesive but not sticky. Gather the dough, flatten it slightly into a disc, and wrap it tightly in plastic cling wrap. Refrigerate the dough for at least 30 minutes. Chilling is essential as it firms up the butter, prevents the cookies from spreading too much during baking, and allows the flavors to meld beautifully. You can even chill it longer, up to a day, if preparing ahead.
Step 5: Roll, Cut, and Bake the Cookies
Once the dough has chilled sufficiently, remove it from the refrigerator. On a lightly floured surface, roll out the cookie dough to an even thickness, about 1/4 inch. Using a round cookie cutter (approximately 2 inches in diameter) and a smaller cutter for the center (or a piping nozzle tip), cut out your distinctive doughnut-shaped cookies. Carefully transfer the cut cookies to a baking sheet lined with parchment paper. Parchment paper prevents sticking and ensures even baking. Preheat your oven to 350°F (175°C). Bake the cookies for approximately 10 to 13 minutes, or until the edges are lightly golden. Remove them from the oven and let them cool completely on the baking sheet before handling. A fully cooled cookie is essential for the topping application.
Step 6: Prepare the Caramel-Coconut Topping
In a heatproof bowl, combine the soft caramel (if using store-bought, ensure they are unwrapped), salt, heavy cream, and vanilla extract. Microwave the mixture for 2 minutes, stirring every 30 seconds, until the caramel is completely melted and smooth. Alternatively, you can melt it over a double boiler on the stovetop. Once melted, set aside approximately 1/4 cup of this smooth caramel; this will be used later for a thin layer directly on the cookie. Add the remaining melted caramel to your toasted coconut flakes in a separate bowl. Stir thoroughly until all the coconut is evenly coated with the rich caramel. Ensure your coconut is properly toasted for maximum flavor and texture.
Step 7: Assemble the Caramel-Coconut Layer
Once your cookies are completely cool, it’s time to add the iconic caramel and coconut topping. Take one cooled cookie and, using a small offset spatula or butter knife, spread a thin layer of the reserved plain melted caramel over the top surface of the cookie. This acts as an extra adhesive and a flavor booster. Immediately, take a generous amount of the caramel-coated coconut mixture and gently press it onto the caramel layer on the cookie. Ensure the coconut adheres well and covers the entire top surface, creating that signature Samoas look and texture. Repeat this process for all your cookies.
Step 8: The Decadent Chocolate Finish
For the final touch, melt your chosen chocolate. You can do this in the microwave in 30-second intervals, stirring well after each, or over a double boiler until smooth and glossy. Take each cookie, holding it by the edges, and dip the bottom flat side into the melted chocolate. Allow any excess chocolate to drip off. Place the chocolate-dipped cookie onto a parchment-lined baking sheet. For the signature Samoas drizzle, you can either use a spoon to artistically drizzle melted chocolate over the top of the coconut layer, or transfer some melted chocolate into a piping bag with a very small tip (or a Ziploc bag with a snipped corner) for more control. Let the chocolate set completely. This can be done at room temperature or in the refrigerator for about 10-15 minutes to speed up the process. Once the chocolate is firm, your glorious homemade Samoas are ready to serve and enjoy!
Tips for Homemade Samoas Success
- Quality Ingredients: Using good quality butter, pure vanilla extract, and decent chocolate will significantly elevate the flavor of your cookies.
- Don’t Overmix: Overmixing the cookie dough can lead to a tough, dense cookie. Mix just until combined.
- Perfectly Toasted Coconut: Toasting coconut in a dry pan over medium-low heat until golden brown, or spreading it on a baking sheet and baking at 325°F (160°C) for 5-10 minutes, releases its rich, nutty flavor. Watch it carefully as it can burn quickly!
- Caramel Consistency: If your caramel becomes too thick while working, gently rewarm it in the microwave for a few seconds. If it’s too thin, let it cool slightly.
- Chocolate Melting: When melting chocolate, do so gently. Overheating chocolate can cause it to seize or burn. Use a double boiler or microwave in short bursts, stirring frequently.
- Even Thickness: Roll your cookie dough to an even 1/4 inch thickness for uniform baking and a consistent bite.
- Cool Completely: Ensure your cookies are entirely cool before adding the caramel and chocolate toppings. Warm cookies will cause the toppings to melt or slide off.
Variations and Storage for Your Samoas
Creative Variations to Try:
- Chocolate Choices: Experiment with different types of chocolate! Dark chocolate provides a more intense, less sweet contrast, while milk chocolate offers a classic, creamy sweetness. White chocolate can also be used for a unique twist.
- Salted Caramel Boost: Add a pinch more sea salt to your caramel mixture or sprinkle a few flakes of flaky sea salt over the wet chocolate drizzle for an extra gourmet touch.
- Nutty Twist: For an additional layer of flavor and texture, finely chop some pecans or almonds and mix a small amount into the toasted coconut layer.
- Spiced Cookies: A tiny pinch of cinnamon or nutmeg in the cookie dough can add a subtle warmth and complexity.
Storing Your Homemade Samoas:
These delicious cookies store exceptionally well, making them perfect for making ahead or enjoying over several days. Store them in an airtight container at room temperature for up to one week. If your kitchen is particularly warm, or for longer storage, you can keep them in the refrigerator for up to two weeks. Ensure layers are separated by parchment paper to prevent sticking. Samoas also freeze beautifully for up to 2-3 months. To freeze, arrange them in a single layer on a baking sheet until firm, then transfer to a freezer-safe airtight container or bag, again separating layers with parchment paper. Thaw at room temperature before serving.
Indulge in the Ultimate Homemade Samoas Experience
There’s something incredibly satisfying about recreating a beloved classic in your own kitchen, and these homemade Samoas (Caramel deLites) are no exception. This recipe empowers you to enjoy that perfect blend of buttery cookie, chewy caramel, crunchy toasted coconut, and rich chocolate whenever the craving strikes. No longer will you have to wait for cookie season; with this recipe, every day can be a Samoas day!
Whether you’re baking them for a special occasion, a sweet treat for your family, or simply to satisfy your own dessert desires, these cookies are guaranteed to be a hit. The effort is minimal compared to the incredible reward of biting into a perfectly crafted Samoa. So gather your ingredients, follow these steps, and prepare to delight in the ultimate Girl Scout cookie copycat experience. Happy baking!