
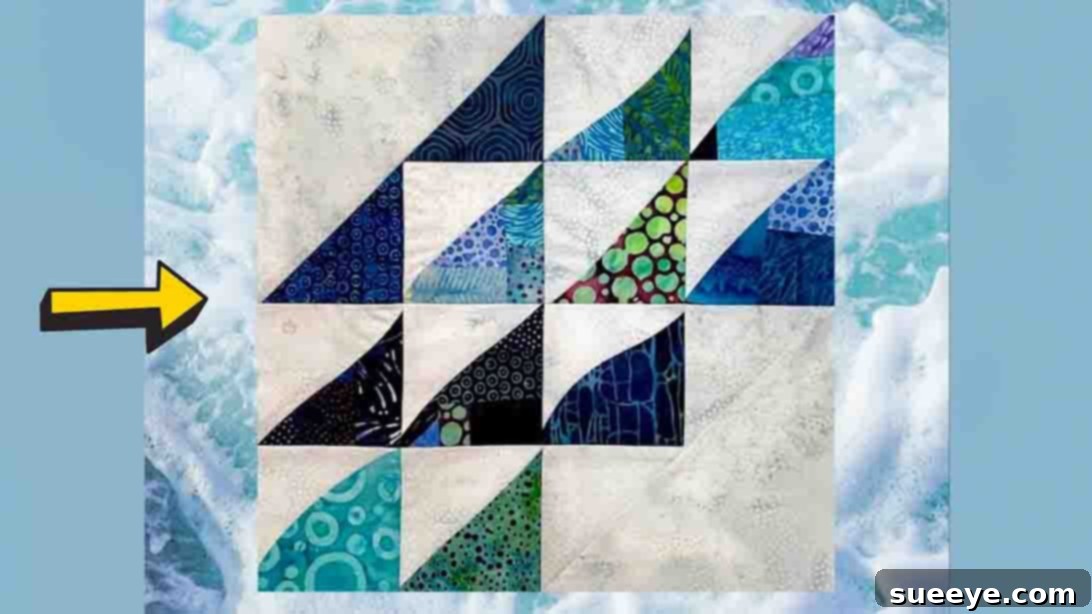
Are you searching for a quilt pattern that combines visual dynamism with creative freedom? Look no further than the captivating Ocean Waves Curves Quilt. This mesmerizing design, popularized by talented quilters like Jennifer Strauser, offers a unique opportunity to create a stunning, flowing masterpiece. It’s a favorite among quilters for its distinctive aesthetic and the sheer joy it brings to the crafting process. Whether you’re an experienced quilter eager for a new challenge or a beginner venturing into the delightful world of curved piecing, this project promises a rewarding and enjoyable experience.
The beauty of the Ocean Waves Curves Quilt lies in its adaptability. It’s an exceptional choice for utilizing your cherished scrap fabric stash, allowing you to transform small remnants into a cohesive and beautiful design. Alternatively, if you prefer a more coordinated look, a carefully selected charm pack can create a harmonious palette. For those who love the “scrappy” aesthetic, this pattern is a perfect canvas for celebrating a diverse collection of fabrics, turning every piece into a tiny ripple in your ocean of fabric.
RELATED: How To Make An Ocean Currents Quilt Block
One of the most appealing aspects of this quilt is its surprising accessibility. While curved piecing might sound daunting, this particular design employs a gentle curve that is remarkably beginner-friendly. The techniques involved are straightforward, building confidence with each seam. Even seasoned quilters will find the process relaxing and highly satisfying, offering a wonderful break from traditional straight-line piecing. So, why wait to dive into this fantastic project? Gather your materials and prepare to embark on a creative journey that culminates in a truly special quilt. Follow the comprehensive step-by-step instructions below, and don’t forget to express your gratitude to Jennifer Strauser for sharing this incredible tutorial. Be sure to explore her channel for more inspiring quilting content!
Why Choose the Ocean Waves Curves Quilt?
The Ocean Waves Curves Quilt stands out in the vast world of quilting patterns for several compelling reasons. Its distinctive design evokes the serene yet powerful motion of ocean waves, bringing a sense of fluidity and organic beauty to your home decor. Unlike rigid geometric patterns, the gentle curves offer a soft, inviting appeal that can complement a wide range of interior styles, from modern minimalist to cozy farmhouse.
Unleashing Your Creativity
This pattern is a dream for creative expression. With an array of fabric choices—be it vibrant solids, playful prints, or a sophisticated mix of textures—you can imbue each quilt with a unique personality. Imagine a quilt featuring cool blues and greens for a tranquil seaside vibe, or fiery oranges and reds to mimic a sunset over the water. The possibilities are truly endless, making each Ocean Waves Curves Quilt a personal artistic statement.
A Sustainable Choice: Scrap-Friendly Quilting
For environmentally conscious quilters or those looking to reduce fabric waste, this quilt is an excellent solution. Its construction method, which uses small squares, is ideal for repurposing fabric scraps from previous projects. This not only makes your quilt eco-friendly but also tells a story of your quilting journey through the various fabrics it incorporates. It’s a wonderful way to honor beloved remnants and give them a new life.
Mastering Gentle Curves with Confidence
Many quilters shy away from curved piecing, fearing complexity and imprecision. However, the Ocean Waves Curves Quilt is designed to introduce this technique gently. The curves in this pattern are subtle, making them easier to manage than tighter, more dramatic curves. This project serves as an excellent stepping stone for developing confidence in sewing curves, opening up a whole new realm of design possibilities for your future quilting endeavors. It proves that curves can be accessible, enjoyable, and surprisingly forgiving, even for beginners.
Materials:
- 4 1/2″ white squares (consider using a high-quality solid white or a subtle tone-on-tone print for the “wave crests”)
- 4 1/2″ colored/printed squares (these will form the “water” or background of your waves; experiment with various shades and patterns for a dynamic effect)
Directions:
Step 1: Preparing Your Curved Units – The Heart of the Wave
The magic of the Ocean Waves Curves Quilt begins with creating the foundational curved units. Start by taking one 4 1/2″ white square and one 4 1/2″ colored or printed square. Place them together, ensuring they are perfectly aligned. This initial precision is key for a successful outcome. Now, with your rotary cutter in hand, make a single, sweeping diagonal cut across the stacked squares. The key here is to create a slight curve, mimicking the natural flow of a wave. Don’t aim for a deep, exaggerated curve; a gentle arc is all that’s needed to achieve the signature look of this quilt. Precision is important, but a light touch will give you the desired organic shape.
Once you’ve made your curved cut, you’ll have two sets of pieces. Take one piece from the white square and one from the colored square. Stack them right sides up, then switch the corresponding pieces so that you now have a white curved piece matched with a colored curved piece. Flip one over so that they are right sides together, ready for sewing. Carefully align the curved edges, paying close attention as you guide the fabric under the presser foot of your sewing machine. Sewing curves requires a slightly different approach than straight lines; go slowly, easing the fabric around the curve. You might find it helpful to use a walking foot or to gently pin along the curve to prevent shifting. Once sewn, carefully press your seam open to reduce bulk and ensure a flat, crisp finish. Take your newly sewn unit to your cutting table. Place your square ruler over the top, carefully aligning it to trim the block back to its original 4 1/2″ square dimension, squaring it up perfectly. This trimming step is critical for maintaining accurate block sizes, which will ensure your quilt comes together beautifully without distorted seams.
Step 2: Assembling Your Quilt Block – Forming the Wave Pattern
To complete a single Ocean Waves Curves Quilt block, you will need to create a total of 12 of these unique curved pieces. Additionally, you’ll need three plain 4 1/2″ white squares. These white squares serve as key connecting elements within the block, providing negative space that enhances the “waving” effect of the curved units. Once you have all 15 pieces prepared, it’s time to arrange them. Lay them out carefully on a design wall or a flat surface, referring to the provided image or Jennifer Strauser’s tutorial for the precise placement. The arrangement is crucial here, as it dictates how the waves will flow across your block. Experiment with rotating the curved units until you achieve the desired visual rhythm.
Once you are satisfied with your layout, begin sewing the pieces together in rows. Typically, this block is composed of multiple rows, with each row consisting of a combination of curved units and plain white squares. Stitch each piece within a row together with a consistent 1/4-inch seam allowance. Press seams in alternating directions for adjacent rows to ensure they nest nicely when you join the rows. After all your rows are complete, carefully sew these rows together to form your finished block. Take your time, matching up all the seam intersections as accurately as possible. Precision in this step will result in a beautifully squared-up block and a stunning overall quilt. This completed block will measure approximately 12.5″ unfinished (or 12″ finished), depending on your seam allowance accuracy.
Step 3: Expanding Your Quilt – From Block to Masterpiece
With your first Ocean Waves Curves Quilt block complete, the next step is to create enough blocks to achieve your desired quilt size. For a throw quilt, you might need 12-20 blocks, while a larger bed quilt will require significantly more. As you create more blocks, lay them out on your design wall to experiment with different arrangements. You can set them in a straight grid, rotate every other block for a swirling effect, or even combine them with solid squares or sashing strips to create unique visual pathways. This stage is where your quilt truly comes to life, as you see the individual waves merge into a grand ocean of fabric.
Once all your blocks are sewn together into a quilt top, it’s time for the layering process: backing, batting, and quilt top. Baste these layers securely together using pins, basting spray, or thread basting. Now, the quilting itself begins! You can choose simple straight-line quilting that follows the block lines, or explore free-motion quilting to echo the curves and add textural depth. Finally, finish your quilt with a beautiful binding, choosing a fabric that complements your quilt’s overall palette. This final touch will frame your work and ensure its durability for years of enjoyment.
Tips for Success in Your Ocean Waves Quilt Journey
Achieving a beautiful and professional-looking Ocean Waves Curves Quilt is within reach for every quilter. Here are some invaluable tips to guide you through the process:
- Precision is Paramount: While curved piecing offers a bit of flexibility, accurate cutting of your initial 4 1/2″ squares is essential. Use a sharp rotary blade and a reliable ruler. When making your curved cut, try to maintain a consistent arc across all your pieces for a cohesive look.
- Slow and Steady Sewing: When sewing curves, resist the urge to rush. Guide your fabric gently, stopping with the needle down frequently to adjust and pivot the fabric as needed. This prevents puckering and ensures a smooth seam.
- The Power of Pressing: Proper pressing is crucial for flat, crisp blocks. After sewing each seam, press it open to reduce bulk. Use a dry iron and gentle pressure, allowing the heat to set the stitches without distorting the fabric.
- Invest in Good Tools: A sharp rotary cutter, quality thread, and a reliable sewing machine will make your quilting experience much more enjoyable and successful. Consider a quilting foot for your machine, which can assist with consistent seam allowances.
- Fabric Selection Matters: Choose fabrics that contrast well. For the “white” squares, a true white or a very light solid will make your “waves” pop. For the colored squares, a mix of light, medium, and dark tones within a chosen color family can create beautiful depth and movement. High-quality cotton quilting fabrics are recommended for their ease of use and durability.
- Take Breaks: Quilting, especially with new techniques, can be intensive. Step away from your machine if you feel frustrated. A fresh perspective often helps resolve challenges.
- Embrace Imperfection: Remember that handmade quilts carry the unique charm of their creator. Don’t strive for absolute perfection, especially on your first curved piecing project. Enjoy the process and celebrate your progress!
Variations and Customization for Your Unique Quilt
The Ocean Waves Curves Quilt pattern, while beautiful in its original form, is also incredibly versatile, inviting countless possibilities for customization. Once you’ve mastered the basic block, consider these ideas to make your quilt truly unique:
- Color Palette Play: Experiment with different color schemes. Instead of traditional blues and whites, try a rainbow of bright colors for a playful look, or a sophisticated gradient of grays and blacks for a modern aesthetic. Seasonal themes, like autumnal reds and oranges or spring pastels, can also be stunning.
- Scale and Size: While the tutorial uses 4.5-inch squares, you can easily scale the pattern up or down. Larger squares will create bolder, more dramatic waves, while smaller squares will result in a more intricate, detailed design. Adjusting the number of blocks will determine whether you create a delicate table runner, a cozy baby quilt, a generous throw, or a grand bedspread.
- Block Rotation: The way you orient your blocks when assembling the quilt top can dramatically change the overall pattern. Try rotating every other block by 90 or 180 degrees to create different wave directions or even star-like secondary patterns where the curves meet.
- Sashing and Borders: Introduce solid sashing strips between your blocks to give the eye a resting place and emphasize the individual blocks. A thoughtful border can frame your quilt beautifully, whether it’s a simple solid strip or a pieced border that complements the wave motif.
- Mixed Media: For the adventurous quilter, consider incorporating embroidered details along some of the white “wave crests” or adding small appliqué elements within some of the colored sections. This can add texture and an extra layer of artistry.
- Fabric Print Combinations: Don’t limit yourself to just solids and small prints. Try pairing a bold floral print with a subtle geometric, or a charming novelty print with a coordinating stripe. The interplay of different patterns can add depth and visual interest.
Each modification allows you to put your personal stamp on the Ocean Waves Curves Quilt, transforming it into a reflection of your individual style and creativity. Don’t be afraid to experiment and play with your fabrics!
Ocean Waves Curves Quilt Tutorial: Your Creative Journey Awaits
The journey of creating an Ocean Waves Curves Quilt is more than just sewing fabric; it’s an exploration of color, movement, and personal expression. From selecting your initial fabric squares, whether from a cherished scrap pile or a fresh charm pack, to the satisfying moment of placing the final stitch, each step is imbued with creative potential. This pattern, championed by talented quilters like Jennifer Strauser, proves that even techniques often perceived as challenging, such as curved piecing, can be approachable and immensely rewarding for quilters of all skill levels.
By following this detailed tutorial, you’re not just making a quilt; you’re developing new skills, building confidence, and ultimately crafting a unique piece of textile art that will bring warmth and beauty to any space. The gentle, flowing curves of this design create a mesmerizing visual effect, reminiscent of ocean tides, making it a truly timeless and captivating project. Whether it becomes a cherished heirloom, a thoughtful gift, or a vibrant addition to your home decor, your handmade Ocean Waves Curves Quilt will be a testament to your patience, creativity, and dedication.
So, gather your materials, set up your sewing machine, and prepare to immerse yourself in the delightful process of creating this beautiful quilt. Remember to refer to the excellent video tutorial by Jennifer Strauser for visual guidance, and don’t hesitate to explore her channel for more inspiration. Happy quilting!