
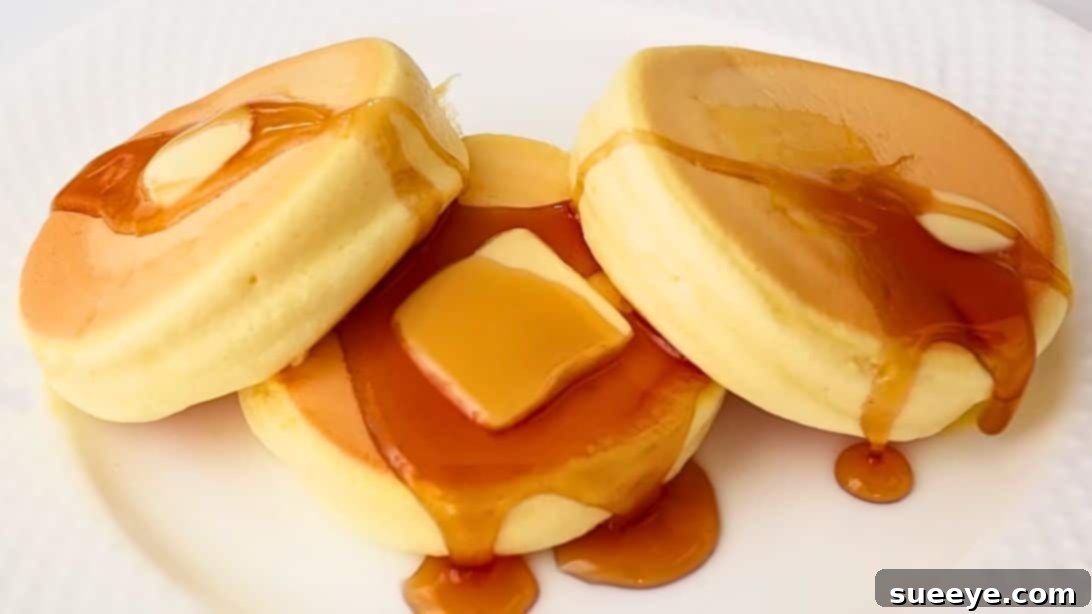
Prepare to elevate your breakfast game with a culinary experience unlike any other: the incredibly fluffy soufflé pancake. If you’ve never tasted these cloud-like delights, you’re in for a treat that will redefine your perception of pancakes. Originating from Japan, these towering, jiggly masterpieces are renowned for their airy texture, delicate sweetness, and melt-in-your-mouth quality. They are truly a spectacle to behold and an absolute joy to devour.
Imagine sinking your fork into a pancake so light it feels like a sweet cloud, perfectly paired with your favorite fruit, a dollop of whipped cream, or a generous drizzle of maple syrup. The beauty of these soufflé pancakes lies in their versatility and their ability to transform any morning into a special occasion. And the best part? Achieving this culinary marvel at home is far simpler than you might think.
We’re thrilled to share an incredibly straightforward recipe, inspired by the talented Qiong Cooking on YouTube, that requires just a few basic ingredients you likely already have in your kitchen. Forget complicated techniques or obscure components; this guide will walk you through each step, ensuring you master the art of the perfect fluffy soufflé pancake. Get ready to impress your family and friends (or just yourself!) with this irresistible breakfast sensation.
Essential Ingredients for Your Soufflé Pancakes
Crafting these airy wonders requires a precise yet minimal set of ingredients. Each component plays a crucial role in achieving that signature fluffy texture. For the most authentic and delectable results, ensure your ingredients are fresh and measured accurately.
- 2 large eggs: The star of our recipe! Ensure they are at room temperature for easier separation and better meringue volume. Remember to separate the yolks from the whites with great care.
- 20ml (approximately 4 teaspoons) of milk: Whole milk is recommended for a richer flavor and texture, but any milk will work.
- 30g (approximately 4 tablespoons) of all-purpose flour: Sifting the flour is key to preventing lumps and ensuring a smooth, light batter.
- 25g (approximately 2 tablespoons) of granulated sugar: This provides the necessary sweetness and, crucially, stabilizes the egg white meringue, allowing it to hold its airy structure.
Optional Enhancements:
- 1.25ml (approximately ¼ teaspoon) of vanilla extract: A touch of vanilla adds a beautiful aromatic depth that complements the sweetness of the pancakes.
Recommended Equipment
While the ingredients are simple, having the right tools can make all the difference in ensuring a smooth and successful soufflé pancake-making experience.
- Two large mixing bowls: Essential for separating egg whites and yolks and preparing the distinct batters. Ensure at least one is impeccably clean and grease-free for whipping egg whites.
- Electric hand mixer or stand mixer: Highly recommended for efficiently whipping egg whites to stiff peaks. A balloon whisk can work, but it requires significantly more effort.
- Fine-mesh sieve: For sifting flour, ensuring a lump-free and airy batter.
- Rubber spatula or silicone spoon: Crucial for gently folding the meringue into the yolk mixture without deflating the precious air.
- Piping bag with a large round tip (or simply snip the end): While not strictly necessary, a piping bag helps create perfectly round, uniformly sized pancakes, which is part of their visual appeal.
- Large non-stick frying pan or griddle with a lid: A good non-stick surface is vital to prevent sticking, and a tight-fitting lid is essential for creating the steaming environment that cooks the pancakes through and makes them extra fluffy.
- Measuring cups and spoons: For accurate ingredient proportions.
Step-by-Step Directions: Crafting Your Fluffy Pancakes
Follow these detailed steps carefully to achieve that coveted light and airy texture. Patience and gentle handling are your best friends here!
Step 1: Preparing the Batter and Whipping the Meringue
Begin by taking your two large mixing bowls. In the first bowl, add the separated egg yolks and the measured milk. Use a whisk to gently break the yolks and whisk them together until the mixture is smooth and uniformly combined. Next, sift the all-purpose flour directly over the egg yolk and milk mixture. This step is crucial for preventing lumps and ensuring a velvety batter. Continue to whisk gently until the flour is fully incorporated and you have a smooth, thin batter. If using, now is the time to add the vanilla extract, whisking briefly to combine. Be careful not to overmix at this stage; overworking the gluten in the flour can lead to tough pancakes.
In the second (and absolutely clean, grease-free) large mixing bowl, add the separated egg whites. Using an electric hand mixer (or a stand mixer with a whisk attachment), begin beating the egg whites on medium-high speed. Continue beating until they become frothy and soft peaks begin to form. This usually takes about 1-2 minutes. Once frothy, start adding the granulated sugar in three separate batches. After each addition, continue to beat the egg whites thoroughly, allowing the sugar to dissolve and integrate. Beat the mixture until stiff, glossy peaks form. You’ll know it’s ready when the meringue holds its shape firmly, even when you lift the whisk, and the peaks stand tall without drooping. This stable meringue is the secret to your pancakes’ incredible fluffiness.
Step 2: Gently Folding the Batter and Preparing to Cook
Now comes the delicate art of combining the two mixtures. Take about one-third of your stiff meringue and carefully add it to the egg yolk batter. Using your rubber spatula, gently fold the meringue into the yolk mixture. Use a technique where you cut down through the center of the batter, sweep along the bottom of the bowl, and then fold it over. Rotate the bowl as you go. This initial folding helps to lighten the yolk mixture, making it easier to incorporate the remaining meringue without deflating it too much. Once partially combined, transfer this entire mixture back into the bowl containing the remaining two-thirds of the meringue.
Continue to fold the entire batter gently until it is just combined and uniformly incorporated. The goal is to retain as much air as possible, so avoid vigorous stirring. The batter should be thick, airy, and somewhat cloud-like. Once combined, carefully transfer your fluffy batter into a piping bag. Snip off the end of the piping bag to create an opening of about 1-inch (2.5 cm) in diameter. This will allow you to pipe perfectly round and uniform pancakes.
Place a large non-stick pan on your stove over a very low heat setting. It’s crucial that the pan is not too hot. Add just a tiny drop of cooking oil to the pan, then use a kitchen towel or a piece of paper towel to spread it around the pan evenly. This creates a thin, non-stick film without excess oil that could burn.
Step 3: Cooking the Soufflé Pancakes to Perfection
Carefully pipe three pancake mounds onto the prepared non-stick pan. Aim for consistency in size and shape. As soon as the batter is piped, add approximately two teaspoons of water to the side of the pan (not directly on the pancakes). Immediately cover the pan with a tight-fitting lid. The water will create steam, which helps the pancakes rise beautifully and cook through without burning the bottom.
Let them cook over low heat for about 5 minutes. During this time, resist the urge to peek under the lid, as this releases the steam. After 5 minutes, carefully lift the lid, and with a wide, thin spatula, gently flip the pancakes. Add another one teaspoon of water to the side of the pan, and quickly cover it again with the lid. Continue cooking for another 5 minutes on the second side, or until they are golden brown and cooked through. They should feel springy to the touch. The total cooking time might vary slightly depending on your stove and pan, so adjust as needed.
Once perfectly cooked, transfer the fluffy soufflé pancakes immediately onto a serving plate. They are best enjoyed fresh off the pan. Serve them with a generous pat of butter, a cascade of maple syrup, a dusting of powdered sugar, or a medley of fresh berries. Enjoy the pure bliss of these homemade, cloud-like pancakes!
Tips for Achieving Soufflé Pancake Perfection
While the recipe is simple, a few expert tips can ensure your soufflé pancakes turn out flawless every time:
- Room Temperature Eggs: Eggs separate more easily when cold, but egg whites whip up to a larger volume when they are at room temperature. Plan ahead!
- Spotless Bowl for Egg Whites: Even a tiny speck of yolk or grease can prevent your egg whites from whipping up properly. Ensure your bowl and whisk are immaculately clean and dry.
- Don’t Overmix the Yolk Batter: Once you add the flour, mix just until combined. Overmixing develops gluten, which can lead to dense rather than fluffy pancakes.
- Achieve Stiff, Not Dry, Peaks: Your meringue should be firm and glossy. Overbeating can make it dry and crumbly, which will be harder to fold and less stable.
- Gentle Folding is Key: The air in the meringue is what makes these pancakes fluffy. Fold the batter with care to preserve as much of that air as possible.
- Low and Slow Heat: This is crucial. High heat will burn the outside before the inside cooks through. Patience is a virtue here.
- Use a Lid: The lid traps steam, which not only helps the pancakes rise higher but also ensures they cook evenly throughout.
- Work Quickly: Once the batter is mixed, the air will slowly start to escape. Try to cook the pancakes as soon as possible after folding.
Elevate Your Soufflé Pancakes: Serving Suggestions & Variations
These fluffy pancakes are a delightful canvas for a myriad of toppings and flavor profiles. Here are some ideas to make them even more special:
Classic Toppings:
- Maple Syrup: The quintessential pancake pairing, choose pure maple syrup for the best flavor.
- Powdered Sugar: A simple dusting adds a touch of sweetness and an elegant finish.
- Fresh Berries: Strawberries, blueberries, raspberries, or a mix of seasonal fruits provide freshness and a burst of color.
- Whipped Cream: A generous dollop of freshly whipped cream takes these pancakes to dessert-like levels.
- Butter: A classic pat of melting butter enhances the richness.
Gourmet Additions:
- Fruit Compote: Homemade or store-bought berry, cherry, or apple compotes add a luscious fruit layer.
- Chocolate Sauce or Nutella: For the ultimate sweet indulgence.
- Ice Cream: A scoop of vanilla bean or matcha ice cream transforms them into a decadent dessert.
- Lemon Curd: A zesty, tangy contrast that brightens the sweetness.
- Matcha Powder: Dusting with matcha or incorporating a small amount into the batter for a subtle earthy flavor.
Flavor Variations for the Batter:
- Citrus Zest: Add a teaspoon of lemon or orange zest to the yolk batter for a fragrant twist.
- Cinnamon or Nutmeg: A pinch of spice can add warmth to the batter.
- Cocoa Powder: Mix in a tablespoon of unsweetened cocoa powder for a chocolate soufflé pancake.
Conclusion: Your Journey to Fluffy Pancake Bliss
Mastering the art of fluffy soufflé pancakes is a rewarding culinary adventure, and with this easy 5-ingredient recipe, you’re well on your way to creating breakfast magic at home. These cloud-like wonders are not just a meal; they’re an experience – a delightful fusion of texture, sweetness, and visual appeal that will leave a lasting impression.
By following these detailed steps and incorporating our helpful tips, you’ll soon be flipping perfectly golden, impossibly tall, and wonderfully jiggly pancakes with confidence. Whether you’re treating yourself to a luxurious weekend breakfast or surprising loved ones with a special brunch, these soufflé pancakes are guaranteed to bring smiles and satisfaction.
So, gather your ingredients, fire up your stove, and embark on this delicious journey. Don’t forget to visit Qiong Cooking’s YouTube channel for more inspiring recipes and culinary tips. Happy cooking, and enjoy every melt-in-your-mouth bite!
*All images in this article are credited to Qiong Cooking via YouTube. We highly recommend giving her channel a visit and subscribing for more fantastic recipes!