
DIY Dollar Tree Mini Christmas Trees: Craft Stunning & Budget-Friendly Holiday Decor
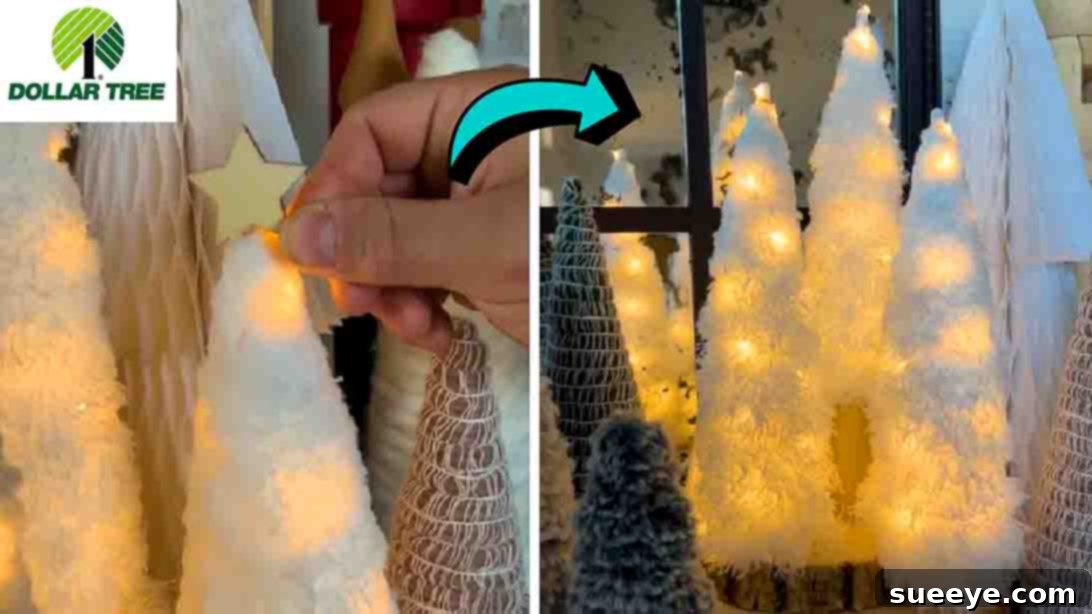
The holiday season isn’t just about festive cheer; it’s also a wonderful opportunity to unleash your creativity and infuse your home with personalized, handmade decorations. There’s a unique satisfaction in crafting something beautiful from unexpected materials, especially when it saves you money and looks incredibly chic. For your next festive DIY project, we highly recommend these charming mini Christmas trees, inspired by the ingenious minds at @thenavagepatch on TikTok. Prepare to be amazed: these elegant little trees are crafted from ordinary dusters purchased from Dollar Tree! They possess such a polished, refined aesthetic that they could easily be mistaken for premium decor found in high-end stores like Pottery Barn.
RELATED: DIY Wool Christmas Tree Tutorial
Why You’ll Love This Festive Duster Craft
Beyond their surprisingly sophisticated appearance, these DIY mini Christmas trees offer a host of benefits, making them the perfect holiday project for anyone. Whether you’re a seasoned crafter or a beginner looking for a fun seasonal activity, you’ll find joy in bringing these tiny trees to life.
- Unbeatable Value: The core materials for this project come from Dollar Tree, making it incredibly budget-friendly. You can create an entire collection of stylish trees for a fraction of the cost of store-bought alternatives.
- Effortlessly Easy: With simple steps and minimal tools, this craft is accessible for all skill levels. No complex techniques or intricate designs – just straightforward fun that yields impressive results.
- Perfect for Family Fun: Gather your friends or family for a delightful crafting session. It’s an excellent way to bond and kick off the holiday season together, creating cherished memories alongside beautiful decorations.
- Surprisingly Chic and Versatile: Despite their humble origins, these duster trees exude a modern farmhouse or rustic charm that complements various interior styles. Their simple elegance makes them versatile additions to any room.
- Customizable for Any Decor: The basic design provides a fantastic canvas for personalization. Add your unique touch with different lights, bases, or tiny embellishments to match your existing holiday theme.
Ready to transform humble dusters into enchanting festive decor? Let’s dive into the materials you’ll need and the simple steps to create your own Dollar Tree duster Christmas trees. You can follow along with @thenavagepatch’s video tutorial for visual guidance, or continue reading our detailed instructions below.
Gather Your Simple Supplies: What You’ll Need
One of the best aspects of this DIY project is that all the primary materials are readily available and affordable, most notably from your local Dollar Tree store. Stock up on these items, and you’ll be ready to craft in no time.
- Dusters from Dollar Tree: These are the star of our show! Look for the microfiber dusters, typically in white, gray, or festive colors if available. You’ll need one duster per tree.
- A Pair of Sharp Scissors: Essential for precise trimming and shaping. A good pair of craft scissors will make the job much easier.
- Battery-Operated Fairy Lights: Opt for small, delicate fairy lights with a compact battery pack. Warm white lights offer a cozy glow, but colorful or cool white options can also create different moods.
- Wooden Cups (or alternative bases): Small wooden cups provide a charming, rustic base. Dollar Tree often carries suitable options, or you can repurpose small pots, jars, or candle holders.
- Floral Foam (or Styrofoam): A small block of floral foam will help secure your duster tree firmly in its base.
- Circle Wooden Board (Optional): If you plan to create a cluster of trees or a larger display, a small wooden board can serve as a sturdy, unified base.
- Optional: Hot Glue Gun & Glue Sticks: Useful for securing lights, bases, or any additional embellishments.
- Optional: Craft Knife: Can be helpful for trimming floral foam to fit snugly into your chosen base.
Step-by-Step Guide: Crafting Your Duster Christmas Trees
With your materials ready, let’s transform these everyday dusters into enchanting mini Christmas trees. Follow these simple steps to bring your festive vision to life.
Step 1: Transforming Your Duster into a Tree
Begin by giving your duster a good shake to fluff out all its fibers. This helps identify the natural shape and prepares it for trimming. Next, take your scissors and start trimming the duster from about three-fourths of the way down, working your way towards the top. The goal is to gradually shape the duster into a conical, Christmas tree-like form. Envision the classic triangle shape of a fir tree and carefully snip away excess material, rotating the duster as you go to ensure an even shape from all sides. Don’t worry about perfection; a slightly organic shape can add to its charm.
Once you’re satisfied with the tree shape, carefully remove the duster’s plastic handle. Sometimes it simply unscrews or pulls out, or you might need to snip around the base if it’s integrated into the duster head. After removing the handle, give the duster tree another good shake to fluff it up further and dislodge any loose threads or trimmed fibers. This will give it a fuller, more refined appearance.
Now it’s time to add a magical glow! Take your battery-operated fairy lights and begin wrapping them around your newly shaped tree. Start from the base and work your way up, ensuring the lights are evenly distributed to create a consistent twinkle. Hide the small battery pack discreetly near the base of the tree or within the chosen stand. Repeat these steps for each additional tree you wish to create, perhaps experimenting with slightly different sizes for a varied display.
Step 2: Creating a Sturdy and Stylish Base
The next step is to give your duster Christmas tree a stable and attractive base. If you’re using a wooden cup, place a piece of floral foam inside it. You might need to trim the foam with a craft knife to ensure it fits snugly and securely within the cup. Once the foam is in place, gently but firmly stick the bottom “trunk” of your duster tree into the floral foam. The foam will hold the tree upright and stable.
For those looking for a more rustic or clustered display, consider drilling small holes into a circle wooden board. These holes should be just wide enough to accommodate the base of your duster trees. You can arrange multiple trees of varying heights on a single board to create a charming forest scene. Once the trees are securely mounted, whether in individual cups or on a shared board, turn on their fairy lights. Now, your beautiful, handmade mini Christmas trees are ready to be placed wherever you desire, adding a warm, festive glow to your home.
@thenavagepatch This is much more fun than dusting. #dollartreediy #dollartreechristmasdiy #dollartreehacks #dollartreeprojects #dollartreefinds #christmas #christmas2023 #christmascrafts #christmasdiy #diychristmas #christmasiscoming #holidaycrafts #christmasdecor #christmasdecorating #christmasdecorations #renterfriendly
♬ original sound – TheNavagePatch – DIY & Crafts
Elevate Your Decor: Customization and Display Ideas
The beauty of DIY lies in the ability to make each creation uniquely yours. While these duster trees are charming on their own, a little extra personalization can truly make them shine and seamlessly integrate with your existing holiday decor. Don’t limit yourself to the basic tutorial – let your imagination guide you!
Personalizing Your Mini Trees
- Color and Texture: While white dusters offer a classic, snowy look, consider other duster colors if available, or experiment (carefully!) with fabric dyes if you’re adventurous. For a frosted appearance, a light spray of faux snow or glitter spray can add extra sparkle and texture.
- Embellishments: Think small and delicate. Tiny bows made from thin ribbon, miniature beads, faux berries, or even a sprinkle of iridescent glitter can add a touch of glamour. Small, lightweight ornaments meant for miniature trees also work wonderfully.
- Unique Bases: Beyond wooden cups, explore other creative bases. Mason jars, small painted terracotta pots, vintage teacups, or even small tin buckets can provide different aesthetics, from farmhouse rustic to charming vintage. Fill the bases with pebbles, moss, or decorative sand for added visual interest and stability.
Creative Display Inspirations
Once your mini Christmas trees are complete, consider where and how they’ll make the biggest impact. Their versatility means they can enhance almost any space in your home.
- Elegant Centerpiece: Arrange a cluster of varying-sized duster trees on a decorative tray, perhaps surrounded by faux snow, pinecones, or cranberries. This creates a stunning focal point for your dining table or coffee table.
- Mantel and Shelf Decor: Line them along a mantelpiece interspersed with garland and candles for a cozy, enchanting display. They also look fantastic tucked onto bookshelves or accent tables, bringing holiday cheer to unexpected nooks.
- Window Sills: Place them on window sills to cast a warm, inviting glow both inside and out. The soft twinkle of their fairy lights will be particularly magical after dusk.
- Gift Toppers or Party Favors: For a personal touch, use a miniature version of these trees as a unique gift topper, or craft several as charming party favors for your holiday guests.
- Kids’ Rooms: Since they use battery-operated lights and are safe, they are perfect for adding festive cheer to a child’s bedroom without the worry of cords or fragile ornaments.
- Office Desk Decor: Brighten up your workspace with a small, festive tree that brings a bit of holiday spirit to your daily tasks.
Why DIY Decor Matters This Holiday Season
In a world often consumed by mass-produced items, the act of creating your own holiday decor holds a special significance. Handmade items carry a story, a personal touch that store-bought decorations simply cannot replicate. They imbue your home with warmth, character, and a sense of accomplishment. This Dollar Tree duster Christmas tree project is more than just a craft; it’s an opportunity to create something beautiful, reduce waste by repurposing materials, and most importantly, infuse your home with love and creativity during the most wonderful time of the year. The memories made while crafting, the unique pieces created, and the joy they bring are truly priceless.
Ready to Start Your Holiday Crafting Journey?
We hope this detailed guide has inspired you to grab some dusters and embark on your own Dollar Tree mini Christmas tree adventure! It’s a testament to how simple materials and a little imagination can transform into something truly magical. These charming, budget-friendly trees are not only easy to make but also add an undeniable touch of elegance to any holiday setting. So, gather your supplies, invite some friends or family, and get ready to craft some festive magic. Don’t forget to share your beautiful creations with us!